
 Web Front-end
JS Tutorial
Detailed explanation of npm and webpack configuration methods in node.js
Web Front-end
JS Tutorial
Detailed explanation of npm and webpack configuration methods in node.js
Detailed explanation of npm and webpack configuration methods in node.js

Node.js is written in c++ language. It is a javascript running environment based on the chrome V8 engine. It allows javascript to run independently of the browser server. You can use javaScript language to write server-side code. It mainly introduces the detailed explanation of node. Friends who need it can refer to the npm and webpack configuration in js. I hope it can help everyone.
1. Use node to implement an http server
The following creates a server with port 8787. It is different from php, java, etc., like php locally, it is also based on the Apache server. Node.js can quickly build a server using code.
// 引入http模块
var http = require("http");
// 调用http的接口创建服务器;回调--->异步;
var server = http.createServer(function(req,res){
 // request:浏览器提交给服务器相关;response:服务器到浏览器;
 console.log(111);
 // 设置编码格式
 res.setHeader("Content-type","text/html;charset=utf8");
 res.write("<h1>hello world 11233</h1>");
 res.write("你好世界");
 res.end();
})
server.listen(8787);Modularization
1. Modular development
1. CommonJS is to formulate specifications for the performance of JS. Because js does not have the function of a module, CommonJS came into being. It wants js to run everywhere, not just in the browser.
2. Create your own module
The namespace in node.js is independent
To introduce methods or variables of another module into one module, use require
•Introduction of fnData module
require("./fnData");
•Import and export (export variables or functions)
module.exports = {
myFn:test.myFn,
a:test.a
}2. Built-in modules
Nodejs built-in modules include: Buffer, C/C++Addons, Child Processes, Cluster, Console, Cr
ypto, Debugger, DNS, Domain, Errors, Events, File System,
Globals, HTTP, HTTPS, Modules, Net, OS, Path, Process, P unycode, Query Strings, Readline, REPL, Stream, String Decoder, Timers, TLS/SSL, TTY, UDP/Datagram, URL, Utilities, V8, VM, ZLIB; built-in modules do not need to be installed, external modules need to be installed;
3. npm
1. A collection of modules, which is the package manager of node
Common npm terminal commands below
1.
Install Node module
npm install moduleNames
Install the package into the global environment
npm install
While installing, if there is a package.json file, the command will write the information into the project path in package.json
npm install
2. View the package.json folder of the node module npm view moduleNames
3. View the installed node packages in the current directory
npm list
4. View help command
npm help
5. View package dependencies
npm view moudleName dependencies
6. View the source file address of the package
npm view moduleName repository.url
7. View the version of Node that the package depends on
npm view moduleName engines
8. View all folders used by npm
npm help folders
9. Used to rebuild after changing the package content
npm rebuild moduleName
10. Check whether the package is outdated. This command will list all outdated packages and you can update the package in time
npm outdated
11. Update the node module
npm update moduleName
12. Uninstall node module
npm uninstall moudleName
13. An npm package is a folder containing package.json, package.json description the structure of this folder. The method to access npm's json folder is as follows:
$ npm help json
This command will open a web page in the default way. If the default opening program is changed, it may not open the web page in the default way. form opens.
14. When publishing an npm package, you need to check whether a certain package name already exists
$ npm search packageName
15.npm init: will guide you to create a package.json file, including name, version, author information, etc.
16.npm root: View the installation path of the current package
npm root -g: View the installation path of the global package
17.npm -v: Check the version installed by npm
4. webpack
Concept: It is a recent loader and packaging tool, which can combine various resources. For example, J (including J X), coffee, styles (including less/sass), pictures, etc. are all used and processed as modules.
Configuration steps
1. Install webpack globally
npm install webpack -g
2. Create a new webpack.config.js to write this configuration file
module.exports = {
// 当前执行文件的路径
 // 输入
 entry:__dirname+"/app/index.js",
 // 输出
 output:{
  path:__dirname+"/build",
  filename:"bundle.js"
 },
 module:{
  loaders:[{
   test:/\.css$/,
   loader:"style-loader!css-loader"
  }]
 },
 watch:true,
 devServer: {
  contentBase: "./build",//本地服务器所加载的页面所在的目录
  historyApiFallback: true,//不跳转
  inline: true//实时刷新
 },
}3. Use the following terminal command to initialize and automatically create the package.json file. Just keep pressing enter.
npm init
4. The package.json file is ready. We are here Install Webpack as a dependent package in the project
// 安装Webpack
npm install --save-dev webpack
Then create a new app and build folder in the folder. The app folder contains the js, css and other module files we want to write, and the build contains the js files generated by webpack packaging. And an index.html
The directory structure is as follows:

5.Introduce the automatically generated bundle.js
in the inex.html file<!DOCTYPE html> <html lang="en"> <head> <meta charset="UTF-8"> <title>Title</title> </head> <body> <p class="p1"></p> <!--webpack/gulp/grount--> </body> <script src="bundle.js"></script> </html>
Define some variables and methods in module1.js and export them as a module using exports
console.log("我是module1.js");
var a = "我是a变量";
var fn = function(){
 console.log("我是fn函数");
}
module.exports = {
 a,
 fn
}Use require in index.js to introduce the methods and variables of module.js
var res = require("./module1");
require("./index.css");
console.log("我是index.js");
console.log(res.a);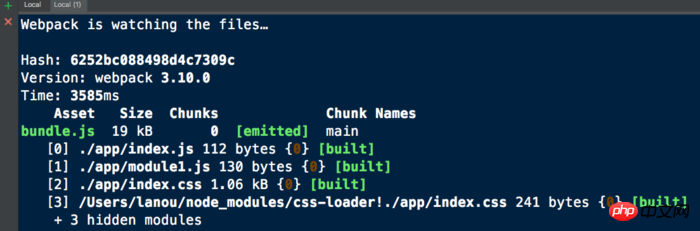
res.fn();6. Run webpack on the terminal
webpack
7. Configure scripts in package-loack.json
After configuring npm, you can use a simple npm start in the command line command to replace the webpack command
After configuring as below, npm dev can replace npm webpack-dev-server --open command
{
 "dependencies": {
 "css-loader": "^0.28.8",
 "style-loader": "^0.19.1",
 "webpack": "^3.10.0"
 },
 "devDependencies": {
 "webpack-dev-server": "^2.11.0"
 },
 "scripts": {
 "start": "webpack",
 "dev": "webpack-dev-server --open"
 }
}At this time, enter npm start to package the file
related suggestion:
Detailed explanation of back-end rendering after webpack configuration
Example detailed explanation of vue-cli optimized webpack configuration
React and Webpack build packaging Detailed explanation of optimization examples
The above is the detailed content of Detailed explanation of npm and webpack configuration methods in node.js. For more information, please follow other related articles on the PHP Chinese website!

Hot AI Tools

Undresser.AI Undress
AI-powered app for creating realistic nude photos

AI Clothes Remover
Online AI tool for removing clothes from photos.

Undress AI Tool
Undress images for free

Clothoff.io
AI clothes remover

AI Hentai Generator
Generate AI Hentai for free.

Hot Article
Hot Tools

Notepad++7.3.1
Easy-to-use and free code editor

SublimeText3 Chinese version
Chinese version, very easy to use

Zend Studio 13.0.1
Powerful PHP integrated development environment

Dreamweaver CS6
Visual web development tools

SublimeText3 Mac version
God-level code editing software (SublimeText3)
Hot Topics
 1378
1378
 52
52

 How to implement an online speech recognition system using WebSocket and JavaScript
Dec 17, 2023 pm 02:54 PM
How to implement an online speech recognition system using WebSocket and JavaScript
Dec 17, 2023 pm 02:54 PM
How to use WebSocket and JavaScript to implement an online speech recognition system Introduction: With the continuous development of technology, speech recognition technology has become an important part of the field of artificial intelligence. The online speech recognition system based on WebSocket and JavaScript has the characteristics of low latency, real-time and cross-platform, and has become a widely used solution. This article will introduce how to use WebSocket and JavaScript to implement an online speech recognition system.
 WebSocket and JavaScript: key technologies for implementing real-time monitoring systems
Dec 17, 2023 pm 05:30 PM
WebSocket and JavaScript: key technologies for implementing real-time monitoring systems
Dec 17, 2023 pm 05:30 PM
WebSocket and JavaScript: Key technologies for realizing real-time monitoring systems Introduction: With the rapid development of Internet technology, real-time monitoring systems have been widely used in various fields. One of the key technologies to achieve real-time monitoring is the combination of WebSocket and JavaScript. This article will introduce the application of WebSocket and JavaScript in real-time monitoring systems, give code examples, and explain their implementation principles in detail. 1. WebSocket technology
 How to use JavaScript and WebSocket to implement a real-time online ordering system
Dec 17, 2023 pm 12:09 PM
How to use JavaScript and WebSocket to implement a real-time online ordering system
Dec 17, 2023 pm 12:09 PM
Introduction to how to use JavaScript and WebSocket to implement a real-time online ordering system: With the popularity of the Internet and the advancement of technology, more and more restaurants have begun to provide online ordering services. In order to implement a real-time online ordering system, we can use JavaScript and WebSocket technology. WebSocket is a full-duplex communication protocol based on the TCP protocol, which can realize real-time two-way communication between the client and the server. In the real-time online ordering system, when the user selects dishes and places an order
 How to implement an online reservation system using WebSocket and JavaScript
Dec 17, 2023 am 09:39 AM
How to implement an online reservation system using WebSocket and JavaScript
Dec 17, 2023 am 09:39 AM
How to use WebSocket and JavaScript to implement an online reservation system. In today's digital era, more and more businesses and services need to provide online reservation functions. It is crucial to implement an efficient and real-time online reservation system. This article will introduce how to use WebSocket and JavaScript to implement an online reservation system, and provide specific code examples. 1. What is WebSocket? WebSocket is a full-duplex method on a single TCP connection.
 JavaScript and WebSocket: Building an efficient real-time weather forecasting system
Dec 17, 2023 pm 05:13 PM
JavaScript and WebSocket: Building an efficient real-time weather forecasting system
Dec 17, 2023 pm 05:13 PM
JavaScript and WebSocket: Building an efficient real-time weather forecast system Introduction: Today, the accuracy of weather forecasts is of great significance to daily life and decision-making. As technology develops, we can provide more accurate and reliable weather forecasts by obtaining weather data in real time. In this article, we will learn how to use JavaScript and WebSocket technology to build an efficient real-time weather forecast system. This article will demonstrate the implementation process through specific code examples. We
 How to use insertBefore in javascript
Nov 24, 2023 am 11:56 AM
How to use insertBefore in javascript
Nov 24, 2023 am 11:56 AM
Usage: In JavaScript, the insertBefore() method is used to insert a new node in the DOM tree. This method requires two parameters: the new node to be inserted and the reference node (that is, the node where the new node will be inserted).
 Simple JavaScript Tutorial: How to Get HTTP Status Code
Jan 05, 2024 pm 06:08 PM
Simple JavaScript Tutorial: How to Get HTTP Status Code
Jan 05, 2024 pm 06:08 PM
JavaScript tutorial: How to get HTTP status code, specific code examples are required. Preface: In web development, data interaction with the server is often involved. When communicating with the server, we often need to obtain the returned HTTP status code to determine whether the operation is successful, and perform corresponding processing based on different status codes. This article will teach you how to use JavaScript to obtain HTTP status codes and provide some practical code examples. Using XMLHttpRequest
 How to get HTTP status code in JavaScript the easy way
Jan 05, 2024 pm 01:37 PM
How to get HTTP status code in JavaScript the easy way
Jan 05, 2024 pm 01:37 PM
Introduction to the method of obtaining HTTP status code in JavaScript: In front-end development, we often need to deal with the interaction with the back-end interface, and HTTP status code is a very important part of it. Understanding and obtaining HTTP status codes helps us better handle the data returned by the interface. This article will introduce how to use JavaScript to obtain HTTP status codes and provide specific code examples. 1. What is HTTP status code? HTTP status code means that when the browser initiates a request to the server, the service
