

Simple experience of mobile development with mui framework

Have you ever used mui to develop? This article mainly introduces the detailed explanation of the first experience of mobile development with the mui framework. The editor thinks it is quite good. I will share it with you now and give it as a reference. Let’s follow the editor to take a look, I hope it can help everyone.
1. Status bar settings
Now when most apps are opened, the status bar is integrated with the APP, which is not only beautiful, but also coordinated with the whole.
The blogger is a moderate obsessive-compulsive disorder patient, and the little black bar at the top really makes me uncomfortable.
First, we create a new mobile APP project on HBuilder
1.1 Immersive status bar (transparent status bar)
Generally, when the entire page is a picture, the status bar will be transparent.
First, detect whether the current environment supports the immersive status bar. Detection statement:
<script type="text/javascript">
  document.addEventListener('plusready', function(){
    //是否支持沉浸式状态栏
    alert(plus.navigator.isImmersedStatusbar());

  });
</script>is not supported by default and false will pop up. If you want the environment to support it, you need to modify the configuration file manifest.json under the project
There is a manifest.json file under the project. After opening it, open the code view:

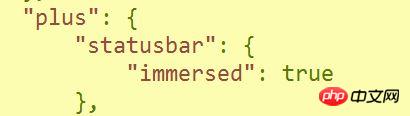
Add
    "statusbar": {
      "immersed": true
},under the code view "plus" as shown in the picture:

- Android4.4 and above system support;
- iOS7 .0 and above systems support
<script type="text/javascript">
  document.addEventListener('plusready', function(){
    //参数:true - 全屏;false - 不全屏
    plus.navigator.setFullscreen(true);

  });
</script> ##1.3 Status bar background color
Modifying the background color is generally used in scenarios where the background color at the top of the page is a solid color. Modify it to the same background color as the page to make the page more harmonious.
//设置系统状态栏背景色
plus.navigator.setStatusBarBackground('#6495ED');The Android platform does not support this function. If there is an expert, please give me some advice.
2. Frosted glass effect
Blurring pictures can give people a hazy and beautiful effect. Click on the image blur effect not mentioned before:
css attribute filter:
filter: blur(16px);
The pixels in blur() are the degree of blur.
3. Simply use mui to quickly build a page
The status bar problem that bothered me most has been solved, and the page layout is easier to handle. It can be built quickly using mui templates.
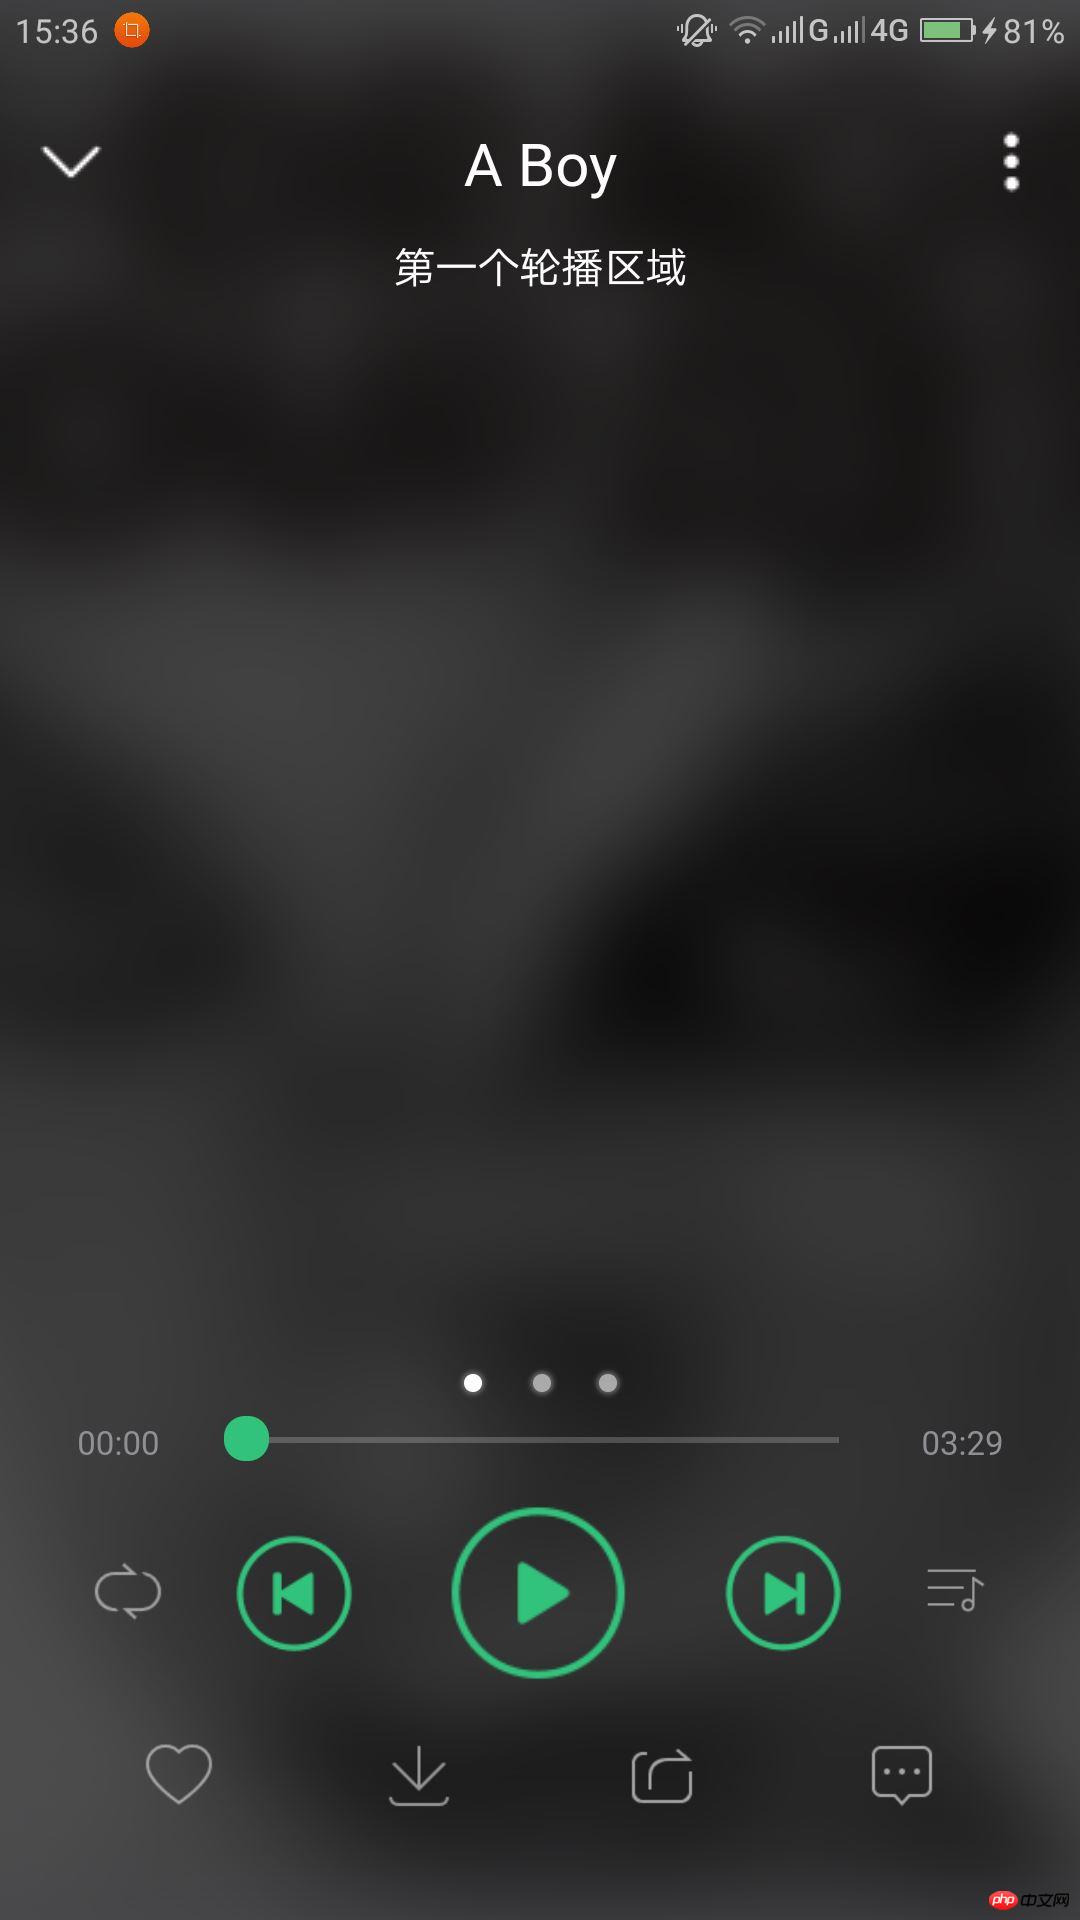
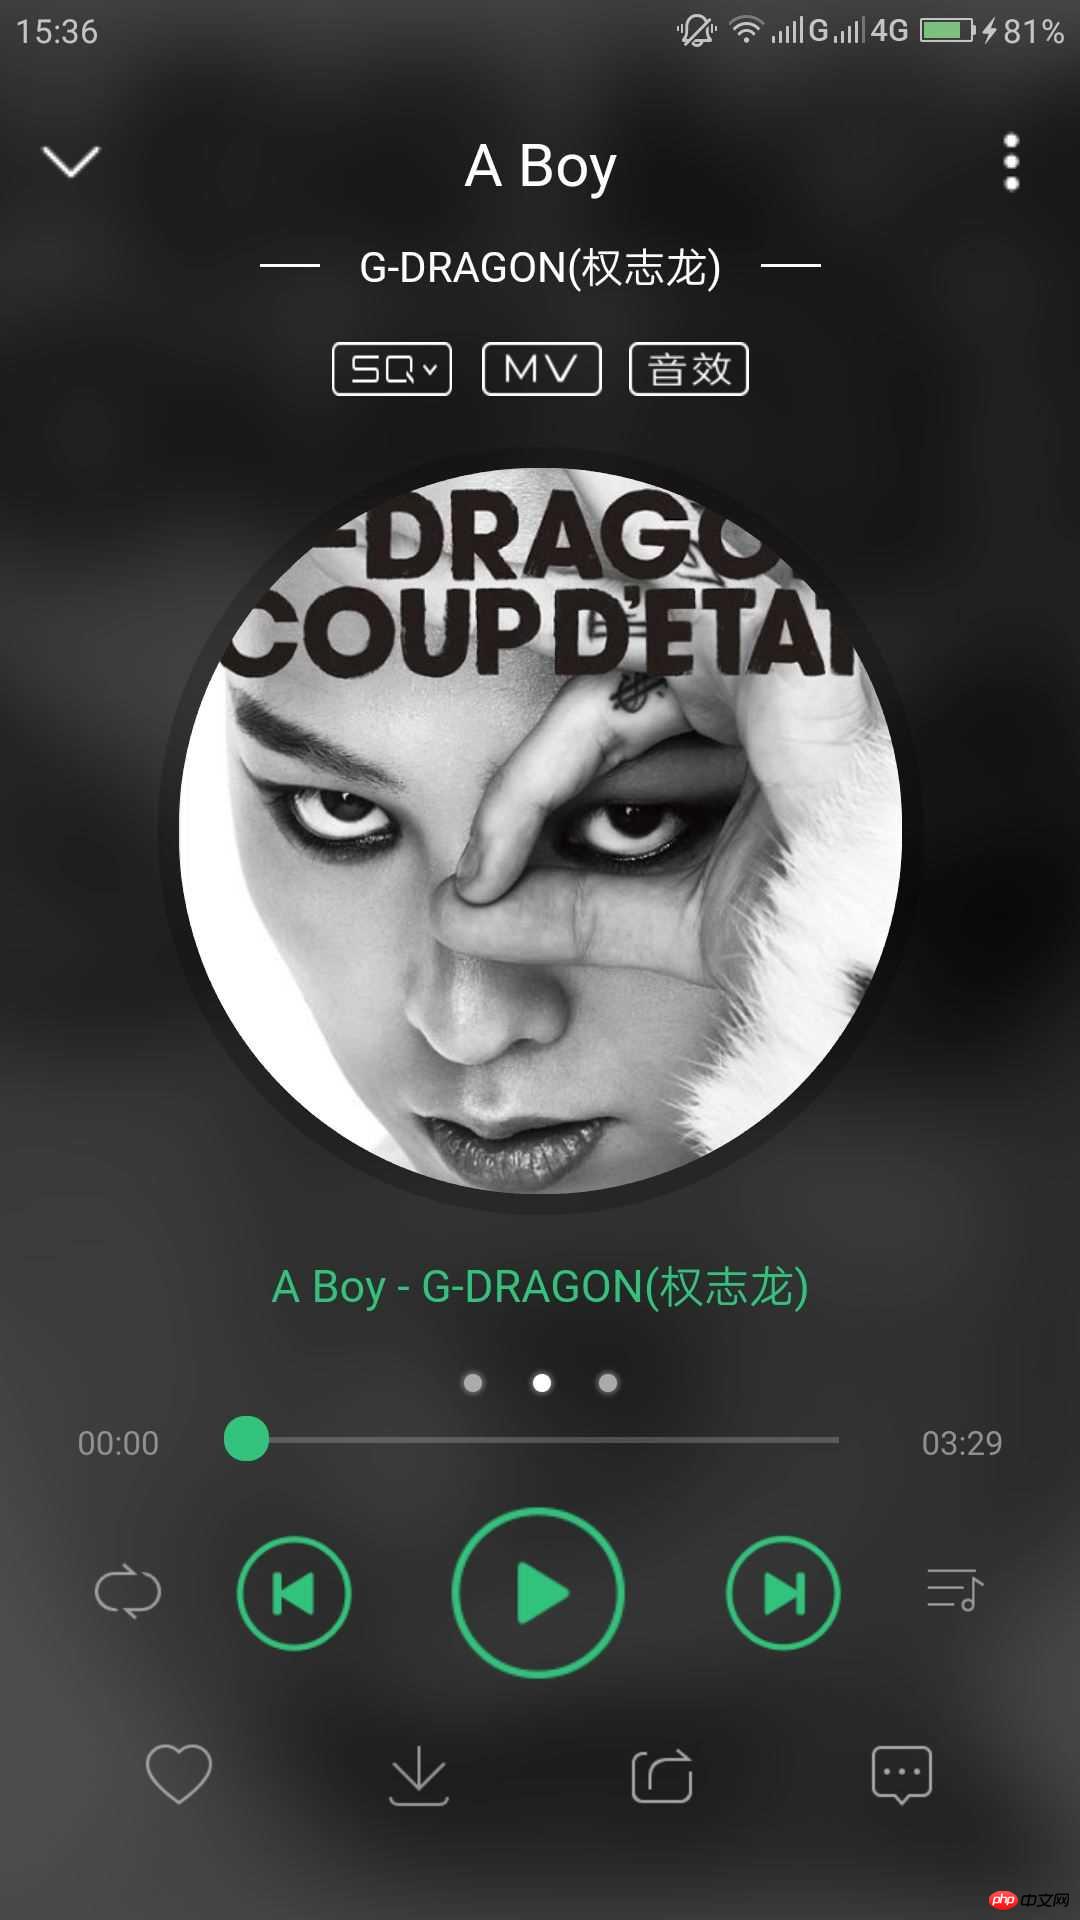
Take XX Music as an example:
2.1 Import file
  <script src="js/mui.min.js"></script>
  <link href="css/mui.min.css" rel="external nofollow" rel="stylesheet"/>
  <link rel="stylesheet" href="css/bofang.css" rel="external nofollow" />
2.2HTML code
The following HTML code is the mui framework part used and the above status bar The relevant part, this mui is about the regional carousel part
The top img is the background image, the p wrapped in the outer layer is very necessary, and the overflow attribute must be used flexibly to achieve perfect effects.
Because the header part of the APP uses positioning, the main part of the page needs to add a padding-top with a height of about 74px
  <p class="mui-slider">
       <p class="mui-slider-group">
         <p class="mui-slider-item">
          第一个轮播区域
         </p>
         <p class="mui-slider-item">
          <p class="singer">
            <span class="ce"></span>
            <span class="mui-text-center">G-DRAGON</span>
            <span class="ce"></span>
          </p>
          <p class="yinxiao">
            <img src="img/player_btn_sq_hlight.png"/>
            <img src="img/player_btn_mv_normal.png"/>
            <img src="img/player_btn_dts_on.png"/>
          </p>

          <p class="datu">
            <img src="img/GD.jpg"/>
          </p>

          <p class="geci">A Boy - G-DRAGON</p>


         </p>
         <p class="mui-slider-item">
          第二个轮播区域
         </p>
       </p>
       <p class="mui-slider-indicator">
        <p class="mui-indicator"></p>
        <p class="mui-indicator mui-active"></p>
        <p class="mui-indicator"></p>
       </p>
    </p>
Main css code:
*{
  padding: 0px;
  margin: 0px;
}
body{
  overflow: hidden;
  height: 100vh;
}
#background{
  overflow: hidden;
  text-align: right;
}
#background #backImg{
  margin-left: -120px;
  height: 99vh;
  filter: blur(16px);
}
.mui-bar-nav{
  top: 30px;
  background-color: rgba(0,0,0,0);
  box-shadow: 0 0px 0px #ccc;
}
.mui-bar-nav .mui-title{
  color: white;
  font-size: 20px;
  font-weight: normal;
  line-height: 50px;
}
#continer{
  width: 100%;
  height: 100vh;
  position: relative;
  top: -100vh;
  z-index: 5;
  padding-top: 80px;
  background-color: rgba(0,0,0,0.7);
  text-align: center;
  color: white;
}The latter is different I didn’t think of center-aligning the large and small pictures for a moment. Here we need to use the cross-axis alignment of flexible layout:
#continer .footer1{
  margin-bottom: 0px;
  display: flex;
  align-items: center;
  justify-content: center;
}Show the effect below:
 小q It is said that
bloggers also want to improve themselves when writing blogs, and they also ask for advice from experts.
In addition, the framework is indeed easy to use, but the blogger feels that you still have to master the native code first.
Related recommendations:
How to use the MUI framework in mobile HTML5Mui uses jquery and uses click to jump to a new window example sharing Example details the encapsulation process of mui pull-up to load more pull-down refresh dataThe above is the detailed content of Simple experience of mobile development with mui framework. For more information, please follow other related articles on the PHP Chinese website!

Hot AI Tools

Undresser.AI Undress
AI-powered app for creating realistic nude photos

AI Clothes Remover
Online AI tool for removing clothes from photos.

Undress AI Tool
Undress images for free

Clothoff.io
AI clothes remover

Video Face Swap
Swap faces in any video effortlessly with our completely free AI face swap tool!

Hot Article
Hot Tools

Notepad++7.3.1
Easy-to-use and free code editor

SublimeText3 Chinese version
Chinese version, very easy to use

Zend Studio 13.0.1
Powerful PHP integrated development environment

Dreamweaver CS6
Visual web development tools

SublimeText3 Mac version
God-level code editing software (SublimeText3)
Hot Topics
 1386
1386
 52
52

 The easiest way to query the hard drive serial number
Feb 26, 2024 pm 02:24 PM
The easiest way to query the hard drive serial number
Feb 26, 2024 pm 02:24 PM
The hard disk serial number is an important identifier of the hard disk and is usually used to uniquely identify the hard disk and identify the hardware. In some cases, we may need to query the hard drive serial number, such as when installing an operating system, finding the correct device driver, or performing hard drive repairs. This article will introduce some simple methods to help you check the hard drive serial number. Method 1: Use Windows Command Prompt to open the command prompt. In Windows system, press Win+R keys, enter "cmd" and press Enter key to open the command
 Four recommended AI-assisted programming tools
Apr 22, 2024 pm 05:34 PM
Four recommended AI-assisted programming tools
Apr 22, 2024 pm 05:34 PM
This AI-assisted programming tool has unearthed a large number of useful AI-assisted programming tools in this stage of rapid AI development. AI-assisted programming tools can improve development efficiency, improve code quality, and reduce bug rates. They are important assistants in the modern software development process. Today Dayao will share with you 4 AI-assisted programming tools (and all support C# language). I hope it will be helpful to everyone. https://github.com/YSGStudyHards/DotNetGuide1.GitHubCopilotGitHubCopilot is an AI coding assistant that helps you write code faster and with less effort, so you can focus more on problem solving and collaboration. Git
 Which AI programmer is the best? Explore the potential of Devin, Tongyi Lingma and SWE-agent
Apr 07, 2024 am 09:10 AM
Which AI programmer is the best? Explore the potential of Devin, Tongyi Lingma and SWE-agent
Apr 07, 2024 am 09:10 AM
On March 3, 2022, less than a month after the birth of the world's first AI programmer Devin, the NLP team of Princeton University developed an open source AI programmer SWE-agent. It leverages the GPT-4 model to automatically resolve issues in GitHub repositories. SWE-agent's performance on the SWE-bench test set is similar to Devin, taking an average of 93 seconds and solving 12.29% of the problems. By interacting with a dedicated terminal, SWE-agent can open and search file contents, use automatic syntax checking, edit specific lines, and write and execute tests. (Note: The above content is a slight adjustment of the original content, but the key information in the original text is retained and does not exceed the specified word limit.) SWE-A
 Learn how to develop mobile applications using Go language
Mar 28, 2024 pm 10:00 PM
Learn how to develop mobile applications using Go language
Mar 28, 2024 pm 10:00 PM
Go language development mobile application tutorial As the mobile application market continues to boom, more and more developers are beginning to explore how to use Go language to develop mobile applications. As a simple and efficient programming language, Go language has also shown strong potential in mobile application development. This article will introduce in detail how to use Go language to develop mobile applications, and attach specific code examples to help readers get started quickly and start developing their own mobile applications. 1. Preparation Before starting, we need to prepare the development environment and tools. head
 Summary of the five most popular Go language libraries: essential tools for development
Feb 22, 2024 pm 02:33 PM
Summary of the five most popular Go language libraries: essential tools for development
Feb 22, 2024 pm 02:33 PM
Summary of the five most popular Go language libraries: essential tools for development, requiring specific code examples. Since its birth, the Go language has received widespread attention and application. As an emerging efficient and concise programming language, Go's rapid development is inseparable from the support of rich open source libraries. This article will introduce the five most popular Go language libraries. These libraries play a vital role in Go development and provide developers with powerful functions and a convenient development experience. At the same time, in order to better understand the uses and functions of these libraries, we will explain them with specific code examples.
 Which Linux distribution is best for Android development?
Mar 14, 2024 pm 12:30 PM
Which Linux distribution is best for Android development?
Mar 14, 2024 pm 12:30 PM
Android development is a busy and exciting job, and choosing a suitable Linux distribution for development is particularly important. Among the many Linux distributions, which one is most suitable for Android development? This article will explore this issue from several aspects and give specific code examples. First, let’s take a look at several currently popular Linux distributions: Ubuntu, Fedora, Debian, CentOS, etc. They all have their own advantages and characteristics.
 Exploring Go language front-end technology: a new vision for front-end development
Mar 28, 2024 pm 01:06 PM
Exploring Go language front-end technology: a new vision for front-end development
Mar 28, 2024 pm 01:06 PM
As a fast and efficient programming language, Go language is widely popular in the field of back-end development. However, few people associate Go language with front-end development. In fact, using Go language for front-end development can not only improve efficiency, but also bring new horizons to developers. This article will explore the possibility of using the Go language for front-end development and provide specific code examples to help readers better understand this area. In traditional front-end development, JavaScript, HTML, and CSS are often used to build user interfaces
 Understanding VSCode: What is this tool used for?
Mar 25, 2024 pm 03:06 PM
Understanding VSCode: What is this tool used for?
Mar 25, 2024 pm 03:06 PM
"Understanding VSCode: What is this tool used for?" 》As a programmer, whether you are a beginner or an experienced developer, you cannot do without the use of code editing tools. Among many editing tools, Visual Studio Code (VSCode for short) is very popular among developers as an open source, lightweight, and powerful code editor. So, what exactly is VSCode used for? This article will delve into the functions and uses of VSCode and provide specific code examples to help readers
