

JavaScript+CSS photo album special effects example code

The following editor will bring you a JavaScript+CSS photo album special effects example code. The editor thinks it's pretty good, so now I'll share the source code of JavaScript+css with you, and give it a reference. If you are interested in making photo albums with JavaScript and css, please follow the editor to take a look.
Well, this is such an example. A special effect learned in the video is not very useful in practice. But it can help understand the JS language and become familiar with CSS3 styles.
Design:
Observe the changes in a picture and find:
1. Picture scaling (random , and not at the same time)
1. From large to small
2. From small to large, transparency from 1 to 0 (start immediately after the first step of exercise is completed)
2. Picture rotation (random, and not moving at the same time. It needs to start after all movements are completed)
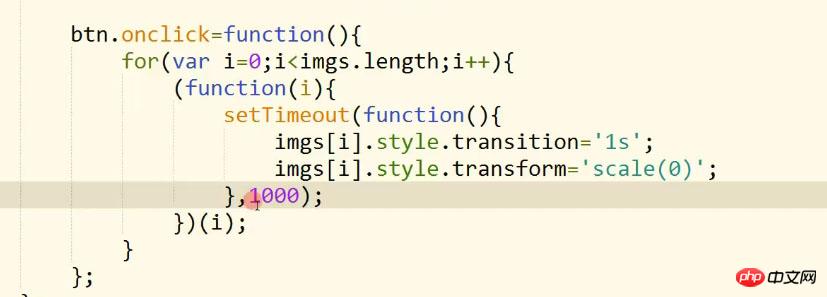
3. Because each picture starts to transform randomly, the starting time is different. Here you can set a delayer setTimeout, and the time can be randomly generated using random.
4. A self-executing function needs to be used in the middle. Because setTimeout ignores i in the for loop, i may be wrong every time the delayer runs. Use a self-executing function to save i value every time.
5. The p of the button cannot be clicked during the conversion and needs to be marked and judged.
6. There are two types of motion, scaling and rotation. Note that the rotation can only start after the scaling is completed. This must also be handled well.
Notes:
scale is the scaling
transition transition, delay
sub-function Modifying the value of the father is a closure
The self-executing function is mainly used to save each value of i
If you add a timer directly, it will not matter The outer loop will be executed after 1s. At this time, i doesn’t know where it is, and it may be out of bounds
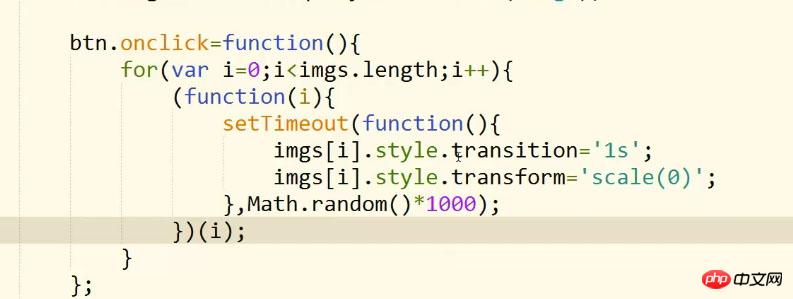
The value generated by Math.random() is a parameter of setTimeout. Delay time
setTimeout delay time is also affected by the computer card
transitionend will be executed as long as the transition is made, it is calculated based on the style
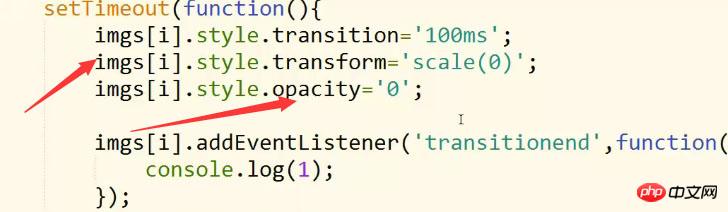
Zooming and transparency will trigger transitionend
call() changes the object pointed to by this
Then it is implemented directly, and this special effect is run when the page is loaded.
Fill in some information found in the middle:
1.CSS3 opacity attribute:
| Value | Description |
|---|---|
| value | Specify opacity. From 0.0 (fully transparent) to 1.0 (fully opaque) |
| inherit | The value of the Opacity attribute should be inherited from the parent element |
2.HTML DOM scale() method:
Parameters
| Parameters | Description |
|---|---|
| sx, sy | Horizontal and vertical scaling factors. |
Description
The scale() method adds a scaling transformation to the current transformation matrix of the canvas. Scaling is done with independent horizontal and vertical scaling factors. For example, passing a value of 2.0 and 0.5 will cause the drawing path to be twice as wide and 1/2 as tall. Specifying a negative sx value causes the X coordinate to be folded along the Y axis, and specifying a negative sy causes the Y coordinate to be folded along the X axis.
My direct parameter here is to reduce the height and width at the same time
3.
p is a block label. In this case, the label of p will be adjusted by the height of the picture inside. Hold it up, img tags float to the left by default, exactly 10 per line, each 80px
margin: 0 auto is the abbreviation of margin: 0 auto 0 auto, that is, the left and right are automatically centered. As for why they are not next to each other The upper p, this should be the upper margin: 80px auto, and the outer margin of the lower p has been set to 80px distance
The height of btn has not been set, it is supported by font
The rest is The code is detailed, the comments are very detailed, and there are many callback functions. . :
<!DOCTYPE html>
<html>
<head>
<meta charset="UTF-8">
<title></title>
<style>
/*图片容器整体样式,左右居中 视角景深800px */
#imgWrap{
width: 800px;
height: 400px;
margin: 80px auto;
perspective: 800px;
}
/*左对齐,高宽*数量=整体p*/
#imgWrap img{
float: left;
width: 80px;
height: 80px;
}
#btn{
width: 100px;
/*height: 40px 这里不定义就是跟font大小一样*/
background: rgb(0,100,0);
padding: 0 20px;
/*font-size 和 line-height 中可能的值。*/
font: 16px/40px "微软雅黑";
color: #fff;
margin: 0 auto;
border-radius: 5px;
box-shadow: 2px 2px 5px #000;
cursor: pointer;
}
</style>
<script>
/*
* 1、图片缩放(随机,并且不是同时运动)
* 1、从大到小
* 2、从小到大,透明度从1到0(在第一步运动完成后立马开始)
*
* 2、图片旋转(随机,并且不是同时运动的。需要在全部运动走完以后开始)
*/
window.onload=function(){
var btn=document.getElementById("btn");
// 选择所有元素
var imgs=document.querySelectorAll("img");
var endNum=0; //它代表图片运动完成的数量
var canClick=true; //它代表用户能否再次点击
btn.onclick=function(){
if(!canClick){
return; //以下的代码不要走了
}
canClick=false;
for(var i=0;i<imgs.length;i++){
(function(i){
setTimeout(function(){
/*imgs[i].style.transition='100ms';
imgs[i].style.transform='scale(0)';
imgs[i].style.opacity='0';
imgs[i].addEventListener('transitionend',function(){
console.log(1);
});*/
motion(imgs[i],'50ms',function(){
this.style.transform='scale(0)';
},function(){
motion(this,'1s',function(){
this.style.transform='scale(1)';
this.style.opacity='0';
},function(){
//在这里表示图片缩放的运动已经全部完成了,接着走第二个运动
endNum++;
if(endNum==imgs.length){
//所有的运动都完成了
//console.log('所有的运动都完成了')
rotate();
//endNum=0;
}
});
});
},Math.random()*1000);
})(i);
}
};
//旋转功能
function rotate(){
for(var i=0;i<imgs.length;i++){
//给运动来一下初始化
imgs[i].style.transition='';
/*imgs[i].style.opacity=1;*/
imgs[i].style.transform='rotateY(0deg) translateZ(-'+Math.random()*500+'px)';
//运动来了,自执行函数
(function(i){
setTimeout(function(){
motion(imgs[i],'2s',function(){
this.style.opacity=1;
this.style.transform='rotateY(-360deg) translateZ(0)';
},function(){
endNum--; //因为在上次运动结束的时候,endNum的值已经加到了50了
//console.log(endNum);
if(endNum==0){
//所有的运动都完成了
canClick=true;
//endNum=0
}
});
},Math.random()*1000);
})(i);
}
}
//运动函数
function motion(obj,timer,doFn,callBack){
//motion(运动对象,运动时间(字符串+单位),运动属性(函数),运动结束后的回调函数)
obj.style.transition=timer;
doFn.call(obj);//改变对象
var end=true; //用来知道过渡有没有完成一次
//结束事件处理函数
function endFn(){
if(end){
//callBack&&callBack.call(obj);
if(callBack){
callBack.call(obj);
}
end=false; //改成false,下次就不会走这个if了
}
obj.removeEventListener('transitionend',endFn); //结束后就把这个事件取消掉,要不它会一直带在身上
}
obj.addEventListener('transitionend',endFn);
}
};
</script>
</head>
<body>
<p id="imgWrap">
<img src="images/1.jpg" alt="" />
<img src="images/2.jpg" alt="" />
<img src="images/3.jpg" alt="" />
<img src="images/4.jpg" alt="" />
<img src="images/5.jpg" alt="" />
<img src="images/6.jpg" alt="" />
<img src="images/7.jpg" alt="" />
<img src="images/8.jpg" alt="" />
<img src="images/9.jpg" alt="" />
<img src="images/10.jpg" alt="" />
<img src="images/11.jpg" alt="" />
<img src="images/12.jpg" alt="" />
<img src="images/13.jpg" alt="" />
<img src="images/14.jpg" alt="" />
<img src="images/15.jpg" alt="" />
<img src="images/16.jpg" alt="" />
<img src="images/17.jpg" alt="" />
<img src="images/18.jpg" alt="" />
<img src="images/19.jpg" alt="" />
<img src="images/20.jpg" alt="" />
<img src="images/21.jpg" alt="" />
<img src="images/22.jpg" alt="" />
<img src="images/23.jpg" alt="" />
<img src="images/24.jpg" alt="" />
<img src="images/25.jpg" alt="" />
<img src="images/26.jpg" alt="" />
<img src="images/27.jpg" alt="" />
<img src="images/28.jpg" alt="" />
<img src="images/29.jpg" alt="" />
<img src="images/30.jpg" alt="" />
<img src="images/31.jpg" alt="" />
<img src="images/32.jpg" alt="" />
<img src="images/33.jpg" alt="" />
<img src="images/34.jpg" alt="" />
<img src="images/35.jpg" alt="" />
<img src="images/36.jpg" alt="" />
<img src="images/37.jpg" alt="" />
<img src="images/38.jpg" alt="" />
<img src="images/39.jpg" alt="" />
<img src="images/40.jpg" alt="" />
<img src="images/41.jpg" alt="" />
<img src="images/42.jpg" alt="" />
<img src="images/43.jpg" alt="" />
<img src="images/44.jpg" alt="" />
<img src="images/45.jpg" alt="" />
<img src="images/46.jpg" alt="" />
<img src="images/47.jpg" alt="" />
<img src="images/48.jpg" alt="" />
<img src="images/49.jpg" alt="" />
<img src="images/50.jpg" alt="" />
</p>
<p id="btn">点击查看效果</p>
</body>
</html>The above is all the content of this article, I hope it can help everyone learn! !
Related recommendations:
Javascript array flattening method is explained in detail
JavaScript implements the select drop-down box Sharing examples of adding and deleting elements in
Javascript algorithm binary search tree sample code
The above is the detailed content of JavaScript+CSS photo album special effects example code. For more information, please follow other related articles on the PHP Chinese website!

Hot AI Tools

Undresser.AI Undress
AI-powered app for creating realistic nude photos

AI Clothes Remover
Online AI tool for removing clothes from photos.

Undress AI Tool
Undress images for free

Clothoff.io
AI clothes remover

AI Hentai Generator
Generate AI Hentai for free.

Hot Article
Hot Tools

Notepad++7.3.1
Easy-to-use and free code editor

SublimeText3 Chinese version
Chinese version, very easy to use

Zend Studio 13.0.1
Powerful PHP integrated development environment

Dreamweaver CS6
Visual web development tools

SublimeText3 Mac version
God-level code editing software (SublimeText3)
Hot Topics
 1386
1386
 52
52

 How to use bootstrap in vue
Apr 07, 2025 pm 11:33 PM
How to use bootstrap in vue
Apr 07, 2025 pm 11:33 PM
Using Bootstrap in Vue.js is divided into five steps: Install Bootstrap. Import Bootstrap in main.js. Use the Bootstrap component directly in the template. Optional: Custom style. Optional: Use plug-ins.
 The Roles of HTML, CSS, and JavaScript: Core Responsibilities
Apr 08, 2025 pm 07:05 PM
The Roles of HTML, CSS, and JavaScript: Core Responsibilities
Apr 08, 2025 pm 07:05 PM
HTML defines the web structure, CSS is responsible for style and layout, and JavaScript gives dynamic interaction. The three perform their duties in web development and jointly build a colorful website.
 How to write split lines on bootstrap
Apr 07, 2025 pm 03:12 PM
How to write split lines on bootstrap
Apr 07, 2025 pm 03:12 PM
There are two ways to create a Bootstrap split line: using the tag, which creates a horizontal split line. Use the CSS border property to create custom style split lines.
 Understanding HTML, CSS, and JavaScript: A Beginner's Guide
Apr 12, 2025 am 12:02 AM
Understanding HTML, CSS, and JavaScript: A Beginner's Guide
Apr 12, 2025 am 12:02 AM
WebdevelopmentreliesonHTML,CSS,andJavaScript:1)HTMLstructurescontent,2)CSSstylesit,and3)JavaScriptaddsinteractivity,formingthebasisofmodernwebexperiences.
 How to resize bootstrap
Apr 07, 2025 pm 03:18 PM
How to resize bootstrap
Apr 07, 2025 pm 03:18 PM
To adjust the size of elements in Bootstrap, you can use the dimension class, which includes: adjusting width: .col-, .w-, .mw-adjust height: .h-, .min-h-, .max-h-
 How to insert pictures on bootstrap
Apr 07, 2025 pm 03:30 PM
How to insert pictures on bootstrap
Apr 07, 2025 pm 03:30 PM
There are several ways to insert images in Bootstrap: insert images directly, using the HTML img tag. With the Bootstrap image component, you can provide responsive images and more styles. Set the image size, use the img-fluid class to make the image adaptable. Set the border, using the img-bordered class. Set the rounded corners and use the img-rounded class. Set the shadow, use the shadow class. Resize and position the image, using CSS style. Using the background image, use the background-image CSS property.
 How to set up the framework for bootstrap
Apr 07, 2025 pm 03:27 PM
How to set up the framework for bootstrap
Apr 07, 2025 pm 03:27 PM
To set up the Bootstrap framework, you need to follow these steps: 1. Reference the Bootstrap file via CDN; 2. Download and host the file on your own server; 3. Include the Bootstrap file in HTML; 4. Compile Sass/Less as needed; 5. Import a custom file (optional). Once setup is complete, you can use Bootstrap's grid systems, components, and styles to create responsive websites and applications.
 How to use bootstrap button
Apr 07, 2025 pm 03:09 PM
How to use bootstrap button
Apr 07, 2025 pm 03:09 PM
How to use the Bootstrap button? Introduce Bootstrap CSS to create button elements and add Bootstrap button class to add button text
