
CSS is finally powerful enough to easily achieve our design goals. This is the best era for web developers. Now, let’s create a homepage using the awesome tool Grid Layout.
Here is the page we will implement

Before we start coding, We need to get into a grid mindset. The first step is to look at our design and divide it into its main grid components. Here are the divisions I made for this design:
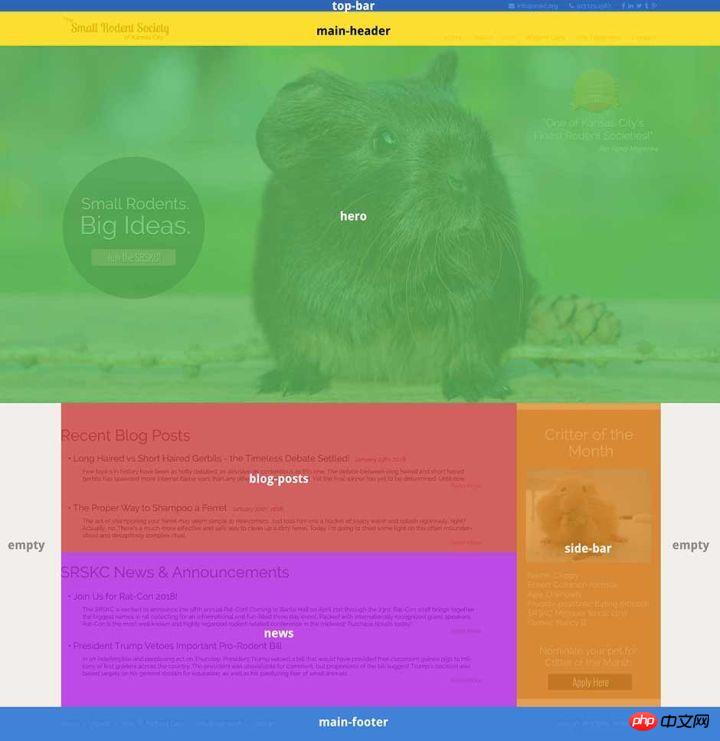
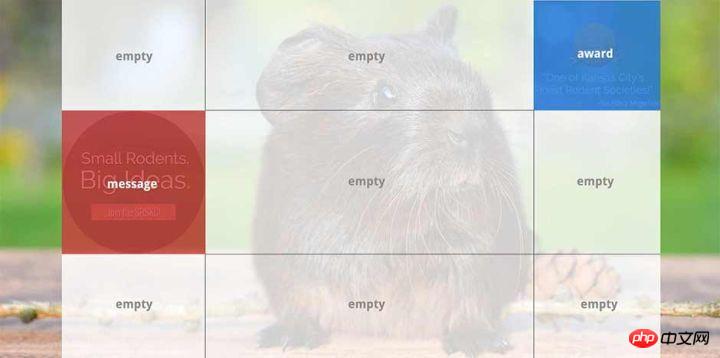
You will notice that the entire page is divided into 7 top-level grid areas. I say "top level" because we can continue to nest grids inside of it, which is exactly what we're going to do with the hero section:
This is the basic structure of HTML. I'll show the entire finished file later, but for now I've left out most of the details. The important parts to note here are the 7 elements that are direct descendants of body: top-bar, main-header, hero , blog-posts, news, side-bar and main-footer. body will become our grid container, and its children will become grid items.
As just mentioned, we will also set up hero as the grid container. It has two children that will serve as grid items: message and award.
<body>

  <header class="top-bar">
    <!-- social links and contact info -->
  </header>

  <header class="main-header">
    <!-- logo and main navigation -->
  </header>

  <section class="hero">
    <p class="message">
      <!-- circular element -->
    </p>
    <p class="award">
      <!-- award image and quote -->
    </p>
  </section>

  <section class="blog-posts">
    <!-- blog posts and excerpts -->
  </section>

  <section class="news">
    <!-- news headlines and excerpts -->
  </section>

  <aside class="side-bar">
    <!-- critter of the month info -->
  </aside>

  <footer class="main-footer">
    <!-- footer menu and copyright -->
  </footer>

</body>
Okey, we will explain it this way. We will not show all the CSS used in the tutorial. I will show the final complete file at the end of the article. For now let's just focus on the part of the grid that appeals to us and any styles directly related to it.
We first define the main grid container on body:
body{
  display: grid;
  grid-template-columns: 12% auto 400px 12%;
  grid-template-rows: auto auto 950px auto auto auto;
}We just created a grid with 4 columns and 6 rows, the first and last columns will As padding on both sides of the main content. I set the third column to 400px because this is where we will place the side-bar element and we want this to be a fixed width. The hero element (third row) has a fixed height of 950px.
Now we use grid-template-areas to define where a certain grid area will go. This is the very interesting part:
body{
  display: grid;
  grid-template-columns: 12% auto 400px 12%;
  grid-template-rows: auto auto 950px auto auto auto;
  grid-template-areas: "top-bar     top-bar     top-bar     top-bar"
                       "main-header main-header main-header main-header"
                       "hero        hero        hero        hero"
                       ".           blog-posts  side-bar    ."
                       ".           news        side-bar    ."
                       "main-footer main-footer main-footer main-footer";
}grid-template-areas allows us to place the element wherever we want, and this property gives us a layout for the element Nice visualization. It is worth noting that the values used here (top-bar, main-header, hero, etc.) do not refer to the class names of those elements, but to We named them using the grid-area attribute, and we will name them next.
When grid area names are repeated, the element will span those columns/rows. For example, top-bar spans four columns, and side-bar spans four and five rows. . stands for empty cells. If you look back at the full design above, you'll see how this definition matches our grid pattern.
Assuming we've applied all our styles but haven't assigned grid area names to grid items yet, our page doesn't look good so far:

The grid will automatically place our elements in the grid according to their source order before assigning grid area names to grid items. Obviously this is not what we want. In order for our layout to work as expected, we need to define our grid areas. So let’s go ahead:
.top-bar{
  grid-area: top-bar;
}
.main-header{
  grid-area: main-header;
}
.hero{
  grid-area: hero;
}
.blog-posts{
  grid-area: blog-posts;
}
.news{
  grid-area: news;
}
.side-bar{
  grid-area: side-bar;
}
.main-footer{
  grid-area: main-footer;
}It’s important to note that these names can be set however you want. For convenience, I chose to have them match the class names.
Now that we have assigned grid area names to the grid items, they will be placed at the appropriate location in the grid. This step makes a big difference:

Everything except the grid items in the hero section is completely Place it correctly as needed and we're almost done.
But before we fix the hero part, I'd like to explain something that's hard to understand: the settings for the padding areas on either side of the main content. As a reminder, we move the settings we just made over again and adjust the columns as follows:
body{
  grid-template-columns: 12% auto 400px 12%;
}设置为12%的两列用于填充主要内容两边的空白,但是它们仅用于第四行和第五行。 回想一下,我们告诉我们的top-bar、main-header、hero和main-footer元素跨越所有列,包括这两个“填充”列。 我们为什么这样做? 因为我们希望这些元素的背景色横跨越整个视窗宽度,且任何一侧都没有空白。 我们只想在 blog-post/news和sidebar元素周围留出空白(第四行和第五行)。
为了让元素水平覆盖整个宽度,同时让元素里面的内容保存一定的padding,我们需要显示地在这些元素上设置padding:
.top-bar{
  padding: 4px 12%;
}
.main-header{
  padding: 12px 12%;
}
.hero{
  padding: 55px 12% 0 12%;
}
.main-footer{
  padding: 25px 12%;
}我们给元素设置左右 padding 为12%,这和grid-template-areas定义中的第一列和最后一列的宽度是一样的。 现在,需要填充整个宽度的元素最终呈现的结果是,背景横跨水平宽度,但其内容在两侧都预留出12%的空白。 很赞!
好了,让我们来修复 hero 部分。 这也将是一个网格容器,因此我们把它定义为一个网格,就像刚刚做过的那样:
.hero{
  display: grid;
  grid-template-columns: auto 1fr auto;
  grid-template-rows: auto auto auto;
  grid-template-areas: ".       .  award"
                       "message .  .    "
                       ".       .  .    ";
}这是一个3×3的网格,除了中间的列,其它都设置为 auto。 我们给中间一列大小设为1fr,因为我们希望在第一列和最后一列用东西填充后,剩下的空间完全需要完全填满。
hero中只有两个元素:message和award。 我们要message占据第二行的第一列,我们要award占据第一行的第三列。所以我们的完整网格定义应该如下所示:
.hero{
  display: grid;
  grid-template-columns: auto 1fr auto;
  grid-template-rows: auto auto auto;
  grid-template-areas: ".       .  award"
                       "message .  .    "
                       ".       .  .    ";
}下面我们所要做的就是命名我们的元素:
.message{
  grid-area: message;
}
.award{
  grid-area: award;
}就这样,message和award卡入到位,我们的页面完成:

CSS Grid 使用媒体查询让重新排列整个布局变得非常简单。你所做的就是重新放置你的网格项。现在回到我们的设计,简单起见,我们只对两个宽度临界值做响应式处理,1600px 和 1050px。我们需要对一些元素(padding、margin等)进行一些小的样式调整,但是我不会把所有的样式调整都全部展示在这里。后面我会放出完整的代码,现在我们只需要关注关注网格相关的东西即可。
1600px 这个临界点的处理比较简单,当浏览器宽度到底1600px时我们将减少网站外部填充的地方。 之所以选择1600px,是到了这个宽度后12%填充看起来不太合适。为了解决这个问题,我们需要做的是在body上改变grid-template-columns的值,将第一列和最后一列减少到2%。 我们还需要调整其他元素的填充以匹配:
@media (max-width: 1600px) {
  body{
    grid-template-columns: 2% auto 400px 2%;
  }
  .top-bar{
    padding: 4px 2%;
  }
  .main-header{
    padding: 12px 2%;
  }
  .hero{
    padding: 55px 2% 0 2%;
  }
  .main-footer{
    padding: 25px 2%;
  }
}对于下一个临界值,我们对网格项重新排列,使它们排列在一个列中。 再次回头看看我们原来的代码是如何对body进行设置的:
body{
  display: grid;
  grid-template-columns: 12% auto 400px 12%;
  grid-template-rows: auto auto 950px auto auto auto;
  grid-template-areas: "top-bar     top-bar     top-bar     top-bar"
                       "main-header main-header main-header main-header"
                       "hero        hero        hero        hero"
                       ".           blog-posts  side-bar    ."
                       ".           news        side-bar    ."
                       "main-footer main-footer main-footer main-footer";
}下面是重新设置的媒体查询:
@media (max-width: 1050px) {
  body{
    grid-template-columns: 3% auto 3%;
    grid-template-rows: auto auto auto auto auto auto auto;
    grid-template-areas: "top-bar     top-bar     top-bar"
                         "main-header main-header main-header"
                         "hero        hero        hero"
                         ".           blog-posts  ."
                         ".           news        ."
                         ".           side-bar    ."
                         "main-footer main-footer main-footer";
  }
}我们在这里做了一些重要的改变:将列数从四个减少到三个,将第一列和最后一列的值改为3%(3%在较窄的宽度上优于2%),添加了 附加行,将所有行的长度改为auto,并将side-bar移动到自己的行。 现在我们的页面元素很适合在较窄的宽度下展示:

下面是我们的主页,以及完整的HTML和CSS文件。 你需要一个支持grid的浏览器来查看预览。 我建议启用Experimental Web Platform Features标志的Chrome 49+(地址栏输入 chrome:// flags ,并向下滚动到“Experimental Web Platform Features”)。
下面的嵌入式页面默认会以移动视图展示,可以点击“Edit on Codepen”在页面全宽下展示不同的效果:
在 CodePen 查看效果 Building a Home Page with Grid by Chris House (@chrishouse) .
补充:基本布局代码
相关推荐:
The above is the detailed content of CSS uses Grid layout to build website homepage. For more information, please follow other related articles on the PHP Chinese website!


