

Three.js uses vertices to draw cubes

This article mainly introduces you to the method of using vertices to draw a cube in Three.js. The article introduces it in great detail through sample code. Friends who need it can refer to it. Let’s take a look together. Hope it helps everyone.
Preface
Before, when we were learning some basics of WebGL, we were studying vertex positions, normal vectors, drawing subscripts and so on every day. Although it is complicated, it is native after all, and its performance is not to mention.
Three.js also provides us with relevant interfaces for us to use native methods to draw models. I won’t say much below, let’s take a look at the detailed introduction.
The following is a personal case of mine.
First, I created a blank shape:
  //立方体
  var cubeGeometry = new THREE.Geometry();
The shape of the cube is as follows:
  // 创建一个立方体
  // v6----- v5
  // /|  /|
  // v1------v0|
  // | |  | |
  // | |v7---|-|v4
  // |/  |/
  // v2------v3
Then I added the vertices of the cube, a total of 8
  //创建立方体的顶点
  var vertices = [
   new THREE.Vector3(10, 10, 10), //v0
   new THREE.Vector3(-10, 10, 10), //v1
   new THREE.Vector3(-10, -10, 10), //v2
   new THREE.Vector3(10, -10, 10), //v3
   new THREE.Vector3(10, -10, -10), //v4
   new THREE.Vector3(10, 10, -10), //v5
   new THREE.Vector3(-10, 10, -10), //v6
   new THREE.Vector3(-10, -10, -10) //v7
  ];

  cubeGeometry.vertices = vertices;
Then the face of the cube is generated through the coordinates of the vertices
  //创建立方的面
  var faces=[
   new THREE.Face3(0,1,2),
   new THREE.Face3(0,2,3),
   new THREE.Face3(0,3,4),
   new THREE.Face3(0,4,5),
   new THREE.Face3(1,6,7),
   new THREE.Face3(1,7,2),
   new THREE.Face3(6,5,4),
   new THREE.Face3(6,4,7),
   new THREE.Face3(5,6,1),
   new THREE.Face3(5,1,0),
   new THREE.Face3(3,2,7),
   new THREE.Face3(3,7,4)
  ];

  cubeGeometry.faces = faces;
Need to pay attention here:
(1) The face is a triangular face composed of three vertices, which is also WebGL way of realizing it. If you need a rectangle, it needs to be made from two triangles.
(2) If the surface to be drawn is facing the camera, then the writing method of the vertices of this surface is drawn counterclockwise, such as the writing in the addition of the first surface of the model in the picture. It's (0,1,2).
(3) If you can make the model have lighting effects, you also need to set the normal vector and let three.js automatically generate it. As follows
  //生成法向量
  cubeGeometry.computeFaceNormals();
The current steps are just for generating After the shape has been determined, you need to set a texture as before, and then generate the mesh through the THTEE.Mesh() method
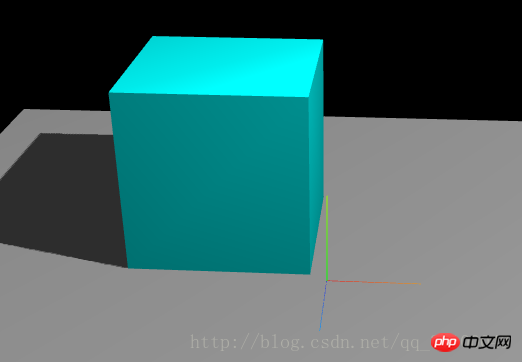
  var cubeMaterial = new THREE.MeshLambertMaterial({color: 0x00ffff});

cube = new THREE.Mesh(cubeGeometry, cubeMaterial);In this way, the drawing of a cube is realized:
The entire code is as follows:
<!DOCTYPE html>
<html lang="en">
<head>
 <meta charset="UTF-8">
 <title>Title</title>
 <style type="text/css">
  html, body {
   margin: 0;
   height: 100%;
  }

  canvas {
   display: block;
  }

 </style>
</head>
<body onload="draw();">

</body>
<script src="build/three.js"></script>
<script src="examples/js/controls/OrbitControls.js"></script>
<script src="examples/js/libs/stats.min.js"></script>
<script src="examples/js/libs/dat.gui.min.js"></script>
<script>
 var renderer;
 function initRender() {
  renderer = new THREE.WebGLRenderer({antialias: true});
  renderer.setSize(window.innerWidth, window.innerHeight);
  //告诉渲染器需要阴影效果
  renderer.shadowMap.enabled = true;
  renderer.shadowMap.type = THREE.PCFSoftShadowMap; // 默认的是,没有设置的这个清晰 THREE.PCFShadowMap
  document.body.appendChild(renderer.domElement);
 }

 var camera;
 function initCamera() {
  camera = new THREE.PerspectiveCamera(45, window.innerWidth / window.innerHeight, 0.1, 1000);
  camera.position.set(0, 40, 100);
  camera.lookAt(new THREE.Vector3(0, 0, 0));
 }

 var scene;
 function initScene() {
  scene = new THREE.Scene();
 }

 //初始化dat.GUI简化试验流程
 var gui;
 function initGui() {
  //声明一个保存需求修改的相关数据的对象
  gui = {
   lightY: 30, //灯光y轴的位置
   cubeX: 25, //立方体的x轴位置
   cubeY: 10, //立方体的x轴位置
   cubeZ: -5 //立方体的z轴的位置
  };
  var datGui = new dat.GUI();
  //将设置属性添加到gui当中,gui.add(对象,属性,最小值,最大值)
  datGui.add(gui, "lightY", 0, 100);
  datGui.add(gui, "cubeX", -30, 30);
  datGui.add(gui, "cubeY", -30, 30);
  datGui.add(gui, "cubeZ", -30, 30);
 }

 var light;
 function initLight() {
  scene.add(new THREE.AmbientLight(0x444444));

  light = new THREE.PointLight(0xffffff);
  light.position.set(15, 30, 10);

  //告诉平行光需要开启阴影投射
  light.castShadow = true;

  scene.add(light);
 }

 var cube;
 function initModel() {

  //辅助工具
  var helper = new THREE.AxisHelper(10);
  scene.add(helper);

  // 创建一个立方体
  // v6----- v5
  // /|  /|
  // v1------v0|
  // | |  | |
  // | |v7---|-|v4
  // |/  |/
  // v2------v3

  //立方体
  var cubeGeometry = new THREE.Geometry();

  //创建立方体的顶点
  var vertices = [
   new THREE.Vector3(10, 10, 10), //v0
   new THREE.Vector3(-10, 10, 10), //v1
   new THREE.Vector3(-10, -10, 10), //v2
   new THREE.Vector3(10, -10, 10), //v3
   new THREE.Vector3(10, -10, -10), //v4
   new THREE.Vector3(10, 10, -10), //v5
   new THREE.Vector3(-10, 10, -10), //v6
   new THREE.Vector3(-10, -10, -10) //v7
  ];

  cubeGeometry.vertices = vertices;

  //创建立方的面
  var faces=[
   new THREE.Face3(0,1,2),
   new THREE.Face3(0,2,3),
   new THREE.Face3(0,3,4),
   new THREE.Face3(0,4,5),
   new THREE.Face3(1,6,7),
   new THREE.Face3(1,7,2),
   new THREE.Face3(6,5,4),
   new THREE.Face3(6,4,7),
   new THREE.Face3(5,6,1),
   new THREE.Face3(5,1,0),
   new THREE.Face3(3,2,7),
   new THREE.Face3(3,7,4)
  ];

  cubeGeometry.faces = faces;

  //生成法向量
  cubeGeometry.computeFaceNormals();

  var cubeMaterial = new THREE.MeshLambertMaterial({color: 0x00ffff});

  cube = new THREE.Mesh(cubeGeometry, cubeMaterial);
  cube.position.x = 25;
  cube.position.y = 5;
  cube.position.z = -5;

  //告诉立方体需要投射阴影
  cube.castShadow = true;

  scene.add(cube);

  //底部平面
  var planeGeometry = new THREE.PlaneGeometry(100, 100);
  var planeMaterial = new THREE.MeshLambertMaterial({color: 0xaaaaaa});

  var plane = new THREE.Mesh(planeGeometry, planeMaterial);
  plane.rotation.x = -0.5 * Math.PI;
  plane.position.y = -0;

  //告诉底部平面需要接收阴影
  plane.receiveShadow = true;

  scene.add(plane);

 }

 //初始化性能插件
 var stats;
 function initStats() {
  stats = new Stats();
  document.body.appendChild(stats.dom);
 }

 //用户交互插件 鼠标左键按住旋转,右键按住平移,滚轮缩放
 var controls;
 function initControls() {

  controls = new THREE.OrbitControls(camera, renderer.domElement);

  // 如果使用animate方法时,将此函数删除
  //controls.addEventListener( 'change', render );
  // 使动画循环使用时阻尼或自转 意思是否有惯性
  controls.enableDamping = true;
  //动态阻尼系数 就是鼠标拖拽旋转灵敏度
  //controls.dampingFactor = 0.25;
  //是否可以缩放
  controls.enableZoom = true;
  //是否自动旋转
  controls.autoRotate = false;
  //设置相机距离原点的最远距离
  controls.minDistance = 50;
  //设置相机距离原点的最远距离
  controls.maxDistance = 200;
  //是否开启右键拖拽
  controls.enablePan = true;
 }

 function render() {
  renderer.render(scene, camera);
 }

 //窗口变动触发的函数
 function onWindowResize() {

  camera.aspect = window.innerWidth / window.innerHeight;
  camera.updateProjectionMatrix();
  render();
  renderer.setSize(window.innerWidth, window.innerHeight);

 }

 function animate() {
  //更新控制器
  render();

  //更新性能插件
  stats.update();

  //更新相关位置
  light.position.y = gui.lightY;
  cube.position.x = gui.cubeX;
  cube.position.y = gui.cubeY;
  cube.position.z = gui.cubeZ;

  controls.update();

  requestAnimationFrame(animate);
 }

 function draw() {
  initGui();
  initRender();
  initScene();
  initCamera();
  initLight();
  initModel();
  initControls();
  initStats();

  animate();
  window.onresize = onWindowResize;
 }
</script>
</html>Related recommendations:
How to use css3 technology to create a special effect of rotating and glowing cubes
jQuery+CSS3 realizes 3D cube rotation effect_jquery
three.js3D field of view scaling effect implementation method
The above is the detailed content of Three.js uses vertices to draw cubes. For more information, please follow other related articles on the PHP Chinese website!

Hot AI Tools

Undresser.AI Undress
AI-powered app for creating realistic nude photos

AI Clothes Remover
Online AI tool for removing clothes from photos.

Undress AI Tool
Undress images for free

Clothoff.io
AI clothes remover

AI Hentai Generator
Generate AI Hentai for free.

Hot Article
Hot Tools

Notepad++7.3.1
Easy-to-use and free code editor

SublimeText3 Chinese version
Chinese version, very easy to use

Zend Studio 13.0.1
Powerful PHP integrated development environment

Dreamweaver CS6
Visual web development tools

SublimeText3 Mac version
God-level code editing software (SublimeText3)
Hot Topics


 How to implement an online speech recognition system using WebSocket and JavaScript
Dec 17, 2023 pm 02:54 PM
How to implement an online speech recognition system using WebSocket and JavaScript
Dec 17, 2023 pm 02:54 PM
How to use WebSocket and JavaScript to implement an online speech recognition system Introduction: With the continuous development of technology, speech recognition technology has become an important part of the field of artificial intelligence. The online speech recognition system based on WebSocket and JavaScript has the characteristics of low latency, real-time and cross-platform, and has become a widely used solution. This article will introduce how to use WebSocket and JavaScript to implement an online speech recognition system.
 WebSocket and JavaScript: key technologies for implementing real-time monitoring systems
Dec 17, 2023 pm 05:30 PM
WebSocket and JavaScript: key technologies for implementing real-time monitoring systems
Dec 17, 2023 pm 05:30 PM
WebSocket and JavaScript: Key technologies for realizing real-time monitoring systems Introduction: With the rapid development of Internet technology, real-time monitoring systems have been widely used in various fields. One of the key technologies to achieve real-time monitoring is the combination of WebSocket and JavaScript. This article will introduce the application of WebSocket and JavaScript in real-time monitoring systems, give code examples, and explain their implementation principles in detail. 1. WebSocket technology
 How to implement an online reservation system using WebSocket and JavaScript
Dec 17, 2023 am 09:39 AM
How to implement an online reservation system using WebSocket and JavaScript
Dec 17, 2023 am 09:39 AM
How to use WebSocket and JavaScript to implement an online reservation system. In today's digital era, more and more businesses and services need to provide online reservation functions. It is crucial to implement an efficient and real-time online reservation system. This article will introduce how to use WebSocket and JavaScript to implement an online reservation system, and provide specific code examples. 1. What is WebSocket? WebSocket is a full-duplex method on a single TCP connection.
 How to use JavaScript and WebSocket to implement a real-time online ordering system
Dec 17, 2023 pm 12:09 PM
How to use JavaScript and WebSocket to implement a real-time online ordering system
Dec 17, 2023 pm 12:09 PM
Introduction to how to use JavaScript and WebSocket to implement a real-time online ordering system: With the popularity of the Internet and the advancement of technology, more and more restaurants have begun to provide online ordering services. In order to implement a real-time online ordering system, we can use JavaScript and WebSocket technology. WebSocket is a full-duplex communication protocol based on the TCP protocol, which can realize real-time two-way communication between the client and the server. In the real-time online ordering system, when the user selects dishes and places an order
 Simple JavaScript Tutorial: How to Get HTTP Status Code
Jan 05, 2024 pm 06:08 PM
Simple JavaScript Tutorial: How to Get HTTP Status Code
Jan 05, 2024 pm 06:08 PM
JavaScript tutorial: How to get HTTP status code, specific code examples are required. Preface: In web development, data interaction with the server is often involved. When communicating with the server, we often need to obtain the returned HTTP status code to determine whether the operation is successful, and perform corresponding processing based on different status codes. This article will teach you how to use JavaScript to obtain HTTP status codes and provide some practical code examples. Using XMLHttpRequest
 JavaScript and WebSocket: Building an efficient real-time weather forecasting system
Dec 17, 2023 pm 05:13 PM
JavaScript and WebSocket: Building an efficient real-time weather forecasting system
Dec 17, 2023 pm 05:13 PM
JavaScript and WebSocket: Building an efficient real-time weather forecast system Introduction: Today, the accuracy of weather forecasts is of great significance to daily life and decision-making. As technology develops, we can provide more accurate and reliable weather forecasts by obtaining weather data in real time. In this article, we will learn how to use JavaScript and WebSocket technology to build an efficient real-time weather forecast system. This article will demonstrate the implementation process through specific code examples. We
 How to get HTTP status code in JavaScript the easy way
Jan 05, 2024 pm 01:37 PM
How to get HTTP status code in JavaScript the easy way
Jan 05, 2024 pm 01:37 PM
Introduction to the method of obtaining HTTP status code in JavaScript: In front-end development, we often need to deal with the interaction with the back-end interface, and HTTP status code is a very important part of it. Understanding and obtaining HTTP status codes helps us better handle the data returned by the interface. This article will introduce how to use JavaScript to obtain HTTP status codes and provide specific code examples. 1. What is HTTP status code? HTTP status code means that when the browser initiates a request to the server, the service
 How to use insertBefore in javascript
Nov 24, 2023 am 11:56 AM
How to use insertBefore in javascript
Nov 24, 2023 am 11:56 AM
Usage: In JavaScript, the insertBefore() method is used to insert a new node in the DOM tree. This method requires two parameters: the new node to be inserted and the reference node (that is, the node where the new node will be inserted).
