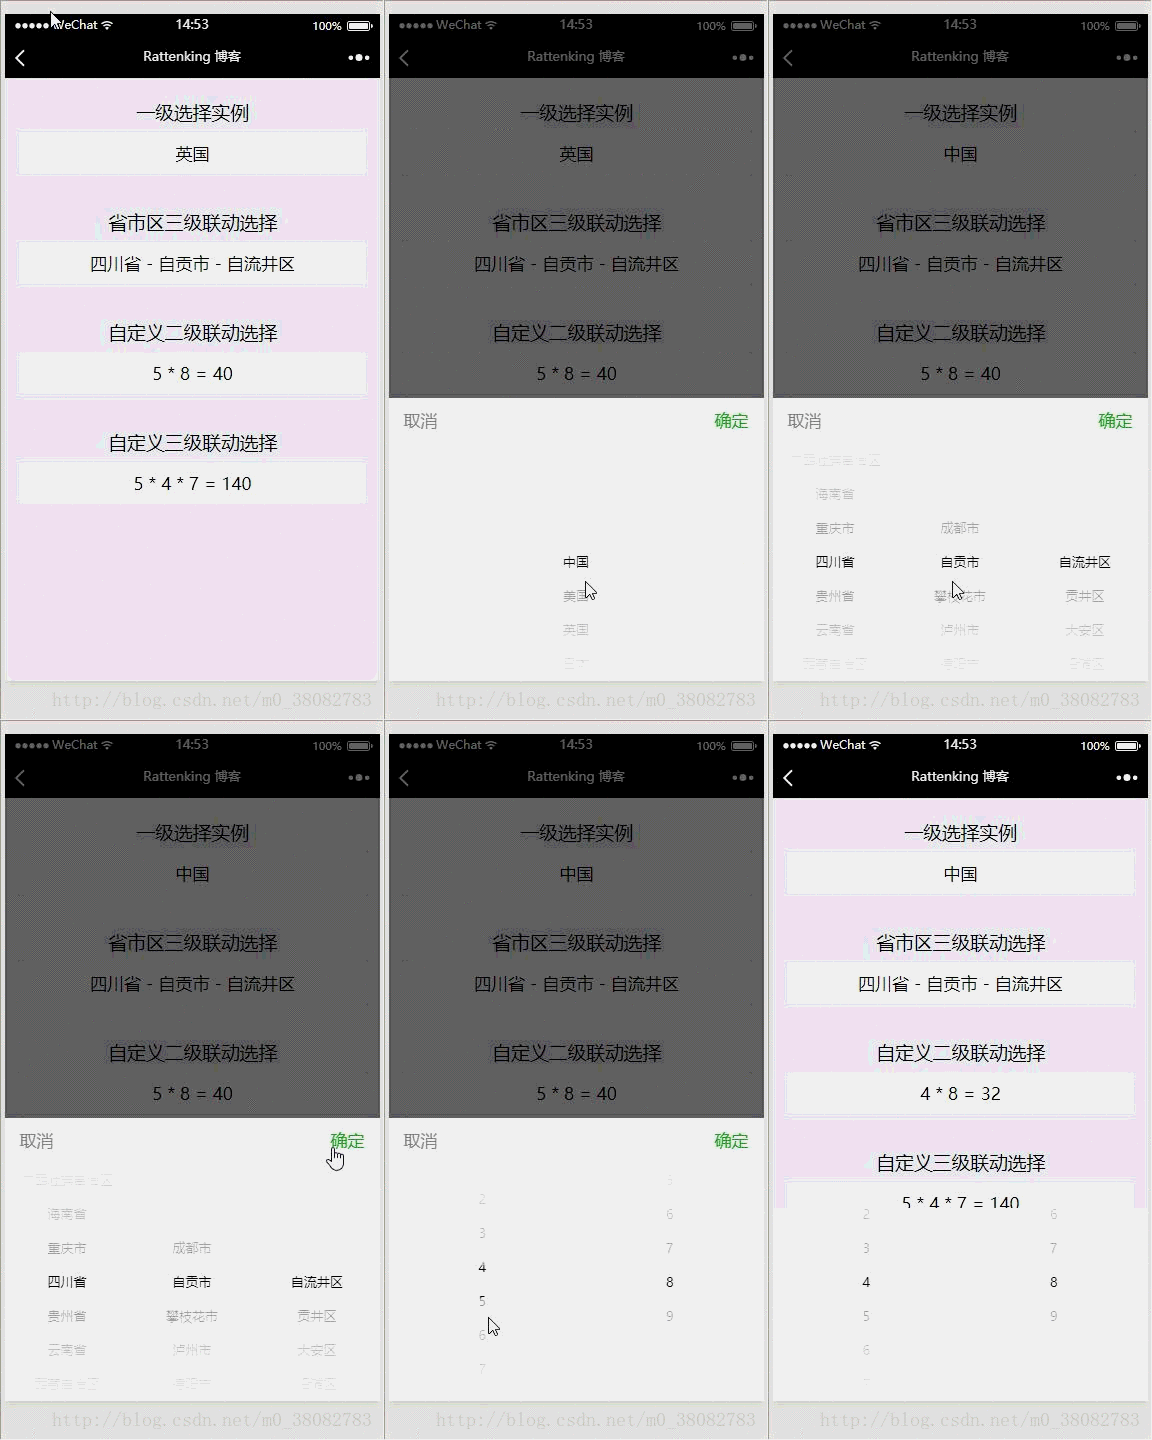
This article mainly shares with you how to use the three-level linkage selector of the WeChat applet. It has certain reference value. Interested friends can refer to it. I hope it can help everyone.
Rendering

Implementation principle
Using the picker component of the WeChat applet , among them:
1, ordinary selector: mode = selector realizes one-level selection instance;
2, province and city selector: mode = region realizes three-level linkage of provinces and cities;
3, multiple columns Selector: mode = multiSelector realizes the multiplication of numbers within 10 in the second-level and third-level linkage.
WXML
<view class="tui-picker-content">
 <view class="tui-picker-name">一级选择实例</view>
 <picker bindchange="changeCountry" value="{{countryIndex}}" range="{{countryList}}">
 <view class="tui-picker-detail">{{countryList[countryIndex]}}</view>
 </picker>
</view>

<view class="tui-picker-content">
 <view class="tui-picker-name">省市区三级联动选择</view>
 <picker bindchange="changeRegin" mode = "region" value="{{region}}">
 <view class="tui-picker-detail">{{region[0]}} - {{region[1]}} - {{region[2]}}</view>
 </picker>
</view>

<view class="tui-picker-content">
 <view class="tui-picker-name">自定义二级联动选择</view>
 <picker bindchange="changeMultiPicker" mode = "multiSelector" value="{{multiIndex}}" range="{{multiArray}}">
 <view class="tui-picker-detail">
 {{multiArray[0][multiIndex[0]]}} * {{multiArray[1][multiIndex[1]]}} = {{multiArray[0][multiIndex[0]] * multiArray[1][multiIndex[1]]}}
 </view>
 </picker>
</view>

<view class="tui-picker-content">
 <view class="tui-picker-name">自定义三级联动选择</view>
 <picker bindchange="changeMultiPicker3" mode = "multiSelector" value="{{multiIndex3}}" range="{{multiArray3}}">
 <view class="tui-picker-detail">
 {{multiArray3[0][multiIndex3[0]]}} * {{multiArray3[1][multiIndex3[1]]}} * {{multiArray3[2][multiIndex3[2]]}} = {{multiArray3[0][multiIndex3[0]] * multiArray3[1][multiIndex3[1]] * multiArray3[2][multiIndex3[2]]}}
 </view>
 </picker>
</view>WXSS
page{background-color: #efeff4;}
.tui-picker-content{
 padding: 30rpx;
 text-align: center;
}
.tui-picker-name{
 height: 80rpx;
 line-height: 80rpx;
}
.tui-picker-detail{
 height: 80rpx;
 line-height: 80rpx;
 background-color: #fff;
 font-size: 35rpx;
 padding: 0 10px;
 overflow: hidden;
}JS
Page({
 data: {
 // 普通选择器列表设置,及初始化
 countryList: ['中国','美国','英国','日本','韩国','巴西','德国'],
 countryIndex: 6,
 // 省市区三级联动初始化
 region: ["四川省", "广元市", "苍溪县"],
 // 多列选择器(二级联动)列表设置,及初始化
 multiArray: [[1, 2, 3, 4, 5, 6, 7, 8, 9], [1, 2, 3, 4, 5, 6, 7, 8, 9]],
 multiIndex: [3,5],
 // 多列选择器(三级联动)列表设置,及初始化
 multiArray3: [[1, 2, 3, 4, 5, 6, 7, 8, 9], [1, 2, 3, 4, 5, 6, 7, 8, 9], [1, 2, 3, 4, 5, 6, 7, 8, 9]],
 multiIndex3: [3, 5, 4]
 },
 // 选择国家函数
 changeCountry(e){
 this.setData({ countryIndex: e.detail.value});
 },
 // 选择省市区函数
 changeRegin(e){
 this.setData({ region: e.detail.value });
 },
 // 选择二级联动
 changeMultiPicker(e) {
 this.setData({multiIndex: e.detail.value})
 },
 // 选择三级联动
 changeMultiPicker3(e) {
 this.setData({ multiIndex3: e.detail.value })
 }
})Summary
1. Thanks to WeChat The picker component of the mini program only provides a separate time picker and date picker. In actual development, we may need to select date and time at the same time. The component is not comprehensive enough, so when making a date picker, you need to pay attention;
2. The method to solve the problem of combining date and time selectors is to use multi-column selectors;
3. Since the data of multi-column selectors uses a two-dimensional array, the linkage effect cannot be directly achieved and the data needs to be judged and processed.
Reasonable use of multi-column selectors can be achieved by the other four selectors provided by the picker component!
Related recommendations:
jQuery three-level linkage effect implementation method
Chosen in jQuery implements three-level linkage function
jQuery uses EasyUi to realize the three-level linkage drop-down box effect example sharing
The above is the detailed content of WeChat applet on how to use the three-level linkage selector. For more information, please follow other related articles on the PHP Chinese website!
 Mini program path acquisition
 How to solve an error in the script of the current page
 Why webstorm cannot run the file
 What does add mean in java?
 git undo submitted commit
 What are the main technologies of firewalls?
 Bitcoin inscription dragon coin
 How to use insert statement in mysql
 Usage of fixed in c language


