

Vue builds multi-page application example code sharing

最近一直在研究使用vue做出来一些东西,但都是SPA的单页面应用,但实际工作中,单页面并不一定符合业务需求,所以这篇我就来说说怎么开发多页面的Vue应用,以及在这个过程会遇到的问题。本文主要和大家介绍用vue构建多页面应用的示例代码,小编觉得挺不错的,现在分享给大家,也给大家做个参考。一起跟随小编过来看看吧,希望能帮助到大家。
这是我放在GitHub上的项目,里面有整个配置文件,可以参看一下:multiple-vue-page
准备工作
在本地用vue-cli新建一个项目,这个步骤vue的官网上有,我就不再说了。
这里有一个地方需要改一下,在执行npm install命令之前,在package.json里添加一个依赖,后面会用到。

修改webpack配置
这里展示一下我的项目目录
├── README.md
├── build
│  ├── build.js
│  ├── check-versions.js
│  ├── dev-client.js
│  ├── dev-server.js
│  ├── utils.js
│  ├── vue-loader.conf.js
│  ├── webpack.base.conf.js
│  ├── webpack.dev.conf.js
│  └── webpack.prod.conf.js
├── config
│  ├── dev.env.js
│  ├── index.js
│  └── prod.env.js
├── package.json
├── src
│  ├── assets
│  │  └── logo.png
│  ├── components
│  │  ├── Hello.vue
│  │  └── cell.vue
│  └── pages
│    ├── cell
│    │  ├── cell.html
│    │  ├── cell.js
│    │  └── cell.vue
│    └── index
│      ├── index.html
│      ├── index.js
│      ├── index.vue
│      └── router
│        └── index.js
└── static
在这一步里我们需要改动的文件都在build文件下,分别是:
utils.js
webpack.base.conf.js
webpack.dev.conf.js
webpack.prod.conf.js
我就按照顺序放出完整的文件内容,然后在做修改或添加的位置用注释符标注出来:
utils.js文件
// utils.js文件

var path = require('path')
var config = require('../config')
var ExtractTextPlugin = require('extract-text-webpack-plugin')

exports.assetsPath = function (_path) {
  var assetsSubDirectory = process.env.NODE_ENV === 'production' ?
    config.build.assetsSubDirectory :
    config.dev.assetsSubDirectory
  return path.posix.join(assetsSubDirectory, _path)
}

exports.cssLoaders = function (options) {
  options = options || {}

  var cssLoader = {
    loader: 'css-loader',
    options: {
      minimize: process.env.NODE_ENV === 'production',
      sourceMap: options.sourceMap
    }
  }

  // generate loader string to be used with extract text plugin
  function generateLoaders(loader, loaderOptions) {
    var loaders = [cssLoader]
    if (loader) {
      loaders.push({
        loader: loader + '-loader',
        options: Object.assign({}, loaderOptions, {
          sourceMap: options.sourceMap
        })
      })
    }

    // Extract CSS when that option is specified
    // (which is the case during production build)
    if (options.extract) {
      return ExtractTextPlugin.extract({
        use: loaders,
        fallback: 'vue-style-loader'
      })
    } else {
      return ['vue-style-loader'].concat(loaders)
    }
  }

  // https://vue-loader.vuejs.org/en/configurations/extract-css.html
  return {
    css: generateLoaders(),
    postcss: generateLoaders(),
    less: generateLoaders('less'),
    sass: generateLoaders('sass', { indentedSyntax: true }),
    scss: generateLoaders('sass'),
    stylus: generateLoaders('stylus'),
    styl: generateLoaders('stylus')
  }
}

// Generate loaders for standalone style files (outside of .vue)
exports.styleLoaders = function (options) {
  var output = []
  var loaders = exports.cssLoaders(options)
  for (var extension in loaders) {
    var loader = loaders[extension]
    output.push({
      test: new RegExp('\\.' + extension + '$'),
      use: loader
    })
  }
  return output
}

/* 这里是添加的部分 ---------------------------- 开始 */

// glob是webpack安装时依赖的一个第三方模块,还模块允许你使用 *等符号, 例如lib/*.js就是获取lib文件夹下的所有js后缀名的文件
var glob = require('glob')
// 页面模板
var HtmlWebpackPlugin = require('html-webpack-plugin')
// 取得相应的页面路径,因为之前的配置,所以是src文件夹下的pages文件夹
var PAGE_PATH = path.resolve(__dirname, '../src/pages')
// 用于做相应的merge处理
var merge = require('webpack-merge')


//多入口配置
// 通过glob模块读取pages文件夹下的所有对应文件夹下的js后缀文件,如果该文件存在
// 那么就作为入口处理
exports.entries = function () {
  var entryFiles = glob.sync(PAGE_PATH + '/*/*.js')
  var map = {}
  entryFiles.forEach((filePath) => {
    var filename = filePath.substring(filePath.lastIndexOf('\/') + 1, filePath.lastIndexOf('.'))
    map[filename] = filePath
  })
  return map
}

//多页面输出配置
// 与上面的多页面入口配置相同,读取pages文件夹下的对应的html后缀文件,然后放入数组中
exports.htmlPlugin = function () {
  let entryHtml = glob.sync(PAGE_PATH + '/*/*.html')
  let arr = []
  entryHtml.forEach((filePath) => {
    let filename = filePath.substring(filePath.lastIndexOf('\/') + 1, filePath.lastIndexOf('.'))
    let conf = {
      // 模板来源
      template: filePath,
      // 文件名称
      filename: filename + '.html',
      // 页面模板需要加对应的js脚本,如果不加这行则每个页面都会引入所有的js脚本
      chunks: ['manifest', 'vendor', filename],
      inject: true
    }
    if (process.env.NODE_ENV === 'production') {
      conf = merge(conf, {
        minify: {
          removeComments: true,
          collapseWhitespace: true,
          removeAttributeQuotes: true
        },
        chunksSortMode: 'dependency'
      })
    }
    arr.push(new HtmlWebpackPlugin(conf))
  })
  return arr
}
/* 这里是添加的部分 ---------------------------- 结束 */webpack.base.conf.js 文件
// webpack.base.conf.js 文件

var path = require('path')
var utils = require('./utils')
var config = require('../config')
var vueLoaderConfig = require('./vue-loader.conf')

function resolve(dir) {
 return path.join(__dirname, '..', dir)
}

module.exports = {
 /* 修改部分 ---------------- 开始 */
 entry: utils.entries(),
 /* 修改部分 ---------------- 结束 */
 output: {
  path: config.build.assetsRoot,
  filename: '[name].js',
  publicPath: process.env.NODE_ENV === 'production' ?
   config.build.assetsPublicPath :
   config.dev.assetsPublicPath
 },
 resolve: {
  extensions: ['.js', '.vue', '.json'],
  alias: {
   'vue$': 'vue/dist/vue.esm.js',
   '@': resolve('src'),
   'pages': resolve('src/pages'),
   'components': resolve('src/components')
  }
 },
 module: {
  rules: [{
   test: /\.vue$/,
   loader: 'vue-loader',
   options: vueLoaderConfig
  },
  {
   test: /\.js$/,
   loader: 'babel-loader',
   include: [resolve('src'), resolve('test')]
  },
  {
   test: /\.(png|jpe?g|gif|svg)(\?.*)?$/,
   loader: 'url-loader',
   options: {
    limit: 10000,
    name: utils.assetsPath('img/[name].[hash:7].[ext]')
   }
  },
  {
   test: /\.(woff2?|eot|ttf|otf)(\?.*)?$/,
   loader: 'url-loader',
   options: {
    limit: 10000,
    name: utils.assetsPath('fonts/[name].[hash:7].[ext]')
   }
  }
  ]
 }
}webpack.dev.conf.js 文件
var utils = require('./utils')
var webpack = require('webpack')
var config = require('../config')
var merge = require('webpack-merge')
var baseWebpackConfig = require('./webpack.base.conf')
var HtmlWebpackPlugin = require('html-webpack-plugin')
var FriendlyErrorsPlugin = require('friendly-errors-webpack-plugin')

// add hot-reload related code to entry chunks
Object.keys(baseWebpackConfig.entry).forEach(function (name) {
 baseWebpackConfig.entry[name] = ['./build/dev-client'].concat(baseWebpackConfig.entry[name])
})

module.exports = merge(baseWebpackConfig, {
 module: {
  rules: utils.styleLoaders({ sourceMap: config.dev.cssSourceMap })
 },
 // cheap-module-eval-source-map is faster for development
 devtool: '#cheap-module-eval-source-map',
 plugins: [
  new webpack.DefinePlugin({
   'process.env': config.dev.env
  }),
  // https://github.com/glenjamin/webpack-hot-middleware#installation--usage
  new webpack.HotModuleReplacementPlugin(),
  new webpack.NoEmitOnErrorsPlugin(),
  // https://github.com/ampedandwired/html-webpack-plugin
  /* 注释这个区域的文件 ------------- 开始 */
  // new HtmlWebpackPlugin({
  //  filename: 'index.html',
  //  template: 'index.html',
  //  inject: true
  // }),
  /* 注释这个区域的文件 ------------- 结束 */
  new FriendlyErrorsPlugin()

  /* 添加 .concat(utils.htmlPlugin()) ------------------ */
 ].concat(utils.htmlPlugin())
})webpack.prod.conf.js 文件
var path = require('path')
var utils = require('./utils')
var webpack = require('webpack')
var config = require('../config')
var merge = require('webpack-merge')
var baseWebpackConfig = require('./webpack.base.conf')
var CopyWebpackPlugin = require('copy-webpack-plugin')
var HtmlWebpackPlugin = require('html-webpack-plugin')
var ExtractTextPlugin = require('extract-text-webpack-plugin')
var OptimizeCSSPlugin = require('optimize-css-assets-webpack-plugin')

var env = config.build.env

var webpackConfig = merge(baseWebpackConfig, {
 module: {
  rules: utils.styleLoaders({
   sourceMap: config.build.productionSourceMap,
   extract: true
  })
 },
 devtool: config.build.productionSourceMap ? '#source-map' : false,
 output: {
  path: config.build.assetsRoot,
  filename: utils.assetsPath('js/[name].[chunkhash].js'),
  chunkFilename: utils.assetsPath('js/[id].[chunkhash].js')
 },
 plugins: [
  // http://vuejs.github.io/vue-loader/en/workflow/production.html
  new webpack.DefinePlugin({
   'process.env': env
  }),
  new webpack.optimize.UglifyJsPlugin({
   compress: {
    warnings: false
   },
   sourceMap: true
  }),
  // extract css into its own file
  new ExtractTextPlugin({
   filename: utils.assetsPath('css/[name].[contenthash].css')
  }),
  // Compress extracted CSS. We are using this plugin so that possible
  // duplicated CSS from different components can be deduped.
  new OptimizeCSSPlugin({
   cssProcessorOptions: {
    safe: true
   }
  }),
  // generate dist index.html with correct asset hash for caching.
  // you can customize output by editing /index.html
  // see https://github.com/ampedandwired/html-webpack-plugin

  /* 注释这个区域的内容 ---------------------- 开始 */
  // new HtmlWebpackPlugin({
  //  filename: config.build.index,
  //  template: 'index.html',
  //  inject: true,
  //  minify: {
  //   removeComments: true,
  //   collapseWhitespace: true,
  //   removeAttributeQuotes: true
  //   // more options:
  //   // https://github.com/kangax/html-minifier#options-quick-reference
  //  },
  //  // necessary to consistently work with multiple chunks via CommonsChunkPlugin
  //  chunksSortMode: 'dependency'
  // }),
  /* 注释这个区域的内容 ---------------------- 结束 */

  // split vendor js into its own file
  new webpack.optimize.CommonsChunkPlugin({
   name: 'vendor',
   minChunks: function (module, count) {
    // any required modules inside node_modules are extracted to vendor
    return (
     module.resource &&
     /\.js$/.test(module.resource) &&
     module.resource.indexOf(
      path.join(__dirname, '../node_modules')
     ) === 0
    )
   }
  }),
  // extract webpack runtime and module manifest to its own file in order to
  // prevent vendor hash from being updated whenever app bundle is updated
  new webpack.optimize.CommonsChunkPlugin({
   name: 'manifest',
   chunks: ['vendor']
  }),
  // copy custom static assets
  new CopyWebpackPlugin([{
   from: path.resolve(__dirname, '../static'),
   to: config.build.assetsSubDirectory,
   ignore: ['.*']
  }])
  /* 该位置添加 .concat(utils.htmlPlugin()) ------------------- */
 ].concat(utils.htmlPlugin())
})

if (config.build.productionGzip) {
 var CompressionWebpackPlugin = require('compression-webpack-plugin')

 webpackConfig.plugins.push(
  new CompressionWebpackPlugin({
   asset: '[path].gz[query]',
   algorithm: 'gzip',
   test: new RegExp(
    '\\.(' +
    config.build.productionGzipExtensions.join('|') +
    ')$'
   ),
   threshold: 10240,
   minRatio: 0.8
  })
 )
}

if (config.build.bundleAnalyzerReport) {
 var BundleAnalyzerPlugin = require('webpack-bundle-analyzer').BundleAnalyzerPlugin
 webpackConfig.plugins.push(new BundleAnalyzerPlugin())
}

module.exports = webpackConfig至此,webpack的配置就结束了。
但是还没完啦,下面继续。
文件结构
├── src
│  ├── assets
│  │  └── logo.png
│  ├── components
│  │  ├── Hello.vue
│  │  └── cell.vue
│  └── pages
│    ├── cell
│    │  ├── cell.html
│    │  ├── cell.js
│    │  └── cell.vue
│    └── index
│      ├── index.html
│      ├── index.js
│      ├── index.vue
│      └── router
│        └── index.js
src就是我所使用的工程文件了,assets,components,pages分别是静态资源文件、组件文件、页面文件。
前两个就不多说,主要是页面文件里,我目前是按照项目的模块分的文件夹,你也可以按照你自己的需求调整。然后在每个模块里又有三个内容:vue文件,js文件和html文件。这三个文件的作用就相当于做spa单页面应用时,根目录的index.html页面模板,src文件下的main.js和app.vue的功能。
原先,入口文件只有一个main.js,但现在由于是多页面,因此入口页面多了,我目前就是两个:index和cell,之后如果打包,就会在dist文件下生成两个HTML文件:index.html和cell.html(可以参考一下单页面应用时,打包只会生成一个index.html,区别在这里)。
cell文件下的三个文件,就是一般模式的配置,参考index的就可以,但并不完全相同。
特别注意的地方
cell.js
在这个文件里,按照写法,应该是这样的吧:
import Vue from 'Vue'
import cell from './cell.vue'
new Vue({
el:'#app',// 这里参考cell.html和cell.vue的根节点id,保持三者一致
teleplate:'<cell/>',
components:{ cell }
})这个配置在运行时(npm run dev)会报错
[Vue warn]: You are using the runtime-only build of Vue where the template compiler is not available. Either pre-compile the templates into render functions, or use the compiler-included build.
(found in
网上的解释是这样的:
运行时构建不包含模板编译器,因此不支持 template 选项,只能用 render 选项,但即使使用运行时构建,在单文件组件中也依然可以写模板,因为单文件组件的模板会在构建时预编译为 render 函数。运行时构建比独立构建要轻量30%,只有 17.14 Kb min+gzip大小。
上面一段是官方api中的解释。就是说,如果我们想使用template,我们不能直接在客户端使用npm install之后的vue。
也给出了相应的修改方案:
resolve: { alias: { 'vue': 'vue/dist/vue.js' } }这里是修改package.json的resolve下的vue的配置,很多人反应这样修改之后就好了,但是我按照这个方法修改之后依然报错。然后我就想到上面提到的render函数,因此我的修改是针对cell.js文件的。
import Vue from 'Vue'
import cell from './cell.vue'

/* eslint-disable no-new */
new Vue({
 el: '#app',
 render: h => h(cell)
})这里面我用render函数取代了组件的写法,在运行就没问题了。
页面跳转
既然是多页面,肯定涉及页面之间的互相跳转,就按照我这个项目举例,从index.html文件点击a标签跳转到cell.html。
我最开始写的是:
<!-- index.html --> <a href='../cell/cell.html'></a>
但这样写,不论是在开发环境还是最后测试,都会报404,找不到这个页面。
改成这样既可:
<!-- index.html --> <a href='cell.html'></a>
这样他就会自己找cell.html这个文件。
打包后的资源路径
执行npm run build之后,打开相应的html文件你是看不到任何东西的,查看原因是找不到相应的js文件和css文件。
这时候的文件结构是这样的:
├── dist
│  ├── js
│  ├── css
│  ├── index.html
│  └── cell.html
查看index.html文件之后会发现资源的引用路径是:
/dist/js.........
这样,如果你的dist文件不是在根目录下的,就根本找不到资源。
方法当然也有啦,如果你不嫌麻烦,就一个文件一个文件的修改路径咯,或者像我一样偷懒,修改config下的index.js文件。具体的做法是:
build: {
  env: require('./prod.env'),
  index: path.resolve(__dirname, '../dist/index.html'),
  assetsRoot: path.resolve(__dirname, '../dist'),
  assetsSubDirectory: 'static',
  assetsPublicPath: '/',
  productionSourceMap: true,
  // Gzip off by default as many popular static hosts such as
  // Surge or Netlify already gzip all static assets for you.
  // Before setting to `true`, make sure to:
  // npm install --save-dev compression-webpack-plugin
  productionGzip: false,
  productionGzipExtensions: ['js', 'css'],
  // Run the build command with an extra argument to
  // View the bundle analyzer report after build finishes:
  // `npm run build --report`
  // Set to `true` or `false` to always turn it on or off
  bundleAnalyzerReport: process.env.npm_config_report
},将这里面的
assetsPublicPath: '/',
改成
assetsPublicPath: './',
酱紫,配置文件资源的时候找到的就是相对路径下的资源了,在重新npm run build看看吧。
相关推荐:
用Storyboard构建标签栏多页面应用程序UI_html/css_WEB-ITnose
The above is the detailed content of Vue builds multi-page application example code sharing. For more information, please follow other related articles on the PHP Chinese website!

Hot AI Tools

Undresser.AI Undress
AI-powered app for creating realistic nude photos

AI Clothes Remover
Online AI tool for removing clothes from photos.

Undress AI Tool
Undress images for free

Clothoff.io
AI clothes remover

Video Face Swap
Swap faces in any video effortlessly with our completely free AI face swap tool!

Hot Article
Hot Tools

Notepad++7.3.1
Easy-to-use and free code editor

SublimeText3 Chinese version
Chinese version, very easy to use

Zend Studio 13.0.1
Powerful PHP integrated development environment

Dreamweaver CS6
Visual web development tools

SublimeText3 Mac version
God-level code editing software (SublimeText3)
Hot Topics
 1386
1386
 52
52

 How to Undo Delete from Home Screen in iPhone
Apr 17, 2024 pm 07:37 PM
How to Undo Delete from Home Screen in iPhone
Apr 17, 2024 pm 07:37 PM
Deleted something important from your home screen and trying to get it back? You can put app icons back on the screen in a variety of ways. We have discussed all the methods you can follow and put the app icon back on the home screen. How to Undo Remove from Home Screen in iPhone As we mentioned before, there are several ways to restore this change on iPhone. Method 1 – Replace App Icon in App Library You can place an app icon on your home screen directly from the App Library. Step 1 – Swipe sideways to find all apps in the app library. Step 2 – Find the app icon you deleted earlier. Step 3 – Simply drag the app icon from the main library to the correct location on the home screen. This is the application diagram
 The role and practical application of arrow symbols in PHP
Mar 22, 2024 am 11:30 AM
The role and practical application of arrow symbols in PHP
Mar 22, 2024 am 11:30 AM
The role and practical application of arrow symbols in PHP In PHP, the arrow symbol (->) is usually used to access the properties and methods of objects. Objects are one of the basic concepts of object-oriented programming (OOP) in PHP. In actual development, arrow symbols play an important role in operating objects. This article will introduce the role and practical application of arrow symbols, and provide specific code examples to help readers better understand. 1. The role of the arrow symbol to access the properties of an object. The arrow symbol can be used to access the properties of an object. When we instantiate a pair
 From beginner to proficient: Explore various application scenarios of Linux tee command
Mar 20, 2024 am 10:00 AM
From beginner to proficient: Explore various application scenarios of Linux tee command
Mar 20, 2024 am 10:00 AM
The Linuxtee command is a very useful command line tool that can write output to a file or send output to another command without affecting existing output. In this article, we will explore in depth the various application scenarios of the Linuxtee command, from entry to proficiency. 1. Basic usage First, let’s take a look at the basic usage of the tee command. The syntax of tee command is as follows: tee[OPTION]...[FILE]...This command will read data from standard input and save the data to
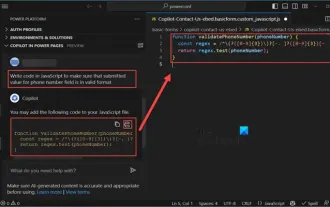 How to use Copilot to generate code
Mar 23, 2024 am 10:41 AM
How to use Copilot to generate code
Mar 23, 2024 am 10:41 AM
As a programmer, I get excited about tools that simplify the coding experience. With the help of artificial intelligence tools, we can generate demo code and make necessary modifications as per the requirement. The newly introduced Copilot tool in Visual Studio Code allows us to create AI-generated code with natural language chat interactions. By explaining functionality, we can better understand the meaning of existing code. How to use Copilot to generate code? To get started, we first need to get the latest PowerPlatformTools extension. To achieve this, you need to go to the extension page, search for "PowerPlatformTool" and click the Install button
 Create and run Linux ".a" files
Mar 20, 2024 pm 04:46 PM
Create and run Linux ".a" files
Mar 20, 2024 pm 04:46 PM
Working with files in the Linux operating system requires the use of various commands and techniques that enable developers to efficiently create and execute files, code, programs, scripts, and other things. In the Linux environment, files with the extension ".a" have great importance as static libraries. These libraries play an important role in software development, allowing developers to efficiently manage and share common functionality across multiple programs. For effective software development in a Linux environment, it is crucial to understand how to create and run ".a" files. This article will introduce how to comprehensively install and configure the Linux ".a" file. Let's explore the definition, purpose, structure, and methods of creating and executing the Linux ".a" file. What is L
 Tsinghua University and Zhipu AI open source GLM-4: launching a new revolution in natural language processing
Jun 12, 2024 pm 08:38 PM
Tsinghua University and Zhipu AI open source GLM-4: launching a new revolution in natural language processing
Jun 12, 2024 pm 08:38 PM
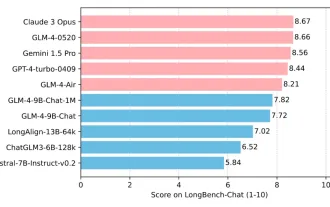
Since the launch of ChatGLM-6B on March 14, 2023, the GLM series models have received widespread attention and recognition. Especially after ChatGLM3-6B was open sourced, developers are full of expectations for the fourth-generation model launched by Zhipu AI. This expectation has finally been fully satisfied with the release of GLM-4-9B. The birth of GLM-4-9B In order to give small models (10B and below) more powerful capabilities, the GLM technical team launched this new fourth-generation GLM series open source model: GLM-4-9B after nearly half a year of exploration. This model greatly compresses the model size while ensuring accuracy, and has faster inference speed and higher efficiency. The GLM technical team’s exploration has not
 Explore the advantages and application scenarios of Go language
Mar 27, 2024 pm 03:48 PM
Explore the advantages and application scenarios of Go language
Mar 27, 2024 pm 03:48 PM
The Go language is an open source programming language developed by Google and first released in 2007. It is designed to be a simple, easy-to-learn, efficient, and highly concurrency language, and is favored by more and more developers. This article will explore the advantages of Go language, introduce some application scenarios suitable for Go language, and give specific code examples. Advantages: Strong concurrency: Go language has built-in support for lightweight threads-goroutine, which can easily implement concurrent programming. Goroutin can be started by using the go keyword
 Create Agent in one sentence! Robin Li: The era is coming when everyone is a developer
Apr 17, 2024 pm 02:28 PM
Create Agent in one sentence! Robin Li: The era is coming when everyone is a developer
Apr 17, 2024 pm 02:28 PM
The big model subverts everything, and finally got to the head of this editor. It is also an Agent that was created in just one sentence. Like this, give him an article, and in less than 1 second, fresh title suggestions will come out. Compared to me, this efficiency can only be said to be as fast as lightning and as slow as a sloth... What's even more incredible is that creating this Agent really only takes a few minutes. Prompt belongs to Aunt Jiang: And if you also want to experience this subversive feeling, now, based on the new Wenxin intelligent agent platform launched by Baidu, everyone can create their own intelligent assistant for free. You can use search engines, smart hardware platforms, speech recognition, maps, cars and other Baidu mobile ecological channels to let more people use your creativity! Robin Li himself
