

How to make a 'dot' border appear after clicking a button
This time I will show you how to make the button appear with a "dot" border after clicking it, and what are the precautions , the following are Let’s take a look at practical cases.
// A
input  {
  outline: none;
}
// B
Input::-moz-focus-inner {
  border:  none;
}
//加了ouline没用,别死磕,重启I believe you have mastered the methods after reading these cases. For more exciting information, please pay attention to other related articles on the php Chinese website!
Related reading:
How to upload files asynchronously in html
How to set the border and transparency style of Div
The element margin-top in the div tagInvalid solution
The above is the detailed content of How to make a 'dot' border appear after clicking a button. For more information, please follow other related articles on the PHP Chinese website!

Hot AI Tools

Undresser.AI Undress
AI-powered app for creating realistic nude photos

AI Clothes Remover
Online AI tool for removing clothes from photos.

Undress AI Tool
Undress images for free

Clothoff.io
AI clothes remover

AI Hentai Generator
Generate AI Hentai for free.

Hot Article
Hot Tools

Notepad++7.3.1
Easy-to-use and free code editor

SublimeText3 Chinese version
Chinese version, very easy to use

Zend Studio 13.0.1
Powerful PHP integrated development environment

Dreamweaver CS6
Visual web development tools

SublimeText3 Mac version
God-level code editing software (SublimeText3)
Hot Topics
 1378
1378
 52
52

 How to adjust window border settings on Windows 11: Change color and size
Sep 22, 2023 am 11:37 AM
How to adjust window border settings on Windows 11: Change color and size
Sep 22, 2023 am 11:37 AM
Windows 11 brings fresh and elegant design to the forefront; the modern interface allows you to personalize and change the finest details, such as window borders. In this guide, we'll discuss step-by-step instructions to help you create an environment that reflects your style in the Windows operating system. How to change window border settings? Press + to open the Settings app. WindowsI go to Personalization and click Color Settings. Color Change Window Borders Settings Window 11" Width="643" Height="500" > Find the Show accent color on title bar and window borders option, and toggle the switch next to it. To display accent colors on the Start menu and taskbar To display the theme color on the Start menu and taskbar, turn on Show theme on the Start menu and taskbar
 How to set multiple timers on iPhone iOS 17
Sep 18, 2023 am 09:01 AM
How to set multiple timers on iPhone iOS 17
Sep 18, 2023 am 09:01 AM
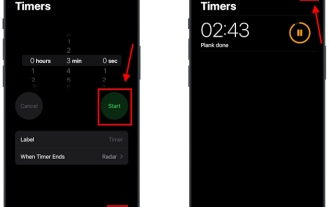
In iOS 17, you can set multiple timers on your iPhone using the Clock app, or use Siri to set it hands-free. We discuss both in this article. Let's take a look at them. Set Multiple Timers on iPhone Using the Clock App Open the Clock app on your iPhone and tap the Timers tab in the lower right corner. Now, set the hours, minutes, and seconds. You can use the "Label" and "When does the timer end" options to set a name for the timer and a preferred tone when the timer completes. This will help you differentiate between timers. Once done, click the "Start" button. Then, click the "+" icon in the upper right corner. Now, repeat the above steps to set multiple timers on iPhone. You can also browse
 How to Make a Shopping List in the iOS 17 Reminders App on iPhone
Sep 21, 2023 pm 06:41 PM
How to Make a Shopping List in the iOS 17 Reminders App on iPhone
Sep 21, 2023 pm 06:41 PM
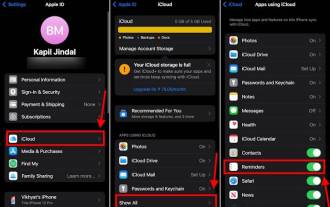
How to Make a GroceryList on iPhone in iOS17 Creating a GroceryList in the Reminders app is very simple. You just add a list and populate it with your items. The app automatically sorts your items into categories, and you can even work with your partner or flat partner to make a list of what you need to buy from the store. Here are the full steps to do this: Step 1: Turn on iCloud Reminders As strange as it sounds, Apple says you need to enable reminders from iCloud to create a GroceryList on iOS17. Here are the steps for it: Go to the Settings app on your iPhone and tap [your name]. Next, select i
![How to set up my business card in Contacts on iPhone [2023]](https://img.php.cn/upload/article/000/465/014/169538863364905.jpg?x-oss-process=image/resize,m_fill,h_207,w_330) How to set up my business card in Contacts on iPhone [2023]
Sep 22, 2023 pm 09:17 PM
How to set up my business card in Contacts on iPhone [2023]
Sep 22, 2023 pm 09:17 PM
With My Business Cards in iOS, you can create a personalized contact card that Siri and other services recognize and associate with you and your phone number. With the introduction of contact posters in iOS17, My Cards becomes very important as it is now used to create your contact posters. If you're eager to get your contact poster up and running, you have to start by setting up My Business Card. We'll walk through how to create a My Business Card and how to make it work smoothly with Siri and your contact poster. How to Set Up My Business Cards in Contacts on iPhone [2023] If you are setting up My Business Cards on your iPhone for the first time, you must do it through the Contacts app only
![How to turn off alarms on iPhone [2023]](https://img.php.cn/upload/article/000/465/014/169259550735100.png?x-oss-process=image/resize,m_fill,h_207,w_330) How to turn off alarms on iPhone [2023]
Aug 21, 2023 pm 01:25 PM
How to turn off alarms on iPhone [2023]
Aug 21, 2023 pm 01:25 PM
Since the advent of smartphones, they have undoubtedly replaced alarm clocks. If you own an iPhone, you can use the Clock app to easily set as many alarms for multiple occasions throughout the day. The app lets you configure the alarm time, the tone, how often it repeats, and whether you want to delay them using the Snooze option. If you want to turn off the alarm you have set, the following post should help you disable and delete regular alarms and wake-up alarms on your iPhone. How to Turn Off a Regular Alarm on iPhone By default, when you add an alarm on the Clock app or ask Siri to add an alarm for you, you're actually creating a regular alarm. You can create as many alarm clocks on your iPhone as you like and put them
 How to change contact photos on iPhone
Jun 08, 2023 pm 03:44 PM
How to change contact photos on iPhone
Jun 08, 2023 pm 03:44 PM
iOS17 is finally here, and it includes a lot of new features. Let's learn how to change contact photos on iPhone in today's tutorial. Apple's recent WWDC 2023 event unveiled a slew of exciting products and upcoming software updates. One of the notable features of iOS 17 is the option to customize your contact photos and posters, providing a unique way to greet others when they receive a call from you on their iPhone. This innovative feature for iOS is designed to make phone calls more personal and user-friendly, allowing you to choose how they appear on the recipient's screen. If you're eager to get your hands on this new feature and greet your loved ones in a personalized way when making calls, here's how to add it to your iPhone
 How to make custom borders in Microsoft Word
Nov 18, 2023 pm 11:17 PM
How to make custom borders in Microsoft Word
Nov 18, 2023 pm 11:17 PM
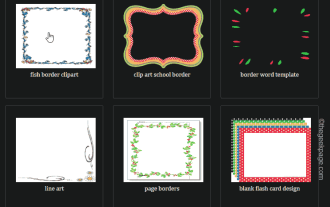
Want to make the front page of your school project look exciting? Nothing makes it stand out from other submissions like a nice, elegant border on the homepage of your workbook. However, the standard single-line borders in Microsoft Word have become very obvious and boring. Therefore, we show you the steps to create and use custom borders in Microsoft Word documents. How to Make Custom Borders in Microsoft Word Creating custom borders is very easy. However, you will need a boundary. Step 1 – Download Custom Borders There are tons of free borders on the internet. We have downloaded a border like this. Step 1 – Search the Internet for custom borders. Alternatively, you can go to clipping
 Popular science on how to set excel borders
Mar 20, 2024 am 10:30 AM
Popular science on how to set excel borders
Mar 20, 2024 am 10:30 AM
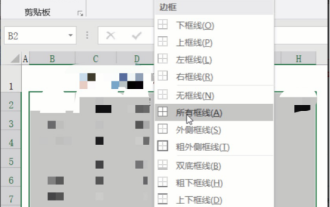
It is not uncommon for Excel to appear in our daily work and life. Whether it is the production of employee information, salary tables, or student enrollment information and transcripts, Excel is a relatively easy-to-use tool. When printing Excel, you need to set borders to meet printing requirements. In this article, the editor will introduce you to several ways to set Excel borders. Method 1. Use the function tab button. This should be a method often used by everyone. It is convenient and fast. The specific operation: select the cell area B2:H10 where you need to add a border, click the [Start] tab - [Border] drop-down on the right Button-[All Frames] to complete adding frames. Method 2. Select the cell area B2:H10 where you want to add a border.
