

Vue+webpack basic configuration sharing

I am learning webpack recently, and I am following the course to create a single-page application. I will record it here. This part mainly talks about how to configure the webpack environment and the configuration of webpack dev. The record is rough and will be updated later. This article mainly introduces you to the basic configuration tutorial of the Vue+webpack project. Friends who need it can refer to it. I hope it can help you.
1. Development environment: vscode, node.js, vue.js, webpack
If you want to install node.js yourself, you can refer to the novice tutorial
The IDE used is VScode
2. Project initialization
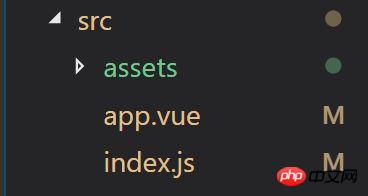
Shortcut key ctrl+` to open the vscode console

vscode interface
2.1 Install webpack vue vue-loader
npm init
npm i webpack vue vue-loader
npm warns you that you need dependencies, follow the prompts to install

warn
Install the corresponding loader
npm i css-loader vue-template-compiler
2.2 Configure webpack to load app.vue File
First create the src folder, and create app.vue as the main code file under it, and index.js as the entry file.
Basic file
The content of the app.vue file is as follows:
<template>
<p id="text">{{text}}</p>
</template>
<script>
export default{
data(){
return {
text: 'abc'
}
}
}
</script>
<style>
#test{
color: red;
}
</style>In
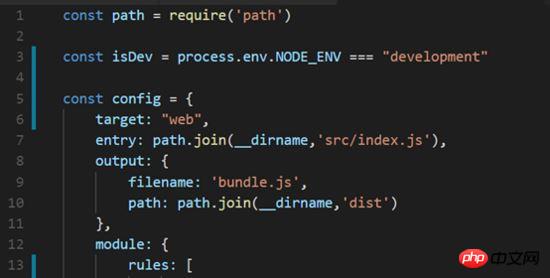
Create the webpack.config.js file in the same directory as src, configure the entry, and output the output
Create the package.json file and webpack .config.js file
//webpack.config.js
const path = require('path')
module.exports = {
 entry: path.join(__dirname,'src/index.js'), //调用Index.js作为入口文件
 output: { //打包完的js文件会在bundle.js中,这个文件待会会自动生成的
 filename: 'bundle.js',
 path: path.join(__dirname,'dist') //用来存放bundle.js文件的地址,自己定义
 },
 module: {
 rules: [{
  test: /.vue$/,
  loader: 'vue-loader'
 }]
 }
}index.js file as the entry
//index.js
import Vue from 'vue'
import App from './app.vue'
const root = document.createElement('p')
document.body.appendChild(root)
new Vue({
 render: (h) => h(App)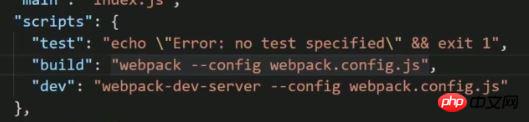
}).$mount(root)Configuration package.json file scripts command, add build
"scripts": {
 "test": "echo \"Error: no test specified\" && exit 1",
 "build": "webpack --config webpack.config.js"
},Enter the npm run build command in the console to package, as shown in the figure after successful packaging
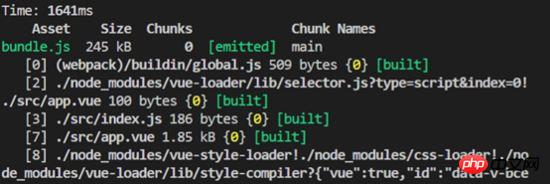
After webpack packaging is completed
2.3 Configure webpack to load non-Js files
Webpack.config.js file specific configuration
Module in webpack.config.js: Add rules:[] in the {} module to set the file types that webpack needs to recognize. The vue file type has been set before, so you need to add css/images.
//webpack.config.js
module: {
 rules: [
 {
 test: /.vue$/,
 loader: 'vue-loader'
 },
 {
 test: /.css$/,
 use:[
 'style-loader',
 'css-loader'
 ]
 },
 {
 test: /\.(gif|jpg|png|svg)$/,
 use: [{
  loader: 'url-loader',
  options: {
  limit: 1024,
  name:'[name].[ext]'
  }
 }]
 }
]
}Execute the command in the console and install the corresponding loader
##
npm i style-loader css-loader url-loader file-loader

Import these non-js files in Index.js.
//index.js
import Vue from 'vue'
import App from './app.vue'
import './assets/styles/test.css' //import css文件
import './assets/images/0.jpg' //import 图片
const root = document.createElement('p')
document.body.appendChild(root)
new Vue({
 render: (h) => h(App)
}).$mount(root)npm run build on the console to test the results.
//webpack.config.js
  {
  test:/.styl$/,
  use: [
   'style-loader',
   'css-loader',
   'stylus-loader'
  ]
}npm i style-loader stylus-loader
npm run build on the console to test the results.
npm i webpack-dev-server

因为在windows和mac环境下的命令会不同,这里安装cross-env 包,使得在不同开发环境下命令相同。
npm i cross-env
再次修改package.json文件,在“build:”和“dev:"行添加dev命令
cross-env NODE_ENV=development 后面不变

package.json文件build
然后,在webpack.config.js文件中进行判断。
首先,配置config.devServer
webpack2之后就可以直接用config.devServer进行配置了。
更改文件头部几行代码
在文件的最后加上如下代码
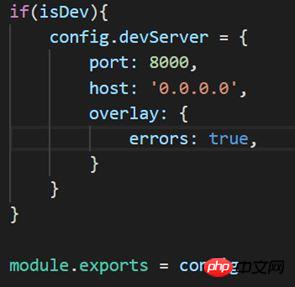
config.devServer
注意:
host:'0.0.0.0'不要直接写localhost,这样别人的电脑就访问不了了;port不要被占用,不然会打不开
最后.安装html-webpack-plugin插件使得html可以作为入口,自动包含JS
npm i html-webpack-plugin
修改webpack.config.js文件
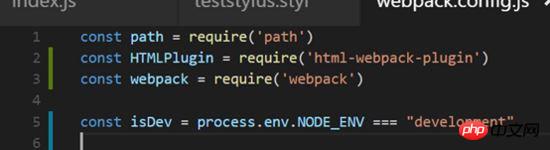
config.js

config.js
至此,dev配置基本完成
控制台执行 npm run dev
npm run dev
打包成功的话就可以在浏览器中查看效果了,
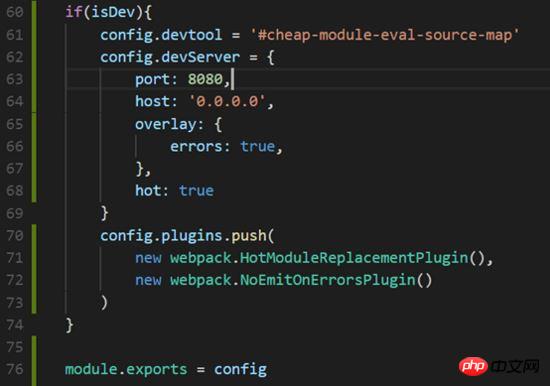
如果出现错误,根据提示修改,注意端口是否占用。我的8000端口占用了,后来用了8080端口就好了
浏览器访问:localhost:8080,可以查看渲染效果。恩,背景图0.jpg是我爱豆23333。笔芯。注意左上角有红色的abc。

浏览器效果
2.6最后还有一些东西要加在config.js中
最后还要加一些东西
1) historyFallback:{}
因为我们做的是单页应用,所以要加一下地址映射到入口index.html,这个先忽略
2) 热加载功能。
hot功能,可以实现局部渲染:比如你改了一个组件的代码,页面只重新渲染这个组件而不是整个页面进行渲染,不需要进行刷新操作。
3) 一些插件
webpack.HotModuleReplacementPlugin()启动hot功能
webpack.NoEmitOnErrorsPlugin()去除一些不必要的信息
4) 浏览器调试代码功能的工具
在浏览器中调试的时候,代码不会转码。
config.devtool = “#cheap-module-evel-source-map”
最后配置完成后,重新npm run dev一次
npm run dev
成功之后,可以在浏览器中测试热加载效果,修改app.vue文件中的text的内容,就可以看到左上角那个红色的字在变了emmmm
//app.vue
<template>
<p id="text">{{text}}</p>
</template>
<script>
export default{
data(){
return {
text: 'abc' //打开浏览器,然后直接改这里就可以实时看到文字变化效果了。
}
}
}
</script>
<style>
#test{
color: red;
}
</style>相关推荐:
The above is the detailed content of Vue+webpack basic configuration sharing. For more information, please follow other related articles on the PHP Chinese website!

Hot AI Tools

Undresser.AI Undress
AI-powered app for creating realistic nude photos

AI Clothes Remover
Online AI tool for removing clothes from photos.

Undress AI Tool
Undress images for free

Clothoff.io
AI clothes remover

Video Face Swap
Swap faces in any video effortlessly with our completely free AI face swap tool!

Hot Article
Hot Tools

Notepad++7.3.1
Easy-to-use and free code editor

SublimeText3 Chinese version
Chinese version, very easy to use

Zend Studio 13.0.1
Powerful PHP integrated development environment

Dreamweaver CS6
Visual web development tools

SublimeText3 Mac version
God-level code editing software (SublimeText3)
Hot Topics
 1389
1389
 52
52

 How to share Quark Netdisk to Baidu Netdisk?
Mar 14, 2024 pm 04:40 PM
How to share Quark Netdisk to Baidu Netdisk?
Mar 14, 2024 pm 04:40 PM
Quark Netdisk and Baidu Netdisk are very convenient storage tools. Many users are asking whether these two softwares are interoperable? How to share Quark Netdisk to Baidu Netdisk? Let this site introduce to users in detail how to save Quark network disk files to Baidu network disk. How to save files from Quark Network Disk to Baidu Network Disk Method 1. If you want to know how to transfer files from Quark Network Disk to Baidu Network Disk, first download the files that need to be saved on Quark Network Disk, and then open the Baidu Network Disk client. , select the folder where the compressed file is to be saved, and double-click to open the folder. 2. After opening the folder, click "Upload" in the upper left corner of the window. 3. Find the compressed file that needs to be uploaded on your computer and click to select it.
 How to share NetEase Cloud Music to WeChat Moments_Tutorial on sharing NetEase Cloud Music to WeChat Moments
Mar 25, 2024 am 11:41 AM
How to share NetEase Cloud Music to WeChat Moments_Tutorial on sharing NetEase Cloud Music to WeChat Moments
Mar 25, 2024 am 11:41 AM
1. First, we enter NetEase Cloud Music, and then click on the software homepage interface to enter the song playback interface. 2. Then in the song playback interface, find the sharing function button in the upper right corner, as shown in the red box in the figure below, click to select the sharing channel; in the sharing channel, click the "Share to" option at the bottom, and then select the first "WeChat Moments" allows you to share content to WeChat Moments.
 How to share files with friends on Baidu Netdisk
Mar 25, 2024 pm 06:52 PM
How to share files with friends on Baidu Netdisk
Mar 25, 2024 pm 06:52 PM
Recently, Baidu Netdisk Android client has ushered in a new version 8.0.0. This version not only brings many changes, but also adds many practical functions. Among them, the most eye-catching is the enhancement of the folder sharing function. Now, users can easily invite friends to join and share important files in work and life, achieving more convenient collaboration and sharing. So how do you share the files you need to share with your friends? Below, the editor of this site will give you a detailed introduction. I hope it can help you! 1) Open Baidu Cloud APP, first click to select the relevant folder on the homepage, and then click the [...] icon in the upper right corner of the interface; (as shown below) 2) Then click [+] in the "Shared Members" column 】, and finally check all
 Mango tv member account sharing 2023
Feb 07, 2024 pm 02:27 PM
Mango tv member account sharing 2023
Feb 07, 2024 pm 02:27 PM
Mango TV has various types of movies, TV series, variety shows and other resources, and users can freely choose to watch them. Mango TV members can not only watch all VIP dramas, but also set the highest definition picture quality to help users watch dramas happily. Below, the editor will bring you some free Mango TV membership accounts for users to use, hurry up and take a look Take a look. Mango TV latest member account free sharing 2023: Note: These are the latest member accounts collected, you can log in directly and use them, do not change the password at will. Account number: 13842025699 Password: qds373 Account number: 15804882888 Password: evr6982 Account number: 13330925667 Password: jgqae Account number: 1703
 Solve the problem that Discuz WeChat sharing cannot be displayed
Mar 09, 2024 pm 03:39 PM
Solve the problem that Discuz WeChat sharing cannot be displayed
Mar 09, 2024 pm 03:39 PM
Title: To solve the problem that Discuz WeChat shares cannot be displayed, specific code examples are needed. With the development of the mobile Internet, WeChat has become an indispensable part of people's daily lives. In website development, in order to improve user experience and expand website exposure, many websites will integrate WeChat sharing functions, allowing users to easily share website content to Moments or WeChat groups. However, sometimes when using open source forum systems such as Discuz, you will encounter the problem that WeChat shares cannot be displayed, which brings certain difficulties to the user experience.
 What are web standards?
Oct 18, 2023 pm 05:24 PM
What are web standards?
Oct 18, 2023 pm 05:24 PM
Web standards are a set of specifications and guidelines developed by W3C and other related organizations. It includes standardization of HTML, CSS, JavaScript, DOM, Web accessibility and performance optimization. By following these standards, the compatibility of pages can be improved. , accessibility, maintainability and performance. The goal of web standards is to enable web content to be displayed and interacted consistently on different platforms, browsers and devices, providing better user experience and development efficiency.
 How to enable administrative access from the cockpit web UI
Mar 20, 2024 pm 06:56 PM
How to enable administrative access from the cockpit web UI
Mar 20, 2024 pm 06:56 PM
Cockpit is a web-based graphical interface for Linux servers. It is mainly intended to make managing Linux servers easier for new/expert users. In this article, we will discuss Cockpit access modes and how to switch administrative access to Cockpit from CockpitWebUI. Content Topics: Cockpit Entry Modes Finding the Current Cockpit Access Mode Enable Administrative Access for Cockpit from CockpitWebUI Disabling Administrative Access for Cockpit from CockpitWebUI Conclusion Cockpit Entry Modes The cockpit has two access modes: Restricted Access: This is the default for the cockpit access mode. In this access mode you cannot access the web user from the cockpit
 Share two installation methods for HP printer drivers
Mar 13, 2024 pm 05:16 PM
Share two installation methods for HP printer drivers
Mar 13, 2024 pm 05:16 PM
HP printers are essential printing equipment in many offices. Installing the printer driver on the computer can perfectly solve problems such as the printer being unable to connect. So how to install HP printer driver? The editor below will introduce you to two HP printer driver installation methods. The first method: download the driver from the official website 1. Search the HP China official website in the search engine, and in the support column, select [Software and Drivers]. 2. Select the [Printer] category, enter your printer model in the search box, and click [Submit] to find your printer driver. 3. Select the corresponding printer according to your computer system. For win10, select the driver for win10 system. 4. After downloading successfully, find it in the folder
