

yii2-wx installation and upgrade

The main reason for doing this extension is that there is no mature and maintained WeChat SDK under the yii2 framework so far, and as every back-end person, you may not be able to bypass WeChat development. Therefore, in 2017, PHP Academy opened a course called "Constructing an Open Source WeChat SDK" and promised to open source this extension after the course is completed. It is the predecessor of yii2-wx.
Of course, yii2-wx at this moment has more powerful functions. In addition to supporting the WeChat public account interface, it also supports WeChat applet, open platform (open in subsequent versions), etc.
yii2-wx hosting platform
Use Composer to install
You can use composer to automatically install and upgrade, Beige also recommends you do this .
<span style="font-size: 14px;">composer require "abei2017/yii2-wx"<br></span>
If there is a problem with composer, please add the -vvv parameter later so that you can see the specific error message.
<span style="font-size: 14px;">composer require "abei2017/yii2-wx" -vvv<br></span>
After successful installation, yii2-wx will be stored in the vendor/abei2017 folder of the program.
Manual installation
It doesn’t matter if composer cannot be used in your environment. You can enter the download page to download the corresponding version and deploy it manually. The steps are as follows :
Extract the installation package and place it in a certain directory of the program (for example, create a new ext folder)
Open the config/web.php file of yii2 and add an alias
<span style="font-size: 14px;">'aliases' => [<br> 'abei2017/wx' => '@app/ext/yii2-wx/src',<br>],<br></span>
Reminder: The alias and component are at the same level, do not put them wrong. The main purpose of using aliases is for normal reference.
Directory structure
Whether it is automatic installation or manual installation, the directory structure of yii2-wx is the same, as follows
<span style="font-size: 14px;">yii2-wx<br>- src<br>-- core //核心文件<br>-- helpers //帮助文件<br>-- mini //小程序接口<br>-- mp //公众号接口<br>-- Application.php //入口文件<br>- composer.json<br>- README.md<br></span>
Configuration
Follow the above steps and you have successfully installed yii2-wx into your yii2 program. We need to configure it before using it. Down.
<span style="font-size: 14px;">'wx'=>[<br> // 公众号信息<br> 'mp'=>[<br> /**<br> * 账号基本信息,请从微信公众平台<br> */<br> 'app_id' => '', // AppID<br> 'secret' => '', // AppSecret<br> 'token' => '', // Token<br> 'encodingAESKey'=>'',<br> 'safeMode'=>0<br><br> 'payment'=>[<br> 'mch_id' => '',<br> 'key' => '',<br> 'notify_url' => '',<br> 'cert_path' => '', // XXX: 绝对路径!!!!<br> 'key_path' => '', // XXX: 绝对路径!!!!<br> ],<br><br> 'oauth' => [<br> 'scopes' => 'snsapi_userinfo',<br> 'callback' => '',<br> ],<br> ],<br> 'mini'=>[<br> 'app_id' => '', <br> 'secret' => '', <br> 'payment' => [<br> 'mch_id' => '',<br> 'key' => ''<br> ],<br> ]<br>],<br></span>
You only need to ensure that the keys of the arrays in mini and mp remain unchanged. For example, if I want to generate a temporary QR code now, I can implement it with the following code
<span style="font-size: 14px;">$app = new Application(['conf'=>Yii::$app->params['wx']['mp']]);<br>$qrcode = $app->driver("mp.qrcode");<br><br>$result = $qrcode->intTemp(3600,9527);<br></span>. We always instantiate an Application first and pass the parameters (official account/mini program) , and then use the driver to drive the object of the corresponding interface and use the corresponding method.
The above is the detailed content of yii2-wx installation and upgrade. For more information, please follow other related articles on the PHP Chinese website!

Hot AI Tools

Undresser.AI Undress
AI-powered app for creating realistic nude photos

AI Clothes Remover
Online AI tool for removing clothes from photos.

Undress AI Tool
Undress images for free

Clothoff.io
AI clothes remover

Video Face Swap
Swap faces in any video effortlessly with our completely free AI face swap tool!

Hot Article
Hot Tools

Notepad++7.3.1
Easy-to-use and free code editor

SublimeText3 Chinese version
Chinese version, very easy to use

Zend Studio 13.0.1
Powerful PHP integrated development environment

Dreamweaver CS6
Visual web development tools

SublimeText3 Mac version
God-level code editing software (SublimeText3)
Hot Topics
 1387
1387
 52
52

 Solution to the problem that Win11 system cannot install Chinese language pack
Mar 09, 2024 am 09:48 AM
Solution to the problem that Win11 system cannot install Chinese language pack
Mar 09, 2024 am 09:48 AM
Solution to the problem that Win11 system cannot install Chinese language pack With the launch of Windows 11 system, many users began to upgrade their operating system to experience new functions and interfaces. However, some users found that they were unable to install the Chinese language pack after upgrading, which troubled their experience. In this article, we will discuss the reasons why Win11 system cannot install the Chinese language pack and provide some solutions to help users solve this problem. Cause Analysis First, let us analyze the inability of Win11 system to
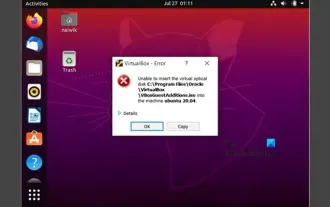 Unable to install guest additions in VirtualBox
Mar 10, 2024 am 09:34 AM
Unable to install guest additions in VirtualBox
Mar 10, 2024 am 09:34 AM
You may not be able to install guest additions to a virtual machine in OracleVirtualBox. When we click on Devices>InstallGuestAdditionsCDImage, it just throws an error as shown below: VirtualBox - Error: Unable to insert virtual disc C: Programming FilesOracleVirtualBoxVBoxGuestAdditions.iso into ubuntu machine In this post we will understand what happens when you What to do when you can't install guest additions in VirtualBox. Unable to install guest additions in VirtualBox If you can't install it in Virtua
 What should I do if Baidu Netdisk is downloaded successfully but cannot be installed?
Mar 13, 2024 pm 10:22 PM
What should I do if Baidu Netdisk is downloaded successfully but cannot be installed?
Mar 13, 2024 pm 10:22 PM
If you have successfully downloaded the installation file of Baidu Netdisk, but cannot install it normally, it may be that there is an error in the integrity of the software file or there is a problem with the residual files and registry entries. Let this site take care of it for users. Let’s introduce the analysis of the problem that Baidu Netdisk is successfully downloaded but cannot be installed. Analysis of the problem that Baidu Netdisk downloaded successfully but could not be installed 1. Check the integrity of the installation file: Make sure that the downloaded installation file is complete and not damaged. You can download it again, or try to download the installation file from another trusted source. 2. Turn off anti-virus software and firewall: Some anti-virus software or firewall programs may prevent the installation program from running properly. Try disabling or exiting the anti-virus software and firewall, then re-run the installation
 Tutorial on how to solve the problem of being unable to access the Internet after upgrading win10 system
Mar 27, 2024 pm 02:26 PM
Tutorial on how to solve the problem of being unable to access the Internet after upgrading win10 system
Mar 27, 2024 pm 02:26 PM
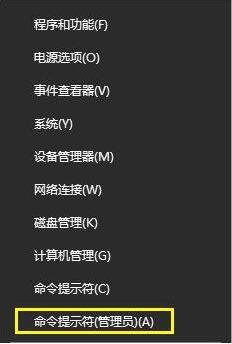
1. Use the win+x shortcut key to open the menu and select [Command Prompt (Administrator) (A)], as shown below: 2. After entering the command prompt interface, enter the [ipconfig/flushdns] command and press Enter , as shown in the figure below: 3. Then enter the [netshwinsockresetcatalog] command and press Enter, as shown in the figure below: 4. Finally enter the [netshintipreset] command and press Enter, restart the computer and you can access the Internet, as shown in the figure below:
 How to install Android apps on Linux?
Mar 19, 2024 am 11:15 AM
How to install Android apps on Linux?
Mar 19, 2024 am 11:15 AM
Installing Android applications on Linux has always been a concern for many users. Especially for Linux users who like to use Android applications, it is very important to master how to install Android applications on Linux systems. Although running Android applications directly on Linux is not as simple as on the Android platform, by using emulators or third-party tools, we can still happily enjoy Android applications on Linux. The following will introduce how to install Android applications on Linux systems.
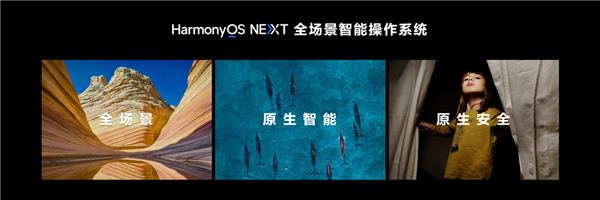 Xiaoyi upgraded to an intelligent agent! HarmonyOS NEXT Hongmeng native intelligence opens a new AI era
Jun 22, 2024 am 01:56 AM
Xiaoyi upgraded to an intelligent agent! HarmonyOS NEXT Hongmeng native intelligence opens a new AI era
Jun 22, 2024 am 01:56 AM
On June 21, Huawei Developer Conference 2024 (HDC2024) gathered again in Songshan Lake, Dongguan. At this conference, the most eye-catching thing is that HarmonyOSNEXT officially launched Beta for developers and pioneer users, and comprehensively demonstrated the three "king-breaking" innovative features of HarmonyOSNEXT in all scenarios, native intelligence and native security. HarmonyOSNEXT native intelligence: Opening a new AI era After abandoning the Android framework, HarmonyOSNEXT has become a truly independent operating system independent of Android and iOS, which can be called an unprecedented rebirth. Among its many new features, native intelligence is undoubtedly the new feature that can best bring users intuitive feelings and experience upgrades.
 How to install Podman on Ubuntu 24.04
Mar 22, 2024 am 11:26 AM
How to install Podman on Ubuntu 24.04
Mar 22, 2024 am 11:26 AM
If you have used Docker, you must understand daemons, containers, and their functions. A daemon is a service that runs in the background when a container is already in use in any system. Podman is a free management tool for managing and creating containers without relying on any daemon such as Docker. Therefore, it has advantages in managing containers without the need for long-term backend services. Additionally, Podman does not require root-level permissions to be used. This guide discusses in detail how to install Podman on Ubuntu24. To update the system, we first need to update the system and open the Terminal shell of Ubuntu24. During both installation and upgrade processes, we need to use the command line. a simple
 How to upgrade Xiaomi 14Pro to ThePaper OS?
Mar 18, 2024 pm 07:34 PM
How to upgrade Xiaomi 14Pro to ThePaper OS?
Mar 18, 2024 pm 07:34 PM
Mi 14 Pro is Xiaomi's latest flagship phone, and ThePaper OS is a new operating system independently developed by Xiaomi, dedicated to providing a smoother and smarter user experience. With the continuous development of technology, ThePaper OS is also constantly being updated and upgraded. So many users who are using Xiaomi mobile phones for the first time are asking Xiaomi 14Pro users how to upgrade ThePaper OS? How to upgrade Xiaomi Mi 14 Pro to Thermal OS? There is no need to update. The original factory comes with Thermal OS. How to update other models that support ThePaper OS: 1. Open the settings application of your phone and find the system update option. 2. The system will automatically detect the current system version and prompt when a new version is available for update. 3. Just click "Update Now" and the system will start downloading automatically.
