

ngrok+express solves WeChat interface debugging method

When developing WeChat projects, it is often necessary to debug the interfaces provided by WeChat jssdk, such as recording, sharing, uploading images, etc. However, WeChat jssdk requires binding a secure domain name to use a series of functions it provides. However, using localhost or local IP in the development environment cannot complete the authentication and binding of the domain name, so it cannot be debugged locally. Of course, there is a last resort method, which is to develop it locally, package it and send it to the company's test server, and use the domain name certified by the test server for debugging. Every time you make a change, you have to send a test for debugging. Obviously, this method is very troublesome and very time-consuming. It’s not scientific, so this article will focus on this problem to introduce how to use ngrok and express to solve the debugging problem of WeChat interface in the development environment.
This article mainly introduces the use of ngrok+express to solve the WeChat interface debugging problem in the local environment. Friends who need it can refer to it. I hope it can help everyone.
1: First introduce ngrok. The main function of ngrok is to map the local IP to the external network and assign you an available domain name. Through this domain name, external network users can open your The local web service is also very simple to use, and the official website also has documents and detailed introductions. Here is a brief introduction to how to use it. First, go to ngrok's official website to download the corresponding client of ngrok, and register as a user. You can register through your github account or google account. After the registration is completed, open the auth option in the personal center and copy the authtoken here. , as shown below:

(Here we take the window version as an example), then after downloading and decompressing, there will be an ngrok.exe file. Double-click to run and the following command line will appear. :

First we need to complete the ngrok token authentication, otherwise an error will occur during operation. Run the command
ngrok authtoken ******** ********* //* number is the token in the personal center, just copy it.
After the authentication is completed, you can operate it. The examples in the picture above are some commonly used examples. For the command, we use ngrok http. The following parameter is the port number of your local web service. After running, an external domain name will be assigned. Through this domain name, you can access your local web service.
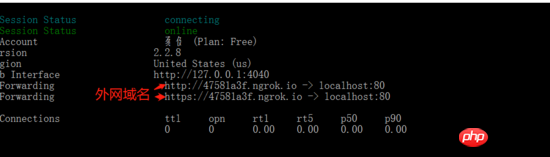
However, this domain name will be reassigned a new domain name after the restart, resulting in the need to go to the WeChat public platform to reset the security domain name and token authentication after the restart. Unfortunately, in ngrok 1.0, the assigned domain name can be fixed each time through ngrok http subdomain=*** (custom domain name) 80, but after version 2.0, free users cannot fix the domain name, only paid users can , although it only costs $5 per month, for people who don’t test it frequently, there is still no desire to buy it. The key is that it only seems to support visaa... However, for fat friends who want a free fixed domain name, there are still solutions. There is sunny-ngrok in China, which allows you to apply for a custom fixed domain name for free. You can check its official website for specific tutorials. It is not very complicated. There are If you have any questions, you can ask me in the comments, I won’t go into details. Of course, there are many other methods to achieve external network mapping, such as using Localtunnel and peanut shell installed by npm, etc. You can learn about it yourself.
2: After getting the domain name, the next thing we have to do is use the domain name to complete the WeChat secure domain name binding. We can go to the WeChat public platform to apply for a test account, but it will not pass when filling in at this time. Because WeChat authentication requires its own server to correctly respond to the configuration request
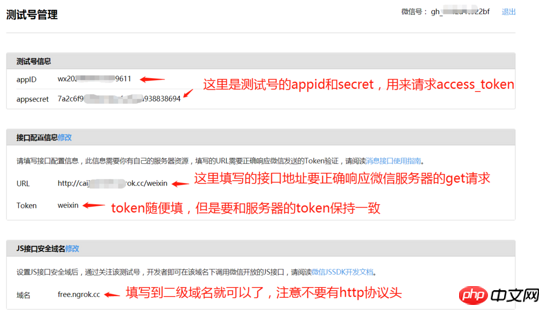
When you apply for a test account, fill in the URL of the configuration information, and the WeChat server will send a get request to this address. , the get request will carry some parameters. We need to use these parameters to generate a signature and compare it with the signature of WeChat parameters. Only if the comparison is successful, the interface will be configured successfully.
Because WeChat authentication requires its own server, here we need to use express to build a simple server to complete WeChat token authentication and generate signatures. The construction process is also very simple. , refer to express Chinese documentation, here are the steps from the official website:

After the installation is completed, enter the myapp directory and create an app.js file,
var express = require('express');
var crypto = require('crypto') //使用npm安装后引入,用来生成签名
var http = require('request') //express的中间件,使用npm安装,用来发出请求
var jsSHA = require('jssha')//jssha是微信官网提供的nodejs版本签名算法,可以去官网下载官网的sample包
var app = express();
app.use(express.static('./review'))
app.get('/weixin',function (req, res) {//这个get接口就是测试号填写的接口,用来响应微信服务器的请求
  var token = 'weixin' //注意这里填写token,与微信测试号申请时候填写的token要保持一致
  var signature = req.query.signature;
  var timestamp = req.query.timestamp;
  var nonce = req.query.nonce;
  var echostr = req.query.echostr;
   /* 加密/校验流程如下: */
   //1. 将token、timestamp、nonce三个参数进行字典序排序
   var array = new Array(token,timestamp,nonce);
   array.sort();
   var str = array.toString().replace(/,/g,"");
  //2. 将三个参数字符串拼接成一个字符串进行sha1加密
  var sha1Code = crypto.createHash("sha1");
  var code = sha1Code.update(str,'utf-8').digest("hex");
   //3. 开发者获得加密后的字符串可与signature对比,标识该请求来源于微信
  if(code===signature){
    res.send(echostr)
  }else{
    res.send("error");
  }
});
var server = app.listen(80, function () {
  var host = server.address().address;
  var port = server.address().port;
  console.log('Example app listening at http://%s:%s', host, port);
});After the creation is completed, run
node app.js
The server will be started. The following points to note are:
1 :jssha cannot be installed using npm, because when running npm installation will report Chosen SHA variant is not supported
,必须使用官网提供的sample包,下载解压后,选择node版本,打开后将node_module里面jssha文件复制到项目内的node_module里面即可;
2:这里的token值需要和微信测试号中填写的token值一致;
现在我们就可以开始填写测试号的参数了,填写完成微信服务器就会发送请求给你填写的接口了,都正确响应的话就会弹出配置成功。
当然到这还没有结束,因为前端想要调用jssdk的接口还需要通过接口请求完成权限配置,这里大家可以看一下微信jssdk的说明文档,具体引用步骤这里就不赘述了,接口请求大概如下:
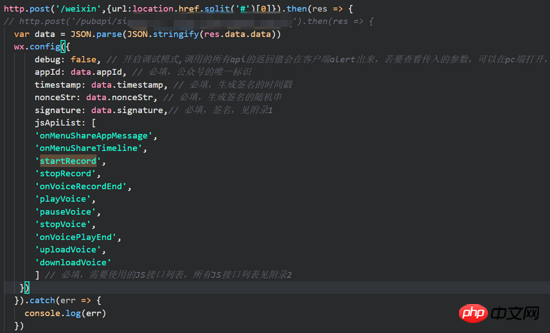
这个接口主要就是提交当前的url请求服务端拿到相应的参数,完成权限配置,所以在express中还需要在写一个响应post请求的接口,这个接口做的主要的工作就是拿appid和appSerect(测试号提供)去请求微信提供的接口生成access_token,然后拿这个access_token再去请求微信提供的接口生成tiket,关于这两者文档上都有详细说明。最后生成签名,代码如下
// noncestr生成var createNonceStr = function() {
return Math.random().toString(36).substr(2, 15);
};
// timestamp时间戳生成var createTimeStamp = function () {
return parseInt(new Date().getTime() / 1000) + '';
};
//获取tiket
var getTiket= function (data) { //通过access_token获取tiket
return new Promise((reslove,reject)=>{
http.get(`https://api.weixin.qq.com/cgi-bin/ticket/getticket?access_token=${data}&type=jsapi`,
function(err,res,body){
if(res.body.tiket){
resoleve(res.body.ticket)
}else{
reject(err)
} }) })}
// 计算签名方法
var calcSignature = function (ticket, noncestr, ts, url) {//使用jssha
var str = 'jsapi_ticket=' + ticket + '&noncestr=' + noncestr + '×tamp='+ ts +'&url=' + url;
shaObj = new jsSHA(str, 'TEXT'); return shaObj.getHash('SHA-1', 'HEX');
}
//返回给前端配置信息的post接口
app.post('/weixin',function(req,res,next){
let appId = '******'
let appSecret = '******'
let url = `https://api.weixin.qq.com/cgi-bin/token?grant_type=client_credential&appid=${appId}&secret=${appSecret }`
http.get(url, function (err, response, body) {
getTiket(response.body).then(resolve=>{
let tiket = resolve//tiket
let nonceStr = createNonceStr()//随机字符串
let timeStamp = createTimeStamp()//时间戳
let signature = calcSignature(tiket,nonceStr,timeStamp,req.body.url)
let obj = { //将前端需要的参数返回
data:{
appId:appId,
timestamp:timeStamp,
nonceStr:nonceStr,
signature:signature
}
}
res.end(JSON.stringify(obj))
}).catch(err=>{})
res.end(JSON.stringify(err))
});})这里要注意的是微信返回的access_token 和tiket的都有7200s的有效期,所以要进行缓存,我的代码中没有写缓存的操作代码了,大家有两种方法:
1.拿到access_token和tiket后,直接写在变量中存下来,有效期内就不用继续请求接口了,直接进行签名操作就可以了;过期后,在请求一次就好了,虽然这种方法有点笨,不过好歹有效期还算长。
2.在服务器拿到access_token和tiket后,写入本地的json文件中,具体步骤也不赘述了,然后判断是否过期,过期后就重新请求,没过期就直接读取json文件中的数据进行签名。
最后呢,有两种选择:
第一:把我们的前端项目执行 npm run build 后,把dist文件放入我们的服务器文件夹中,可以直接用express的static中间件
app.use(express.static('./dist'))
然后微信开发者工具,输入分配的域名打开我们的项目,这样我们不用设置代理了,不过需要执行build,项目大一点的话还是有点浪费时间的;
第二:就是为我们的开发环境在申请一个域名,因为现在脚手架的热更新其实就是启动了一个webpack-dev-sever的微服务器,申请域名是后填写开发的端口号就可以了,使得开发地址和我们的服务器地址的二级域名相同,不过对于服务器的接口,开发环境需要设置一下代理,而且热更新也会失效,需要手动刷新一下,不过相对于第一种方法可能会更好一点。
两种方法运行成功后查看发出请求如果配置成功,控制台会出现配置成功的信息如下:

然后我们就可以愉快的在使用jssdk的接口了,再也不求后端,可以自己在本地测试好所有的接口了,且不是美滋滋。
相关推荐:
The above is the detailed content of ngrok+express solves WeChat interface debugging method. For more information, please follow other related articles on the PHP Chinese website!

Hot AI Tools

Undresser.AI Undress
AI-powered app for creating realistic nude photos

AI Clothes Remover
Online AI tool for removing clothes from photos.

Undress AI Tool
Undress images for free

Clothoff.io
AI clothes remover

Video Face Swap
Swap faces in any video effortlessly with our completely free AI face swap tool!

Hot Article
Hot Tools

Notepad++7.3.1
Easy-to-use and free code editor

SublimeText3 Chinese version
Chinese version, very easy to use

Zend Studio 13.0.1
Powerful PHP integrated development environment

Dreamweaver CS6
Visual web development tools

SublimeText3 Mac version
God-level code editing software (SublimeText3)
Hot Topics
 1386
1386
 52
52

 How to recover deleted contacts on WeChat (simple tutorial tells you how to recover deleted contacts)
May 01, 2024 pm 12:01 PM
How to recover deleted contacts on WeChat (simple tutorial tells you how to recover deleted contacts)
May 01, 2024 pm 12:01 PM
Unfortunately, people often delete certain contacts accidentally for some reasons. WeChat is a widely used social software. To help users solve this problem, this article will introduce how to retrieve deleted contacts in a simple way. 1. Understand the WeChat contact deletion mechanism. This provides us with the possibility to retrieve deleted contacts. The contact deletion mechanism in WeChat removes them from the address book, but does not delete them completely. 2. Use WeChat’s built-in “Contact Book Recovery” function. WeChat provides “Contact Book Recovery” to save time and energy. Users can quickly retrieve previously deleted contacts through this function. 3. Enter the WeChat settings page and click the lower right corner, open the WeChat application "Me" and click the settings icon in the upper right corner to enter the settings page.
 Detailed explanation of C++ function debugging: How to debug problems in multi-threaded functions?
May 02, 2024 pm 04:15 PM
Detailed explanation of C++ function debugging: How to debug problems in multi-threaded functions?
May 02, 2024 pm 04:15 PM
C++ multi-thread debugging can use GDB: 1. Enable debugging information compilation; 2. Set breakpoints; 3. Use infothreads to view threads; 4. Use thread to switch threads; 5. Use next, stepi, and locals to debug. Actual case debugging deadlock: 1. Use threadapplyallbt to print the stack; 2. Check the thread status; 3. Single-step the main thread; 4. Use condition variables to coordinate access to solve the deadlock.
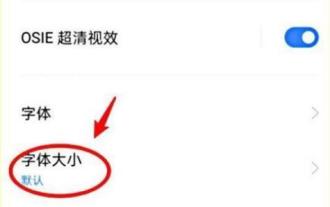 How to set font size on mobile phone (easily adjust font size on mobile phone)
May 07, 2024 pm 03:34 PM
How to set font size on mobile phone (easily adjust font size on mobile phone)
May 07, 2024 pm 03:34 PM
Setting font size has become an important personalization requirement as mobile phones become an important tool in people's daily lives. In order to meet the needs of different users, this article will introduce how to improve the mobile phone use experience and adjust the font size of the mobile phone through simple operations. Why do you need to adjust the font size of your mobile phone - Adjusting the font size can make the text clearer and easier to read - Suitable for the reading needs of users of different ages - Convenient for users with poor vision to use the font size setting function of the mobile phone system - How to enter the system settings interface - In Find and enter the "Display" option in the settings interface - find the "Font Size" option and adjust it. Adjust the font size with a third-party application - download and install an application that supports font size adjustment - open the application and enter the relevant settings interface - according to the individual
 The secret of hatching mobile dragon eggs is revealed (step by step to teach you how to successfully hatch mobile dragon eggs)
May 04, 2024 pm 06:01 PM
The secret of hatching mobile dragon eggs is revealed (step by step to teach you how to successfully hatch mobile dragon eggs)
May 04, 2024 pm 06:01 PM
Mobile games have become an integral part of people's lives with the development of technology. It has attracted the attention of many players with its cute dragon egg image and interesting hatching process, and one of the games that has attracted much attention is the mobile version of Dragon Egg. To help players better cultivate and grow their own dragons in the game, this article will introduce to you how to hatch dragon eggs in the mobile version. 1. Choose the appropriate type of dragon egg. Players need to carefully choose the type of dragon egg that they like and suit themselves, based on the different types of dragon egg attributes and abilities provided in the game. 2. Upgrade the level of the incubation machine. Players need to improve the level of the incubation machine by completing tasks and collecting props. The level of the incubation machine determines the hatching speed and hatching success rate. 3. Collect the resources required for hatching. Players need to be in the game
 How to use LeakSanitizer to debug C++ memory leaks?
Jun 02, 2024 pm 09:46 PM
How to use LeakSanitizer to debug C++ memory leaks?
Jun 02, 2024 pm 09:46 PM
How to use LeakSanitizer to debug C++ memory leaks? Install LeakSanitizer. Enable LeakSanitizer via compile flag. Run the application and analyze the LeakSanitizer report. Identify memory allocation types and allocation locations. Fix memory leaks and ensure all dynamically allocated memory is released.
 Shortcut to golang function debugging and analysis
May 06, 2024 pm 10:42 PM
Shortcut to golang function debugging and analysis
May 06, 2024 pm 10:42 PM
This article introduces shortcuts for Go function debugging and analysis, including: built-in debugger dlv, which is used to pause execution, check variables, and set breakpoints. Logging, use the log package to record messages and view them during debugging. The performance analysis tool pprof generates call graphs and analyzes performance, and uses gotoolpprof to analyze data. Practical case: Analyze memory leaks through pprof and generate a call graph to display the functions that cause leaks.
 How to choose a mobile phone screen protector to protect your mobile phone screen (several key points and tips for purchasing mobile phone screen protectors)
May 07, 2024 pm 05:55 PM
How to choose a mobile phone screen protector to protect your mobile phone screen (several key points and tips for purchasing mobile phone screen protectors)
May 07, 2024 pm 05:55 PM
Mobile phone film has become one of the indispensable accessories with the popularity of smartphones. To extend its service life, choose a suitable mobile phone film to protect the mobile phone screen. To help readers choose the most suitable mobile phone film for themselves, this article will introduce several key points and techniques for purchasing mobile phone film. Understand the materials and types of mobile phone films: PET film, TPU, etc. Mobile phone films are made of a variety of materials, including tempered glass. PET film is relatively soft, tempered glass film has good scratch resistance, and TPU has good shock-proof performance. It can be decided based on personal preference and needs when choosing. Consider the degree of screen protection. Different types of mobile phone films have different degrees of screen protection. PET film mainly plays an anti-scratch role, while tempered glass film has better drop resistance. You can choose to have better
 How to debug PHP asynchronous code
May 31, 2024 am 09:08 AM
How to debug PHP asynchronous code
May 31, 2024 am 09:08 AM
Tools for debugging PHP asynchronous code include: Psalm: a static analysis tool that can find potential errors. ParallelLint: A tool that inspects asynchronous code and provides recommendations. Xdebug: An extension for debugging PHP applications by enabling a session and stepping through the code. Other tips include using logging, assertions, running code locally, and writing unit tests.
