

Element-UI build management backend code sharing in Vue

This article mainly shares with you the Elememt-UI construction and management backend code in Vue, hoping to help you.
Installation
I am using vue-cli initialization project, the command is as follows:
  npm i -g vue-cli
mkdir my-project && cd my-project
vue init webpack
Modify the package.json file:
   ...
"dependencies": {
  "vue": "^2.5.2",
  "vue-router": "^3.0.1",
  "element-ui": "^2.0.7",  // element-ui
  "axios": "^0.17.1"  // http 请求库
}
...After Execute npm install to install dependencies. If the installation speed is a bit slow, you can try cnpm and find out the specific installation and usage by yourself.
Briefly introduce the directory structure of the project:
├─build  // 构建配置
├─config  // 配置文件
├─src  // vue 开发源文件目录
├────assets  // css/js 文件
├────components  // vue 组件
├────router   // 路由
├────App.vue   // 启动组件
├────main.js  // 入口文件
├─static  // 静态文件目录
├─test  // 测试目录
Then execute npm run dev in the project root directory, open the browser and enter http://localhost:8080 to view it.
Goal
Login page, login, exit function
Home page, call interface rendering list
Routing
Routing uses vue -router, for specific usage, please refer to the official documentation
We need two routes here:
src/router/index.js
   import Vue from 'vue'
import Router from 'vue-router'
import Index from '@/components/Index'
import Login from '@/components/Login'
Vue.use(Router)
const routers =  new Router({
  routes: [
    {
      path: '/index',
      name: 'index',
      component: Index
    },
    {
      path: '/login',
      name: 'login',
      component: Login
    }
  ]
})
routers.beforeEach((to, from, next) => {
  if (to.name !== 'login' && !localStorage.getItem('token')) {
    next({path: 'login'})
  } else {
    next()
  }
})
export default routersLogin page
src/components/Login. vue
<template>
<p class="login">
<el-form name="aa" :inline="true" label-position="right" label-width="80px">
<el-form-item label="用户名">
<el-input v-model="user.name"></el-input>
</el-form-item>
<el-form-item label="密码">
<el-input type="password" v-model="user.password"></el-input>
</el-form-item>
<el-form-item label=" ">
<el-button type="primary" @click="login()">登录</el-button>
</el-form-item>
</el-form>
</p>
</template>
<script>
import $http from '@/api/'
import config from '@/config'
export default {
data () {
return {
user: {
name: '',
password: ''
}
}
},
mounted: function () {
var token = localStorage.getItem('token')
if (token) {
this.$router.push('/index')
}
},
methods: {
login: function () {
var data = {
grant_type: 'password',
client_id: config.oauth_client_id,
client_secret: config.oauth_secret,
username: this.user.name,
password: this.user.password
}
var _this = this
$http.login(data).then(function (res) {
if (res.status === 200) {
$http.setToken(res.data.access_token)
_this.$message({
showClose: false,
message: '登录成功',
type: 'success'
})
_this.$router.push('/index')
} else {
_this.$message({
showClose: false,
message: '登录失败',
type: 'error'
})
}
})
}
}
}
</script>
<style>
.login{
width: 300px;
margin: 100px auto;
background-color: #ffffff;
padding: 30px 30px 5px;
border-radius: 5px;
}
</style>Homepage
src/components/Index.vue
<template>
<p class="main">
<el-table
stripe
v-loading="loading"
element-loading-background="#dddddd"
:data="tableData"
style="width: 100%">
<el-table-column
prop="id"
label="ID">
</el-table-column>
<el-table-column
prop="name"
label="名称">
</el-table-column>
</el-table>
<el-pagination
background
layout="prev, pager, next"
:total="total"
class="page"
@current-change="pageList">
</el-pagination>
</p>
</template>
<script>
import $http from '@/api/'
export default {
data () {
return {
tableData: [],
total: 0,
loading: false
}
},
mounted: function () {
this.getList()
},
methods: {
pageList: function (page) {
this.search.page = page
this.getList()
},
getList: function () {
var _this = this
_this.loading = true
$http.index().then(function (res) {
if (res.status === 200) {
_this.tableData = res.data.data.lists
_this.total = res.data.data.total
}
_this.loading = false
})
}
}
}
</script>App
src/App.vue
<template>
<p id="app">
<el-row v-if="token">
<menus class="left-menu">
<h3 class="logo"><a href="/">Admin</a></h3>
</menus>
<el-col :span="21" :gutter="0" :offset="3">
<el-breadcrumb separator-class="el-icon-arrow-right" class="breadcrumb">
<el-breadcrumb-item :to="{ path: '/' }">首页</el-breadcrumb-item>
<el-breadcrumb-item class="active">列表</el-breadcrumb-item>
</el-breadcrumb>
<el-dropdown @command="operate" class="header">
<img src="/static/image/head.jpg" />
<el-dropdown-menu slot="dropdown" :click="true">
<el-dropdown-item command="/user/profile">基本资料</el-dropdown-item>
<el-dropdown-item command="/logout">安全退出</el-dropdown-item>
</el-dropdown-menu>
</el-dropdown>
<router-view/>
</el-col>
<el-col :span="21" :gutter="0" :offset="3" class="footer">Copyright © 2017 Flyerboy All Rights Reserved</el-col>
</el-row>
<router-view v-if="!token" />
</p>
</template>
<script>
import Menus from '@/components/Menu'
export default {
name: 'App',
data () {
return {
token: false
}
},
mounted: function () {
this.token = localStorage.getItem('token') ? true : false
},
watch: {
'$route.path': function ($newVal, $oldVal) {
this.token = localStorage.getItem('token') ? true : false
}
},
methods: {
operate: function (command) {
if (command === '/logout') {
localStorage.removeItem('token')
this.$router.push('login')
} else {
this.$router.push(command)
}
}
},
components: {
Menus
}
}
</script>
<style>
body{
margin: 0;
padding: 0;
background-color: #eeeeee;
}
.header{
position: absolute;
top: 5px;
right: 20px;
}
.header img{
width: 38px;
height: 38px;
border-radius: 20px;
border: 1px solid #aaaaaa;
}
#app {
font-family: 'Avenir', Helvetica, Arial, sans-serif;
-webkit-font-smoothing: antialiased;
-moz-osx-font-smoothing: grayscale;
}
.main{
padding: 20px;
min-height: 600px;
margin-bottom: 20px;
}
.main table{
background: #ffffff;
}
.left-menu{
background-color: #33374B;
}
.logo{
padding: 20px 0 15px 20px;
font-size: 24px;
border-bottom: 2px solid #3a8ee6;
}
.logo a{
color: #ffffff;
text-decoration: none;
}
.left-menu .el-menu{
border-right: 0;
}
.breadcrumb{
line-height: 40px;
padding: 5px 20px;
background: #ffffff;
}
.breadcrumb span{
color: #069;
font-weight: normal;
}
.breadcrumb .active{
color: #aaaaaa;
}
.page{
margin: 20px 0 0;
margin-left: -10px;
}
.page .el-pager li.number{
background-color: #ffffff;
}
.el-submenu .el-menu-item{
padding-left: 60px !important;
}
.footer{
position: fixed;
bottom: 0;
right: 0;
font-size: 12px;
color: #888888;
padding: 15px 20px;
text-align: center;
background-color: #ffffff;
margin-top: 40px;
}
</style>Call API
src/api/index.js
   import axios from 'axios'
axios.defaults.baseURL = 'http://localhost:8000/'
axios.defaults.headers.post['Content-Type'] = 'application/x-www-form-urlencoded'
axios.defaults.headers.common['Authorization'] = 'Bearer ' + localStorage.getItem('token')
export default {
  setToken: function (token) {
    localStorage.setItem('token', token)
    axios.defaults.headers.common['Authorization'] = 'Bearer ' + token
  },
  login: function (param) {
    return axios.post('oauth/token', param)
  },
  index: function (params) {
    return axios.get('api/user/list', {
      params: params
    })
  }
}config
src/config.js Here configure the client_id and secret required for logging in to oauth
   export default {
  oauth_client_id: 2,
  oauth_secret: ''
}main. js
src/main.js
import Vue from 'vue'
import App from './App'
import router from './router'
import ElementUI from 'element-ui'
import 'element-ui/lib/theme-chalk/index.css'
Vue.use(ElementUI)
Vue.config.productionTip = false
new Vue({
el: '#app',
router,
components: { App },
template: '<App/>'
})api interface
Mainly uses two interfaces, one is the api/oauth/token login and token interface, and the other is the get list api /user/list.
The first interface uses laravel oauth, and the second interface is directly a simple query user list interface. The details will be described in the next article.
Related recommendations:
WeChat public platform development management backend development
Management backend developed based on thinkphp5
Vue’s elementUI implements custom themes
The above is the detailed content of Element-UI build management backend code sharing in Vue. For more information, please follow other related articles on the PHP Chinese website!

Hot AI Tools

Undresser.AI Undress
AI-powered app for creating realistic nude photos

AI Clothes Remover
Online AI tool for removing clothes from photos.

Undress AI Tool
Undress images for free

Clothoff.io
AI clothes remover

AI Hentai Generator
Generate AI Hentai for free.

Hot Article
Hot Tools

Notepad++7.3.1
Easy-to-use and free code editor

SublimeText3 Chinese version
Chinese version, very easy to use

Zend Studio 13.0.1
Powerful PHP integrated development environment

Dreamweaver CS6
Visual web development tools

SublimeText3 Mac version
God-level code editing software (SublimeText3)
Hot Topics
 1378
1378
 52
52

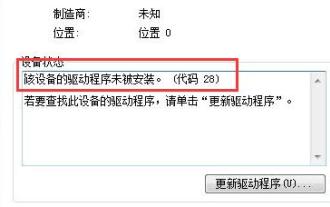 How to solve win7 driver code 28
Dec 30, 2023 pm 11:55 PM
How to solve win7 driver code 28
Dec 30, 2023 pm 11:55 PM
Some users encountered errors when installing the device, prompting error code 28. In fact, this is mainly due to the driver. We only need to solve the problem of win7 driver code 28. Let’s take a look at what should be done. Do it. What to do with win7 driver code 28: First, we need to click on the start menu in the lower left corner of the screen. Then, find and click the "Control Panel" option in the pop-up menu. This option is usually located at or near the bottom of the menu. After clicking, the system will automatically open the control panel interface. In the control panel, we can perform various system settings and management operations. This is the first step in the nostalgia cleaning level, I hope it helps. Then we need to proceed and enter the system and
 Discuz background login problem solution revealed
Mar 03, 2024 am 08:57 AM
Discuz background login problem solution revealed
Mar 03, 2024 am 08:57 AM
The solution to the Discuz background login problem is revealed. Specific code examples are needed. With the rapid development of the Internet, website construction has become more and more common, and Discuz, as a commonly used forum website building system, has been favored by many webmasters. However, precisely because of its powerful functions, sometimes we encounter some problems when using Discuz, such as background login problems. Today, we will reveal the solution to the Discuz background login problem and provide specific code examples. We hope to help those in need.
 What to do if the blue screen code 0x0000001 occurs
Feb 23, 2024 am 08:09 AM
What to do if the blue screen code 0x0000001 occurs
Feb 23, 2024 am 08:09 AM
What to do with blue screen code 0x0000001? The blue screen error is a warning mechanism when there is a problem with the computer system or hardware. Code 0x0000001 usually indicates a hardware or driver failure. When users suddenly encounter a blue screen error while using their computer, they may feel panicked and at a loss. Fortunately, most blue screen errors can be troubleshooted and dealt with with a few simple steps. This article will introduce readers to some methods to solve the blue screen error code 0x0000001. First, when encountering a blue screen error, we can try to restart
 The computer frequently blue screens and the code is different every time
Jan 06, 2024 pm 10:53 PM
The computer frequently blue screens and the code is different every time
Jan 06, 2024 pm 10:53 PM
The win10 system is a very excellent high-intelligence system. Its powerful intelligence can bring the best user experience to users. Under normal circumstances, users’ win10 system computers will not have any problems! However, it is inevitable that various faults will occur in excellent computers. Recently, friends have been reporting that their win10 systems have encountered frequent blue screens! Today, the editor will bring you solutions to different codes that cause frequent blue screens in Windows 10 computers. Let’s take a look. Solutions to frequent computer blue screens with different codes each time: causes of various fault codes and solution suggestions 1. Cause of 0×000000116 fault: It should be that the graphics card driver is incompatible. Solution: It is recommended to replace the original manufacturer's driver. 2,
 Resolve code 0xc000007b error
Feb 18, 2024 pm 07:34 PM
Resolve code 0xc000007b error
Feb 18, 2024 pm 07:34 PM
Termination Code 0xc000007b While using your computer, you sometimes encounter various problems and error codes. Among them, the termination code is the most disturbing, especially the termination code 0xc000007b. This code indicates that an application cannot start properly, causing inconvenience to the user. First, let’s understand the meaning of termination code 0xc000007b. This code is a Windows operating system error code that usually occurs when a 32-bit application tries to run on a 64-bit operating system. It means it should
 GE universal remote codes program on any device
Mar 02, 2024 pm 01:58 PM
GE universal remote codes program on any device
Mar 02, 2024 pm 01:58 PM
If you need to program any device remotely, this article will help you. We will share the top GE universal remote codes for programming any device. What is a GE remote control? GEUniversalRemote is a remote control that can be used to control multiple devices such as smart TVs, LG, Vizio, Sony, Blu-ray, DVD, DVR, Roku, AppleTV, streaming media players and more. GEUniversal remote controls come in various models with different features and functions. GEUniversalRemote can control up to four devices. Top Universal Remote Codes to Program on Any Device GE remotes come with a set of codes that allow them to work with different devices. you may
 Detailed explanation of the causes and solutions of 0x0000007f blue screen code
Dec 25, 2023 pm 02:19 PM
Detailed explanation of the causes and solutions of 0x0000007f blue screen code
Dec 25, 2023 pm 02:19 PM
Blue screen is a problem we often encounter when using the system. Depending on the error code, there will be many different reasons and solutions. For example, when we encounter the problem of stop: 0x0000007f, it may be a hardware or software error. Let’s follow the editor to find out the solution. 0x000000c5 blue screen code reason: Answer: The memory, CPU, and graphics card are suddenly overclocked, or the software is running incorrectly. Solution 1: 1. Keep pressing F8 to enter when booting, select safe mode, and press Enter to enter. 2. After entering safe mode, press win+r to open the run window, enter cmd, and press Enter. 3. In the command prompt window, enter "chkdsk /f /r", press Enter, and then press the y key. 4.
 What does the blue screen code 0x000000d1 represent?
Feb 18, 2024 pm 01:35 PM
What does the blue screen code 0x000000d1 represent?
Feb 18, 2024 pm 01:35 PM
What does the 0x000000d1 blue screen code mean? In recent years, with the popularization of computers and the rapid development of the Internet, the stability and security issues of the operating system have become increasingly prominent. A common problem is blue screen errors, code 0x000000d1 is one of them. A blue screen error, or "Blue Screen of Death," is a condition that occurs when a computer experiences a severe system failure. When the system cannot recover from the error, the Windows operating system displays a blue screen with the error code on the screen. These error codes
