

Quick knowledge about WeChat mini program

This article mainly shares with you the quick knowledge of WeChat mini programs, which can make it easier for everyone to develop WeChat mini programs. I hope this article can help everyone.
1. Configuration
Full configuration analysis
- ##project.config.json (project configuration file)
{
    // 文件描述
    "description": "项目配置文件",
    // 项目代码配置
    "setting": {
        // 是否检查 url 域名安全性和 TLS 版本
        "urlCheck": false,
        // 是否将项目的 es5 代码转成 es6
        "es6": true,
        // 是否自动补全 css 兼容前缀
        "postcss": true,
        // 是否压缩代码
        "minified": true,
        // 是否启用新功能
        "newFeature": true
    },
    // 编译方式
    "compileType": "miniprogram",
    // 版本号
    "libVersion": "1.7.2",
    // appid
    "appid": "touristappid",
    // 项目名
    "projectname": "haiyangbg",
    // 项目配置
    "condition": {
        // 搜索关键字
        "search": {
            "current": -1,
            "list": []
        },
        // 客服
        "conversation": {
            "current": -1,
            "list": []
        },
        // 编译方式
        "miniprogram": {
            "current": -1,
            "list": []
        }
    }
}- app.json (mini-program configuration)
{
  // 项目路由设置(第一项为首页)
  "pages":[
    "pages/index/index",
    "pages/logs/logs"
  ],
  // 窗口设置
  "window":{
    // 顶部导航栏背景色,必须是十六进制颜色值,如"#000000"
    "navigationBarBackgroundColor": "#9ef468",
    // 顶部导航栏显示文字
    "navigationBarTitleText": "组件展示",
    // 导航栏文字颜色,仅支持 black/white
    "navigationBarTextStyle": "black",
    // 下拉背景的文字样式,仅支持 dark/light
    "backgroundTextStyle":"light",
    // 下拉背景色,必须是十六进制颜色值,如"#000000"
    "backgroundColor": "#333",
    // 是否开启下拉刷新
    "enablePullDownRefresh": true,
    // 距离最底端触多少距离时触发触底事件,单位px
    "onReachBottomDistance": 40
  },
  //网络请求过期时间,单位毫秒
  "networkTimeout": {
    // 普通ajax请求
    "request": 20000,
    // Socket请求
    "connectSocket": 20000,
    // 文件上传
    "uploadFile": 20000,
    // 文件下载
    "downloadFile": 20000
  },
  // tab导航栏
  "tabBar": {
    // 文字的颜色
    "color": "#999",
    // 选中时文字的颜色
    "selectedColor": "#000",
    // 背景色
    "backgroundColor": "#fff",
    // 上边框的颜色,仅支持 black/white
    "borderStyle": "black",
    // tab导航栏显示在底部还是顶部(顶部不显示图片)
    "position": "bottom",
    // 导航栏列表项
    "list": [{
      // 导航到的页面路径
      "pagePath": "pages/index/index",
      // tab按钮上的文字
      "text": "组件",
      // 图片路径
      "iconPath": "img/com-l.png",
      // 选中后显示的图片
      "selectedIconPath": "img/com-d.png"
    },{
      "pagePath": "pages/logs/logs",
      "text": "API",
      "iconPath": "img/api-l.png",
      "selectedIconPath": "img/api-d.png"
    }]
  },
  // 调试信息
  "debug": true
}- page.json (single Page configuration)
json of a single page is the window field of app.json, when loaded into this page When #onLaunch ------ Triggered when the mini program initialization is completed (will only be called once)
onShow ------ 1. Mini program starts 2. Enter the foreground display from the background, trigger
onHide ------ When the applet enters the background from the foreground, trigger
onError -- ---- 1. A script error occurred 2. The api call failed and was triggered with an error message
- Single page Page life cycle
- onLoad ------ Triggered when the page is loaded (will only be called once)
onReady ------ When the initial rendering is completed, trigger (will only be called once)
onHide ----- - When the page is hidden, trigger
onUnload ------ When the page is unloaded, trigger
- Details Life cycle classification:
- 1. Mini program launch:
-
App.onLaunch
- -> App.onShow
Page. onLoad
- -> Page.onShow - ->
Page.onReady2. Switch to the background (app and page life cycles overlap ): The applet was switched to the background - -> page.onHide - -> App.onHide - -> Switched back to the applet Program - -> App.onShow - ->
3. Jump page:
old represents the previous page , new means new pagenavigateToJump- -> Set the route as the target page route- -> old.onHide - -> Initialization page data - ->
- ->
new.onShow- ->
new.onReady-
new.onReadyredirectToRedirect- -> Set routing- ->old.onUnload- -> init data - ->new .onLoad- ->new.onShow- -> -
##reLaunch##navigateBackPage return - -> Set routing - ->old.onUnload- -> init data - ->new.onShow Restart- -> Set routing- -> - old.onUnload
- -> init data - ->
new.onLoad- ->new.onShow- ->new.onReady ##switchTab
Tab switch (picture taken from Official document)3. Data binding and renderingData Binding: { { message } }
Rendering
 ##List rendering:
- wx:for=" { { message } } "
- wx:for-index="idx" (设置索引的变量名,默认 index )
- wx:for-item="itemName"(设置每一项的变量名,默认item )- Conditional rendering:
- 4. Template )
- wx:if="boolean" - wx:elif="boolean" -wx:else="boolean" == (if - else if - if)
- hidden="boolean"
Basic usage:
- (Define code snippets, which can be called in different places, use the name attribute as the name of the template, and use the is attribute when calling)
// 源码(需要和调用的页面在同一个wxml里)
<template name="template">
  <view>
    I am {{ name }}
  </view>
</template>

// 调用
<template is="template" data="{{...message}}"/>

// js 数据
Page({
  data: {
    message: {
      name: '海洋饼干'
    }
  }
})
Copy after login Advanced usage - When many pages needed the same template, the template needed to be imported
First Create a new
template folderin the pages folder, and create a new template.wxml file in the folder
// template.wxml
<template name="template">
  <view>
    I am {{ name }}
  </view>
</template>// page.wxml 调用
<import src ="../template/template.wxml"/>
<template is="template" data="{{...message}}"/>
// js 数据
Page({
data: {
message: {
name: '海洋饼干'
}
}
})5. Event
Event list
Click Event
Click eventtap
- longpress
- event
-
touch start touchstart -
Start moving after touching touchmove
Interrupted after touch
touchcancelTouch endedtouchend-
Animation Event -
过渡完成时触发
transitionend动画开始时触发
animationstart一次迭代结束时触发
animationiteration动画完成时触发
animationend
事件冒泡,事件捕获
绑定事件 + 冒泡:
bind+ 事件名 , 如bindtap绑定事件 + 阻止冒泡:
catch+ 事件名 , 如catchtap
捕获 + 冒泡:
capture-bind:+ 事件名 , 如capture-bind:tap捕获 + 中断事件 + 取消冒泡:
capture-catch:+ 事件名 , 如capture-catch:tap
事件对象
BaseEvent( 基础事件,所有事件的父类 )同 target
id( String - 事件源的id )tagName( String - 当前组件的类型 )dataset( Object - 事件源组件上由data-开头的自定义属性集合 )type( String - 事件类型 )timeStamp( Integer - 事件生成时的时间戳 )target( Object - 触发事件的组件的属性 )currentTarget( Object - 当前组件的属性 )TouchEvent( 触摸事件 )identifier( Number - 触摸点的标识符 )pageX( Number - 距文档左上角 x 轴的距离 )pageY( Number 距文档左上角 y 轴的距离 )clientX( Number 距页面可显示区域 x 轴的距离 )clientY( Number 距页面可显示区域 y 轴的距离 )touches( Array 停留在屏幕中的触摸点的信息对象集合 )changedTouches( Array 变化的触摸点信息对象集合 )CustomEvent( 自定义事件 )detail( Object - 自定义事件额外的信息 )
6. wxs 模块
wxs 文件就是 js 文件,引入 wxs 文件就是引入一个 js 模块( 不能用es6 ),现有两种引入方式
-
在
wxml里引用,使用<wxs>标签
1.1.module必填,为当前模块的模块名
1.2.src选填,引用.wxs文件的相对路径(仅当标签为 单闭合标签 或 标签的内容为空 时有效)
1.3. 例引入:<wxs src="./index.wxs" module="index" /> 自己撸: <wxs module="index"> var foo = '海洋饼干' module.exports = { foo } </wxs>Copy after login 在
wxs里引用,使用require引用
2.1. 例var tools = require("./tools.wxs")
7. wxss 样式
微信版的 css ,几个不同的地方
添加 自适应尺寸单位 ( rpx )
添加 导入外联样式 ( @import )
精减 css选择器,只支持
类选择器 .class
id选择器 #id
标签选择器 element
兄弟选择器 element1,element2
伪元素选择器 只支持两种 ::after ::before
8. 自定义组件
使用自定义组件
-
创建自定义组件( 类似于page,但需要在 json 文件中将
component字段设为true){ "component": true }Copy after login -
创建组件构造器 ( 构造函数不是page(),而是Component() )
Component({
  // 组件的对外属性(父组件传的数据)
  properties: {
    msg: {
      type: String,
      value: 'msg',
      // 父组件值改变时触发的回调
      observer: () => {
          console.log('i am change')
      }
    }
  },
  data: {
    componentData: {}
  },
})
Copy after login -
使用自定义组件( 先要在页面的
json文件中进行引用声明 )// 先引用声明 "usingComponents": { // hybg 标签名 "hybg": "../component/component" // 相对路径 } // 直接使用,需要的话要绑定数据 <hybg msg="{{ data }}"></hybg>Copy after login
slot 模板
 1. 单 solt
    "
    // component
    <view>
        <slot></slot>
    </view>

    // page ( hybg 是上面的组件标签名)
    <hybg>
        <view> page 的 slot </view>
    </hybg>

    // 效果
    <view>
        <view> page 的 slot </view>
    </view>

    "
 2. 多slot
    "
    // 先在 Component 的 js 中添加
    options: {
        // 启用多slot
        multipleSlots: true
      },
    // 多 slot 需要使用不同的 name 来区分
    <view>
        <slot name="first"></slot>
        <slot name="last"></slot>
    </view>

    // page ( hybg 是上面的组件标签名)
    <hybg>
        <view slot="first"> first -- slot </view>
        <view slot="last"> last-- slot </view>
    </hybg>

    // 效果
    <view>
        <view slot="first"> first -- slot </view>
        <view slot="last"> last-- slot </view>
    </view>

"父子组件事件(子组件传值)
// page
fatherEvent: function(e){
    console.log(e.detail) // 组件传递的自定义信息
  }
<hybg bindhybgEvent="fatherEvent"></hybg>

 // component
 tap: function(){
  var myEventDetail = { a: 10} // detail对象,提供给事件监听函数
  var myEventOption = {} // 触发事件的配置选项
  // bubbles 事件是否冒泡
  // capturePhase 事件是否拥有捕获阶段
  // composed 是否可以穿越父组件边界
  this.triggerEvent('hybgEvent', myEventDetail, myEventOption)
}

<view bindtap="tap">触发 hybgEvent 事件</view>相关推荐:
The above is the detailed content of Quick knowledge about WeChat mini program. For more information, please follow other related articles on the PHP Chinese website!

Hot AI Tools

Undresser.AI Undress
AI-powered app for creating realistic nude photos

AI Clothes Remover
Online AI tool for removing clothes from photos.

Undress AI Tool
Undress images for free

Clothoff.io
AI clothes remover

AI Hentai Generator
Generate AI Hentai for free.

Hot Article
Hot Tools

Notepad++7.3.1
Easy-to-use and free code editor

SublimeText3 Chinese version
Chinese version, very easy to use

Zend Studio 13.0.1
Powerful PHP integrated development environment

Dreamweaver CS6
Visual web development tools

SublimeText3 Mac version
God-level code editing software (SublimeText3)
Hot Topics
 1371
1371
 52
52

 Develop WeChat applet using Python
Jun 17, 2023 pm 06:34 PM
Develop WeChat applet using Python
Jun 17, 2023 pm 06:34 PM
With the popularity of mobile Internet technology and smartphones, WeChat has become an indispensable application in people's lives. WeChat mini programs allow people to directly use mini programs to solve some simple needs without downloading and installing applications. This article will introduce how to use Python to develop WeChat applet. 1. Preparation Before using Python to develop WeChat applet, you need to install the relevant Python library. It is recommended to use the two libraries wxpy and itchat here. wxpy is a WeChat machine
 Can small programs use react?
Dec 29, 2022 am 11:06 AM
Can small programs use react?
Dec 29, 2022 am 11:06 AM
Mini programs can use react. How to use it: 1. Implement a renderer based on "react-reconciler" and generate a DSL; 2. Create a mini program component to parse and render DSL; 3. Install npm and execute the developer Build npm in the tool; 4. Introduce the package into your own page, and then use the API to complete the development.
 Implement card flipping effects in WeChat mini programs
Nov 21, 2023 am 10:55 AM
Implement card flipping effects in WeChat mini programs
Nov 21, 2023 am 10:55 AM
Implementing card flipping effects in WeChat mini programs In WeChat mini programs, implementing card flipping effects is a common animation effect that can improve user experience and the attractiveness of interface interactions. The following will introduce in detail how to implement the special effect of card flipping in the WeChat applet and provide relevant code examples. First, you need to define two card elements in the page layout file of the mini program, one for displaying the front content and one for displaying the back content. The specific sample code is as follows: <!--index.wxml-->&l
 Alipay launched the 'Chinese Character Picking-Rare Characters' mini program to collect and supplement the rare character library
Oct 31, 2023 pm 09:25 PM
Alipay launched the 'Chinese Character Picking-Rare Characters' mini program to collect and supplement the rare character library
Oct 31, 2023 pm 09:25 PM
According to news from this site on October 31, on May 27 this year, Ant Group announced the launch of the "Chinese Character Picking Project", and recently ushered in new progress: Alipay launched the "Chinese Character Picking-Uncommon Characters" mini program to collect collections from the society Rare characters supplement the rare character library and provide different input experiences for rare characters to help improve the rare character input method in Alipay. Currently, users can enter the "Uncommon Characters" applet by searching for keywords such as "Chinese character pick-up" and "rare characters". In the mini program, users can submit pictures of rare characters that have not been recognized and entered by the system. After confirmation, Alipay engineers will make additional entries into the font library. This website noticed that users can also experience the latest word-splitting input method in the mini program. This input method is designed for rare words with unclear pronunciation. User dismantling
 How uniapp achieves rapid conversion between mini programs and H5
Oct 20, 2023 pm 02:12 PM
How uniapp achieves rapid conversion between mini programs and H5
Oct 20, 2023 pm 02:12 PM
How uniapp can achieve rapid conversion between mini programs and H5 requires specific code examples. In recent years, with the development of the mobile Internet and the popularity of smartphones, mini programs and H5 have become indispensable application forms. As a cross-platform development framework, uniapp can quickly realize the conversion between small programs and H5 based on a set of codes, greatly improving development efficiency. This article will introduce how uniapp can achieve rapid conversion between mini programs and H5, and give specific code examples. 1. Introduction to uniapp unia
 How to operate mini program registration
Sep 13, 2023 pm 04:36 PM
How to operate mini program registration
Sep 13, 2023 pm 04:36 PM
Mini program registration operation steps: 1. Prepare copies of personal ID cards, corporate business licenses, legal person ID cards and other filing materials; 2. Log in to the mini program management background; 3. Enter the mini program settings page; 4. Select " "Basic Settings"; 5. Fill in the filing information; 6. Upload the filing materials; 7. Submit the filing application; 8. Wait for the review results. If the filing is not passed, make modifications based on the reasons and resubmit the filing application; 9. The follow-up operations for the filing are Can.
 Tutorial on writing a simple chat program in Python
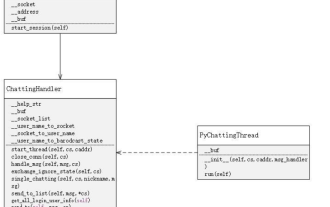
May 08, 2023 pm 06:37 PM
Tutorial on writing a simple chat program in Python
May 08, 2023 pm 06:37 PM
Implementation idea: Establishing the server side of thread, so as to process the various functions of the chat room. The establishment of the x02 client is much simpler than the server. The function of the client is only to send and receive messages, and to enter specific characters according to specific rules. To achieve the use of different functions, therefore, on the client side, you only need to use two threads, one is dedicated to receiving messages, and the other is dedicated to sending messages. As for why not use one, that is because, only
 Introduction to WeChat applet development in Java language
Jun 09, 2023 pm 10:40 PM
Introduction to WeChat applet development in Java language
Jun 09, 2023 pm 10:40 PM
WeChat applet is a lightweight application that can be run on the WeChat platform. It does not require downloading and installation, which is convenient and fast. Java language, as a language widely used in enterprise-level application development, can also be used for the development of WeChat applets. In Java language, you can use the SpringBoot framework and third-party toolkits to develop WeChat applets. The following is a simple WeChat applet development process. To create a WeChat mini program, first, you need to register a mini program on the WeChat public platform. After successful registration, you can obtain
