

Simple implementation methods of MVC and MVVM

MVC is a design pattern that divides the application into three parts: data (model), presentation layer (view) and user interaction layer. Combined with the picture below, we can better understand the relationship between the three. 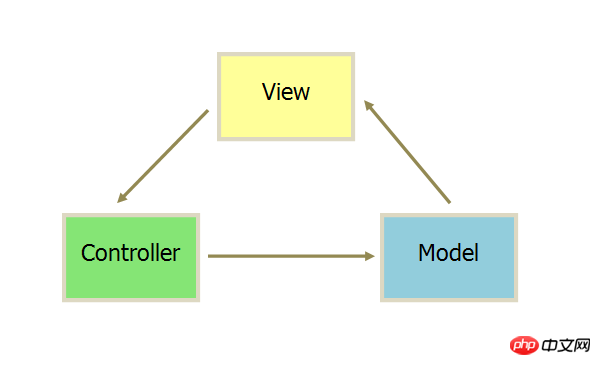
In other words, the occurrence of an event is the process
User and application interaction
The controller's event handler is triggered
The controller requests data from the model and hands it to the view
View presents data to the user
Model: used to store all data objects of the application. The model does not have to know the details of the view and controller; the model only needs to contain the data and the logic directly related to that data. Any event handling code, view templates, and logic that is not related to the model should be isolated from the model.
View: The view layer is presented to the user, and the user interacts with it. In JavaScript applications, views are mostly composed of html, css and JavaScript templates. Views should not contain any logic other than simple conditional statements in templates. In fact, similar to the model, the view should also be decoupled from other parts of the application
Controller: The controller is the link between the model and the view. The controller gets events and input from the view, handles them, and updates the view accordingly. When the page loads, the controller adds event listeners to the view, such as listening for form submissions and button clicks. Then when the user interacts with the application, the event triggers in the controller start working.
For example, the early JavaScript framework backbone adopted the MVC pattern.
The above example seems too empty. Let’s talk about an example from real life:
1. The user submits a new chat message
2. The event handler of the controller is triggered
3. The controller creates a new chat model
4. Then the controller updates the view
5. The user sees the new chat information in the chat window
Let’s talk about a life example. We use Code the way to get a deeper understanding of MVC.
Model
M in MVC represents model, and logic related to data operations and behavior should be put into the model. For example, if we create a Model object, all data operations should be placed in this namespace. The following is some simplified code. First, create a new model and instance
var Model = {
    create: function() {
        this.records = {}
        var object = Object.create(this)
        object.prototype = Object.create(this.prototype)
        return object
    }
}create is used to create an object with Model as the prototype, and then there are some functions including data operations including search and storage
var Model = {
    /*---代码片段--*/
    find: function () {
        return this.records[this.id]
    },
    save: function () {
        this.records[this.id] = this
    }
}We can use this Model below:
user = Model.create()
user.id = 1
user.save()
asset = Model.create()
asset.id = 2
asset.save()
Model.find(1)
=> {id:1}You can see that we have found this object. We have completed the model, which is the data part.
Control
Let’s talk about the controller in mvc. When the page loads, the controller binds the event handler to the view, handles callbacks appropriately, and interfaces with the model as necessary. The following is a simple example of a controller:
var ToggleView = {
    init: function (view) {
        this.view = $(view)
        this.view.mouseover(this.toggleClass, true)
        this.view.mouseout(this.toggleClass, false)
    },
    this.toggleClass: function () {
        this.view.toggleClass('over', e.data)
    }
}In this way, we have achieved simple control of a view. When the mouse is moved into the element, the over class is added, and when the mouse is removed, the over class is removed. Then add some simple styles such as
    ex:
        .over {color: red}
        p{color: black}

这样控制器就和视图建立起了连接。在MVC中有一个特性就是一个控制器控制一个视图,随着项目体积的增大,就需要一个状态机用于管理这些控制器。先来创建一个状态机
var StateMachine = function() {}
SateMachine.add = function (controller) {
    this.bind('change', function (e, current) {
        if (controller == current) {
            controller.activate()
        } else {
            controller.deactivate()
        }
    })

    controller.active = function () {
        this.trigger('change', controller)
    }
}
// 创建两个控制器
var con1 = {
    activate: funtion() {
        $('#con1').addClass('active')
    },
    deactivate: function () {
        $('#con1').removeClass('active')
    }
}

var con2 = {
    activate: funtion() {
        $('#con2').addClass('active')
    },
    deactivate: function () {
        $('#con2').removeClass('active')
    }
}

// 创建状态机,添加状态
var sm = new StateMachine
sm.add(con1)
sm.add(con2)

// 激活第一个状态
con1.active()to achieve simple controller management, and finally we add some css styles.
#con1, #con2 { display: none }
#con2.active, #con2.active { display: block }When con1 is activated, the style changes, that is, the view changes.
That’s it for the controller. Let’s take a look at the View part in MVC, that is, the view
View
The view is the interface of the application, which provides users with visual presentation and Interact with users. In JavaScript, views are snippets of HTML without logic, managed by application controllers, and views handle event callbacks and embedded data. To put it simply, write HTML code in javaScript, and then insert HTML fragments into HTML pages. Here are two methods:
Dynamic rendering view
Use document.createElement to create DOM elements, Set their content and append to the page, for example
var views = documents.getElementById('views')
views.innerHTML = '' // Elements are cleared
var wapper = document.createElement('p ')
wrapper.innerText = 'add to views'
views.appendChild(wrapper)
This completes creating the element with createElement and then adding it to the HTML page.
Templates
If you have previous back-end development experience, you should be familiar with templates. For example, ejs is commonly used in nodejs. The following is a small example of ejs. You can see that ejs directly renders javascript into HTML
str = '
<%= title %>'
ejs.render(str, {
title: 'ejs'
Copy after login
title: 'ejs'
});
那么这个渲染后的结果就是
ejs
当然实际中ejs的功能更强大,我们甚至可以在其中加入函数,模板语言是不是觉得跟vue,React的书写方式特别像,我也觉得像。那么view的作用就显而易见了,就是将HTML和javaScript连接起来。剩下一个问题就是在mvc原理图我们看到了视图和模型之间的关系,当模型更改的时候,视图也会跟着更新。那么视图和模型就需要进行绑定,它意味着当记录发生改变时,你的控制器不需要处理视图的更新,因为这些更新是在后台自动完成的。为了将javaScript对象和视图绑定在一起,我们需要设置一个回调函数,当对象的属性发生改变时发送一个更新视图的通知。下面是值发生变化的时候调用的回调函数,当然现在我们可以使用更简单的set,get进行数据的监听,这在我们后面的MVVM将会讲到。
var addChange = function (ob) {
    ob.change = function (callback) {
        if (callback) {
            if (!this._change) this._change = {}
            this._change.push(callback)
        } else {
            if (!this._change) return
            for (var i = this._change.length - 1; i >= 0; i--) {
                this._change[i].apply(this)
            }
        }
    }
}我们来看看一个实际的例子
var addChange = function (ob) {
    ob.change = function (callback) {
        if (callback) {
            if (!this._change) this._change = {}
            this._change.push(callback)
        } else {
            if (!this._change) return
            for (var i = this._change.length - 1; i >= 0; i--) {
                this._change[i].apply(this)
            }
        }
    }
}

var object = {}
object.name = 'Foo'

addChange(object)
object.change(function () {
    console.log('Changed!', this)
    // 更新视图的代码
})
obejct.change()
object.name = 'Bar'
object.change()这样就实现了执行和触发change事件了。
我相信大家对MVC有了比较深刻的理解,下面来学习MVVM模式。
MVVM
如今主流的web框架基本都采用的是MVVM模式,为什么放弃了MVC模式,转而投向了MVVM模式呢。在之前的MVC中我们提到一个控制器对应一个视图,控制器用状态机进行管理,这里就存在一个问题,如果项目足够大的时候,状态机的代码量就变得非常臃肿,难以维护。还有一个就是性能问题,在MVC中我们大量的操作了DOM,而大量操作DOM会让页面渲染性能降低,加载速度变慢,影响用户体验。最后就是当Model频繁变化的时候,开发者就主动更新View,那么数据的维护就变得困难。世界是懒人创造的,为了减小工作量,节约时间,一个更适合前端开发的架构模式就显得非常重要。这时候MVVM模式在前端中的应用就应运而生。
MVVM让用户界面和逻辑分离更加清晰。下面是MVVM的示意图,可以看到它由Model、ViewModel、View这三个部分组成。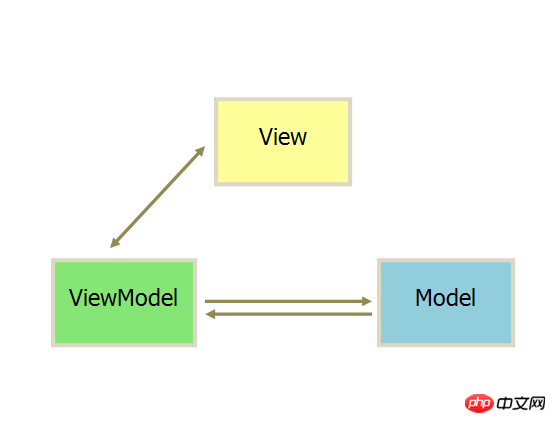
下面分别来讲讲他们的作用
View
View是作为视图模板,用于定义结构、布局。它自己不处理数据,只是将ViewModel中的数据展现出来。此外为了和ViewModel产生关联,那么还需要做的就是数据绑定的声明,指令的声明,事件绑定的声明。这在当今流行的MVVM开发框架中体现的淋淋尽致。在示例图中,我们可以看到ViewModel和View之间是双向绑定,意思就是说ViewModel的变化能够反映到View中,View的变化也能够改变ViewModel的数据值。那如何实现双向绑定呢,例如有这个input元素:
<input type='text' yg-model='message'>
随着用户在Input中输入值的变化,在ViewModel中的message也会发生改变,这样就实现了View到ViewModel的单向数据绑定。下面是一些思路:
扫描看哪些节点有yg-xxx属性
自动给这些节点加上onchange这种事件
更新ViewModel中的数据,例如ViewModel.message = xx.innerText
那么ViewModel到View的绑定可以是下面例子:
<p yg-text='message'></p>
渲染后p中显示的值就是ViewModel中的message变量值。下面是一些思路:
首先注册ViewModel
扫描整个DOM Tree 看哪些节点有yg-xxx这中属性
记录这些被单向绑定的DOM节点和ViewModel之间的隐射关系
使用innerText,innerHTML = ViewModel.message进行赋值
ViewModel
ViewModel起着连接View和Model的作用,同时用于处理View中的逻辑。在MVC框架中,视图模型通过调用模型中的方法与模型进行交互,然而在MVVM中View和Model并没有直接的关系,在MVVM中,ViewModel从Model获取数据,然后应用到View中。相对MVC的众多的控制器,很明显这种模式更能够轻松管理数据,不至于这么混乱。还有的就是处理View中的事件,例如用户在点击某个按钮的时候,这个行动就会触发ViewModel的行为,进行相应的操作。行为就可能包括更改Model,重新渲染View。
Model
Model 层,对应数据层的域模型,它主要做域模型的同步。通过 Ajax/fetch 等 API 完成客户端和服务端业务 Model 的同步。在层间关系里,它主要用于抽象出 ViewModel 中视图的 Model。
MVVM简单实现
实现效果:
<p id="mvvm">
<input type="text" v-model="message">
<p>{{message}}</p>
<button v-click='changeMessage'></button>
</p>
<script type="">
const vm = new MVVM({
el: '#mvvm',
methods: {
changeMessage: function () {
this.message = 'message has change'
}
},
data: {
message: 'this is old message'
}
})
</script>这里为了简单,借鉴了Vue的一些方法
Observer
MVVM为我们省去了手动更新视图的步骤,一旦值发生变化,视图就重新渲染,那么就需要对数据的改变就行检测。例如有这么一个例子:
hero = {
    name: 'A'
}这时候但我们访问hero.name 的时候,就会打印出一些信息:
hero.name
// I'm A
当我们对hero.name 进行更改的时候,也会打印出一些信息:
hero.name = 'B'
// the name has change
这样我们是不是就实现了数据的观测了呢。
在Angular中实现数据的观测使用的是脏检查,就是在用户进行可能改变ViewModel的操作的时候,对比以前老的ViewModel然后做出改变。
而在Vue中,采取的是数据劫持,就是当数据获取或者设置的时候,会触发Object.defineProperty()。
这里我们采取的是Vue数据观测的方法,简单一些。下面是具体的代码
function observer (obj) {
    let keys = Object.keys(obj)
    if (typeof obj === 'object' && !Array.isArray(obj)) {
        keys.forEach(key => {
            defineReactive(obj, key, obj[key])
        })
    }
}

function defineReactive (obj, key, val) {
    observer(val)
    Object.defineProperty(obj, key, {
        enumerable: true,
        configurable: true,
        get: function () {
            console.log('I am A')
            return val
        },
        set: function (newval) {
            console.log('the name has change')
            observer(val)
            val = newval
        }
    })
}把hero带入observe方法中,结果正如先前预料的一样的结果。这样数据的检测也就实现了,然后在通知订阅者。如何通知订阅者呢,我们需要实现一个消息订阅器,维护一个数组用来收集订阅者,数据变动触发notify(),然后订阅者触发update()方法,改善后的代码长这样:
function defineReactive (obj) {
    dep = new Dep()
    Object.defineProperty(obj, key, {
        enumerable: true,
        configurable: true,
        get: function () {
            console.log('I am A')
            Dep.target || dep.depend()
            return val
        },
        set: function (newval) {
            console.log('the name has change')
            dep.notify()
            observer(val)
            val = newval
        }
    })
}

var Dep = function Dep () {
    this.subs = []
}
Dep.prototype.notify = function(){
    var subs = this.subs.slice()
    for (var i = 0, l = subs.length; i < l; i++) {
        subs[i].update()
    }
}
Dep.prototype.addSub = function(sub){
    this.subs.push(sub)
}
Dep.prototype.depend = function(){
    if (Dep.target) {
        Dep.target.addDep(this)
    }
}这跟Vue源码差不多,就完成了往订阅器里边添加订阅者,和通知订阅者。这里以前我看Vue源码的时候,困扰了很久的问题,就是在get方法中Dep是哪儿来的。这里说一下他是一个全局变量,添加target变量是用于向订阅器中添加订阅者。这里的订阅者是Wacther,Watcher就可以连接视图更新视图。下面是Watcher的一部分代码
Watcher.prototype.get = function(key){
    Dep.target = this
    this.value = obj[key] // 触发get从而向订阅器中添加订阅者
    Dep.target = null // 重置
};Compile
在讲MVVM概念的时候,在View -> ViewModel的过程中有一个步骤就是在DOM tree中寻找哪个具有yg-xx的元素。这一节就是讲解析模板,让View和ViewModel连接起来。遍历DOM tree是非常消耗性能的,所以会先把节点el转换为文档碎片fragment进行解析编译操作。操作完成后,在将fragment添加到原来的真实DOM节点中。下面是它的代码
function Compile (el) {
    this.el = document.querySelector(el)
    this.fragment = this.init()
    this.compileElement()
}

Compile.prototype.init = function(){
    var fragment = document.createDocumentFragment(), chid
    while (child.el.firstChild) {
        fragment.appendChild(child)
    }
    return fragment
};

Compile.prototype.compileElement = function(){
    fragment = this.fragment
    me = this
    var childNodes = el.childNodes
    [].slice.call(childNodes).forEach(function (node) {
        var text = node.textContent
        var reg = /\{\{(.*)\}\}/ // 获取{{}}中的值
        if (reg.test(text)) {
            me.compileText(node, RegExp.$1)
        }

        if (node.childNodes && node.childNodes.length) {
            me.compileElement(node)
        }
    })
}
Compile.prototype.compileText = function (node, vm, exp) {
    updateFn && updateFn(node, vm[exp])
    new Watcher(vm, exp, function (value, oldValue) {
        // 一旦属性值有变化,就会收到通知执行此更新函数,更新视图
        updateFn() && updateFn(node, val)
    })
}
// 更新视图
function updateFn (node, value) {
    node.textContent = value
}这样编译fragment就成功了,并且ViewModel中值的改变就能够引起View层的改变。接下来是Watcher的实现,get方法已经讲了,我们来看看其他的方法。
Watcher
Watcher是连接Observer和Compile之间的桥梁。可以看到在Observer中,往订阅器中添加了自己。dep.notice()发生的时候,调用了sub.update(),所以需要一个update()方法,值发生变化后,就能够触发Compile中的回调更新视图。下面是Watcher的具体实现
var Watcher = function Watcher (vm, exp, cb) {
    this.vm = vm
    this.cb = cb
    this.exp = exp
    // 触发getter,向订阅器中添加自己
    this.value = this.get()
}

Watcher.prototype = {
    update: function () {
        this.run()
    },
    addDep: function (dep) {
        dep.addSub(this)
    },
    run: function () {
        var value = this.get()
        var oldVal = this.value
        if (value !== oldValue) {
            this.value = value
            this.cb.call(this.vm, value, oldValue) // 执行Compile中的回调
        }
    },
    get: function () {
        Dep.target = this
        value = this.vm[exp] // 触发getter
        Dep.target = null
        return value
    }
}在上面的代码中Watcher就起到了连接Observer和Compile的作用,值发生改变的时候通知Watcher,然后Watcher调用update方法,因为在Compile中定义的Watcher,所以值发生改变的时候,就会调用Watcher()中的回调,从而更新视图。最重要的部分也就完成了。在加一个MVVM的构造器就ok了。推荐一篇文章自己实现MVVM,这里边讲的更加详细。
相关推荐:
The above is the detailed content of Simple implementation methods of MVC and MVVM. For more information, please follow other related articles on the PHP Chinese website!

Hot AI Tools

Undresser.AI Undress
AI-powered app for creating realistic nude photos

AI Clothes Remover
Online AI tool for removing clothes from photos.

Undress AI Tool
Undress images for free

Clothoff.io
AI clothes remover

Video Face Swap
Swap faces in any video effortlessly with our completely free AI face swap tool!

Hot Article
Hot Tools

Notepad++7.3.1
Easy-to-use and free code editor

SublimeText3 Chinese version
Chinese version, very easy to use

Zend Studio 13.0.1
Powerful PHP integrated development environment

Dreamweaver CS6
Visual web development tools

SublimeText3 Mac version
God-level code editing software (SublimeText3)
Hot Topics
 1386
1386
 52
52

 How to delete WeChat friends? How to delete WeChat friends
Mar 04, 2024 am 11:10 AM
How to delete WeChat friends? How to delete WeChat friends
Mar 04, 2024 am 11:10 AM
WeChat is one of the mainstream chat tools. We can meet new friends, contact old friends and maintain the friendship between friends through WeChat. Just as there is no such thing as a banquet that never ends, disagreements will inevitably occur when people get along with each other. When a person extremely affects your mood, or you find that your views are inconsistent when you get along, and you can no longer communicate, then we may need to delete WeChat friends. How to delete WeChat friends? The first step to delete WeChat friends: tap [Address Book] on the main WeChat interface; the second step: click on the friend you want to delete and enter [Details]; the third step: click [...] in the upper right corner; Step 4: Click [Delete] below; Step 5: After understanding the page prompts, click [Delete Contact]; Warm
 How to write a novel in the Tomato Free Novel app. Share the tutorial on how to write a novel in Tomato Novel.
Mar 28, 2024 pm 12:50 PM
How to write a novel in the Tomato Free Novel app. Share the tutorial on how to write a novel in Tomato Novel.
Mar 28, 2024 pm 12:50 PM
Tomato Novel is a very popular novel reading software. We often have new novels and comics to read in Tomato Novel. Every novel and comic is very interesting. Many friends also want to write novels. Earn pocket money and edit the content of the novel you want to write into text. So how do we write the novel in it? My friends don’t know, so let’s go to this site together. Let’s take some time to look at an introduction to how to write a novel. Share the Tomato novel tutorial on how to write a novel. 1. First open the Tomato free novel app on your mobile phone and click on Personal Center - Writer Center. 2. Jump to the Tomato Writer Assistant page - click on Create a new book at the end of the novel.
 How to enter bios on Colorful motherboard? Teach you two methods
Mar 13, 2024 pm 06:01 PM
How to enter bios on Colorful motherboard? Teach you two methods
Mar 13, 2024 pm 06:01 PM
Colorful motherboards enjoy high popularity and market share in the Chinese domestic market, but some users of Colorful motherboards still don’t know how to enter the bios for settings? In response to this situation, the editor has specially brought you two methods to enter the colorful motherboard bios. Come and try it! Method 1: Use the U disk startup shortcut key to directly enter the U disk installation system. The shortcut key for the Colorful motherboard to start the U disk with one click is ESC or F11. First, use Black Shark Installation Master to create a Black Shark U disk boot disk, and then turn on the computer. When you see the startup screen, continuously press the ESC or F11 key on the keyboard to enter a window for sequential selection of startup items. Move the cursor to the place where "USB" is displayed, and then
 How to recover deleted contacts on WeChat (simple tutorial tells you how to recover deleted contacts)
May 01, 2024 pm 12:01 PM
How to recover deleted contacts on WeChat (simple tutorial tells you how to recover deleted contacts)
May 01, 2024 pm 12:01 PM
Unfortunately, people often delete certain contacts accidentally for some reasons. WeChat is a widely used social software. To help users solve this problem, this article will introduce how to retrieve deleted contacts in a simple way. 1. Understand the WeChat contact deletion mechanism. This provides us with the possibility to retrieve deleted contacts. The contact deletion mechanism in WeChat removes them from the address book, but does not delete them completely. 2. Use WeChat’s built-in “Contact Book Recovery” function. WeChat provides “Contact Book Recovery” to save time and energy. Users can quickly retrieve previously deleted contacts through this function. 3. Enter the WeChat settings page and click the lower right corner, open the WeChat application "Me" and click the settings icon in the upper right corner to enter the settings page.
 How to set font size on mobile phone (easily adjust font size on mobile phone)
May 07, 2024 pm 03:34 PM
How to set font size on mobile phone (easily adjust font size on mobile phone)
May 07, 2024 pm 03:34 PM
Setting font size has become an important personalization requirement as mobile phones become an important tool in people's daily lives. In order to meet the needs of different users, this article will introduce how to improve the mobile phone use experience and adjust the font size of the mobile phone through simple operations. Why do you need to adjust the font size of your mobile phone - Adjusting the font size can make the text clearer and easier to read - Suitable for the reading needs of users of different ages - Convenient for users with poor vision to use the font size setting function of the mobile phone system - How to enter the system settings interface - In Find and enter the "Display" option in the settings interface - find the "Font Size" option and adjust it. Adjust the font size with a third-party application - download and install an application that supports font size adjustment - open the application and enter the relevant settings interface - according to the individual
 Summary of methods to obtain administrator rights in Win11
Mar 09, 2024 am 08:45 AM
Summary of methods to obtain administrator rights in Win11
Mar 09, 2024 am 08:45 AM
A summary of how to obtain Win11 administrator rights. In the Windows 11 operating system, administrator rights are one of the very important permissions that allow users to perform various operations on the system. Sometimes, we may need to obtain administrator rights to complete some operations, such as installing software, modifying system settings, etc. The following summarizes some methods for obtaining Win11 administrator rights, I hope it can help you. 1. Use shortcut keys. In Windows 11 system, you can quickly open the command prompt through shortcut keys.
 The secret of hatching mobile dragon eggs is revealed (step by step to teach you how to successfully hatch mobile dragon eggs)
May 04, 2024 pm 06:01 PM
The secret of hatching mobile dragon eggs is revealed (step by step to teach you how to successfully hatch mobile dragon eggs)
May 04, 2024 pm 06:01 PM
Mobile games have become an integral part of people's lives with the development of technology. It has attracted the attention of many players with its cute dragon egg image and interesting hatching process, and one of the games that has attracted much attention is the mobile version of Dragon Egg. To help players better cultivate and grow their own dragons in the game, this article will introduce to you how to hatch dragon eggs in the mobile version. 1. Choose the appropriate type of dragon egg. Players need to carefully choose the type of dragon egg that they like and suit themselves, based on the different types of dragon egg attributes and abilities provided in the game. 2. Upgrade the level of the incubation machine. Players need to improve the level of the incubation machine by completing tasks and collecting props. The level of the incubation machine determines the hatching speed and hatching success rate. 3. Collect the resources required for hatching. Players need to be in the game
 Detailed explanation of Oracle version query method
Mar 07, 2024 pm 09:21 PM
Detailed explanation of Oracle version query method
Mar 07, 2024 pm 09:21 PM
Detailed explanation of Oracle version query method Oracle is one of the most popular relational database management systems in the world. It provides rich functions and powerful performance and is widely used in enterprises. In the process of database management and development, it is very important to understand the version of the Oracle database. This article will introduce in detail how to query the version information of the Oracle database and give specific code examples. Query the database version of the SQL statement in the Oracle database by executing a simple SQL statement
