Antsle (https://antsle.com/) is an incredibly powerful, easy-to-use tool for deploying virtual machines and containers. These deployed machines are called "antlets" and can be fully fledged server operating systems (such as CentOS, Ubuntu Server or Windows Server) or desktop operating systems. Antsle makes developers' dreams come true and works in production environments. Deploy and develop your antlets to run websites, databases, cloud servers, and more.
But how difficult is it to deploy a new antlet? You'll be surprised how easy this process is. This article walks through the process of creating a new antlet: an Ubuntu Server with the entire Kubernetes stack. Considering the complexity of installing Kubernetes, you would think that the process would take a long time, but it doesn't.
what do you need?
You need an Antsle, which must be connected to your LAN and turned on. I assume you already have the product installed and have access to antmans, Antsle's web-based interface.
Create antlet
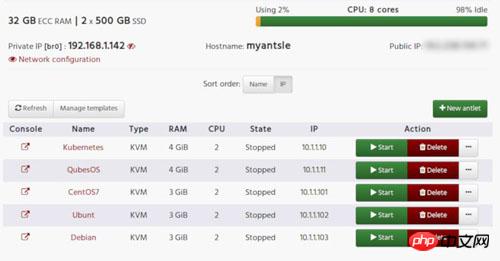
Once you are logged in to antMan, click the antMan Home tab and click the New antlet button (see Figure A).

Figure A: antMan main page
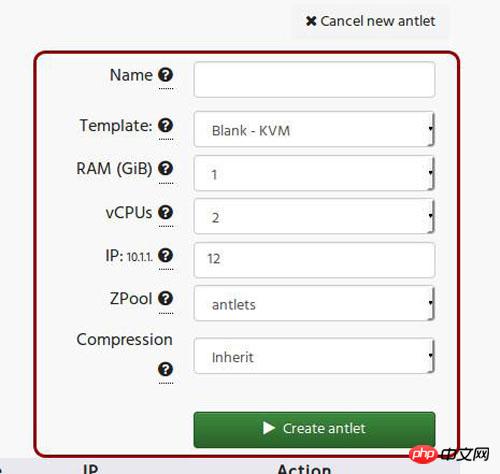
In the subsequent window (see Figure B), you can configure the antlet to meet your requirements. Remember, if the antlet is serving a resource-hungry environment, make sure you provide it with enough memory and vCPU.

Figure B: Creating a new antlet
There are a few things you need to know before clicking the Create antlet button. First, the template option lets you choose from a list of pre-installed templates. The available options are:
Blank
CentOS 7
FreeBSD
Ubuntu 16.04 Kubernetes
Debian - LXC
Those are the only templates available in the Template drop-down menu. If you click Add More, you will find:
Ubuntu-Xenial LXC
Windows Server 2012
Debian 8.5
Windows Server 2012 Standard GUI
Kali Linux
Windows 10
CentOS 7.1 LXC
Windows Server 2016
Kali Linux (without GUI)
It is important to note that Windows templates do not include a Windows license. If you deploy one of these templates, an operating system license is required.
Take this article as an example, choose Ubuntu 16.04 Kubernetes.
Let’s talk about the IP address first. By default, our Antlets run on the 10.1.1 subnet, so when you create a new Antlet, define the last part of the address. I'll cover creating a virtual network card (so you can access Antlet from your LAN) in the next article. For the purposes of this article, we'll stick with the 10.1.1 subnet.
Once you have configured the antlet to meet your requirements, click Create antlet. In the subsequent window, antMan will guide you on how to access the new antlet. To do this, you use SSH in this form:
1.ssh -p 22XXX root@myantsle.local
Before doing this step, you must start the newly created Antlet. To do this, return to the antMan main page and click on the Start button associated with the newly created antlet (see Figure C).
Figure C: Our newly created antlet, ready to start
Once the antlet has been opened, it needs to be given time to start. You can always click the VNC button (to the left of the antlet name) to establish a VNC connection to the antlet. You will see the operating system login prompt. For most antlets, the login information is root/antsle. Obviously, you'll want to change that login immediately. If it is a Linux antlet, you need to create a new administrator account and log in as a non-root user.
To ensure you are connected to the antlet through the shell, you will want to connect via SSH to port 22XXX (where XXX is the IP of your antlet). So, if your antlet is running on 10.1.1.12, the port will be 22012 and the secure shell command will be:
1.ssh -p 22012 root@myantsle.local
This , you may encounter another problem. For some reason, the machine you are trying to log in to antlet cannot see myantsle.local. At this time, you need to replace antsle's IP address as follows (my Antsle is at 192.168.1.142):
1.ssh -p 22012 root@192.168.1.142
Guess what? You'll find another problem here. Most Linux distributions do not allow secure shell login using the root account. Therefore, before connecting to the antlet via ssh, you must first log in through the VNC solution and create a new user. You can then connect to the antlet via SSH as the new user. Several commands used to create new users are:
1.useradd -m USERNAME
2.passwd USERNAME
3.usermod -aG sudo USERNAME
Where USERNAME is the actual name of the new user. Once you have added the new user, open the file /etc/passwd (using the command nano /etc/passwd), find the new user, and add /bin/bash to the end of the line for that user (see Figure D).
Figure D: Make sure the new user's shell is bash
At this point, you should be able to SSH into the antlet and start working.
Welcome to your antlet
Congratulations on just deploying your first antlet. It took less than 5 minutes (more likely to be about 2 minutes) from logging into antMan to logging into Antlet. Aside from solving the SSH login issue, the whole process is actually pretty simple. Start three or four Ubuntu Kubernetes antlets and you're ready to start using your first Kubernetes cluster. Isn't this attractive?
 setInterval
 What is the shortcut key for brush size?
 Detailed explanation of linux dd command
 How to solve disk parameter errors
 What are the SEO diagnostic methods?
 What are the css3 gradient properties?
 The most promising coin in 2024
 What does pycharm mean when running in parallel?
 The difference between PD fast charging and general fast charging


