How to use SpringMvc+AngularJs
This time I will bring you how to use SpringMvc+AngularJs, what are the precautions when using SpringMvc+AngularJs, the following is a practical case, let's take a look.
The front-end framework is segmented and complicated, and the framework itself is changing with each passing day. However, there are still many good frameworks, such as jQuery, but many of jQuery's own class libraries are relatively messy. AngularJs and jQuery are both front-end frameworks. This article mainly explains the integration of AngularJs and SpringMvc according to the scenario that suits you. The code comes from GitHub. Download it and take a look at it yourself, and write down your own understanding of the integration.
Directory
1. Why use AngularJs
2. Integrate SpringMvc and AngularJs
3. Summary
1. Why Using AngulaJs
AngularJS simplifies application development by presenting developers with a higher level of abstraction. As with other abstraction techniques, some flexibility is lost. In other words, not all applications are suitable for AngularJS. The main concern of AngularJS is building CRUD applications. Fortunately, at least 90% of WEB applications are CRUD applications.
2. Integration of SpringMvc and AngularJs
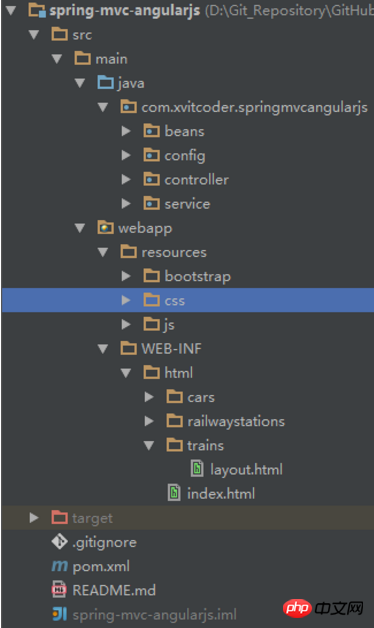
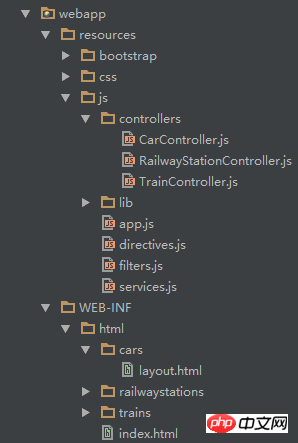
Project structure

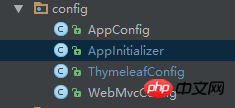
Use JavaConfig to configure Spring
Use thymeleaf as a template Instead of JSP
UseBootStrap
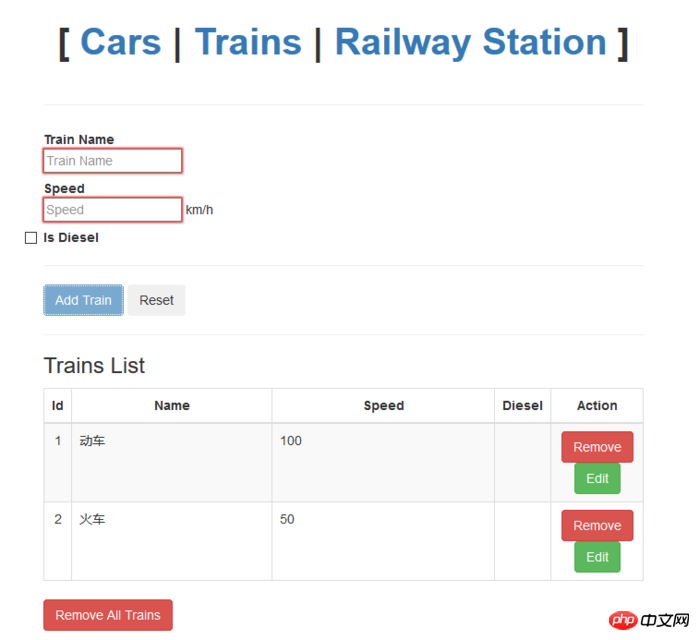
Use AngularJs
Configure Spring using JavaConfig
 ##
##
public class AppInitializer implements WebApplicationInitializer {
        public void onStartup(ServletContext servletContext) throws ServletException {
        AnnotationConfigWebApplicationContext rootContext = new AnnotationConfigWebApplicationContext();
        rootContext.register(AppConfig.class);
        servletContext.addListener(new ContextLoaderListener(rootContext));
        AnnotationConfigWebApplicationContext dispatcherContext = new AnnotationConfigWebApplicationContext();
        dispatcherContext.register(WebMvcConfig.class);
 ServletRegistration.Dynamic dispatcher = servletContext.addServlet("dispatcher", new DispatcherServlet(dispatcherContext));
        dispatcher.setLoadOnStartup(1);
        dispatcher.addMapping("/");
    }
}@Configuration@EnableWebMvc@ComponentScan(basePackages = "com.xvitcoder.springmvcangularjs")@Import({ThymeleafConfig.class})public class WebMvcConfig extends WebMvcConfigurerAdapter { @Override
public void configureDefaultServletHandling(DefaultServletHandlerConfigurer configurer) {
configurer.enable();
} @Override
public void addResourceHandlers(final ResourceHandlerRegistry registry) {
registry.addResourceHandler("/resources/**").addResourceLocations("/resources/");
} @Override
public void configureMessageConverters(List<HttpMessageConverter<?>> converters) {
converters.add(new MappingJackson2HttpMessageConverter()); super.configureMessageConverters(converters);
}
}Rewritten three methods, configuring Handler, resource interception and Converter respectively
@Configurationpublic class ThymeleafConfig {    @Bean
    public ServletContextTemplateResolver templateResolver() {
        ServletContextTemplateResolver resolver = new ServletContextTemplateResolver();
        resolver.setPrefix("/WEB-INF/html/");
        resolver.setSuffix(".html");
        resolver.setTemplateMode("HTML5");
        resolver.setCacheable(false);        return resolver;
    }    @Bean
    public SpringTemplateEngine templateEngine() {
        SpringTemplateEngine engine = new SpringTemplateEngine();
        engine.setTemplateResolver(templateResolver());        return engine;
    }    @Bean
    public ThymeleafViewResolver thymeleafViewResolver() {
        ThymeleafViewResolver resolver = new ThymeleafViewResolver();
        resolver.setTemplateEngine(templateEngine());        return resolver;
    }
}

<!doctype html><html lang="en" ng-app="AngularSpringApp"><head>
    <meta charset="utf-8"/>
    <title>Service App</title>
    <link rel="stylesheet" href="resources/css/app.css"/>
    <link rel="stylesheet" href="resources/bootstrap/css/bootstrap.min.css" /></head><body><div id="wrapper">
    <ul class="menu">
        <li><a href="#/cars">Cars</a></li>
        <li><a href="#/trains">Trains</a></li>
        <li><a href="#/railwaystations">Railway Station</a></li>
    </ul>
    <hr class="" />
<div ng-view=""></div></div><script src="resources/js/lib/angular/angular.js"></script><script src="resources/js/app.js"></script><script src="resources/js/services.js"></script><script src="resources/js/controllers/RailwayStationController.js"></script><script src="resources/js/controllers/CarController.js"></script><script src="resources/js/controllers/TrainController.js"></script><script src="resources/js/filters.js"></script><script src="resources/js/directives.js"></script></body>var AngularSpringApp = {};
var App = angular.module('AngularSpringApp', ['AngularSpringApp.filters', 'AngularSpringApp.services', 'AngularSpringApp.directives']);// Declare app level module which depends on filters, and servicesApp.config(['$routeProvider', function ($routeProvider) {
$routeProvider.when('/cars', { templateUrl: 'cars/layout', controller: CarController
});
$routeProvider.when('/trains', { templateUrl: 'trains/layout', controller: TrainController
});
$routeProvider.when('/railwaystations', { templateUrl: 'railwaystations/layout', controller: RailwayStationController
});
$routeProvider.otherwise({redirectTo: '/cars'});
}]);var CarController = function($scope, $http) {
$scope.fetchCarsList = function() {
$http.get('cars/carlist.json').success(function(carList){
$scope.cars = carList;
});
};
$scope.addNewCar = function(newCar) {
$http.post('cars/addCar/' + newCar).success(function() {
$scope.fetchCarsList();
});
$scope.carName = '';
};
$scope.removeCar = function(car) {
$http.delete('cars/removeCar/' + car).success(function() {
$scope.fetchCarsList();
});
};
$scope.removeAllCars = function() {
$http.delete('cars/removeAllCars').success(function() {
$scope.fetchCarsList();
});
};
$scope.fetchCarsList();
};<div class="input-append">
<input style="width:358px; margin-left: 100px;" class="span2" type="text" ng-model="carName" required="required" min="1" />
<button class="btn btn-primary" ng-disabled="!carName" ng-click="addNewCar(carName)">Add Car</button></div><h3 id="Car-nbsp-List">Car List</h3><div class="alert alert-info" style="width:400px;margin-left:100px;" ng-show="cars.length == 0">
No cars found</div><table class="table table-bordered table-striped" style="width:450px; margin-left: 100px;" ng-show="cars.length > 0">
<thead>
<tr>
<th style="text-align: center; width: 25px;">Action</th>
<th style="text-align: center;">Car Name</th>
</tr>
</thead>
<tbody>
<tr ng-repeat="car in cars">
<td style="width:70px;text-align:center;"><button class="btn btn-mini btn-danger" ng-click="removeCar(car)">Remove</button></td>
<td>{{car}}</td>
</tr>
</tbody></table><button style="margin-left:100px;" class="btn btn-danger" ng-show="cars.length > 1" ng-click="removeAllCars()">Remove All Cars</button>
How to convert table data in HTML to Json format
Defining multiple class attributes in HTML invalid
The above is the detailed content of How to use SpringMvc+AngularJs. For more information, please follow other related articles on the PHP Chinese website!

Hot AI Tools

Undresser.AI Undress
AI-powered app for creating realistic nude photos

AI Clothes Remover
Online AI tool for removing clothes from photos.

Undress AI Tool
Undress images for free

Clothoff.io
AI clothes remover

AI Hentai Generator
Generate AI Hentai for free.

Hot Article

Hot Tools

Notepad++7.3.1
Easy-to-use and free code editor

SublimeText3 Chinese version
Chinese version, very easy to use

Zend Studio 13.0.1
Powerful PHP integrated development environment

Dreamweaver CS6
Visual web development tools

SublimeText3 Mac version
God-level code editing software (SublimeText3)

Hot Topics
 How to implement an online speech recognition system using WebSocket and JavaScript
Dec 17, 2023 pm 02:54 PM
How to use WebSocket and JavaScript to implement an online speech recognition system Introduction: With the continuous development of technology, speech recognition technology has become an important part of the field of artificial intelligence. The online speech recognition system based on WebSocket and JavaScript has the characteristics of low latency, real-time and cross-platform, and has become a widely used solution. This article will introduce how to use WebSocket and JavaScript to implement an online speech recognition system.
 WebSocket and JavaScript: key technologies for implementing real-time monitoring systems
Dec 17, 2023 pm 05:30 PM
WebSocket and JavaScript: Key technologies for realizing real-time monitoring systems Introduction: With the rapid development of Internet technology, real-time monitoring systems have been widely used in various fields. One of the key technologies to achieve real-time monitoring is the combination of WebSocket and JavaScript. This article will introduce the application of WebSocket and JavaScript in real-time monitoring systems, give code examples, and explain their implementation principles in detail. 1. WebSocket technology
 How to implement an online reservation system using WebSocket and JavaScript
Dec 17, 2023 am 09:39 AM
How to use WebSocket and JavaScript to implement an online reservation system. In today's digital era, more and more businesses and services need to provide online reservation functions. It is crucial to implement an efficient and real-time online reservation system. This article will introduce how to use WebSocket and JavaScript to implement an online reservation system, and provide specific code examples. 1. What is WebSocket? WebSocket is a full-duplex method on a single TCP connection.
 How to use JavaScript and WebSocket to implement a real-time online ordering system
Dec 17, 2023 pm 12:09 PM
Introduction to how to use JavaScript and WebSocket to implement a real-time online ordering system: With the popularity of the Internet and the advancement of technology, more and more restaurants have begun to provide online ordering services. In order to implement a real-time online ordering system, we can use JavaScript and WebSocket technology. WebSocket is a full-duplex communication protocol based on the TCP protocol, which can realize real-time two-way communication between the client and the server. In the real-time online ordering system, when the user selects dishes and places an order
 JavaScript and WebSocket: Building an efficient real-time weather forecasting system
Dec 17, 2023 pm 05:13 PM
JavaScript and WebSocket: Building an efficient real-time weather forecast system Introduction: Today, the accuracy of weather forecasts is of great significance to daily life and decision-making. As technology develops, we can provide more accurate and reliable weather forecasts by obtaining weather data in real time. In this article, we will learn how to use JavaScript and WebSocket technology to build an efficient real-time weather forecast system. This article will demonstrate the implementation process through specific code examples. We
 Simple JavaScript Tutorial: How to Get HTTP Status Code
Jan 05, 2024 pm 06:08 PM
JavaScript tutorial: How to get HTTP status code, specific code examples are required. Preface: In web development, data interaction with the server is often involved. When communicating with the server, we often need to obtain the returned HTTP status code to determine whether the operation is successful, and perform corresponding processing based on different status codes. This article will teach you how to use JavaScript to obtain HTTP status codes and provide some practical code examples. Using XMLHttpRequest
 How to use insertBefore in javascript
Nov 24, 2023 am 11:56 AM
Usage: In JavaScript, the insertBefore() method is used to insert a new node in the DOM tree. This method requires two parameters: the new node to be inserted and the reference node (that is, the node where the new node will be inserted).
 How to get HTTP status code in JavaScript the easy way
Jan 05, 2024 pm 01:37 PM
Introduction to the method of obtaining HTTP status code in JavaScript: In front-end development, we often need to deal with the interaction with the back-end interface, and HTTP status code is a very important part of it. Understanding and obtaining HTTP status codes helps us better handle the data returned by the interface. This article will introduce how to use JavaScript to obtain HTTP status codes and provide specific code examples. 1. What is HTTP status code? HTTP status code means that when the browser initiates a request to the server, the service


