npm install --save vue element-ui
npm install --save vue-router
npminstall --save axios
npm install sass-loader -Dnpm install node-sass -D
 Web Front-end
 JS Tutorial
 Sharing examples of environment construction for vue.js, element-ui, and vuex
Sharing examples of environment construction for vue.js, element-ui, and vuex
This article mainly shares with you vue.js, element-ui, and vuex environment construction examples. This article mainly shares graphic examples and code, hoping to help everyone.
1. Initialize the project
vue init webpack <project-name>

2. Initialize dependency packages
npm install
3. Run debugging
npm run dev
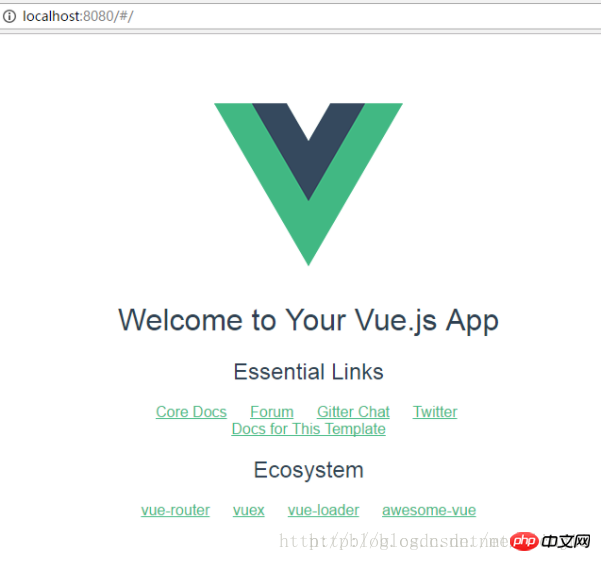
Address Enter localhost:8080
npm install --save vue element-ui
Copy after login
5. Import vue-router packagenpm install --save vue element-ui
npm install --save vue-router
Copy after login
6. Import axios Packagenpm install --save vue-router
npminstall --save axios
Copy after login
7. Install sass-loader and node-sass plug-innpminstall --save axios
npm install sass-loader -Dnpm install node-sass -D
Copy after login
npm install sass-loader -Dnpm install node-sass -D
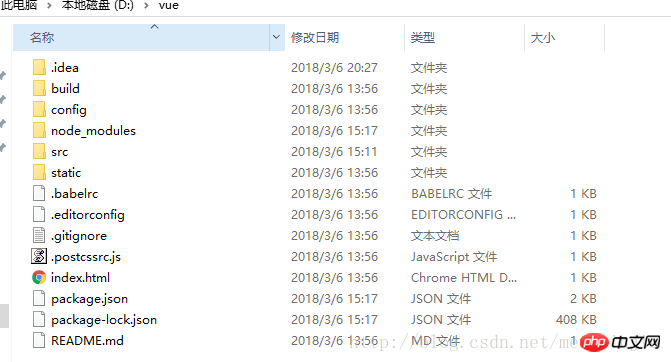
Project directory
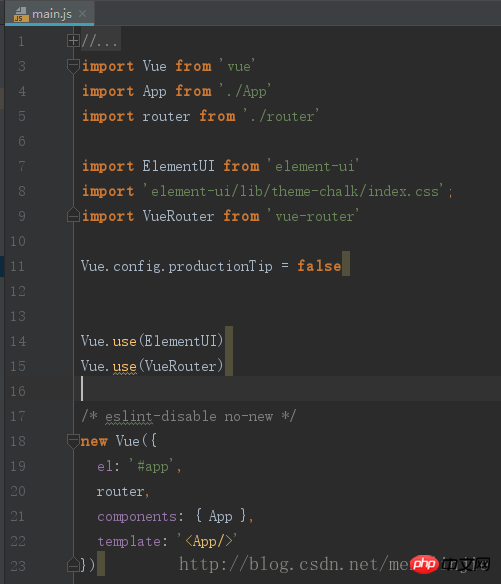
Introduce vue element and router into main.js:
import ElementUI from 'element-ui'import 'element-ui/lib/theme-chalk/index.css';import VueRouter from 'vue-router'Vue.use(ElementUI)
Vue.use(VueRouter)
<template>
<el-form :model="ruleForm2" :rules="rules2" ref="ruleForm2" label-position="left" label-width="0px"
class="demo-ruleForm login-container">
<h3 id="系统登录">系统登录</h3>
<el-form-item prop="account">
<el-input type="text" v-model="ruleForm2.account" auto-complete="off" placeholder="账号"></el-input>
</el-form-item>
<el-form-item prop="checkPass">
<el-input type="password" v-model="ruleForm2.checkPass" auto-complete="off" placeholder="密码"></el-input>
</el-form-item>
<el-form-item style="width:100%;">
<el-button type="primary" style="width:100%;" @click.native.prevent="handleSubmit2" >登录 </el-button>
</el-form-item>
</el-form></template><script>
export default {
name: "Ulogin.vue",
data() { var checkAccount = (rule, value, callback) => { if (!value) { return callback(new Error('请输入账号'));
} else if (value.length < 4 || value.length>12) { return callback(new Error('账号名必须在4~12位'));
} else {
callback();
}
}; var checkPass = (rule, value, callback) => { if (value === '') { return callback(new Error('请输入密码'));
} else if (value.length < 2) { return callback(new Error('密码不能小于两位'));
} else { return callback();
}
}; return {
ruleForm2: {
account: '',
checkPass: ''
},
rules2: {
account: [
{validator: checkAccount, trigger: 'blur'},
],
checkPass: [
{validator: checkPass, trigger: 'blur'},
]
}
};
},
methods: {
handleSubmit2(ruleForm2) { this.$refs.ruleForm2.validate((valid) => { if (valid) {
alert('提交!')
} else {
alert('登陆失败!');
console.log('error submit!!'); return false;
}
});
}
}
}</script><style lang="scss" scoped>
.login-container { /*box-shadow: 0 0px 8px 0 rgba(0, 0, 0, 0.06), 0 1px 0px 0 rgba(0, 0, 0, 0.02);*/
-webkit-border-radius: 5px; border-radius: 5px; -moz-border-radius: 5px; background-clip: padding-box; margin: 180px auto; width: 350px; padding: 35px 35px 15px 35px; background: #fff; border: 1px solid #eaeaea; box-shadow: 0 0 25px #cac6c6; .title {
margin: 0px auto 40px auto; text-align: center; color: #505458; }
.remember { margin: 0px 0px 35px 0px; }
}</style>import Ulogin from '../components/Ulogin'Vue.use(Router)
export default new Router({
routes: [ // {
// path: '/',
// name: 'HelloWorld',
// component: HelloWorld
// },
{
path:'/',
name:'',
component:Ulogin
}
]
})<template>
<p id="app">
<router-view/>
</p></template><script>
export default {
name: 'App'
}</script><style>
#app { font-family: 'Avenir', Helvetica, Arial, sans-serif; -webkit-font-smoothing: antialiased; -moz-osx-font-smoothing: grayscale; text-align: center; color: #2c3e50; margin-top: 60px; }</style>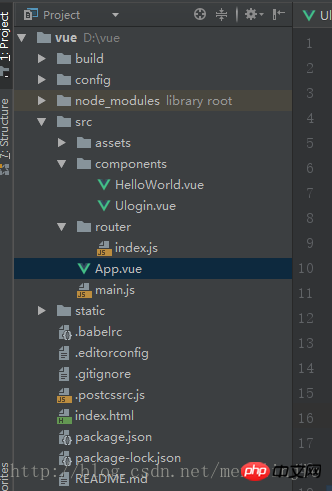
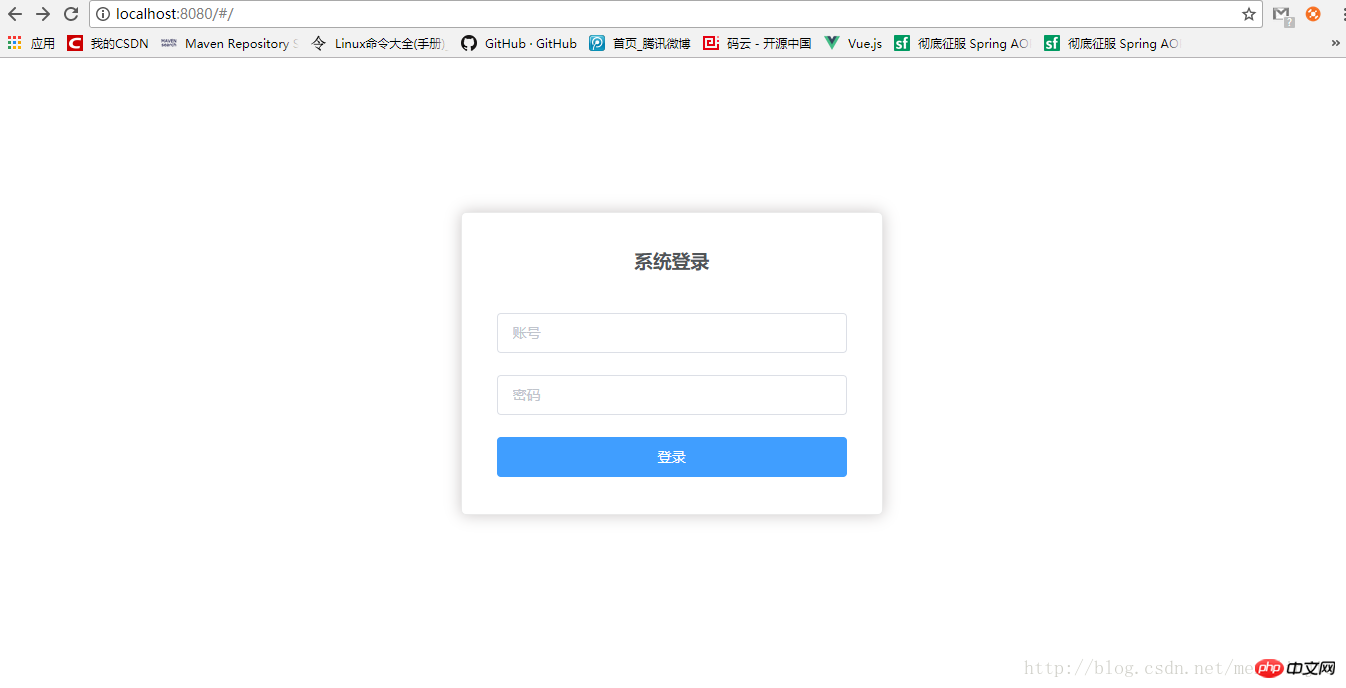
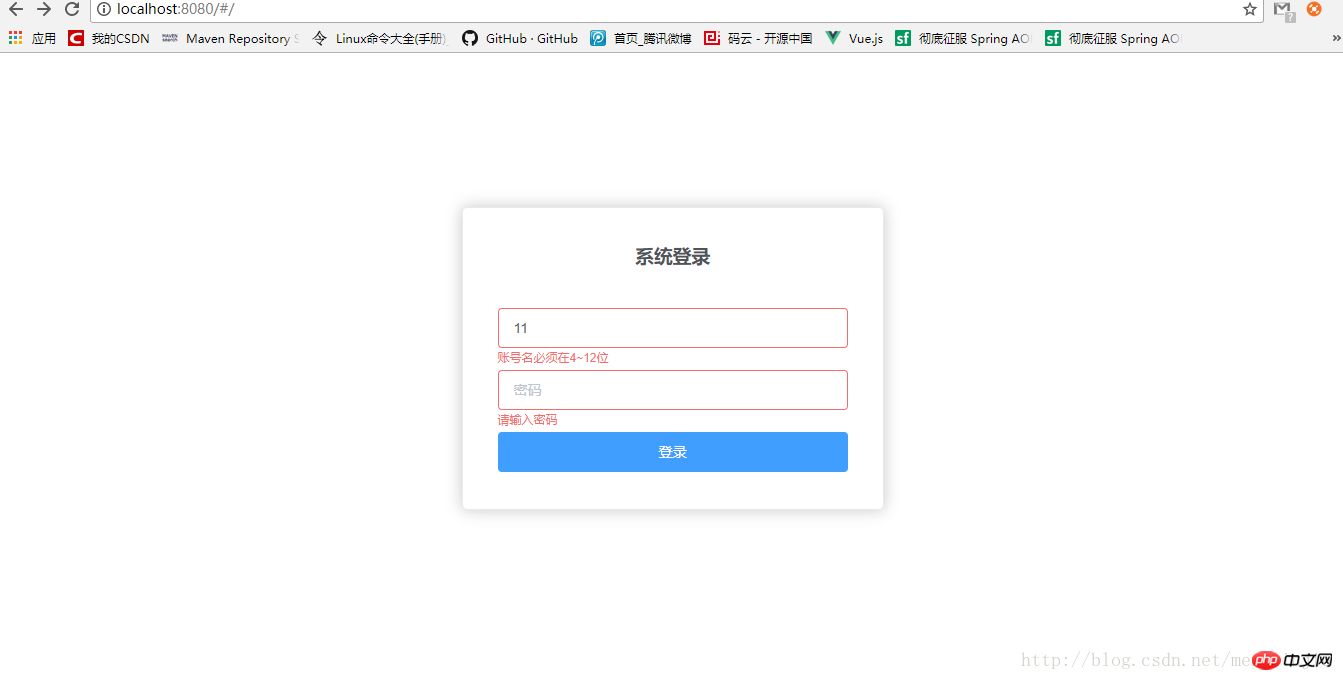
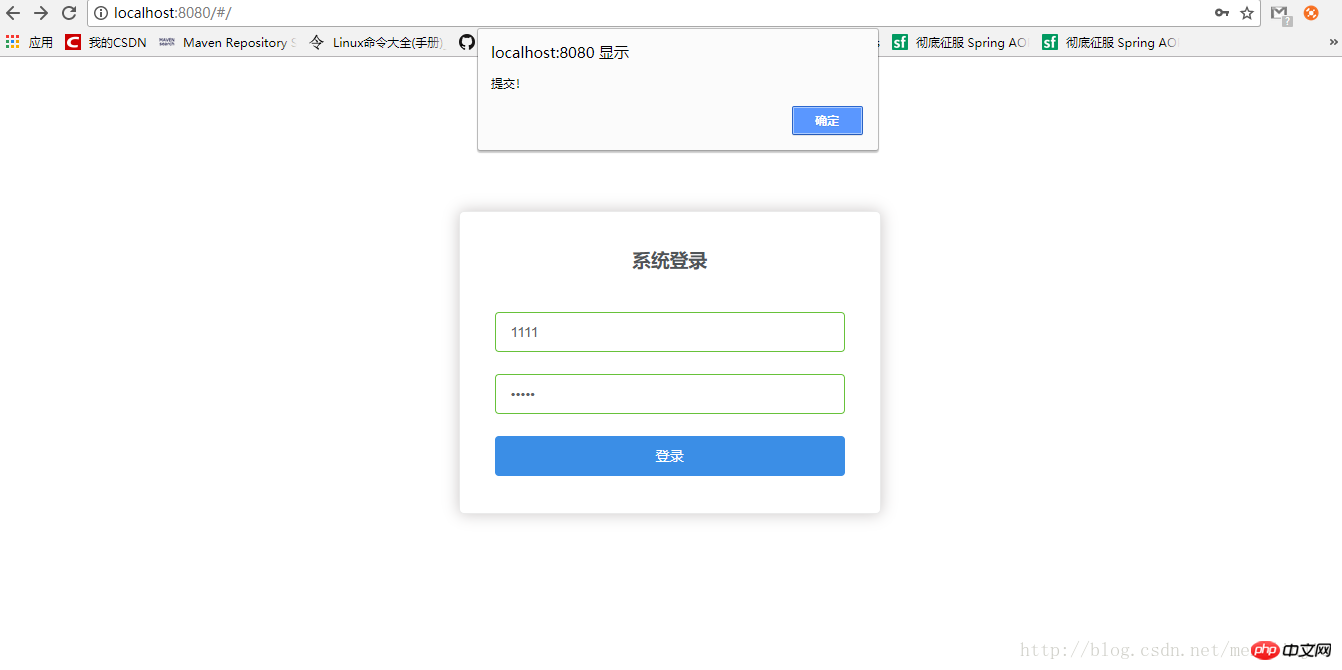
Detailed tutorial on how to build a vue, node, and webpack environment
Detailed examples of simple tutorials on building a vue environment
Recommendations for the 6 best PHP environment building tools in 2017
The above is the detailed content of Sharing examples of environment construction for vue.js, element-ui, and vuex. For more information, please follow other related articles on the PHP Chinese website!

Hot AI Tools

Undresser.AI Undress
AI-powered app for creating realistic nude photos

AI Clothes Remover
Online AI tool for removing clothes from photos.

Undress AI Tool
Undress images for free

Clothoff.io
AI clothes remover

AI Hentai Generator
Generate AI Hentai for free.

Hot Article

Hot Tools

Notepad++7.3.1
Easy-to-use and free code editor

SublimeText3 Chinese version
Chinese version, very easy to use

Zend Studio 13.0.1
Powerful PHP integrated development environment

Dreamweaver CS6
Visual web development tools

SublimeText3 Mac version
God-level code editing software (SublimeText3)

Hot Topics
 1379
1379
 52
52
 How to implement an online speech recognition system using WebSocket and JavaScript
Dec 17, 2023 pm 02:54 PM
How to use WebSocket and JavaScript to implement an online speech recognition system Introduction: With the continuous development of technology, speech recognition technology has become an important part of the field of artificial intelligence. The online speech recognition system based on WebSocket and JavaScript has the characteristics of low latency, real-time and cross-platform, and has become a widely used solution. This article will introduce how to use WebSocket and JavaScript to implement an online speech recognition system.
 WebSocket and JavaScript: key technologies for implementing real-time monitoring systems
Dec 17, 2023 pm 05:30 PM
WebSocket and JavaScript: Key technologies for realizing real-time monitoring systems Introduction: With the rapid development of Internet technology, real-time monitoring systems have been widely used in various fields. One of the key technologies to achieve real-time monitoring is the combination of WebSocket and JavaScript. This article will introduce the application of WebSocket and JavaScript in real-time monitoring systems, give code examples, and explain their implementation principles in detail. 1. WebSocket technology
 How to use JavaScript and WebSocket to implement a real-time online ordering system
Dec 17, 2023 pm 12:09 PM
Introduction to how to use JavaScript and WebSocket to implement a real-time online ordering system: With the popularity of the Internet and the advancement of technology, more and more restaurants have begun to provide online ordering services. In order to implement a real-time online ordering system, we can use JavaScript and WebSocket technology. WebSocket is a full-duplex communication protocol based on the TCP protocol, which can realize real-time two-way communication between the client and the server. In the real-time online ordering system, when the user selects dishes and places an order
 How to implement an online reservation system using WebSocket and JavaScript
Dec 17, 2023 am 09:39 AM
How to use WebSocket and JavaScript to implement an online reservation system. In today's digital era, more and more businesses and services need to provide online reservation functions. It is crucial to implement an efficient and real-time online reservation system. This article will introduce how to use WebSocket and JavaScript to implement an online reservation system, and provide specific code examples. 1. What is WebSocket? WebSocket is a full-duplex method on a single TCP connection.
 JavaScript and WebSocket: Building an efficient real-time weather forecasting system
Dec 17, 2023 pm 05:13 PM
JavaScript and WebSocket: Building an efficient real-time weather forecast system Introduction: Today, the accuracy of weather forecasts is of great significance to daily life and decision-making. As technology develops, we can provide more accurate and reliable weather forecasts by obtaining weather data in real time. In this article, we will learn how to use JavaScript and WebSocket technology to build an efficient real-time weather forecast system. This article will demonstrate the implementation process through specific code examples. We
 How to use insertBefore in javascript
Nov 24, 2023 am 11:56 AM
Usage: In JavaScript, the insertBefore() method is used to insert a new node in the DOM tree. This method requires two parameters: the new node to be inserted and the reference node (that is, the node where the new node will be inserted).
 Simple JavaScript Tutorial: How to Get HTTP Status Code
Jan 05, 2024 pm 06:08 PM
JavaScript tutorial: How to get HTTP status code, specific code examples are required. Preface: In web development, data interaction with the server is often involved. When communicating with the server, we often need to obtain the returned HTTP status code to determine whether the operation is successful, and perform corresponding processing based on different status codes. This article will teach you how to use JavaScript to obtain HTTP status codes and provide some practical code examples. Using XMLHttpRequest
 JavaScript and WebSocket: Building an efficient real-time image processing system
Dec 17, 2023 am 08:41 AM
JavaScript is a programming language widely used in web development, while WebSocket is a network protocol used for real-time communication. Combining the powerful functions of the two, we can create an efficient real-time image processing system. This article will introduce how to implement this system using JavaScript and WebSocket, and provide specific code examples. First, we need to clarify the requirements and goals of the real-time image processing system. Suppose we have a camera device that can collect real-time image data


