

In-depth JavaScript DOM application
This time I will bring you in-depth JavaScript DOM application, What are the precautions when using JavaScript DOM application, the following is a practical case, let's take a look.
What is DOM:
Document, node! In fact, it is all about the same thing. In CSS, it is called a label, in JS, it is called an element, and in DOM, it is called a node;
Browser support
IE:10% Chrome:60% FF:99% Support
DOM node
childNodes: child node
nodeType: type of node
nodeType == 3 -> Text node
nodeType == 1 -> Element node
childNodes and nodeType are used together
<head> <meta charset="UTF-8">
<title>01-DOM基础</title>
<script>
window.onload = function () { // ul的子节点为li
var oUl = document.getElementById('ul1'); for(var i=0;i<oUl.childNodes.length;i++){ //由于在不同的浏览器下,获取到的oUl.childNodes是不一样的;IE6-8会将文本节点也算进去;
//故若想给元素节点修改样式,可以通过 oUl.childNodes[i].nodeType == 1 来获取元素节点,并修改样式;
//nodeType==3 -> 文本节点
//nodeType==1 -> 元素节点
//给所有的li设置背景颜色
if(oUl.childNodes[i].nodeType == 1){
oUl.childNodes[i].style.background = 'red';
}
}
} </script></head><body><ul id="ul1">
<li></li>
<li></li>
<li></li>
<li></li>
<li></li></ul>abcdefg //文本节点<span>abcdefg</span> //元素节点</body></html>Get child nodes
children:he Only includes elements, no text, compatible with all browsers
So the above example can be written like this, simple and crude!!!
for (var i=0;i<oUl.children.length;i++){
oUl.children[i].style.background = 'red';
}parentNode: parent node
Example: click on the link to hide the entire li
parentNode example:
<html lang="en"><head>
<meta charset="UTF-8">
<title>02-parentNode</title>
<script>
window.onload = function () { var aA = document.getElementsByTagName('a'); for(var i=0;i<aA.length;i++){
aA[i].onclick = function () { this.parentNode.style.display = 'none';
}
}
} </script></head><body><ul>
<li>11111<a href="javaScript:;">隐藏</a></li>
<li>22222<a href="javaScript:;">隐藏</a></li>
<li>33333<a href="javaScript:;">隐藏</a></li>
<li>44444<a href="javaScript:;">隐藏</a></li></ul></body></html>offsetParent
Example: Get the actual position of the element on the page
Mainly used for positioning, get the actual parent node of the element.
Example One: Set absolute positioning to the second div2, and set nothing to the parent node div1 of div2, then the offsetParent of div2 is body.
<html lang="en"> <head> <meta charset="UTF-8"> <title>offsetParent</title> <style> #div1{width: 200px;height: 200px;background: #ccc;margin-left: 100px;} #div2{width: 100px;height: 100px;background: red;position: absolute;left: 10px;} </style> <script> window.onload = function () { oDiv2 = document.getElementById('div2'); alert(oDiv2.offsetParent); //结果:[object HTMLBodyElement] 父节点为body; } </script> </head> <body> <div id="div1"> <div id="div2"></div> </div> </body> </html>Example 2: Give the second div2 Set absolute positioning and set relative positioning for the parent node div1 of div2, then the offsetParent of div2 is div1.
<html lang="en"> <head> <meta charset="UTF-8"> <title>offsetParent</title> <style> #div1{width: 200px;height: 200px;background: #ccc;margin-left: 100px; position: relative;} #div2{width: 100px;height: 100px;background: red;position: absolute;left: 10px;} </style> <script> window.onload = function () { oDiv2 = document.getElementById('div2'); alert(oDiv2.offsetParent); //结果:[object HTMLDivElement] 父节点为div; } </script> </head> <body> <div id="div1"> <div id="div2"></div> </div> </body> </html>2.DOM node (2)
First and last child node
There are compatibility issues
firstChild、firstElementChild
lastChild 、lastElementChild
   //IE6-8    //oUl.firstChild.style.background='red';    //高级浏览器    //oUl.firstElementChild.style.background='red';
<html><head><meta charset="utf-8"><title>无标题文档</title><script>window.onload=function (){ var oUl=document.getElementById('ul1'); //IE6-8
//oUl.firstChild.style.background='red';
//高级浏览器
//oUl.firstElementChild.style.background='red';
//给第一个li设置红色背景:由于兼容问题,故需判断下
if(oUl.firstElementChild)
{
oUl.firstElementChild.style.background='red';
} else
{
oUl.firstChild.style.background='red';
}
};</script></head><body><ul id="ul1">
<li>1</li>
<li>2</li>
<li>3</li></ul></body></html>Sibling nodes (use the same as above)
There are compatibility issues
nextSibling, nextElementSibling
previousSibling, previousElementSibling
3. Manipulate element attributes
ElementAttribute operation
First type: oDiv.style.display=' block';
Second type: oDiv.style['display']='block';
Third type: Dom method: oDiv2.setAttribute('display','none');
DOM way to operate element attributes
Get: getAttribute(name)
Set: setAttribute(name, value)
Delete: removeAttribute(name)
4. Use className to select the element
How to select elements using className
Select all elements
Filter by className conditions
Basic usage
<html><head>
<meta charset="utf-8">
<title>无标题文档</title>
<script>
window.onload=function () { var oUl=document.getElementById('ul1'); var aLi=oUl.getElementsByTagName('li'); for(var i=0;i<aLi.length;i++)
{ if(aLi[i].className=='box')
{
aLi[i].style.background='red';
}
}
}; </script></head><body><ul id="ul1">
<li class="box"></li>
<li class="box"></li>
<li></li>
<li></li>
<li></li>
<li class="box"></li>
<li></li></ul></body></html>Encapsulate into a function
Advanced usage
<script>
//封装成函数
function getByClass(oParent, sClass) { var aResult=[]; var aEle=oParent.getElementsByTagName('*');//*通配符,获取oParent下面所有的节点
for(var i=0;i<aEle.length;i++)
{ if(aEle[i].className==sClass)
{
aResult.push(aEle[i]);
}
} return aResult;
} window.onload=function () { var oUl=document.getElementById('ul1'); var aBox=getByClass(oUl, 'box'); for(var i=0;i<aBox.length;i++)
{
aBox[i].style.background='red';
}
}; </script>
<body>
<ul id="ul1">
<li class="box"></li>
<li class="box"></li>
<li></li>
<li></li>
<li></li>
<li class="box"></li>
<li></li>
</ul></body>5. Create, insert and delete elements
Create DOM elements
createElement(tag name) Create a node appendChild(node) Append a node
Note: appendChild (Node) has two functions:
(1) If this element is created through createElement (tag name), then it can be added directly to the new parent;
(2). If This element has a parent, then 1. Delete the element from the original parent first; 2. Add it to the new parent.
Example: Insert li for ul
<html><head>
<meta charset="utf-8">
<title>无标题文档</title>
<script>
window.onload=function () { var oBtn=document.getElementById('btn1'); var oUl=document.getElementById('ul1'); var oTxt=document.getElementById('txt1');
oBtn.onclick=function () { //创建节点
var oLi=document.createElement('li');
oLi.innerHTML=oTxt.value; //添加节点 父级.appendChild(子节点);
oUl.appendChild(oLi);
};
}; </script></head><body><input id="txt1" type="text"/><input id="btn1" type="button" value="创建li"/><ul id="ul1"></ul></body></html>Believe After reading the case in this article, you have mastered the method. For more exciting information, please pay attention to other related articles on the PHP Chinese website!
Recommended reading:
In-depth basic application of JavaScript
##8 basic knowledge that must be paid attention to in JS
The above is the detailed content of In-depth JavaScript DOM application. For more information, please follow other related articles on the PHP Chinese website!

Hot AI Tools

Undresser.AI Undress
AI-powered app for creating realistic nude photos

AI Clothes Remover
Online AI tool for removing clothes from photos.

Undress AI Tool
Undress images for free

Clothoff.io
AI clothes remover

AI Hentai Generator
Generate AI Hentai for free.

Hot Article
Hot Tools

Notepad++7.3.1
Easy-to-use and free code editor

SublimeText3 Chinese version
Chinese version, very easy to use

Zend Studio 13.0.1
Powerful PHP integrated development environment

Dreamweaver CS6
Visual web development tools

SublimeText3 Mac version
God-level code editing software (SublimeText3)
Hot Topics
 1384
1384
 52
52

 How to Undo Delete from Home Screen in iPhone
Apr 17, 2024 pm 07:37 PM
How to Undo Delete from Home Screen in iPhone
Apr 17, 2024 pm 07:37 PM
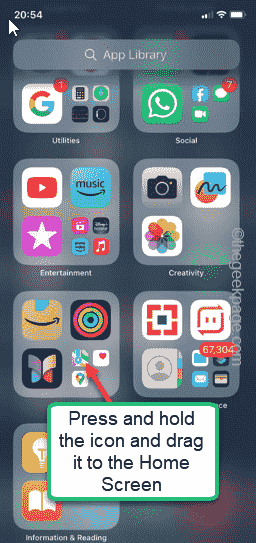
Deleted something important from your home screen and trying to get it back? You can put app icons back on the screen in a variety of ways. We have discussed all the methods you can follow and put the app icon back on the home screen. How to Undo Remove from Home Screen in iPhone As we mentioned before, there are several ways to restore this change on iPhone. Method 1 – Replace App Icon in App Library You can place an app icon on your home screen directly from the App Library. Step 1 – Swipe sideways to find all apps in the app library. Step 2 – Find the app icon you deleted earlier. Step 3 – Simply drag the app icon from the main library to the correct location on the home screen. This is the application diagram
 The role and practical application of arrow symbols in PHP
Mar 22, 2024 am 11:30 AM
The role and practical application of arrow symbols in PHP
Mar 22, 2024 am 11:30 AM
The role and practical application of arrow symbols in PHP In PHP, the arrow symbol (->) is usually used to access the properties and methods of objects. Objects are one of the basic concepts of object-oriented programming (OOP) in PHP. In actual development, arrow symbols play an important role in operating objects. This article will introduce the role and practical application of arrow symbols, and provide specific code examples to help readers better understand. 1. The role of the arrow symbol to access the properties of an object. The arrow symbol can be used to access the properties of an object. When we instantiate a pair
 Recommended: Excellent JS open source face detection and recognition project
Apr 03, 2024 am 11:55 AM
Recommended: Excellent JS open source face detection and recognition project
Apr 03, 2024 am 11:55 AM
Face detection and recognition technology is already a relatively mature and widely used technology. Currently, the most widely used Internet application language is JS. Implementing face detection and recognition on the Web front-end has advantages and disadvantages compared to back-end face recognition. Advantages include reducing network interaction and real-time recognition, which greatly shortens user waiting time and improves user experience; disadvantages include: being limited by model size, the accuracy is also limited. How to use js to implement face detection on the web? In order to implement face recognition on the Web, you need to be familiar with related programming languages and technologies, such as JavaScript, HTML, CSS, WebRTC, etc. At the same time, you also need to master relevant computer vision and artificial intelligence technologies. It is worth noting that due to the design of the Web side
 From beginner to proficient: Explore various application scenarios of Linux tee command
Mar 20, 2024 am 10:00 AM
From beginner to proficient: Explore various application scenarios of Linux tee command
Mar 20, 2024 am 10:00 AM
The Linuxtee command is a very useful command line tool that can write output to a file or send output to another command without affecting existing output. In this article, we will explore in depth the various application scenarios of the Linuxtee command, from entry to proficiency. 1. Basic usage First, let’s take a look at the basic usage of the tee command. The syntax of tee command is as follows: tee[OPTION]...[FILE]...This command will read data from standard input and save the data to
 Explore the advantages and application scenarios of Go language
Mar 27, 2024 pm 03:48 PM
Explore the advantages and application scenarios of Go language
Mar 27, 2024 pm 03:48 PM
The Go language is an open source programming language developed by Google and first released in 2007. It is designed to be a simple, easy-to-learn, efficient, and highly concurrency language, and is favored by more and more developers. This article will explore the advantages of Go language, introduce some application scenarios suitable for Go language, and give specific code examples. Advantages: Strong concurrency: Go language has built-in support for lightweight threads-goroutine, which can easily implement concurrent programming. Goroutin can be started by using the go keyword
 The relationship between js and vue
Mar 11, 2024 pm 05:21 PM
The relationship between js and vue
Mar 11, 2024 pm 05:21 PM
The relationship between js and vue: 1. JS as the cornerstone of Web development; 2. The rise of Vue.js as a front-end framework; 3. The complementary relationship between JS and Vue; 4. The practical application of JS and Vue.
 The wide application of Linux in the field of cloud computing
Mar 20, 2024 pm 04:51 PM
The wide application of Linux in the field of cloud computing
Mar 20, 2024 pm 04:51 PM
The wide application of Linux in the field of cloud computing With the continuous development and popularization of cloud computing technology, Linux, as an open source operating system, plays an important role in the field of cloud computing. Due to its stability, security and flexibility, Linux systems are widely used in various cloud computing platforms and services, providing a solid foundation for the development of cloud computing technology. This article will introduce the wide range of applications of Linux in the field of cloud computing and give specific code examples. 1. Application virtualization technology of Linux in cloud computing platform Virtualization technology
 Understanding MySQL timestamps: functions, features and application scenarios
Mar 15, 2024 pm 04:36 PM
Understanding MySQL timestamps: functions, features and application scenarios
Mar 15, 2024 pm 04:36 PM
MySQL timestamp is a very important data type, which can store date, time or date plus time. In the actual development process, rational use of timestamps can improve the efficiency of database operations and facilitate time-related queries and calculations. This article will discuss the functions, features, and application scenarios of MySQL timestamps, and explain them with specific code examples. 1. Functions and characteristics of MySQL timestamps There are two types of timestamps in MySQL, one is TIMESTAMP
