
Do you often need to log in to a Linux server remotely via SSH or telent? Do you often have headaches with long-running tasks, such as system backup, ftp transfer, etc. Normally we open a remote terminal window for each such task because they take too long to execute. You must wait for it to complete execution. During this period, you cannot close the window or disconnect, otherwise the task will be killed and everything will be abandoned halfway.
Let us take a look at why closing the window/disconnecting will cause the running program to die.
In Linux/Unix, there are several concepts:
Process group (process group): a collection of one or more processes, each process group has The only process group ID, which is the ID of the process leader process.
Session: A collection of one or more process groups, with a unique session leader. The session ID is the ID of the first process.
The session can have a separate controlling terminal (controlling terminal). The first process of the session connected to the controlling terminal is called the controlling process. The process currently interacting with the terminal is called the foreground process group. The remaining process groups are called background process groups.
According to POSIX.1 definition:
The default action of the hang-up signal (SIGHUP) is to terminate the program.
When the terminal interface detects that the network connection is disconnected, it sends a hang-up signal to the control process (the first process of the session).
If the first process of the session terminates, this signal is sent to the foreground process group of the session.
When a process exits and an orphan process group is created, if any orphan process group process is in the STOP state, SIGHUP and SIGCONT signals are sent to all processes in the process group.
Therefore, when the network is disconnected or the terminal window is closed, the control process receives the SIGHUP signal and exits, which will cause other processes in the session to exit.
Let’s look at an example. Open two SSH terminal windows and run the top command in one of them.
[root@tivf09 root]# top
In another terminal window, find the process ID of top as 5180, and its parent process ID is 5128, which is the login shell.
[root@tivf09 root]# ps -ef|grep top
root      5180  5128  0 01:03 pts/0    00:00:02 top
root      5857  3672  0 01:12 pts/2    00:00:00 grep top
Use the pstree command to see this relationship more clearly:
[root@tivf09 root]# pstree -H 5180|grep top
|-sshd-+-sshd---bash---top
Use the ps-xj command to see that the login shell (PID 5128) and top are in the same session, shell It is the first process in the session, and its process group PGID is 5128. The process group top belongs to is PGID 5180, which is the foreground process group.
[root@tivf09 root]# ps -xj|grep 5128
 5126  5128  5128  5128 pts/0     5180 S        0   0:00 -bash
 5128  5180  5180  5128 pts/0     5180 S        0   0:50 top
 3672 18095 18094  3672 pts/2    18094 S        0   0:00 grep 5128
Close the first SSH window, and you can see in another window that top has also been killed.
[root@tivf09 root]# ps -ef|grep 5128
root     18699  3672  0 04:35 pts/2    00:00:00 grep 5128
If we can ignore the SIGHUP signal, closing the window should not affect the running of the program. The nohup command can achieve this purpose. If the standard output/standard error of the program is the terminal, nohup will redirect it to the nohup.out file by default. It is worth noting that the nohup command only causes the program to ignore the SIGHUP signal. You also need to use the mark & to run it in the background.
nohup <command> [argument…] &
Although nohup is easy to use, it is still relatively "crude". It can handle simple commands, but it is troublesome for complex tasks that require human-computer interaction.
In fact, we can use a more powerful utility screen. Popular Linux distributions (such as Red Hat Enterprise Linux 4) usually come with the screen utility. If not, you can download it from the official GNU screen website.
[root@tivf06 ~]# rpm -qa|grep screen
xscreensaver-4.18-5.rhel4.11
screen-4.0.2-5
Simply put, Screen is a window manager that can multiplex a physical terminal between multiple processes. Screen has the concept of session. Users can create multiple screen windows in a screen session, and each screen window is like operating a real telnet/SSH connection window. There are several ways to create a new window in screen:
1. Typing the screen command
[root@tivf06 ~]# screen
Screen directly on the command line will create a full-screen window for executing the shell. You can execute arbitrary shell programs just like in an ssh window. Type exit in the window to exit the window. If this is the only window for the screen session, the screen session exits, otherwise screen automatically switches to the previous window.
2. The Screen command is followed by the program you want to execute.
[root@tivf06 ~]# screen vi test.c
Screen creates a single-window session that executes vi test.c. Exiting vi will exit the window/session.
3. Both of the above methods create a new screen session. We can also create new windows within an existing screen session. Type C-a c in the current screen window, that is, Ctrl key + a key, and then press the c key, screen Create a new window within the session and switch to it.
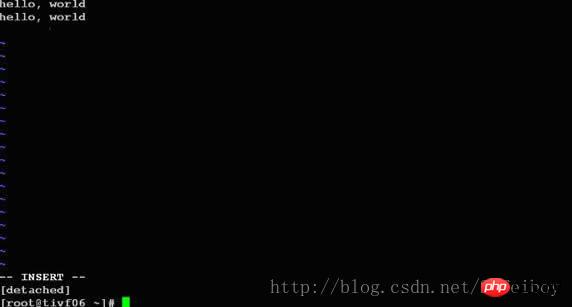
screen also has more advanced functions. You can temporarily disconnect (detach) the screen session without interrupting the running of the program in the screen window, and reconnect (attach) the session at a later time to regain control of the programs running in each window. For example, we open a screen window to edit the /tmp/abc file:
[root@tivf06 ~]# screen vi /tmp/abc
After that we want to temporarily exit and do something else, such as going for a walk, then type C-a d in the screen window, and Screen will give detached hint:
半个小时之后回来了,找到该screen会话:
[root@tivf06 ~]# screen -ls
There is a screen on:
        16582.pts-1.tivf06      (Detached)
1 Socket in /tmp/screens/S-root.重新连接会话:
[root@tivf06 ~]# screen -r 16582
看看出现什么了,太棒了,一切都在。继续干吧。
你可能注意到给screen发送命令使用了特殊的键组合C-a。这是因为我们在键盘上键入的信息是直接发送给当前screen窗口,必须用其他方式向screen窗口管理器发出命令,默认情况下,screen接收以C-a开始的命令。这种命令形式在screen中叫做键绑定(key binding),C-a叫做命令字符(command character)。
可以通过C-a ?来查看所有的键绑定,常用的键绑定有:
| C-a ? | 显示所有键绑定信息 |
|---|---|
| C-a w | 显示所有窗口列表 |
| C-a C-a | 切换到之前显示的窗口 |
| C-a c | 创建一个新的运行shell的窗口并切换到该窗口 |
| C-a n | 切换到下一个窗口 |
| C-a p | 切换到前一个窗口(与C-a n相对) |
| C-a 0..9 | 切换到窗口0..9 |
| C-a a | 发送 C-a到当前窗口 |
| C-a d | 暂时断开screen会话 |
| C-a k | 杀掉当前窗口 |
| C-a [ | 进入拷贝/回滚模式 |
使用键绑定C-a ?命令可以看到, 默认的命令字符(Command key)为C-a,转义C-a(literal ^a)的字符为a:
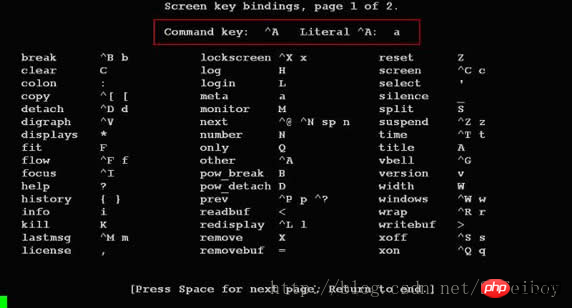
因为screen把C-a看作是screen命令的开始,所以如果你想要screen窗口接收到C-a字符,就要输入C-a a。Screen也允许你使用-e选项设置自己的命令字符和转义字符,其格式为:
-exy x为命令字符,y为转义命令字符的字符
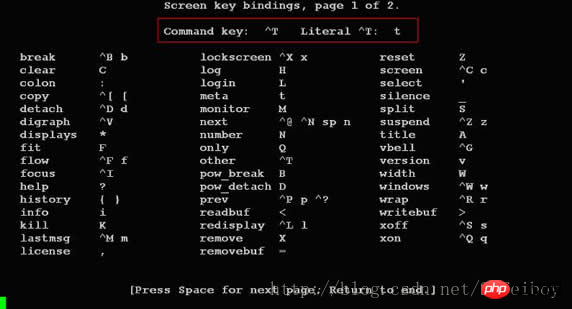
下面命令启动的screen会话指定了命令字符为C-t,转义C-t的字符为t,通过C-t ?命令可以看到该变化。
[root@tivf18 root]# screen -e^tt
其他常用的命令选项有:
| -c file | 使用配置文件file,而不使用默认的$HOME/.screenrc |
|---|---|
| -d|-D [pid.tty.host] | 不开启新的screen会话,而是断开其他正在运行的screen会话 |
| -h num | 指定历史回滚缓冲区大小为num行 |
| -list|-ls | 列出现有screen会话,格式为pid.tty.host |
| -d -m | 启动一个开始就处于断开模式的会话 |
| -r sessionowner/ [pid.tty.host] | 重新连接一个断开的会话。多用户模式下连接到其他用户screen会话需要指定sessionowner,需要setuid-root权限 |
| -S sessionname | 创建screen会话时为会话指定一个名字 |
| -v | 显示screen版本信息 |
| -wipe [match] | 同-list,但删掉那些无法连接的会话 |
下例显示当前有两个处于detached状态的screen会话,你可以使用screen -r
[root@tivf18 root]# screen –ls
There are screens on:
        8736.pts-1.tivf18       (Detached)
        8462.pts-0.tivf18       (Detached)
2 Sockets in /root/.screen.

[root@tivf18 root]# screen –r 8736如果由于某种原因其中一个会话死掉了(例如人为杀掉该会话),这时screen -list会显示该会话为dead状态。使用screen -wipe命令清除该会话:
[root@tivf18 root]# kill -9 8462
[root@tivf18 root]# screen -ls
There are screens on:
        8736.pts-1.tivf18       (Detached)
        8462.pts-0.tivf18       (Dead ???)
Remove dead screens with 'screen -wipe'.
2 Sockets in /root/.screen.

[root@tivf18 root]# screen -wipe
There are screens on:
        8736.pts-1.tivf18       (Detached)
        8462.pts-0.tivf18       (Removed)
1 socket wiped out.
1 Socket in /root/.screen.

[root@tivf18 root]# screen -ls
There is a screen on:
        8736.pts-1.tivf18       (Detached)
1 Socket in /root/.screen.

[root@tivf18 root]#-d –m 选项是一对很有意思的搭档。他们启动一个开始就处于断开模式的会话。你可以在随后需要的时候连接上该会话。有时候这是一个很有用的功能,比如我们可以使用它调试后台程序。该选项一个更常用的搭配是:-dmS sessionname
启动一个初始状态断开的screen会话:
[root@tivf06 tianq]# screen -dmS mygdb gdb execlp_test
连接该会话:
[root@tivf06 tianq]# screen -r mygdb
先来看看如何使用screen解决SIGHUP问题,比如现在我们要ftp传输一个大文件。如果按老的办法,SSH登录到系统,直接ftp命令开始传输,之后。。如果网络速度还可以,恭喜你,不用等太长时间了;如果网络不好,老老实实等着吧,只能传输完毕再断开SSH连接了。让我们使用screen来试试。
SSH登录到系统,在命令行键入screen。
[root@tivf18 root]# screen
在screen shell窗口中输入ftp命令,登录,开始传输。不愿意等了?OK,在窗口中键入C-a d:
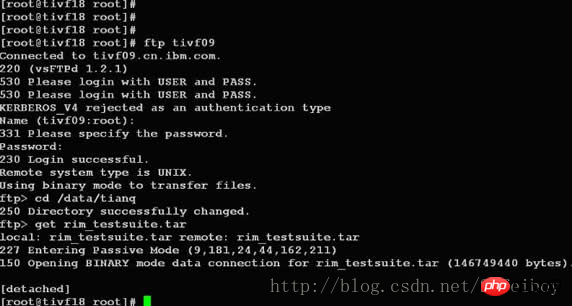
然后。。退出SSH登录?随你怎样,只要别杀掉screen会话。
是不是很方便?更进一步,其实我们可以利用screen这种功能来管理你的远程会话,保存你所有的工作内容。你是不是每次登录到系统都要开很多窗口,然后每天都要重复打开关闭这些窗口?让screen来帮你“保存”吧,你只需要打开一个ssh窗口,创建需要的screen窗口,退出的时候C-a d“保存”你的工作,下次登录后直接screen -r
最好能给每个窗口起一个名字,这样好记些。使用C-a A给窗口起名字。使用C-a w可以看到这些窗口名字,可能名字出现的位置不同。使用putty:
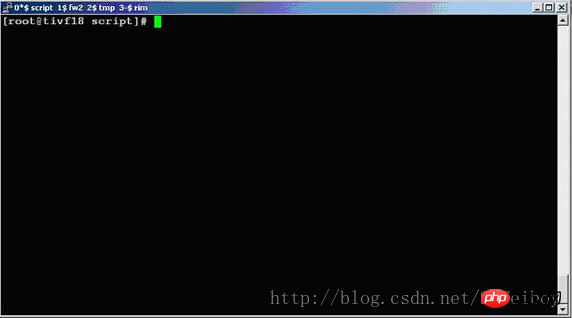
使用telnet:
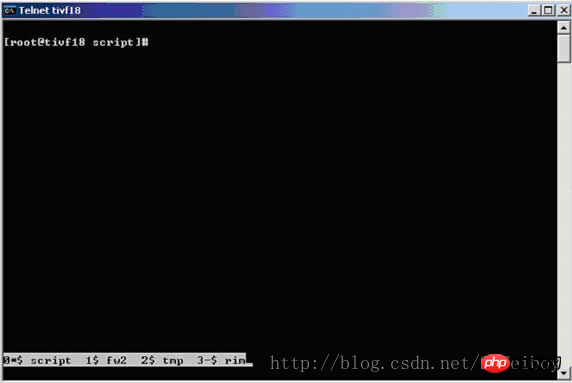
Screen提供了丰富强大的定制功能。你可以在Screen的默认两级配置文件/etc/screenrc和$HOME/.screenrc中指定更多,例如设定screen选项,定制绑定键,设定screen会话自启动窗口,启用多用户模式,定制用户访问权限控制等等。如果你愿意的话,也可以自己指定screen配置文件。
以多用户功能为例,screen默认是以单用户模式运行的,你需要在配置文件中指定multiuser on 来打开多用户模式,通过acl*(acladd,acldel,aclchg...)命令,你可以灵活配置其他用户访问你的screen会话。更多配置文件内容请参考screen的man页。
The above is the detailed content of Linux uses screen to manage remote session instance methods. For more information, please follow other related articles on the PHP Chinese website!


