

How to use jquery pagination plug-in
This time I will show you how to use jquery's paging plug-in, and what are the precautions on how to use jquery's paging plug-in. The following is a practical case, let's take a look.
jqPaginator is a concise and highly customized jQuery paging component, suitable for a variety of application scenarios. IntroductionThere are many kinds of paging components on the Internet, but it is difficult to find one that is very "satisfactory", so jqPaginator was born. The ideal paging component in my mind should not be restricted by CSS frameworks and can be used in web pages in various styles. From my simple experience, to achieve this goal, the key point is a highly customized Html structure. Therefore, jqPaginator strives to be customized within a reasonable range so that it can be used flexibly in various scenarios. Effect screenshot: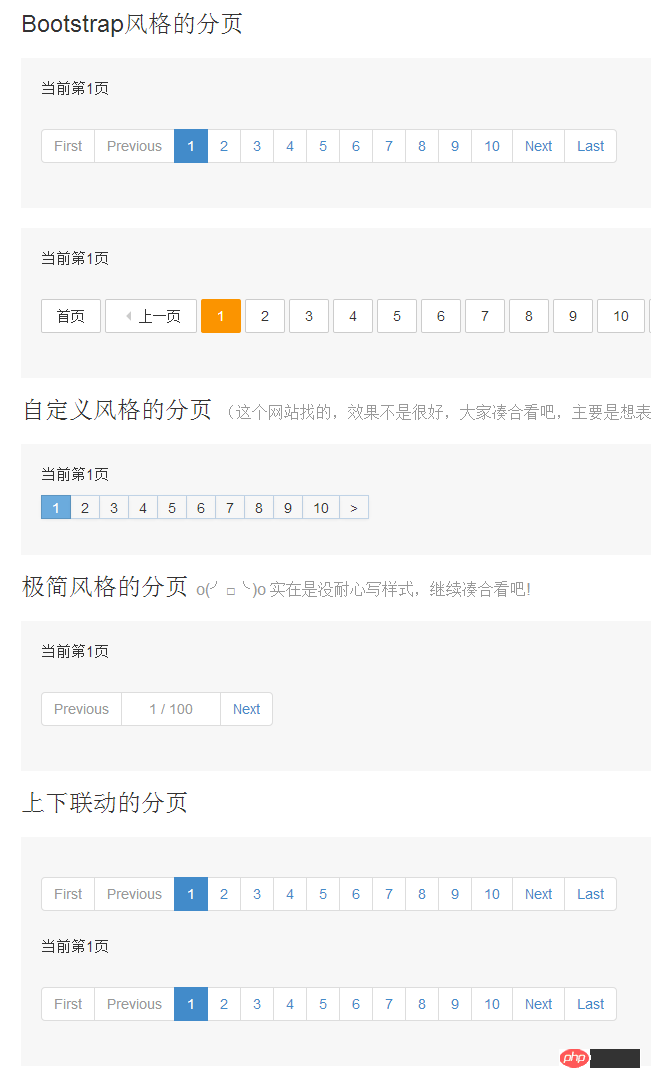
$('#id').jqPaginator({
totalPages: 100,
visiblePages: 10,
currentPage: 1,
first: '<li class="first"><a href="javascript:void(0);">First</a></li>',
prev: '<li class="prev"><a href="javascript:void(0);">Previous</a></li>',
next: '<li class="next"><a href="javascript:void(0);">Next</a></li>',
last: '<li class="last"><a href="javascript:void(0);">Last</a></li>',
page: '<li class="page"><a href="javascript:void(0);">{{page}}</a></li>',
onPageChange: function (num) {
$('#text').html('当前第' + num + '页');
}});| Default value | Description | |
|---|---|---|
| 0 | Set the total number of pages for paging | |
| 0 | Set the total number of entries for paging | |
| 0 | Set the number of entries for each page | Note: Either set totalPages, Either set totalCounts + pageSize, otherwise an error will be reported; after setting totalCounts and pageSize, totalPages will be automatically calculated. |
| 1 | Set the current page number | |
| 7 | Set the maximum number of pages to display (for example, if there are 100, if the current page is 1, then pages 1 - 7 will be displayed) | |
| ' disabled' | Set the "disabled state" style of the homepage, previous page, next page, and last page | |
| 'active' | Set the current page number style | |
| (None) | Set the Html structure of "Homepage" | |
| (none) | Set the Html structure of "previous page" | |
| (None) | Set the Html structure of "Next Page" | |
| (None) | Set "Last Page" "Html structure | |
| (None) | Set the Html structure of the page number, in which {{page}} can be used to represent the current page, {{totalPages}} represents the total number of pages, {{totalCounts}} represents the total number of entries (for example: the above "minimalist style" Demo uses {{placeholder}} and sets visiblePages to 1. ) | |
| (None) | Html wrapper with paging structure, for example: , | |
| (none) | callback function | is generally not used. Triggered when the page is triggered (including when initializing the first page), the page number of the "target page" |
| 参数 | 默认值 | 说明 |
|---|---|---|
| totalPages | 0 | 设置分页的总页数 |
| totalCounts | 0 | 设置分页的总条目数 |
| pageSize | 0 | 设置每一页的条目数 注意:要么设置totalPages,要么设置totalCounts + pageSize,否则报错;设置了totalCounts和pageSize后,会自动计算出totalPages。 |
| currentPage | 1 | 设置当前的页码 |
| visiblePages | 7 | 设置最多显示的页码数(例如有100也,当前第1页,则显示1 - 7页) |
| disableClass | ‘disabled’ | 设置首页,上一页,下一页,末页的”禁用状态”样式 |
| activeClass | ‘active’ | 设置当前页码样式 |
| first | (无) | 设置”首页”的Html结构 |
| prev | (无) | 设置”上一页”的Html结构 |
| next | (无) | 设置”下一页”的Html结构 |
| last | (无) | 设置”末页”的Html结构 |
| page | (无) | 设置页码的Html结构,其中可以使用{{page}}代表当前页,{{totalPages}}代表总页数,{{totalCounts}}代表总条目数(例如:上面的”极简风格”的Demo,就是使用了{{占位符}},并将visiblePages设为1实现的。) |
| wrapper | (无) | 分页结构的Html包裹,例如:,一般不会用到 |
| onPageChange | (无) | 回调函数,当换页时触发(包括初始化第一页的时候),会传入”目标页”的页码 |
扩展方法
jqPaginator提供了两个扩展方法,方便初始化后对组件进行操作。
$('#id').jqPaginator('option', options)
初始化后,动态修改配置
$('#id').jqPaginator('option', {
currentPage: 1});$('#id').jqPaginator('destroy')
销毁jqPaginator
$('#id').jqPaginator('destroy');
相关资料
源码下载:https://github.com/keenwon/jqPaginator
官方地址:http://jqpaginator.keenwon.com/
</p>
推荐解决方案(结合后台):
首页通过一个具体后台查询跳转过来,带上总页数等数据,方便初始化分页导航条,并在table中显示第一页数据。
后续点击每一页按钮都发出ajax请求,并将该页数据作为json返回,填充到table中,这样做的好处是,不用每一次都查询总条数,只需要查询当前页面数据即可,速度快,减少数据库负担。具体代码如下,仅供参考:
<script type="text/javascript">$(function(){
$('#page').jqPaginator({ //totalPages: 100,
pageSize:2,//每一页多少条记录
totalCounts:${totalCount},
visiblePages: 10,
currentPage: 1,
first: '<li class="first"><a href="javascript:void(0);">First</a></li>',
prev: '<li class="prev"><a href="javascript:void(0);">Previous</a></li>',
next: '<li class="next"><a href="javascript:void(0);">Next</a></li>',
last: '<li class="last"><a href="javascript:void(0);">Last</a></li>',
page: '<li class="page"><a href="javascript:void(0);">{{page}}</a></li>',
onPageChange: function (num) {
// alert('当前第' + num + '页');
//此处可以ajax加载下一页数据
$.get('ajaxpage',{num:num},function(data){
$("#tab").html('<tr><th>书籍Id</th><th>书名</th><th>价格</th><th>操作</th></tr>'); for(var i=0;i<data.length;i++){
$("#tab").append('<tr><td>'+data[i].id+'</td><Td>'+data[i].bookName+'</Td><td>'+data[i].bookPrice+'</td>'+ '<td><a href="/test_maven/updateBook?id=${book.id }">修改</a> <a href="#">删除</a></td> </tr>');
}
},'json')
}
});
})</script><title>Insert title here</title></head><body><h1 id="所有书籍">所有书籍</h1><table id="tab">
<tr><th>书籍Id</th><th>书名</th><th>价格</th><th>操作</th></tr>
<c:forEach items="${books }" var="book">
<tr><td>${book.id }</td><Td>${book.bookName }</Td><td>${book.bookPrice }</td>
<td><a href="/test_maven/updateBook?id=${book.id }">修改</a> <a href="#">删除</a></td>
</tr>
</c:forEach></table>相信看了本文案例你已经掌握了方法,更多精彩请关注php中文网其它相关文章!
推荐阅读:
The above is the detailed content of How to use jquery pagination plug-in. For more information, please follow other related articles on the PHP Chinese website!

Hot AI Tools

Undresser.AI Undress
AI-powered app for creating realistic nude photos

AI Clothes Remover
Online AI tool for removing clothes from photos.

Undress AI Tool
Undress images for free

Clothoff.io
AI clothes remover

AI Hentai Generator
Generate AI Hentai for free.

Hot Article
Hot Tools

Notepad++7.3.1
Easy-to-use and free code editor

SublimeText3 Chinese version
Chinese version, very easy to use

Zend Studio 13.0.1
Powerful PHP integrated development environment

Dreamweaver CS6
Visual web development tools

SublimeText3 Mac version
God-level code editing software (SublimeText3)
Hot Topics
 1377
1377
 52
52

 What is the Chrome plug-in extension installation directory?
Mar 08, 2024 am 08:55 AM
What is the Chrome plug-in extension installation directory?
Mar 08, 2024 am 08:55 AM
What is the Chrome plug-in extension installation directory? Under normal circumstances, the default installation directory of Chrome plug-in extensions is as follows: 1. The default installation directory location of chrome plug-ins in windowsxp: C:\DocumentsandSettings\username\LocalSettings\ApplicationData\Google\Chrome\UserData\Default\Extensions2. chrome in windows7 The default installation directory location of the plug-in: C:\Users\username\AppData\Local\Google\Chrome\User
 Share three solutions to why Edge browser does not support this plug-in
Mar 13, 2024 pm 04:34 PM
Share three solutions to why Edge browser does not support this plug-in
Mar 13, 2024 pm 04:34 PM
When users use the Edge browser, they may add some plug-ins to meet more of their needs. But when adding a plug-in, it shows that this plug-in is not supported. How to solve this problem? Today, the editor will share with you three solutions. Come and try it. Method 1: Try using another browser. Method 2: The Flash Player on the browser may be out of date or missing, causing the plug-in to be unsupported. You can download the latest version from the official website. Method 3: Press the "Ctrl+Shift+Delete" keys at the same time. Click "Clear Data" and reopen the browser.
 How to use PUT request method in jQuery?
Feb 28, 2024 pm 03:12 PM
How to use PUT request method in jQuery?
Feb 28, 2024 pm 03:12 PM
How to use PUT request method in jQuery? In jQuery, the method of sending a PUT request is similar to sending other types of requests, but you need to pay attention to some details and parameter settings. PUT requests are typically used to update resources, such as updating data in a database or updating files on the server. The following is a specific code example using the PUT request method in jQuery. First, make sure you include the jQuery library file, then you can send a PUT request via: $.ajax({u
 jQuery Tips: Quickly modify the text of all a tags on the page
Feb 28, 2024 pm 09:06 PM
jQuery Tips: Quickly modify the text of all a tags on the page
Feb 28, 2024 pm 09:06 PM
Title: jQuery Tips: Quickly modify the text of all a tags on the page In web development, we often need to modify and operate elements on the page. When using jQuery, sometimes you need to modify the text content of all a tags in the page at once, which can save time and energy. The following will introduce how to use jQuery to quickly modify the text of all a tags on the page, and give specific code examples. First, we need to introduce the jQuery library file and ensure that the following code is introduced into the page: <
 Use jQuery to modify the text content of all a tags
Feb 28, 2024 pm 05:42 PM
Use jQuery to modify the text content of all a tags
Feb 28, 2024 pm 05:42 PM
Title: Use jQuery to modify the text content of all a tags. jQuery is a popular JavaScript library that is widely used to handle DOM operations. In web development, we often encounter the need to modify the text content of the link tag (a tag) on the page. This article will explain how to use jQuery to achieve this goal, and provide specific code examples. First, we need to introduce the jQuery library into the page. Add the following code in the HTML file:
 How to unblock Google Chrome plug-in
Apr 01, 2024 pm 01:41 PM
How to unblock Google Chrome plug-in
Apr 01, 2024 pm 01:41 PM
How to unblock the Google Chrome plug-in? Many users like to install various useful plug-ins when using Google Chrome. These plug-ins can provide rich functions and services and improve work efficiency. However, some users say that after installing plug-ins in Google Chrome, the plug-ins will always be displayed. is blocked, so how can you unblock the plug-in after encountering this situation? Now let the editor show you the steps to unblock plug-ins in Google Chrome. Friends in need should come and take a look. How to unblock plug-ins in Google Chrome Step 1. When the blocked prompt appears, click the "Control Bar" and select "Install ActiveX Control". 2. Then open the browser "Tools" menu and click "Internet Options". 3.
 Best way to implement array pagination in PHP
May 04, 2024 pm 02:39 PM
Best way to implement array pagination in PHP
May 04, 2024 pm 02:39 PM
There are two most common ways to paginate PHP arrays: using the array_slice() function: calculate the number of elements to skip, and then extract the specified range of elements. Use built-in iterators: implement the Iterator interface, and the rewind(), key(), current(), next(), and valid() methods are used to traverse elements within the specified range.
 How Google Chrome allows animation plugins to run
Mar 28, 2024 am 08:01 AM
How Google Chrome allows animation plugins to run
Mar 28, 2024 am 08:01 AM
How does Google Chrome allow animation plugins to run? Google Chrome is very powerful. Many friends like to use this browser to watch video animations. However, if you want to watch various animated videos, you need to install animation plug-ins in the browser. Many friends use Google Chrome. After installing the animation plug-in, I still cannot care about the video. How should I deal with this problem? Next, let the editor show you the specific steps to allow the animation plug-in to run in Google Chrome. Friends who are interested can come and take a look. Specific steps for Google Chrome to allow animation plug-ins to run: 1. First run Google Chrome on your computer, and click the main menu button in the upper right corner of the homepage (as shown in the picture). 2. After opening the main menu, select the "Settings" option below (as shown in the picture). 3. In settings
