

How to implement file upload with progress bar animation
这次给大家带来怎样实现文件上传带进度条动画,实现文件上传带进度条动画的注意事项有哪些,下面就是实战案例,一起来看一下。
jQuery File Upload 是一个Jquery图片上传组件,支持多文件上传、取消、删除,上传前缩略图预览、列表显示图片大小,支持上传进度条显示;支持各种动态语言开发的服务器端。
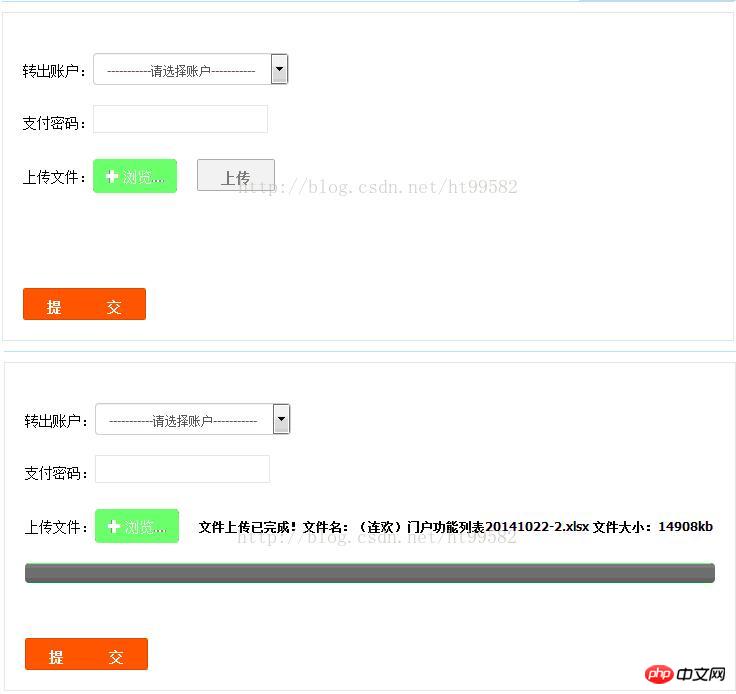
效果图如下所示:
html 部分
<p style="line-height:34px;margin-top:20px;">
    <label style="float: left;font-size:14px">上传文件:</label>
    <span class="btn btn-success fileinput-button fn-left">
   <i class="glyphicon glyphicon-plus"></i>
   <span>浏览...</span>
   <input type="file" name="file" id="file_upload">
  </span>
    <p style="float: left;margin-left: 20px;font-weight: bold" id="uploadText"></p>
    </p>
    <p class="fn-clear"></p>
    <p id="progress">
    <p class="bar" style="width: 0%;"></p>
    </p>
css 部分
<link rel="stylesheet" href="/admin/assets/plugins/jquery-file-upload/css/jquery.fileupload-ui.css" rel="external nofollow" >
<link rel="stylesheet" href="/admin/assets/plugins/jquery-file-upload/css/jquery.fileupload.css" rel="external nofollow" >
/*文件上传控件*/
.bar {
 background-image: -webkit-linear-gradient(top,#5cb85c 0,#449d44 100%);
 background-image: -o-linear-gradient(top,#5cb85c 0,#449d44 100%);
 background-image: -webkit-gradient(linear,left top,left bottom,from(#5cb85c),to(#449d44));
 background-image: linear-gradient(to bottom,#5cb85c 0,#449d44 100%);
 filter: progid:DXImageTransform.Microsoft.gradient(startColorstr='#ff5cb85c', endColorstr='#ff449d44', GradientType=0);
 background-repeat: repeat-x;
 height: 20px;
 font-size: 12px;
 line-height: 20px;
 color: #fff;
 text-align: center;
 background-color: #428bca;
 -webkit-box-shadow: inset 0 -1px 0 rgba(0,0,0,.15);
 box-shadow: inset 0 -1px 0 rgba(0,0,0,.15);
 -webkit-transition: width .6s ease;
 -o-transition: width .6s ease;
 transition: width .6s ease;
}
#progress {
 background-image: -webkit-linear-gradient(top,#ebebeb 0,#f5f5f5 100%);
 background-image: -o-linear-gradient(top,#ebebeb 0,#f5f5f5 100%);
 background-image: -webkit-gradient(linear,left top,left bottom,from(#ebebeb),to(#f5f5f5));
 background-image: linear-gradient(to bottom,#ebebeb 0,#f5f5f5 100%);
 filter: progid:DXImageTransform.Microsoft.gradient(startColorstr='#ffebebeb', endColorstr='#fff5f5f5', GradientType=0);
 background-repeat: repeat-x;
 height: 20px;
 width: 0%;
 margin-bottom: 20px;
 overflow: hidden;
 background-color: #f5f5f5;
 border-radius: 4px;
 -webkit-box-shadow: inset 0 1px 2px rgba(0,0,0,.1);
 box-shadow: inset 0 1px 2px rgba(0,0,0,.1);
 margin-top: 20px;
}
.glyphicon {
 position: relative;
 top: 1px;
 display: inline-block;
 font-family: 'Glyphicons Halflings';
 font-style: normal;
 font-weight: 400;
 line-height: 1;
 -webkit-font-smoothing: antialiased;
 -moz-osx-font-smoothing: grayscale;
}
.glyphicon-plus:before {
 content: "\2b";
}
.btn-success {
 color: #fff;
 background-color: #5cb85c;
 border-color: #4cae4c;
}
.btn {
 display: inline-block;
 padding: 6px 12px;
 margin-bottom: 0;
 font-size: 14px;
 font-weight: 400;
 line-height: 1.42857143;
 text-align: center;
 white-space: nowrap;
 vertical-align: middle;
 cursor: pointer;
 -webkit-user-select: none;
 -moz-user-select: none;
 -ms-user-select: none;
 user-select: none;
 background-image: none;
 border: 1px solid transparent;
 border-radius: 4px;
}js 部分
<script src="/admin/assets/plugins/jquery-file-upload/js/vendor/jquery.ui.widget.js"></script>
<script src="/admin/assets/plugins/jquery-file-upload/js/jquery.fileupload.js"></script>
<script type="text/javascript" src="${pageContext.request.contextPath}/admin/assets/plugins/jquery-1.10.2.min.js"></script><span style="font-family:monospace;font-size:14px;"> <span id="_xhe_cursor"></span>$('#file_upload').fileupload({
dataType: 'json',
url:'${pageContext.request.contextPath}/excel/upload',
autoUpload:false,
add: function (e, data) {
$('#progress').css(
'width','0%'
);
$('#progress .bar').css(
'width', '0%'
);
$("#uploadText").empty();
var fileType = data.files[0].name.split('.').pop();
// console.log(data);
var acceptFileTypes = /xls|xlsx$/i;
var size = data.files[0].size;
size = (size/1024).toFixed(2);//文件大小单位kb
var maxFileSize = 5*1024;//最大允许文件大小单位kb
if (!acceptFileTypes.test(fileType)) {
new Message({message:"不支持的文件类型,仅支持EXCEL文件"});
return ;
}
if(size>maxFileSize){
new Message({message:"文件大小:"+size+"KB,超过最大限制:"+maxFileSize+"KB"});
return ;
}
data.context = $("<button class=' ui-button ui-button-lwhite'/>").text("上传")
.appendTo("#uploadText")
.click(function () {
data.context = $("<p/>").text("正在上传...").replaceAll($(this));
data.submit();
});
},
progressall: function (e, data) {
var progress = parseInt(data.loaded / data.total * 100, 10);
$('#progress').css(
'width','100%'
);
$('#progress .bar').css(
'width',progress + '%'
);
},
fail:function (e, data) {
new Message({message:"上传失败"});
},
done: function (e, data) {
console.log(data.files[0]);
var fileName = data.files[0].name;
var size = data.files[0].size;
var obj = data.result;
if(obj.success == true){
$("#filePath").val(obj.result.fileId+"&"+obj.result.opLogId);
data.context.text("文件上传已完成!文件名:"+fileName+" 文件大小:"+size+"kb");
}else{
alert(obj.errorMsg);
}
}
});</span>XHR响应为Json时IE的下载BUG
这里需要特别注意的是,由于jQuery File Upload都是采用XHR在传递数据,服务器端返回的通常是JSON格式的响应,但是IE会将这些JSON响应误认为是文件传输,然后直接弹出下载框询问是否需要下载。
解决这个问题的方法是必须将相应的Http Head从
Content-Type: application/json
更改为
Content-Type: text/
相信看了本文案例你已经掌握了方法,更多精彩请关注php中文网其它相关文章!
推荐阅读:
The above is the detailed content of How to implement file upload with progress bar animation. For more information, please follow other related articles on the PHP Chinese website!

Hot AI Tools

Undresser.AI Undress
AI-powered app for creating realistic nude photos

AI Clothes Remover
Online AI tool for removing clothes from photos.

Undress AI Tool
Undress images for free

Clothoff.io
AI clothes remover

Video Face Swap
Swap faces in any video effortlessly with our completely free AI face swap tool!

Hot Article
Hot Tools

Notepad++7.3.1
Easy-to-use and free code editor

SublimeText3 Chinese version
Chinese version, very easy to use

Zend Studio 13.0.1
Powerful PHP integrated development environment

Dreamweaver CS6
Visual web development tools

SublimeText3 Mac version
God-level code editing software (SublimeText3)
Hot Topics


 How to recover expired WeChat files? Can expired WeChat files be recovered?
Feb 22, 2024 pm 02:46 PM
How to recover expired WeChat files? Can expired WeChat files be recovered?
Feb 22, 2024 pm 02:46 PM
Open WeChat, select Settings in Me, select General and then select Storage Space, select Management in Storage Space, select the conversation in which you want to restore files and select the exclamation mark icon. Tutorial Applicable Model: iPhone13 System: iOS15.3 Version: WeChat 8.0.24 Analysis 1 First open WeChat and click the Settings option on the My page. 2 Then find and click General Options on the settings page. 3Then click Storage Space on the general page. 4 Next, click Manage on the storage space page. 5Finally, select the conversation in which you want to recover files and click the exclamation mark icon on the right. Supplement: WeChat files generally expire in a few days. If the file received by WeChat has not been clicked, the WeChat system will clear it after 72 hours. If the WeChat file has been viewed,
 Photos cannot open this file because the format is not supported or the file is corrupted
Feb 22, 2024 am 09:49 AM
Photos cannot open this file because the format is not supported or the file is corrupted
Feb 22, 2024 am 09:49 AM
In Windows, the Photos app is a convenient way to view and manage photos and videos. Through this application, users can easily access their multimedia files without installing additional software. However, sometimes users may encounter some problems, such as encountering a "This file cannot be opened because the format is not supported" error message when using the Photos app, or file corruption when trying to open photos or videos. This situation can be confusing and inconvenient for users, requiring some investigation and fixes to resolve the issues. Users see the following error when they try to open photos or videos on the Photos app. Sorry, Photos cannot open this file because the format is not currently supported, or the file
 Preparing for removal takes a long time in Windows 11/10
Feb 19, 2024 pm 07:42 PM
Preparing for removal takes a long time in Windows 11/10
Feb 19, 2024 pm 07:42 PM
In this article, we will introduce how to solve the problem of "Ready to delete" prompt when deleting files or folders in Windows system. This prompt means that the system is performing some background operations, such as checking file permissions, verifying whether the file is occupied by other programs, calculating the size of the item to be deleted, etc. We will provide you with some workarounds to ensure that you can successfully delete your files without waiting too long. Why does Windows take so long to delete files? The time it takes Windows to prepare a file for deletion is affected by a variety of factors, including file size, storage device speed, and background processes. A long or stuck "Preparing to delete" prompt may indicate insufficient system resources, disk errors, or file system issues. exist
 Can Tmp format files be deleted?
Feb 24, 2024 pm 04:33 PM
Can Tmp format files be deleted?
Feb 24, 2024 pm 04:33 PM
Tmp format files are a temporary file format usually generated by a computer system or program during execution. The purpose of these files is to store temporary data to help the program run properly or improve performance. Once the program execution is completed or the computer is restarted, these tmp files are often no longer necessary. Therefore, for Tmp format files, they are essentially deletable. Moreover, deleting these tmp files can free up hard disk space and ensure the normal operation of the computer. However, before deleting Tmp format files, we need to
 How to install GHO files
Feb 19, 2024 pm 10:06 PM
How to install GHO files
Feb 19, 2024 pm 10:06 PM
The gho file is a GhostImage image file, which is usually used to back up the entire hard disk or partition data into a file. In some specific cases, we need to reinstall this gho file back to the hard drive to restore the hard drive or partition to its previous state. The following will introduce how to install the gho file. First, before installation, we need to prepare the following tools and materials: Entity gho file: Make sure you have a complete gho file, which usually has a .gho suffix and contains a backup
 What to do if the 0x80004005 error code appears. The editor will teach you how to solve the 0x80004005 error code.
Mar 21, 2024 pm 09:17 PM
What to do if the 0x80004005 error code appears. The editor will teach you how to solve the 0x80004005 error code.
Mar 21, 2024 pm 09:17 PM
When deleting or decompressing a folder on your computer, sometimes a prompt dialog box "Error 0x80004005: Unspecified Error" will pop up. How should you solve this situation? There are actually many reasons why the error code 0x80004005 is prompted, but most of them are caused by viruses. We can re-register the dll to solve the problem. Below, the editor will explain to you the experience of handling the 0x80004005 error code. Some users are prompted with error code 0X80004005 when using their computers. The 0x80004005 error is mainly caused by the computer not correctly registering certain dynamic link library files, or by a firewall that does not allow HTTPS connections between the computer and the Internet. So how about
 How to transfer files from Quark Cloud Disk to Baidu Cloud Disk?
Mar 14, 2024 pm 02:07 PM
How to transfer files from Quark Cloud Disk to Baidu Cloud Disk?
Mar 14, 2024 pm 02:07 PM
Quark Netdisk and Baidu Netdisk are currently the most commonly used Netdisk software for storing files. If you want to save the files in Quark Netdisk to Baidu Netdisk, how do you do it? In this issue, the editor has compiled the tutorial steps for transferring files from Quark Network Disk computer to Baidu Network Disk. Let’s take a look at how to operate it. How to save Quark network disk files to Baidu network disk? To transfer files from Quark Network Disk to Baidu Network Disk, you first need to download the required files from Quark Network Disk, then select the target folder in the Baidu Network Disk client and open it. Then, drag and drop the files downloaded from Quark Cloud Disk into the folder opened by the Baidu Cloud Disk client, or use the upload function to add the files to Baidu Cloud Disk. Make sure to check whether the file was successfully transferred in Baidu Cloud Disk after the upload is completed. That's it
 Different uses of slashes and backslashes in file paths
Feb 26, 2024 pm 04:36 PM
Different uses of slashes and backslashes in file paths
Feb 26, 2024 pm 04:36 PM
A file path is a string used by the operating system to identify and locate a file or folder. In file paths, there are two common symbols separating paths, namely forward slash (/) and backslash (). These two symbols have different uses and meanings in different operating systems. The forward slash (/) is a commonly used path separator in Unix and Linux systems. On these systems, file paths start from the root directory (/) and are separated by forward slashes between each directory. For example, the path /home/user/Docume
