

How to install php plug-in imagick under win7

Step 1: Install the extension package first
The reason why you install the extension first is because the extension version must correspond to the software version , and the extension version comes out much slower than the software version, so it is always unable to support the latest version of the software. Therefore, it is best to choose the ImageMagick software version to install based on the extensions you have installed.
First of all, Imagic’s php extension package download address: http://pecl.php.net/package/imagick
First, choose according to your own php version. If you don’t know your own version, you can Check phpinfo, I will take a screenshot of my own to give an example:
You should pay attention to the places marked by the red box below. The top is the PHP version, mine is version 5.5.30, and the server environment is x86, which is 32-bit. If it is 64 here, it is 64-bit. pay attention. 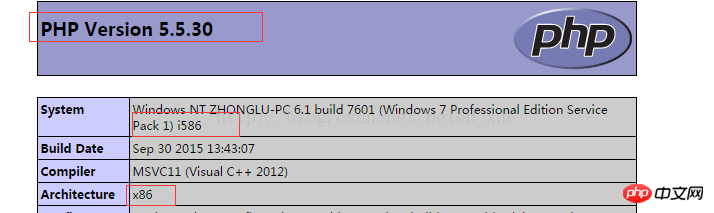 The next step is to look at the security thread status of php: disabled is in the closed state, enable is in the on state, my security thread is closed, be sure to pay attention here
 Let’s take a look at the download page above: here There are the latest php extensions for each version of imagick, and the required versions are also specified. The ImageMagick versions supported here are 6.5.3-6.10, and the php version must be higher than 5.4.
If your PHP version is lower than this, then you may need to find a lower extension version, and the software version will also be lower. This blog post may be different from your installation situation. It can be used as a reference at most. For example, lower versions of ImageMagick require manual system variable path configuration, while higher versions have automatic configuration checked when automatically installed.
Okay, now go to the extension download page given above and you will see the following picture display:
Let’s take a look at the download page above: here There are the latest php extensions for each version of imagick, and the required versions are also specified. The ImageMagick versions supported here are 6.5.3-6.10, and the php version must be higher than 5.4.
If your PHP version is lower than this, then you may need to find a lower extension version, and the software version will also be lower. This blog post may be different from your installation situation. It can be used as a reference at most. For example, lower versions of ImageMagick require manual system variable path configuration, while higher versions have automatic configuration checked when automatically installed.
Okay, now go to the extension download page given above and you will see the following picture display: 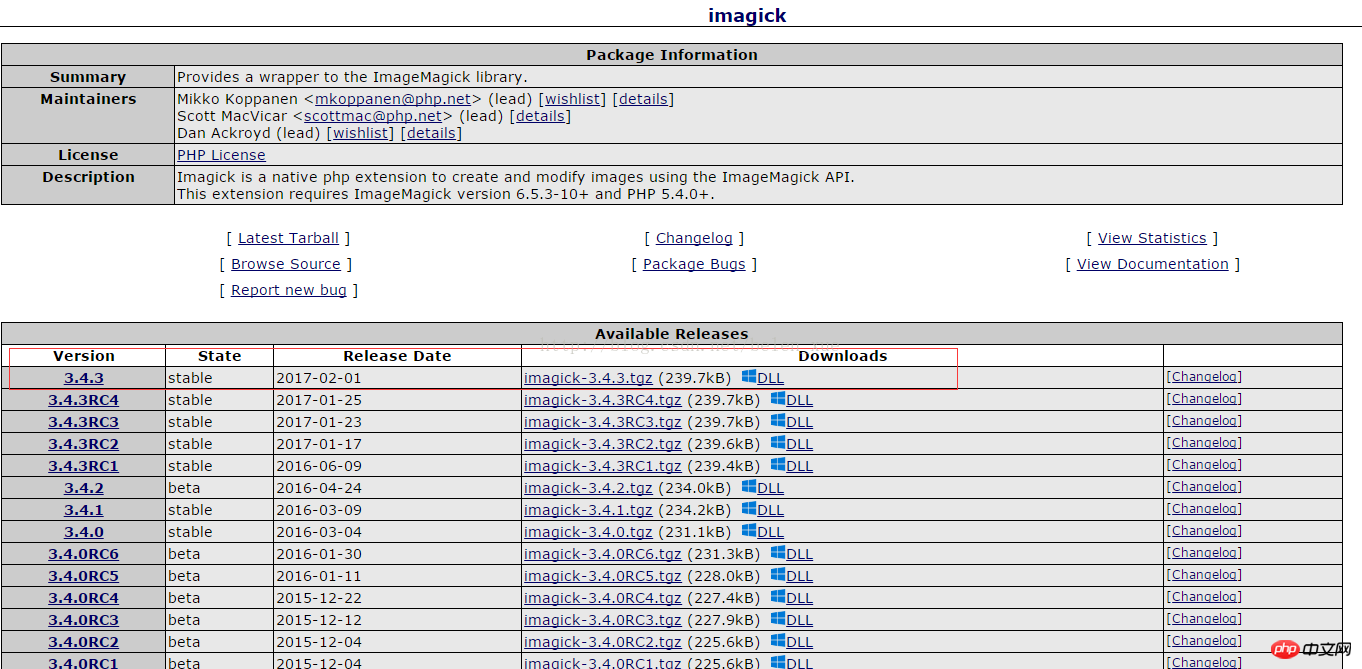 The red box is the version I chose. Basically this is the latest and stable version, so it is still a good choice, of course it can also Choose other versions according to your own situation, but it is better to choose the stable version. Click the DDL with the blue windows logo to enter the windows version options. There are screenshots below.
 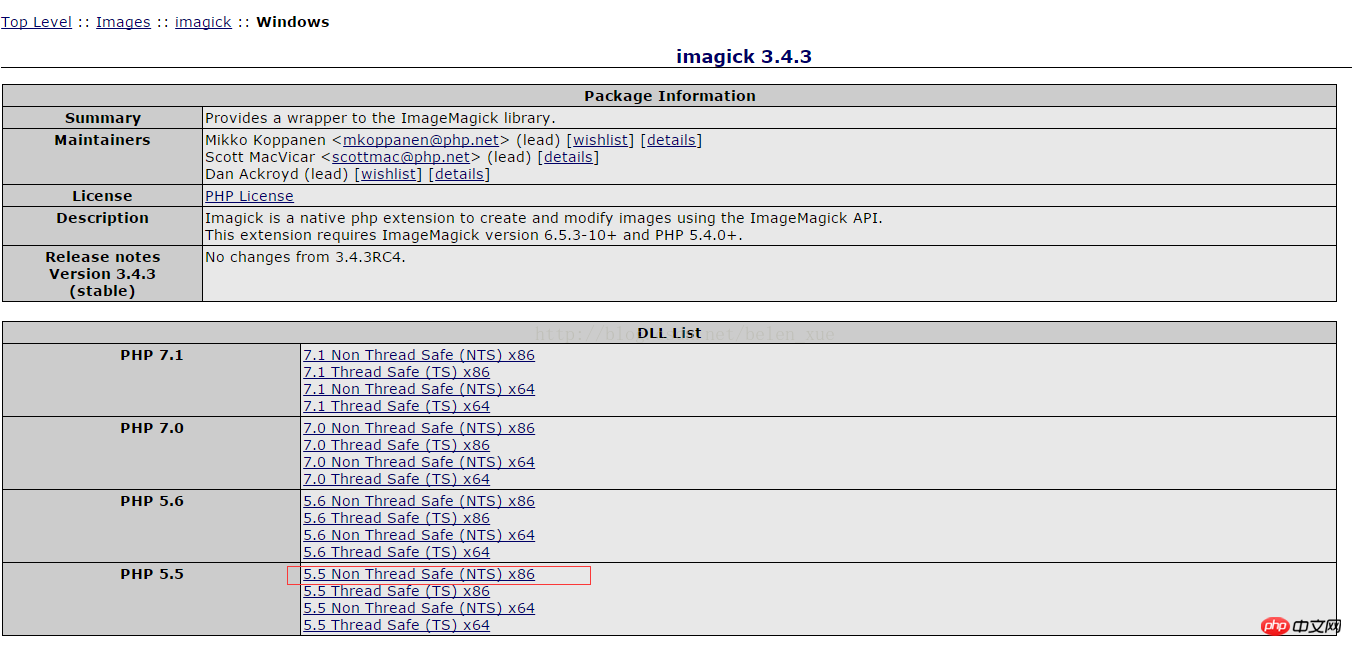 According to the various parameters we got from phpinfo above, we choose the php5.5 version here, and it is the Non Thread Safe version and 32-bit, so we should choose the version in the red box to download.
After the download is complete, let’s take a look at what’s inside:
According to the various parameters we got from phpinfo above, we choose the php5.5 version here, and it is the Non Thread Safe version and 32-bit, so we should choose the version in the red box to download.
After the download is complete, let’s take a look at what’s inside: 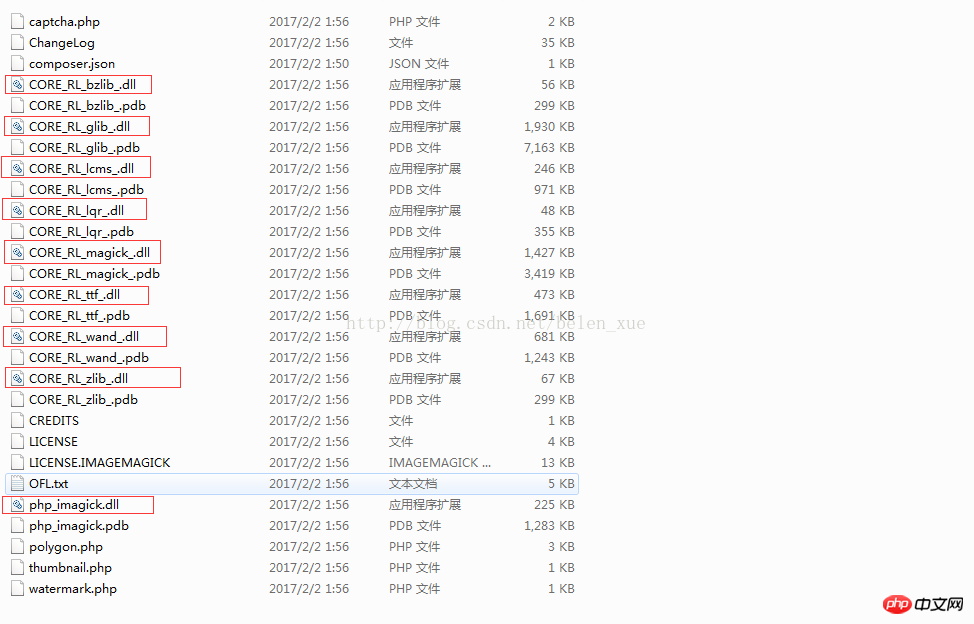 The items marked with red boxes are all needed to install the imagick extension in PHP:
1) Place the bottom php_imagick.dll into the ext extension folder of the PHP installation folder
2) The above dll file is directly put into the php installation folder. If it is phpstudy's multi-version php, put it into the folder corresponding to the version you are using. For example, php55n refers to a version above php5.5 but not higher than 5.6.
The next step is to change the php configuration file, open the php.ini file, and add the extension configuration of extension=php_imagick.dll as shown below.
The items marked with red boxes are all needed to install the imagick extension in PHP:
1) Place the bottom php_imagick.dll into the ext extension folder of the PHP installation folder
2) The above dll file is directly put into the php installation folder. If it is phpstudy's multi-version php, put it into the folder corresponding to the version you are using. For example, php55n refers to a version above php5.5 but not higher than 5.6.
The next step is to change the php configuration file, open the php.ini file, and add the extension configuration of extension=php_imagick.dll as shown below. 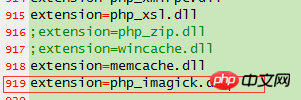 After completing these configurations, restart the computer and server and open phpinfo to see the imagick extension. If there is no imagick in phpinfo, the extension indicates that the installation was not successful. The possibility of error is that the server parameters and php parameters are not related to the imagick extension. The parameters are inconsistent, so check whether the above versions are consistent.
After success, check the imagick details of phpinfo. Since the software has not been installed, the red box mark in the picture below will appear. Note that here I am a screenshot after the installation is successful. The correct situation should be the same as the red box mark and comments, as shown above. 0, the following is empty, because the ImageMagick software has not been installed yet, so it does not support any kind of image processing.
At this point we can also display the detailed version of the supported software in phpinfo based on imagick. I forgot to mark it with a red box below, but it is still easy to see. The supported version is 6.9.3-6.9.7, and you can support it further. , but cannot go up, so you need to find the ImageMagick software version below 6.9.7, so you need to find the corresponding software version based on this version, otherwise the extension will not recognize the ImageMagick software, so the part marked with a red box will always be displayed Empty and 0.
After completing these configurations, restart the computer and server and open phpinfo to see the imagick extension. If there is no imagick in phpinfo, the extension indicates that the installation was not successful. The possibility of error is that the server parameters and php parameters are not related to the imagick extension. The parameters are inconsistent, so check whether the above versions are consistent.
After success, check the imagick details of phpinfo. Since the software has not been installed, the red box mark in the picture below will appear. Note that here I am a screenshot after the installation is successful. The correct situation should be the same as the red box mark and comments, as shown above. 0, the following is empty, because the ImageMagick software has not been installed yet, so it does not support any kind of image processing.
At this point we can also display the detailed version of the supported software in phpinfo based on imagick. I forgot to mark it with a red box below, but it is still easy to see. The supported version is 6.9.3-6.9.7, and you can support it further. , but cannot go up, so you need to find the ImageMagick software version below 6.9.7, so you need to find the corresponding software version based on this version, otherwise the extension will not recognize the ImageMagick software, so the part marked with a red box will always be displayed Empty and 0. 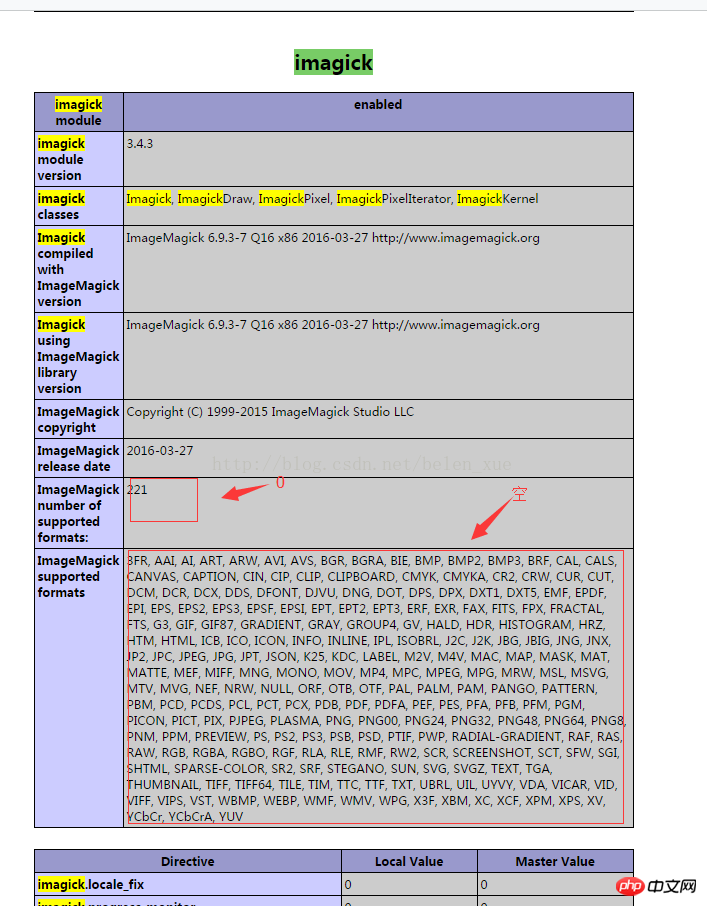
Step 2: Install ImageMagick software
Official website download address: http://www.imagemagick.org/script/download.php Note: As of now, the official website address only has downloads for versions 7.0 and above, but our extension does not support such a higher version, so it needs to be downloaded from other places. I downloaded two relatively lower versions below, and finally found them. If you have points, please go to csdn to download sponsorship points. If you don’t have points, I will upload them to Baidu Netdisk later. Send me the password privately.
csdn:
ImageMagick-6.8.9 x86 version (32-bit)
Download address: http://download.csdn.net/detail/belen_xue/9863187
ImageMagick-6.9.2 x64 version (64-bit)
Download address: http://download.csdn.net/detail/belen_xue/9863206
Baidu Netdisk:
Link: http://pan.baidu.com/s/1dF07evf
Password: hsac
As long as you select the right version of ImageMagick software, installation is very simple, just double-click , select the installation directory. For Windows, it is recommended to install to the D drive. It is best not to install to the C drive. Then just click Next. It will select the automatically checked part. Do not change it. The selected part will automatically be in the path. Add the system variables of the corresponding software, no need to add them manually. After the installation is complete, restart the server and you will see that the internal supported image types appear in the red box of the imagick part of the phpinfo in the screenshot above. This means that the installation is successful.
If there is no supported type yet, please check the installed software version. This situation is only caused by problems with the path environment variable and software version. However, the path is automatically added and generally there will be no problems, so it is most likely. It's still caused by the wrong software version. The ImageMagick software version is divided into 64-bit and 32-bit, and then there is the version number. You can troubleshoot based on these two.
Related recommendations:
How to use php_imagick to achieve retro effect_php example
php installation imagick under Linux
PHP uses imagick to generate combined thumbnails
The above is the detailed content of How to install php plug-in imagick under win7. For more information, please follow other related articles on the PHP Chinese website!

Hot AI Tools

Undresser.AI Undress
AI-powered app for creating realistic nude photos

AI Clothes Remover
Online AI tool for removing clothes from photos.

Undress AI Tool
Undress images for free

Clothoff.io
AI clothes remover

AI Hentai Generator
Generate AI Hentai for free.

Hot Article
Hot Tools

Notepad++7.3.1
Easy-to-use and free code editor

SublimeText3 Chinese version
Chinese version, very easy to use

Zend Studio 13.0.1
Powerful PHP integrated development environment

Dreamweaver CS6
Visual web development tools

SublimeText3 Mac version
God-level code editing software (SublimeText3)
Hot Topics
 1377
1377
 52
52

 PHP 8.4 Installation and Upgrade guide for Ubuntu and Debian
Dec 24, 2024 pm 04:42 PM
PHP 8.4 Installation and Upgrade guide for Ubuntu and Debian
Dec 24, 2024 pm 04:42 PM
PHP 8.4 brings several new features, security improvements, and performance improvements with healthy amounts of feature deprecations and removals. This guide explains how to install PHP 8.4 or upgrade to PHP 8.4 on Ubuntu, Debian, or their derivati
 CakePHP Date and Time
Sep 10, 2024 pm 05:27 PM
CakePHP Date and Time
Sep 10, 2024 pm 05:27 PM
To work with date and time in cakephp4, we are going to make use of the available FrozenTime class.
 Discuss CakePHP
Sep 10, 2024 pm 05:28 PM
Discuss CakePHP
Sep 10, 2024 pm 05:28 PM
CakePHP is an open-source framework for PHP. It is intended to make developing, deploying and maintaining applications much easier. CakePHP is based on a MVC-like architecture that is both powerful and easy to grasp. Models, Views, and Controllers gu
 CakePHP File upload
Sep 10, 2024 pm 05:27 PM
CakePHP File upload
Sep 10, 2024 pm 05:27 PM
To work on file upload we are going to use the form helper. Here, is an example for file upload.
 CakePHP Creating Validators
Sep 10, 2024 pm 05:26 PM
CakePHP Creating Validators
Sep 10, 2024 pm 05:26 PM
Validator can be created by adding the following two lines in the controller.
 How To Set Up Visual Studio Code (VS Code) for PHP Development
Dec 20, 2024 am 11:31 AM
How To Set Up Visual Studio Code (VS Code) for PHP Development
Dec 20, 2024 am 11:31 AM
Visual Studio Code, also known as VS Code, is a free source code editor — or integrated development environment (IDE) — available for all major operating systems. With a large collection of extensions for many programming languages, VS Code can be c
 CakePHP Quick Guide
Sep 10, 2024 pm 05:27 PM
CakePHP Quick Guide
Sep 10, 2024 pm 05:27 PM
CakePHP is an open source MVC framework. It makes developing, deploying and maintaining applications much easier. CakePHP has a number of libraries to reduce the overload of most common tasks.
 How do you parse and process HTML/XML in PHP?
Feb 07, 2025 am 11:57 AM
How do you parse and process HTML/XML in PHP?
Feb 07, 2025 am 11:57 AM
This tutorial demonstrates how to efficiently process XML documents using PHP. XML (eXtensible Markup Language) is a versatile text-based markup language designed for both human readability and machine parsing. It's commonly used for data storage an
