ngrok+express performs local environment WeChat interface debugging
This time I will bring you ngrok+express to debug the WeChat interface in the local environment. What are the precautions for ngrok+express to debug the WeChat interface in the local environment. The following is a practical case, let's take a look.
During the development of WeChat project, it is often necessary to debug the interfaces provided by WeChat jssdk, such as recording, sharing, uploading images and other interfaces, but WeChat jssdk requires binding a secure domain name Only in this way can you use a series of functions it provides. However, using localhost or local IP in the development environment cannot complete the authentication and binding of the domain name, so it cannot be debugged locally. Of course, there is a last resort method, which is to develop it locally, package it and send it to the company's test server, and use the domain name certified by the test server for debugging. Every time you make a change, you have to send a test for debugging. Obviously, this method is very troublesome and very time-consuming. It’s not scientific, so this article will focus on this problem to introduce how to use ngrok and express to solve the debugging problem of WeChat interface in the development environment.
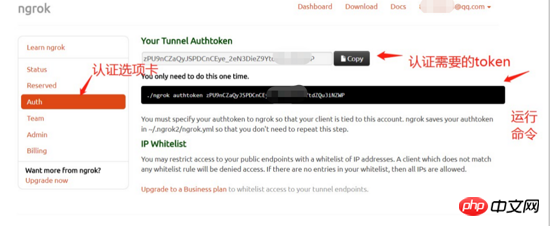
1: First introduce ngrok. The main function of ngrok is to map the local IP to the external network and assign you an available domain name. Through this domain name, external network users can open your local web. The service is also very simple to use, and the official website also has documents and detailed introductions. Here is a brief introduction to how to use it. First, go to ngrok's official website to download the corresponding client of ngrok, and register as a user. You can register through your github account or google account. After the registration is completed, open auth in the personal center. option, copy the authtoken here, as shown below:
(Here we take the window version as an example), then download and unzip it, there will be an ngrok.exe file, double-click to run it The following command line will appear:
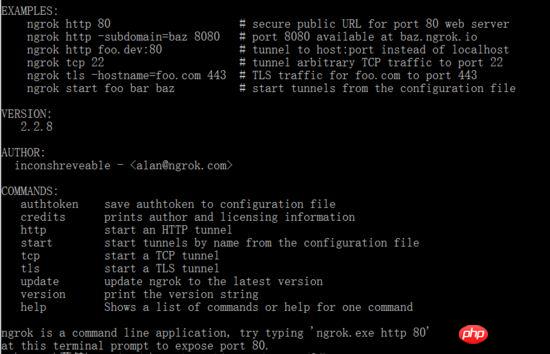
First we need to complete the token authentication of ngrok, otherwise an error will occur during operation. Run the command
ngrok authtoken ** *************** //* number is the token in the personal center, just copy it
After the authentication is completed, you can operate it, as shown in the picture above Examples are some commonly used example commands. We use ngrok http. The following parameter is the port number of your local web service. After running, an external domain name will be assigned. Through this domain name, you can access your local web service. ,

However, this domain name will be reassigned a new domain name after the restart, resulting in the need to go to the WeChat public platform to reset the secure domain name and token authentication after the restart. Unfortunately, in ngrok 1.0, the assigned domain name can be fixed each time through ngrok http subdomain=*** (custom domain name) 80, but after version 2.0, free users cannot fix the domain name, only paid users can , although it only costs $5 per month, for people who don’t test it frequently, there is still no desire to buy it. The key is that it only seems to support visaa... However, for fat friends who want a free fixed domain name, there are still solutions. There is sunny-ngrok in China, which allows you to apply for a custom fixed domain name for free. You can check its official website for specific tutorials. It is not very complicated. There are If you have any questions, you can ask me in the comments, I won’t go into details. Of course, there are many other methods to achieve external network mapping, such as using Localtunnel and peanut shell installed by npm, etc. You can learn about it yourself.
2: After getting the domain name, the next thing we have to do is use the domain name to complete the WeChat secure domain name binding. We can go to the WeChat public platform to apply for a test account, but it will not pass when filling in at this time. Because WeChat authentication requires its own server to correctly respond to the configuration request
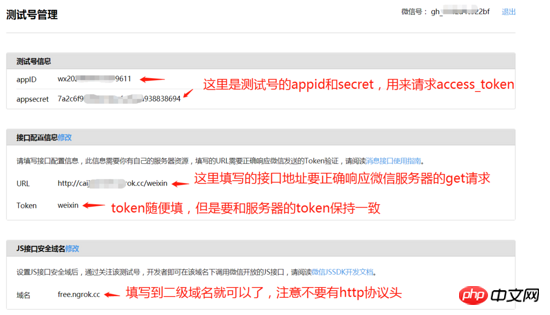
When you apply for a test account, fill in the URL of the configuration information, and the WeChat server will send a get request to this address. , the get request will carry some parameters. We need to use these parameters to generate a signature and compare it with the signature of WeChat parameters. Only if the comparison is successful, the interface will be configured successfully.
Because WeChat authentication requires its own server, here we need to use express to build a simple server to complete WeChat token authentication and generate signatures. The construction process is also very simple. , refer to express Chinese documentation, here are the steps from the official website:
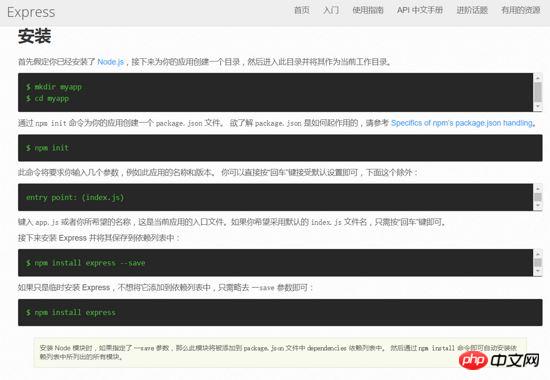
After the installation is completed, enter the myapp directory and create an app.js file.
var express = require('express');
var crypto = require('crypto') //使用npm安装后引入,用来生成签名
var http = require('request') //express的中间件,使用npm安装,用来发出请求
var jsSHA = require('jssha')//jssha是微信官网提供的nodejs版本签名算法,可以去官网下载官网的sample包
var app = express();
app.use(express.static('./review'))
app.get('/weixin',function (req, res) {//这个get接口就是测试号填写的接口,用来响应微信服务器的请求
  var token = 'weixin' //注意这里填写token,与微信测试号申请时候填写的token要保持一致
  var signature = req.query.signature;
  var timestamp = req.query.timestamp;
  var nonce = req.query.nonce;
  var echostr = req.query.echostr;
   /* 加密/校验流程如下: */
   //1. 将token、timestamp、nonce三个参数进行字典序排序
   var array = new Array(token,timestamp,nonce);
   array.sort();
   var str = array.toString().replace(/,/g,"");
  //2. 将三个参数字符串拼接成一个字符串进行sha1加密
  var sha1Code = crypto.createHash("sha1");
  var code = sha1Code.update(str,'utf-8').digest("hex");
   //3. 开发者获得加密后的字符串可与signature对比,标识该请求来源于微信
  if(code===signature){
    res.send(echostr)
  }else{
    res.send("error");
  }
});
var server = app.listen(80, function () {
  var host = server.address().address;
  var port = server.address().port;
  console.log('Example app listening at http://%s:%s', host, port);
});After the creation is completed, run
node app.js
The server is now started. The following points to note are:
1: jssha cannot be installed with npm, because npm installation will report Chosen SHA when running. variant is not supported
, you must use the sample package provided by the official website. After downloading and decompressing, select the node version, open it and copy the jssha file in node_module to the node_module in the project;
2: The token value here needs to be consistent with the token value filled in the WeChat test account;
Now we can start filling in the parameters of the test account. After completing the filling, the WeChat server will send a request to the interface you filled in. , if all responses are correct, a pop-up message indicating successful configuration will appear.
Of course, it’s not over yet, because the front end needs to complete the permission configuration through the interface request if it wants to call the jssdk interface. Here you can take a look at the WeChat jssdk documentation. The specific reference steps will not be repeated here. The interface request is roughly as follows:
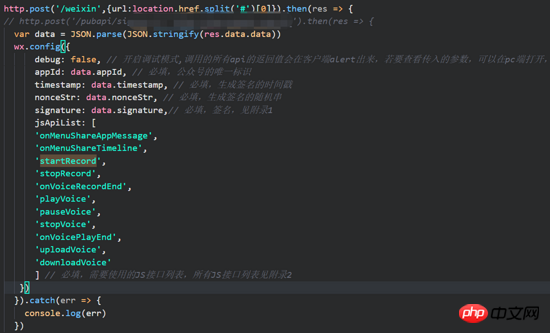
This interface is mainly to submit the current url request to the server to get the corresponding parameters and complete the permission configuration, so you need to write another one in express The interface that responds to post request. The main work of this interface is to use the appid and appSerect (provided by the test number) to request the interface provided by WeChat to generate an access_token, and then use this access_token to request the interface provided by WeChat to generate it. tiket, there are detailed instructions on both of these documents. Finally, the signature is generated. The code is as follows
// noncestr生成var createNonceStr = function() {
return Math.random().toString(36).substr(2, 15);
};
// timestamp时间戳生成var createTimeStamp = function () {
return parseInt(new Date().getTime() / 1000) + '';
};
//获取tiket
var getTiket= function (data) { //通过access_token获取tiket
return new Promise((reslove,reject)=>{
http.get(`https://api.weixin.qq.com/cgi-bin/ticket/getticket?access_token=${data}&type=jsapi`,
function(err,res,body){
if(res.body.tiket){
resoleve(res.body.ticket)
}else{
reject(err)
} }) })}
// 计算签名方法
var calcSignature = function (ticket, noncestr, ts, url) {//使用jssha
var str = 'jsapi_ticket=' + ticket + '&noncestr=' + noncestr + '×tamp='+ ts +'&url=' + url;
shaObj = new jsSHA(str, 'TEXT'); return shaObj.getHash('SHA-1', 'HEX');
}
//返回给前端配置信息的post接口
app.post('/weixin',function(req,res,next){
let appId = '******'
let appSecret = '******'
let url = `https://api.weixin.qq.com/cgi-bin/token?grant_type=client_credential&appid=${appId}&secret=${appSecret }`
http.get(url, function (err, response, body) {
getTiket(response.body).then(resolve=>{
let tiket = resolve//tiket
let nonceStr = createNonceStr()//随机字符串
let timeStamp = createTimeStamp()//时间戳
let signature = calcSignature(tiket,nonceStr,timeStamp,req.body.url)
let obj = { //将前端需要的参数返回
data:{
appId:appId,
timestamp:timeStamp,
nonceStr:nonceStr,
signature:signature
}
}
res.end(JSON.stringify(obj))
}).catch(err=>{})
res.end(JSON.stringify(err))
});})It should be noted here that the access_token and tiket returned by WeChat have a validity period of 7200s, so they need to be cached. There is no cache operation code written in my code. Everyone has it. Two methods:
1. After getting the access_token and tiket, directly write them in variables and save them. During the validity period, you do not need to continue to request the interface, just perform the signature operation directly; after expiration, request once That's good. Although this method is a bit clumsy, it still has a long validity period.
2. After the server gets the access_token and tiket, write it into the local json file. The specific steps will not be repeated. Then determine whether it has expired. After the expiration, request again. If it has not expired, read the json directly. Sign the data in the file.
Finally, there are two options:
First: After executing npm run build on our front-end project, put the dist file into our server folder, you can use express directly static middleware
app.use(express.static('./dist'))
Then WeChat developer tools, enter the assigned domain name to open our project, so we don’t need to set up an agent, but we need to execute build, which is a bit of a waste of time if the project is larger;
Second: Apply for a domain name for our development environment, because the scaffolding is now hot updated In fact, it is to start a webpack-dev-sever micro-server. After applying for a domain name, just fill in the development port number, so that the development address is the same as the second-level domain name of our server address. However, for the server interface, the development environment requires Set the proxy, and the hot update will also be invalid. You need to refresh it manually, but it may be better than the first method.
After the two methods run successfully, check the request. If the configuration is successful, the console will display the configuration success message as follows:

Then we can be happy Now that I am using the interface of jssdk, I no longer need a backend. I can test all the interfaces locally by myself, and it is not a pleasure.
I believe you have mastered the method after reading the case in this article. For more exciting information, please pay attention to other related articles on the php Chinese website!
Recommended reading:
How to use JS to change the status of the radio
The corresponding callback function is executed after the JS script is loaded operate
The above is the detailed content of ngrok+express performs local environment WeChat interface debugging. For more information, please follow other related articles on the PHP Chinese website!

Hot AI Tools

Undresser.AI Undress
AI-powered app for creating realistic nude photos

AI Clothes Remover
Online AI tool for removing clothes from photos.

Undress AI Tool
Undress images for free

Clothoff.io
AI clothes remover

AI Hentai Generator
Generate AI Hentai for free.

Hot Article

Hot Tools

Notepad++7.3.1
Easy-to-use and free code editor

SublimeText3 Chinese version
Chinese version, very easy to use

Zend Studio 13.0.1
Powerful PHP integrated development environment

Dreamweaver CS6
Visual web development tools

SublimeText3 Mac version
God-level code editing software (SublimeText3)

Hot Topics
 Unable to boot into Windows recovery environment
Feb 19, 2024 pm 11:12 PM
Windows Recovery Environment (WinRE) is an environment used to repair Windows operating system errors. After entering WinRE, you can perform system restore, factory reset, uninstall updates, etc. If you are unable to boot into WinRE, this article will guide you through fixes to resolve the issue. Unable to boot into the Windows Recovery Environment If you cannot boot into the Windows Recovery Environment, use the fixes provided below: Check the status of the Windows Recovery Environment Use other methods to enter the Windows Recovery Environment Did you accidentally delete the Windows Recovery Partition? Perform an in-place upgrade or clean installation of Windows below, we have explained all these fixes in detail. 1] Check Wi
 What are the internal interfaces of a computer motherboard? Recommended introduction to the internal interfaces of a computer motherboard
Mar 12, 2024 pm 04:34 PM
When we assemble the computer, although the installation process is simple, we often encounter problems in the wiring. Often, users mistakenly plug the power supply line of the CPU radiator into the SYS_FAN. Although the fan can rotate, it may not work when the computer is turned on. There will be an F1 error "CPUFanError", which also causes the CPU cooler to be unable to adjust the speed intelligently. Let's share the common knowledge about the CPU_FAN, SYS_FAN, CHA_FAN, and CPU_OPT interfaces on the computer motherboard. Popular science on the CPU_FAN, SYS_FAN, CHA_FAN, and CPU_OPT interfaces on the computer motherboard 1. CPU_FANCPU_FAN is a dedicated interface for the CPU radiator and works at 12V
 Common programming paradigms and design patterns in Go language
Mar 04, 2024 pm 06:06 PM
As a modern and efficient programming language, Go language has rich programming paradigms and design patterns that can help developers write high-quality, maintainable code. This article will introduce common programming paradigms and design patterns in the Go language and provide specific code examples. 1. Object-oriented programming In the Go language, you can use structures and methods to implement object-oriented programming. By defining a structure and binding methods to the structure, the object-oriented features of data encapsulation and behavior binding can be achieved. packagemaini
 Introduction to PHP interfaces and how to define them
Mar 23, 2024 am 09:00 AM
Introduction to PHP interface and how it is defined. PHP is an open source scripting language widely used in Web development. It is flexible, simple, and powerful. In PHP, an interface is a tool that defines common methods between multiple classes, achieving polymorphism and making code more flexible and reusable. This article will introduce the concept of PHP interfaces and how to define them, and provide specific code examples to demonstrate their usage. 1. PHP interface concept Interface plays an important role in object-oriented programming, defining the class application
 Solution to NotImplementedError()
Mar 01, 2024 pm 03:10 PM
The reason for the error is in python. The reason why NotImplementedError() is thrown in Tornado may be because an abstract method or interface is not implemented. These methods or interfaces are declared in the parent class but not implemented in the child class. Subclasses need to implement these methods or interfaces to work properly. How to solve this problem is to implement the abstract method or interface declared by the parent class in the child class. If you are using a class to inherit from another class and you see this error, you should implement all the abstract methods declared in the parent class in the child class. If you are using an interface and you see this error, you should implement all methods declared in the interface in the class that implements the interface. If you are not sure which
 Insight into Hongmeng system: actual function measurement and usage experience
Mar 23, 2024 am 10:45 AM
As a new operating system launched by Huawei, Hongmeng system has caused quite a stir in the industry. As a new attempt by Huawei after the US ban, Hongmeng system has high hopes and expectations. Recently, I was fortunate enough to get a Huawei mobile phone equipped with Hongmeng system. After a period of use and actual testing, I will share some functional testing and usage experience of Hongmeng system. First, let’s take a look at the interface and functions of Hongmeng system. The Hongmeng system adopts Huawei's own design style as a whole, which is simple, clear and smooth in operation. On the desktop, various
 Inner class implementation of interfaces and abstract classes in Java
Apr 30, 2024 pm 02:03 PM
Java allows inner classes to be defined within interfaces and abstract classes, providing flexibility for code reuse and modularization. Inner classes in interfaces can implement specific functions, while inner classes in abstract classes can define general functions, and subclasses provide concrete implementations.
 Common problems and solutions for Laravel environment configuration file .env
Mar 10, 2024 pm 12:51 PM
Common problems and solutions for Laravel environment configuration file .env When using the Laravel framework to develop projects, the environment configuration file .env is very important. It contains key configuration information of the project, such as database connection information, application keys, etc. However, sometimes there are some common problems when configuring the .env file. This article will introduce these problems and provide solutions, and attach specific code examples for reference. Problem 1: Unable to read the .env file when we have configured the .env file


