Combining HTML with CCS
This time I will bring you the combination of HTML and CCS. What are the precautions for using HTML and CCS? The following is a practical case, let’s take a look.
1.1 Introduction to HTML
1.1.1 The essence of Web service
import socket
sk = socket.socket()
sk.bind(("127.0.0.1", 8080))
sk.listen(5)
while True:
    conn, addr = sk.accept()
    data = conn.recv(8096)
    conn.send(b"HTTP/1.1 200 OK\r\n\r\n")
    conn.secd(b"<h1>Hello world!</h1>")
conn.close()The browser sends a request--> HTTP protocol--> The server receives the request--> The server returns a response --> The server sends the content of the HTML file to the browser --> The browser renders the page
1.1.2 What is HTML
Hypertext Markup Language (Hypertext Markup Language (HTML) is a markup language used to create web pages.
Essentially, they are rules that can be recognized by the browser. We write web pages according to the rules, and the browser renders our web pages according to the rules. The same tag may be interpreted differently by different browsers. (Compatibility issue)
Extension of web page file: .html or .htm
HTML is a markup language (markup language), it is not a programming language. HTML uses tags to describe web pages.
1.2 HTML document structure
<!DOCTYPE html>
<html lang="zh-CN">
<head>
  <meta charset="UTF-8">
  <title>css样式优先级</title>
</head>
<body>

</body>
</html>
is declared as an HTML5 document.
- ## and are the start tags and end tags of the document. It is the root element of the HTML page, and between them is the head and body of the document.
- , define the beginning of the HTML document. The content between them will not be displayed in the browser's document window. Contains the document's metadata. ##
- The text between and is the visible main content of the web page.
- Note: For Chinese web pages, you need to use to declare the encoding, otherwise garbled characters will appear. Some browsers will set GBK as the default encoding, so you need to set it to .
1.2.1 HTML tag format
- HTML tags are keywords surrounded by angle brackets, such as ,
- HTML tags usually appear in pairs, such as:
- There are also some tags that are presented separately, such as:
- The tag can have several attributes or no attributes.
- Tag syntax:
, etc.
and
. The first tag is the beginning and the second tag is the end. The closing tag will have a slash.,
,
 , etc. .
 Several very important attributes:
id: defines the unique ID of the tag, unique in the HTML document tree
class: defines one or more class names (classname) (CSS style class name) for html elements
style: Specifies the inline style of the element (CSS style)
1.2.2 HTML comments
<!--注释内容-->
1.2.3 tag
<!DOCTYPE> 声明必须是 HTML 文档的第一行,位于 <html><!DOCTYPE>
1.3 Common HTML tags
1.3.1 Common tags in head
 Figure 1-1
1.3.1.1 Meta tag
- meta tag introduction:
- element can provide original information about the page (mata-information), description and key for search engines and update frequency word.
- The tag is located at the head of the document and does not contain any content.
- The information provided is not visible to the user.
- Composition of meta tag: meta tag has two attributes, they are http-equiv attribute and name attribute. Different attributes have different parameter values. These different parameter values Different web page functions are implemented.
1.http-equiv属性:相当于http的文件头作用,它可以向浏览器传回一些有用的信息,以帮助正确地显示网页内容,与之对应的属性值为content,content中的内容其实就是各个参数的变量值。
<meta http-equiv="refresh" content="2;URL=https://www.oldboyedu.com">
<meta http-equiv="content-Type" charset=UTF8">
<meta http-equiv="x-ua-compatible" content="IE=edge">
2.name属性: 主要用于描述网页,与之对应的属性值为content,content中的内容主要是便于搜索引擎机器人查找信息和分类信息用的。
<meta name="keywords" content="meta总结,html meta,meta属性,meta跳转">
<meta name="description" content="老男孩教育Python学院">
1.3.2 body内常用标签
1.3.2.1 基本标签(块级标签和内联标签)
<b>加粗</b>
<i>斜体</i>
<u>下划线</u>
<s>删除</s>

<p>段落标签</p>

<h1>标题1</h1>
<h2>标题2</h2>
<h3>标题3</h3>
<h4>标题4</h4>
<h5>标题5</h5>
<h6>标题6</h6>

<!--换行-->
<br>

<!--水平线--><hr>
1.3.2.2 特殊字符
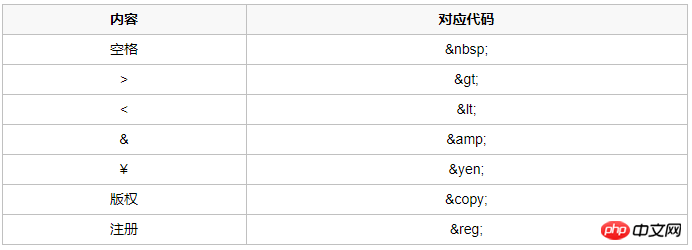
图1-2
1.3.2.3 p标签和span标签
l p标签用来定义一个块级元素,并无实际的意义。主要通过CSS样式为其赋予不同的表现。
l span标签用来定义内联(行内)元素,并无实际的意义。主要通过CSS样式为其赋予不同的表现。
块级元素与行内元素的区别:
所谓块元素,是以另起一行开始渲染的元素,行内元素则不需另起一行。如果单独在网页中插入这两个元素,不会对页面产生任何的影响。
这两个元素是专门为定义CSS样式而生的。
注意:
关于标签嵌套:通常块级元素可以包含内联元素或某些块级元素,但内联元素不能包含块级元素,它只能包含其它内联元素。
注意:p标签不能包含块级标签。
1.3.2.4 img标签
<img src="图片的路径" alt="图片未加载成功时的提示" title="鼠标悬浮时提示信息" width="宽" height="高(宽高两个属性只用一个会自动等比缩放)">
1.3.2.5 a标签
超链接标签
所谓的超链接是指从一个网页指向一个目标的连接关系,这个目标可以是另一个网页,也可以是相同网页上的不同位置,还可以是一个图片,一个电子邮件地址,一个文件,甚至是一个应用程序。
关于URL
URL是统一资源定位器(Uniform Resource Locator)的缩写,也被称为网页地址,是因特网上标准的资源的地址。
URL地址由4部分组成
第1部分:为协议:http://、ftp://等
第2部分:为站点地址:可以是域名或IP地址
第3部分:为页面在站点中的目录:stu
第4部分:为页面名称,例如 index.html
各部分之间用“/”符号隔开。
<a href="http://www.oldboyedu.com" target="_blank" >点我</a>
href属性指定目标网页地址。该地址可以有几种类型:
l 绝对URL - 指向另一个站点(比如 href="http://www.jd.com)
l 相对URL - 指当前站点中确切的路径(href="index.htm")
l 锚URL - 指向页面中的锚(href="#top")
target:
l _blank表示在新标签页中打开目标网页
l _self表示在当前标签页中打开目标网页
1.3.2.6 列表
无序列表
<ul type="disc">
  <li>第一项</li>
  <li>第二项</li>
</ul>
type属性:
l disc(实心圆点,默认值)
l circle(空心圆圈)
l square(实心方块)
l none(无样式)
有序列表
<ol type="1" start="2">
  <li>第一项</li>
  <li>第二项</li>
</ol>
type属性:
l 1 数字列表,默认值
l A 大写字母
l a 小写字母
l Ⅰ大写罗马
l ⅰ小写罗马
1.3.2.7 标题列表
<dl>
  <dt>标题1</dt>
  <dd>内容1</dd>
  <dt>标题2</dt>
  <dd>内容1</dd>
  <dd>内容2</dd>
</dl>
1.3.2.8 表格
表格是一个二维数据空间,一个表格由若干行组成,一个行又有若干单元格组成,单元格里可以包含文字、列表、图案、表单、数字符号、预置文本和其它的表格等内容。
表格最重要的目的是显示表格类数据。表格类数据是指最适合组织为表格格式(即按行和列组织)的数据。
表格的基本结构:
<table>
  <thead>
  <tr>
    <th>序号</th>
    <th>姓名</th>
    <th>爱好</th>
  </tr>
  </thead>
  <tbody>
  <tr>
    <td>1</td>
    <td>Egon</td>
    <td>杠娘</td>
  </tr>
  <tr>
    <td>2</td>
    <td>Yuan</td>
    <td>日天</td>
  </tr>
  </tbody>
</table>
属性:
l border: 表格边框.
l cellpadding: 内边距
l cellspacing: 外边距.
l width: 像素 百分比.(最好通过css来设置长宽)
l rowspan: 单元格竖跨多少行
l colspan: 单元格横跨多少列(即合并单元格)
1.3.2.9 form
功能:
表单用于向服务器传输数据,从而实现用户与Web服务器的交互
表单能够包含input系列标签,比如文本字段、复选框、单选框、提交按钮等等。
表单还可以包含textarea、select、fieldset和 label标签。
表单属性
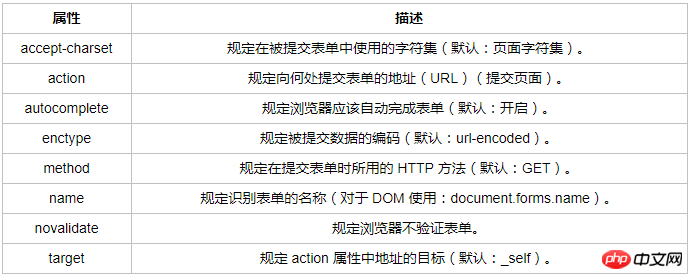
图1-3
表单元素
基本概念:
HTML表单是HTML元素中较为复杂的部分,表单往往和脚本、动态页面、数据处理等功能相结合,因此它是制作动态网站很重要的内容。
表单一般用来收集用户的输入信息
表单工作原理:
访问者在浏览有表单的网页时,可填写必需的信息,然后按某个按钮提交。这些信息通过Internet传送到服务器上。
服务器上专门的程序对这些数据进行处理,如果有错误会返回错误信息,并要求纠正错误。当数据完整无误后,服务器反馈一个输入完成的信息。
from django.conf.urls import url
from django.shortcuts import HttpResponse


def upload(request):
    print("request.GET:", request.GET)
    print("request.POST:", request.POST)

    if request.FILES:
        filename = request.FILES["file"].name
        with open(filename, 'wb') as f:
            for chunk in request.FILES['file'].chunks():
                f.write(chunk)
            return HttpResponse('上传成功')
    return HttpResponse("收到了!")

urlpatterns = [
    url(r'^upload/', upload),
]1.3.2.10 input
元素会根据不同的 type 属性,变化为多种形态。
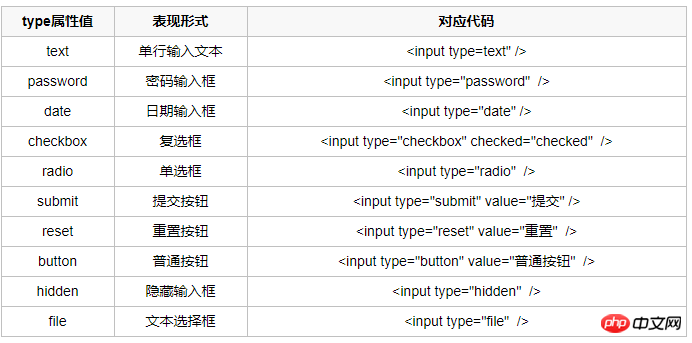
图1-4
属性说明:
l name:表单提交时的“键”,注意和id的区别
l value:表单提交时对应项的值
l type="button", "reset", "submit"时,为按钮上显示的文本年内容
l type="text","password","hidden"时,为输入框的初始值
l type="checkbox", "radio", "file",为输入相关联的值
l checked:radio和checkbox默认被选中的项
l readonly:text和password设置只读
l disabled:所有input均适用
1.3.2.11 select标签
<form action="" method="post">
  <select name="city" id="city">
    <option value="1">北京</option>
    <option selected="selected" value="2">上海</option>
    <option value="3">广州</option>
    <option value="4">深圳</option>
  </select>
</form>
属性说明:
l multiple:布尔属性,设置后为多选,否则默认单选
l disabled:禁用
l selected:默认选中该项
l value:定义提交时的选项值
1.3.2.12 label标签
定义:
说明:
label 元素不会向用户呈现任何特殊效果。
<form action="">
  <label for="username">用户名</label>
  <input type="text" id="username" name="username">
</form>
1.3.2.13 textarea多行文本
<textarea name="memo" id="memo" cols="30" rows="10">
  默认内容
</textarea>
属性说明:
l name:名称
l rows:行数
l cols:列数
l disabled:禁用
1.4 CSS介绍
CSS(Cascading Style Sheet,层叠样式表)定义如何显示HTML元素。
当浏览器读到一个样式表,它就会按照这个样式表来对文档进行格式化(渲染)。
1.5 CSS语法
每个CSS样式由两个组成部分:选择器和声明。声明又包括属性和属性值。每个声明之后用分号结束。
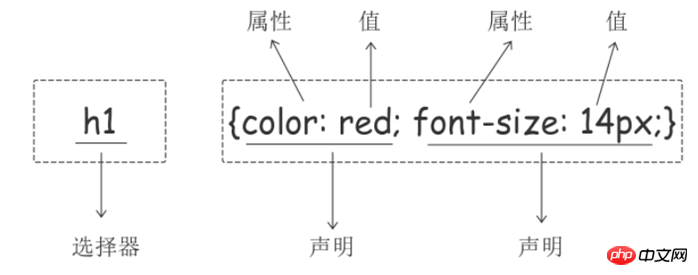
图1-5
1.6 CSS注释
/*这是注释*/
1.7 CSS的几种引入方式
CSS的几种引入方式
1.7.1 行内样式
行内式是在标记的style属性中设定CSS样式。不推荐大规模使用。
<p style="color: red">Hello world.</p>
1.7.2 内部样式
嵌入式是将CSS样式集中写在网页的
标签对的标签对中。格式如下:<head>
<meta charset="UTF-8">
<title>Title</title>
<style>
p{
background-color: #2b99ff;
}
</style>
</head>1.7.3 外部样式
外部样式就是将css写在一个单独的文件中,然后在页面进行引入即可。推荐使用此方式。
<link href="mystyle.css" rel="stylesheet" type="text/css"/>
1.8 CSS选择器
1.8.1 基本选择器
1.8.1.1 元素选择器
p {color: "red";}1.8.1.2 ID选择器
#i1 {
  background-color: red;
}1.8.1.3 类选择器
.c1 {
  font-size: 14px;
}
p.c1 {
  color: red;
}注意:
样式类名不要用数字开头(有的浏览器不认)。
标签中的class属性如果有多个,要用空格分隔。
1.8.1.4 通用选择器
* {
  color: white;
}1.8.2 组合选择器
1.8.2.1 后代选择器
/*li内部的a标签设置字体颜色*/
li a {
  color: green;
}1.8.2.2 儿子选择器
/*选择所有父级是
元素的
元素*/
p>p {
  font-family: "Arial Black", arial-black, cursive;
}1.8.2.3 毗邻选择器
/*选择所有紧接着
元素之后的
元素*/
p+p {
  margin: 5px;
}1.8.2.4 弟弟选择器
/*i1后面所有的兄弟p标签*/
#i1~p {
  border: 2px solid royalblue;
}1.8.3 属性选择器
1.8.3.1 常用的属性选择器
/*用于选取带有指定属性的元素。*/
p[title] {
  color: red;
}/*用于选取带有指定属性和值的元素。*/
p[title="213"] {
  color: green;
}1.8.3.2 不怎么常用的属性选择器
/*找到所有title属性以hello开头的元素*/
[title^="hello"] {
  color: red;
}/*找到所有title属性以hello结尾的元素*/
[title$="hello"] {
  color: yellow;
}/*找到所有title属性中包含(字符串包含)hello的元素*/
[title*=
/*找到所有title属性(有多个值或值以空格分割)中有一个值为hello的元素:*/
[title~="hello"] {
  color: green;
}1.8.4 分组和嵌套
1.8.4.1 分组
当多个元素的样式相同的时候,我们没有必要重复地为每个元素都设置样式,我们可以通过在多个选择器之间使用逗号分隔的分组选择器来统一设置元素样式。
例如:
p, p {
  color: red;
}上面的代码为p标签和p标签统一设置字体为红色。
通常,我们会分两行来写,更清晰:
p,
p {
  color: red;
}1.8.4.2 嵌套
多种选择器可以混合起来使用,比如:.c1类内部所有p标签设置字体颜色为红色。
.c1 p {
  color: red;
}1.8.5 伪类选择器
/* 未访问的链接 */
a:link {
  color: #FF0000
}

/* 已访问的链接 */
a:visited {
  color: #00FF00
}

/* 鼠标移动到链接上 */
a:hover {
  color: #FF00FF
}

/* 选定的链接 */
a:active {
  color: #0000FF
}

/*input输入框获取焦点时样式*/
input:focus {
  outline: none;
  background-color: #eee;
}1.8.6 伪元素选择器
1.8.6.1 first-letter
常用的给首字母设置特殊样式:
p:first-letter {
  font-size: 48px;
  color: red;
}1.8.6.2 before
/*在每个
元素之前插入内容*/
p:before {
  content:"*";
  color:red;
}1.8.6.3 after
/*在每个
元素之后插入内容*/
p:after {
  content:"[?]";
  color:blue;
}before和after多用于清除浮动。
1.8.7 选择器的优先级
1.8.7.1 CSS继承
继承是CSS的一个主要特征,它是依赖于祖先-后代的关系的。继承是一种机制,它允许样式不仅可以应用于某个特定的元素,还可以应用于它的后代。例如一个body定义了的字体颜色值也会应用到段落的文本中。
body {
  color: red;
}此时页面上所有标签都会继承body的字体颜色。然而CSS继承性的权重是非常低的,是比普通元素的权重还要低的0。
我们只要给对应的标签设置字体颜色就可覆盖掉它继承的样式。
p {
  color: green;
}此外,继承是CSS重要的一部分,我们甚至不用去考虑它为什么能够这样,但CSS继承也是有限制的。有一些属性不能被继承,如:border, margin, padding, background等。
1.8.7.2 选择器的优先级
我们上面学了很多的选择器,也就是说在一个HTML页面中有很多种方式找到一个元素并且为其设置样式,那浏览器根据什么来决定应该应用哪个样式呢?
其实是按照不同选择器的权重来决定的,具体的选择器权重计算方式如下图:
图1-6
除此之外还可以通过添加 !import方式来强制让样式生效,但并不推荐使用。因为如果过多的使用!import会使样式文件混乱不易维护。
注意:万不得已可以使用!import,尽量不用!
1.9 CSS属性相关
1.9.1 字体属性
1.9.1.1 文字字体
font-family可以把多个字体名称作为一个“回退”系统来保存。如果浏览器不支持第一个字体,则会尝试下一个。浏览器会使用它可识别的第一个值。
简单实例:
body {
  font-family: "Microsoft Yahei", "微软雅黑", "Arial", sans-serif
}1.9.1.2 字体大小
p {
  font-size: 14px;
}如果设置成inherit表示继承父元素的字体大小值。
1.9.1.3 字重(粗细)
font-weight用来设置字体的字重(粗细)。
p {
  font-size: 14px;
}
图1-7
1.9.1.4 文本颜色
颜色属性被用来设置文字的颜色。
颜色是通过CSS最经常的指定:
十六进制值 - 如: #FF0000
一个RGB值 - 如: RGB(255,0,0)
颜色的名称 - 如: red
还有rgba(255,0,0,0.3),第四个值为alpha, 指定了色彩的透明度/不透明度,它的范围为0.0到1.0之间。
1.9.2 文字属性
1.9.2.1 文字对齐
text-align 属性规定元素中的文本的水平对齐方式。

图1-8
1.9.2.2 文字装饰
ext-decoration 属性用来给文字添加特殊效果。

图1-9
常用的为去掉a标签默认的自划线:
a {
  text-decoration: none;
}1.9.2.3 首行缩进
将段落的第一行缩进 32像素:
p {
  text-indent: 32px;
}1.9.3 背景属性
/*背景颜色*/
background-color: red;
/*背景图片*/
background-image: url('1.jpg');
/*
 背景重复
 repeat(默认):背景图片平铺排满整个网页
 repeat-x:背景图片只在水平方向上平铺
 repeat-y:背景图片只在垂直方向上平铺
 no-repeat:背景图片不平铺
*/
background-repeat: no-repeat;
/*背景位置*/
background-position: right top(20px 20px);支持简写:
background:#ffffff url('1.png') no-repeat right top;使用背景图片的一个常见案例就是很多网站会把很多小图标放在一张图片上,然后根据位置去显示图片。减少频繁的图片请求。
参考链接:http://www.w3school.com.cn/css/css_background.asp
例子:
<!DOCTYPE html>
<html lang="en">
<head>
    <meta charset="UTF-8">
    <meta name="viewport" content="width=device-width, initial-scale=1.0">
    <meta http-equiv="X-UA-Compatible" content="ie=edge">
    <title>滚动背景图示例</title>
    <style>
        * {
            margin: 0;
        }
        .box {
            width: 100%;
            height: 500px;
            background: url("https://www.luffycity.com/static/img/width-bank.1c9d1b0.png") no-repeat center center;
            background-attachment: fixed;
        }
        .d1 {
            height: 500px;
            background-color: tomato;
        }
        .d2 {
            height: 500px;
            background-color: steelblue;
        }
        .d3 {
            height: 500px;
            background-color: mediumorchid;
        }
    </style>
</head>
<body>
    <p class="d1"></p>
    <p class="box"></p>
    <p class="d2"></p>
    <p class="d3"></p>
</body>
</html>1.9.4 边框
边框属性
l border-width
l border-style
l border-color
#i1 {
  border-width: 2px;
  border-style: solid;
  border-color: red;
}通常使用简写方式:
#i1 {
  border: 2px solid red;
}边框样式

图1-10
除了可以统一设置边框外还可以单独为某一个边框设置样式,如下所示:
#i1 {
  border-top-style:dotted;
  border-top-color: red;
  border-right-style:solid;
  border-bottom-style:dotted;
  border-left-style:none;
}1.9.5 border-radius
用这个属性能实现圆角边框的效果。
将border-radius设置为长或高的一半即可得到一个圆形。
1.9.6 display属性
用于控制HTML元素的显示效果。

图1-11
1.9.6.1 display:"none"与visibility:hidden的区别:
visibility:hidden: 可以隐藏某个元素,但隐藏的元素仍需占用与未隐藏之前一样的空间。也就是说,该元素虽然被隐藏了,但仍然会影响布局。
display:none: 可以隐藏某个元素,且隐藏的元素不会占用任何空间。也就是说,该元素不但被隐藏了,而且该元素原本占用的空间也会从页面布局中消失。
1.9.7 CSS盒子模型
l margin: 用于控制元素与元素之间的距离;margin的最基本用途就是控制元素周围空间的间隔,从视觉角度上达到相互隔开的目的。
l padding: 用于控制内容与边框之间的距离;
l Border(边框): 围绕在内边距和内容外的边框。
l Content(内容): 盒子的内容,显示文本和图像。
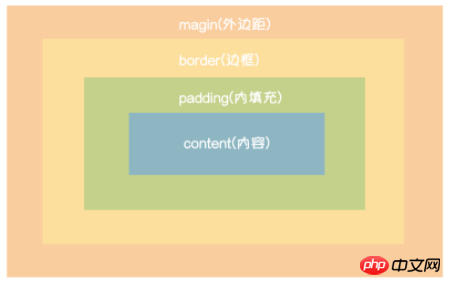
图1-12
1.9.7.1 margin外边距
.margin-test {
  margin-top:5px;
  margin-right:10px;
  margin-bottom:15px;
  margin-left:20px;
}推荐使用简写:
.margin-test {
  margin: 5px 10px 15px 20px;
}顺序:上右下左
1.9.7.2 常见居中:
.mycenter {
  margin: 0 auto;
}1.9.7.3 padding内填充
.padding-test {
  padding-top: 5px;
  padding-right: 10px;
  padding-bottom: 15px;
  padding-left: 20px;
}推荐使用简写:
.padding-test {
  padding: 5px 10px 15px 20px;
}顺序:上右下左
补充padding的常用简写方式:
提供一个,用于四边;
l 提供两个,第一个用于上-下,第二个用于左-右;
l 如果提供三个,第一个用于上,第二个用于左-右,第三个用于下;
l 提供四个参数值,将按上-右-下-左的顺序作用于四边;
1.9.7.4 float
在 CSS 中,任何元素都可以浮动。
浮动元素会生成一个块级框,而不论它本身是何种元素。
关于浮动的两个特点:
l 浮动的框可以向左或向右移动,直到它的外边缘碰到包含框或另一个浮动框的边框为止。
l 由于浮动框不在文档的普通流中,所以文档的普通流中的块框表现得就像浮动框不存在一样。
三种取值
left:向左浮动
right:向右浮动
none:默认值,不浮动
参考链接:http://www.w3school.com.cn/css/css_positioning_floating.asp
1.9.7.5 clear
clear属性规定元素的哪一侧不允许其他浮动元素。

图1-13
注意:clear属性只会对自身起作用,而不会影响其他元素。
父标签塌陷问题
.clearfix:after {
  content: "";
  display: block;
  clear: both;
}1.9.7.6 overflow溢出属性

图1-14
l overflow(水平和垂直均设置)
l overflow-x(设置水平方向)
l overflow-y(设置垂直方向)
1.10 定位(position)
1.10.1 static
static 默认值,无定位,不能当作绝对定位的参照物,并且设置标签对象的left、top等值是不起作用的的。
1.10.2 relative(相对定位)
相对定位是相对于该元素在文档流中的原始位置,即以自己原始位置为参照物。有趣的是,即使设定了元素的相对定位以及偏移值,元素还占有着原来的位置,即占据文档流空间。对象遵循正常文档流,但将依据top,right,bottom,left等属性在正常文档流中偏移位置。而其层叠通过z-index属性定义。
注意:position:relative的一个主要用法:方便绝对定位元素找到参照物。
1.10.3 absolute(绝对定位)
定义:设置为绝对定位的元素框从文档流完全删除,并相对于最近的已定位祖先元素定位,如果元素没有已定位的祖先元素,那么它的位置相对于最初的包含块(即body元素)。元素原先在正常文档流中所占的空间会关闭,就好像该元素原来不存在一样。元素定位后生成一个块级框,而不论原来它在正常流中生成何种类型的框。
重点:如果父级设置了position属性,例如position:relative;,那么子元素就会以父级的左上角为原始点进行定位。这样能很好的解决自适应网站的标签偏离问题,即父级为自适应的,那我子元素就设置position:absolute;父元素设置position:relative;,然后Top、Right、Bottom、Left用百分比宽度表示。
另外,对象脱离正常文档流,使用top,right,bottom,left等属性进行绝对定位。而其层叠通过z-index属性定义。
1.10.4 fixed(固定)
fixed:对象脱离正常文档流,使用top,right,bottom,left等属性以窗口为参考点进行定位,当出现滚动条时,对象不会随着滚动。而其层叠通过z-index属性 定义。 注意点: 一个元素若设置了 position:absolute | fixed; 则该元素就不能设置float。这 是一个常识性的知识点,因为这是两个不同的流,一个是浮动流,另一个是“定位流”。但是 relative 却可以。因为它原本所占的空间仍然占据文档流。
在理论上,被设置为fixed的元素会被定位于浏览器窗口的一个指定坐标,不论窗口是否滚动,它都会固定在这个位置。
返回顶部按钮样式示例
<meta http-equiv="x-ua-compatible" content="IE=edge">返回顶部示例 111
返回顶部
1.10.5 z-index
#i2 {
  z-index: 999;
}设置对象的层叠顺序,数值大的会覆盖在数值小的标签之上。z-index 仅能在定位元素上奏效。
自定义模态框示例
<meta http-equiv="x-ua-compatible" content="IE=edge">自定义模态框
1.10.6 opacity
用来定义透明效果。取值范围是0~1,0是完全透明,1是完全不透明。
1.11 综合示例
1.11.1 顶部导航菜单
<meta http-equiv="x-ua-compatible" content="IE=edge">li标签的float示例
1.11.2 圆形头像
<meta http-equiv="x-ua-compatible" content="IE=edge">圆形的头像示例

相信看了本文案例你已经掌握了方法,更多精彩请关注php中文网其它相关文章!
推荐阅读:
The above is the detailed content of Combining HTML with CCS. For more information, please follow other related articles on the PHP Chinese website!

Hot AI Tools

Undresser.AI Undress
AI-powered app for creating realistic nude photos

AI Clothes Remover
Online AI tool for removing clothes from photos.

Undress AI Tool
Undress images for free

Clothoff.io
AI clothes remover

AI Hentai Generator
Generate AI Hentai for free.

Hot Article

Hot Tools

Notepad++7.3.1
Easy-to-use and free code editor

SublimeText3 Chinese version
Chinese version, very easy to use

Zend Studio 13.0.1
Powerful PHP integrated development environment

Dreamweaver CS6
Visual web development tools

SublimeText3 Mac version
God-level code editing software (SublimeText3)

Hot Topics
 1377
1377
 52
52
 Table Border in HTML
Sep 04, 2024 pm 04:49 PM
Guide to Table Border in HTML. Here we discuss multiple ways for defining table-border with examples of the Table Border in HTML.
 HTML margin-left
Sep 04, 2024 pm 04:48 PM
Guide to HTML margin-left. Here we discuss a brief overview on HTML margin-left and its Examples along with its Code Implementation.
 Nested Table in HTML
Sep 04, 2024 pm 04:49 PM
This is a guide to Nested Table in HTML. Here we discuss how to create a table within the table along with the respective examples.
 HTML Table Layout
Sep 04, 2024 pm 04:54 PM
Guide to HTML Table Layout. Here we discuss the Values of HTML Table Layout along with the examples and outputs n detail.
 HTML Input Placeholder
Sep 04, 2024 pm 04:54 PM
Guide to HTML Input Placeholder. Here we discuss the Examples of HTML Input Placeholder along with the codes and outputs.
 HTML Ordered List
Sep 04, 2024 pm 04:43 PM
Guide to the HTML Ordered List. Here we also discuss introduction of HTML Ordered list and types along with their example respectively
 Moving Text in HTML
Sep 04, 2024 pm 04:45 PM
Guide to Moving Text in HTML. Here we discuss an introduction, how marquee tag work with syntax and examples to implement.
 HTML onclick Button
Sep 04, 2024 pm 04:49 PM
Guide to HTML onclick Button. Here we discuss their introduction, working, examples and onclick Event in various events respectively.


