This time I will bring you front-end technology to implement text and text texture overlay. What are the precautions for front-end technology to implement text and text texture overlay. Here are actual cases, let’s take a look.
The overlay mentioned here is overlay in the blending mode. In other words, the effect to be achieved in this article is to overlay the color and texture of the text itself instead of directly filling the texture.
CSS, SVG and canvas can all achieve similar effects. Let’s look at them one by one.
The HTML and CSS codes are as follows:
<h2>
    <span></span>
    CSS纹理叠加
</h2>
.pattern-overlay {
    font-size: 60px;
    font-family: 'microsoft yahei';
    background-image: url(./pattern01.jpg);
    -webkit-text-fill-color: transparent;
    -webkit-background-clip: text;
}
.pattern-overlay > span {
    position: absolute;
    background-image: linear-gradient(to bottom, #f00, #f00);
    mix-blend-mode: overlay;
    -webkit-text-fill-color: transparent;
    -webkit-background-clip: text;
}
.pattern-overlay > span::before {
    content: attr(data-text);
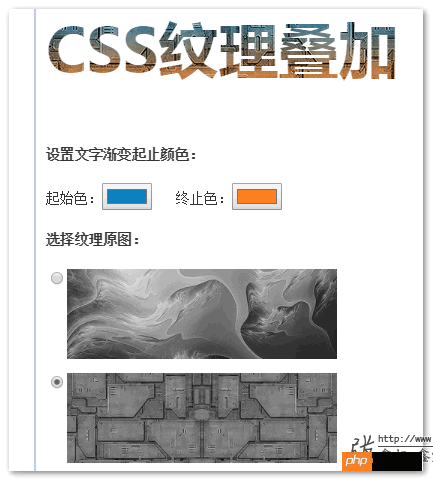
}You can achieve something similar The effect of the picture below (red gradient and gray stone texture overlay effect):

You can click here: CSS to achieve text texture overlay effect demo
In the demo page, we can adjust the starting and ending colors of the gradient image, or change our texture image, all of which will have real-time rendering effects:

Implementation Principle
Under the webkit browser, the text can be displayed in the background through the following CSS combination:
.fill-bg {
    -webkit-text-fill-color: transparent;
    -webkit-background-clip: text;
}can be used to achieve text gradient, or Effects similar to the text streamer on the homepage of this website.

So, we use two layers of labels, clearly fill the gradient background and texture background, and then use the CSS3 blending mode mix-blend-mode:overly to overlay the two layers of labels. , the effect is achieved!
Compatibility
Webkit kernel browser, Chrome, Safari, etc. are all supported.
Explanation on why background-blend-mode is not used
Theoretically, it is the simplest to use background-blend-mode to mix the most background images, because only one layer of performance is needed, theoretically The support code is as follows:
<h2>CSS纹理叠加</h2>
.pattern-overlay {
    font-size: 60px;
    font-family: 'microsoft yahei';
    background-image: linear-gradient(to bottom, #f00, #f00), url(./pattern01.jpg);
    background-blend-mode: overlay;
    -webkit-text-fill-color: transparent;
    -webkit-background-clip: text;
}There is no problem with background gradient and texture overlay itself. The effect is as follows:

But when applying background- When clip:text is declared, the blending mode is ignored, so the final text has no overlay effect. Therefore, the method of superimposing two independent layers of labels using mix-blend-mode is adopted.
//zxx: CSS3 has natural support for mixed modes. You can refer to this article: "Introduction to CSS3 Mixed Mode mix-blend-mode/background-blend-mode", where mix-blend-mode is the blending between elements, background-blend-mode is the blending between background images.
The CSS3 method is the easiest to understand and the fastest to get started, but Firefox andIE browser does not support it, so it can only be used on the mobile terminal. If we want to be compatible with PC browsers, we can try to use SVG to achieve it. The code is as follows:
<svg>
  <defs>
    <filter>
     <feimage></feimage>
     <feblend></feblend>
    </filter>
    <lineargradient>
        <stop></stop>
        <stop></stop>
    </lineargradient>
    <pattern>
        <rect></rect>
    </pattern>
  </defs>
  <text>
    SVG纹理叠加
  </text>
</svg>
Red and green gradient overlay Stone texture, the final effect is as follows:

You can click here: SVG text texture overlay effect demo
Implementation principle
There is a filter element related to blending mode in SVG named
SVG中文本除了可以填充颜色外,还可以填充纹理,元素是
于是,效果达成!
兼容性
Chrome, Safari, Firefox浏览器都支持。
如果在IE浏览器下访问我们的demo页面,会看到纹理并没有叠加,那是因为,IE浏览器下的
因此,如果你希望SVG纹理叠加效果IE9+全兼容,可以试试使用正片叠加混合模式-multiply,对于大部分用户而言,是看不出什么差异的。
canvas并没有现成的混合模式api,因此,如果要想实现叠加效果,需要通过算法重新计算方法。关于混合模式的各种算法,实际上都是公开的,搜一搜就能找到。
在本文中,canvas的混合模式效果使用了一个开源的JS方法,项目地址是:https://github.com/Phrogz/context-blender
JS未压缩状态也就9K不到,各种曾经的混合模式都支持。
于是,要使用canvas实现纹理叠加效果那就容易多了。
下面是实现的效果截图:

您可以狠狠地点击这里:canvas实现文本的纹理叠加效果demo
同样的,我们可以修改渐变颜色,修改纹理图片看到其他渲染效果,例如,我们选择本地一张纸张图片作为纹理:

实现原理
绘制JS代码如下:
// 先引入context_blender.js,然后……
// canvas绘制脚本
var canvas = document.querySelector('canvas');
var context = canvas.getContext('2d');
var width = canvas.width, height = canvas.height;
context.textBaseline = 'middle';
context.font = 'bold 60px "Microsoft Yahei"';
// 绘制方法
var draw = function () {
    context.clearRect(0, 0, width, height);
    // 渐变和纹理
    var gradient, pattern;
    // 创建材质canvas
    var canvasPattern = document.createElement('canvas');
    var contextUnder = canvasPattern.getContext('2d');
    canvasPattern.width = width;
    canvasPattern.height = height;
    // 创建渐变canvas
    var canvasGradient = document.createElement('canvas');
    var contextOver = canvasGradient.getContext('2d');
    canvasGradient.width = width;
    canvasGradient.height = height;
    // 绘制渐变对象
    gradient = contextOver.createLinearGradient(0, 0, 0, height);
    gradient.addColorStop(0, red);
    gradient.addColorStop(1, red);
    // 纹理对象,img指纹理图片对象
    pattern = contextUnder.createPattern(img, 'no-repeat');
    contextUnder.fillStyle = pattern;
    contextUnder.fillRect(0, 0, width, height);
    // 应用渐变
    contextOver.fillStyle = gradient;
    contextOver.fillRect(0, 0, width, height);
    // 叠加canvas
    contextOver.blendOnto(contextUnder, 'overlay');
    // 给当前context创建pattern
    pattern = context.createPattern(canvasPattern, 'no-repeat');
    // 绘制文本
    context.fillStyle = pattern;
    context.fillText('画布纹理叠加', 0, 60);
};原理描述:
临时创建一个canvas绘制一个渐变,临时创建一个canvas使用纹理图片填充,两个canvas叠加混合得到新的canvas,然后页面上那个canvas上的文字就把这个叠加混合后canvas作为纹理进行填充,效果即达成。
兼容性
IE9+,Chrome, Safari, Firefox浏览器都支持。
相信看了本文案例你已经掌握了方法,更多精彩请关注php中文网其它相关文章!
推荐阅读
The above is the detailed content of Front-end technology realizes text texture overlay. For more information, please follow other related articles on the PHP Chinese website!


