

Detailed explanation of Yii installation and application

This article mainly shares with you the detailed explanation of Yii installation and application. First, install Yii. You can install Yii in two ways: using Composer or downloading an archive file.
It is recommended to use the former, so that you can install new extensions or update Yii by executing a simple command.
After the standard installation of Yii, both the framework and a project template are downloaded and installed.
A project template is a viable Yii project that implements some basic features, such as login, contact form, etc.
Its code is organized in a recommended way. Therefore, it can be suitable as a good starting point for your project.
Installing through Composer
Installing Composer
If Composer has not been installed, you can install it according to the method in getcomposer.org.
In Linux and Mac OS X you can run the following command:
curl -sS https://getcomposer.org/installer | php
mv composer.phar /usr/local/bin/composer
In Windows, you need to download and run Composer-Setup.exe.
If you encounter any problems or want to learn Composer in more depth, please refer to the Composer documentation (English),
Composer Chinese.
If you have already installed Composer, please make sure you are using the latest version.
You can use the composer self-update command to update Composer to the latest version.
After Composer is installed, switch to a directory accessible through the Web and execute the following command to install Yii:
composer global require "fxp/composer-asset-plugin:^1.3.1"
composer create-project --prefer-dist yiisoft/yii2-app-basic basic
The first command installs the Composer asset plugin,
It is through Composer is necessary to manage bower and npm packages. This command takes effect globally and can be used once and for all.
The second command will install Yii in a directory named basic. If you want to use a different directory name, you can choose a different directory name.
Note: Composer may ask you for GitHub account authentication information during the installation process, because the GitHub API (for anonymous users) usage limit may be exceeded during use. Because Composer needs to download all extension packages from GitHub
A large amount of information is obtained from , so it is normal to exceed the limit. (Annotation: It also means that as a programmer, you really can’t have fun without a GitHub account.) After logging in to GitHub, you can get a higher API limit so that Composer can run normally. For more details, please refer to Composer
Documentation (This section of the Composer Chinese documentation looks forward to your participation).Tips: If you want to install the latest development version of Yii, you can use the following command instead,
It adds a stability option (Chinese version):composer create-project --prefer-dist --stability=dev yiisoft/yii2-app-basic basicCopy after loginNote that the development version (dev version) of Yii should not be used in a production environment, as it may damage running code.
Installation through archive file
Installing Yii through archive file consists of three steps:
Download the archive file from yiiframework.com.
Extract the downloaded file to a web-accessible folder.
Modify the
config/web.phpfile and add a key to thecookieValidationKeyconfiguration item
(if you installed it through Composer, Then this step will be completed automatically):// !!! 在下面插入一段密钥(若为空) - 以供 cookie validation 的需要'cookieValidationKey' => '在此处输入你的密钥',
Copy after login
Run the application
After installing Yii, there will be a runnable Yii application.
Depending on the configuration , can be accessed through http://hostname/basic/web/index.php or http://hostname/index.php.
Application structure
The most important directories and files in the application (assuming the application root directory is basic):
basic/                  应用根目录
    composer.json       Composer 配置文件, 描述包信息
    config/             包含应用配置及其它配置
        console.php     控制台应用配置信息
        web.php         Web 应用配置信息
    commands/           包含控制台命令类
    controllers/        包含控制器类
    models/             包含模型类
    runtime/            包含 Yii 在运行时生成的文件,例如日志和缓存文件
    vendor/             包含已经安装的 Composer 包,包括 Yii 框架自身
    views/              包含视图文件
    web/                Web 应用根目录,包含 Web 入口文件
        assets/         包含 Yii 发布的资源文件(javascript 和 css)
        index.php       应用入口文件
yii Yii 控制台命令执行脚本Generally speaking, in the application The files can be divided into two categories: those under basic/web and those under other directories.
The former can be accessed directly through HTTP (such as a browser), while the latter cannot and should not be accessed directly.
Request life cycle
The following diagram shows how an application handles requests:
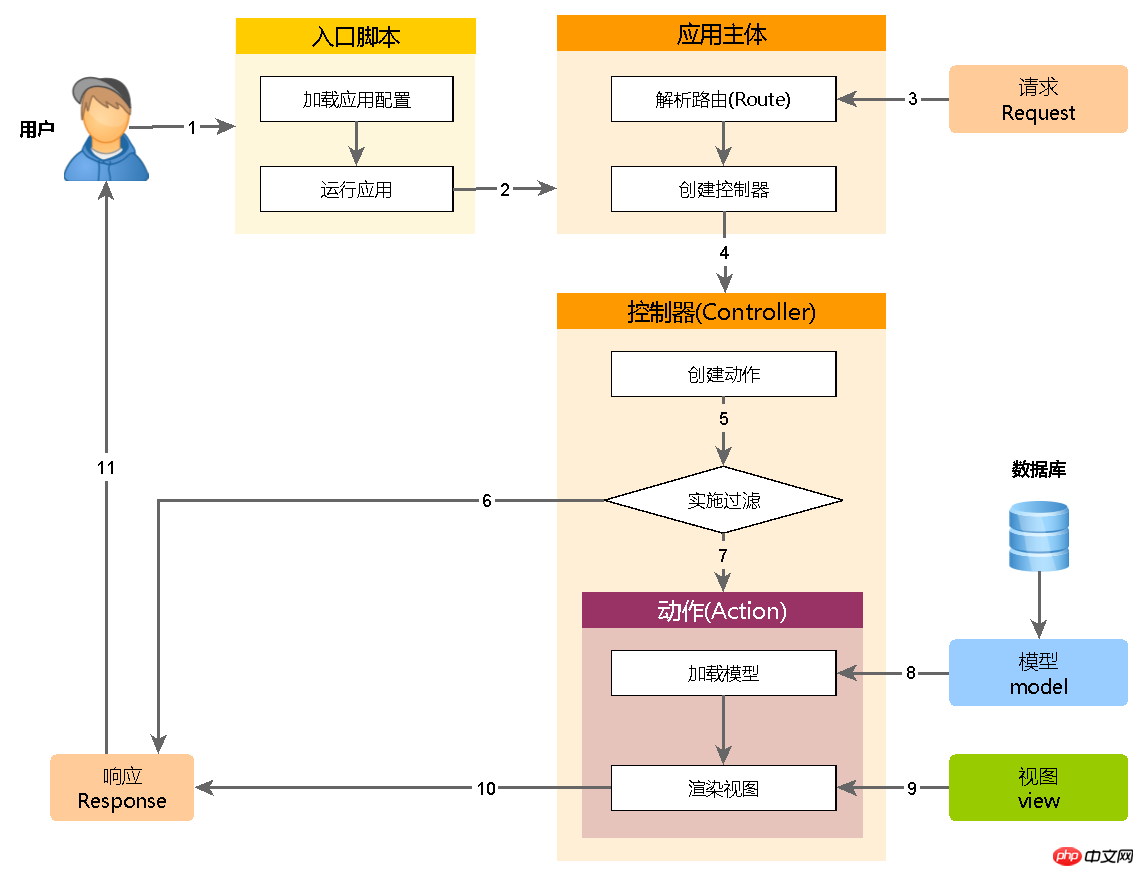
The user submits the request to the entry script
web/index.phpInitiate a request.The entry script loads the application configuration and creates an application
instance to handle the request.The application resolves the requested
route through the request component.The application creates a controller instance to handle the request.
The controller creates an action instance and executes the filter against the action.
If any filter returns failure, the action is cancelled.
If all filters pass, the action will be executed.
The action loads a data model, perhaps from a database.
The action renders a view and provides the data model to it.
The rendering result is returned to the response component.
The response component sends the rendering result to the user's browser.
Related recommendations:
Yii introductory tutorial - Yii installation and hello world
The above is the detailed content of Detailed explanation of Yii installation and application. For more information, please follow other related articles on the PHP Chinese website!

Hot AI Tools

Undresser.AI Undress
AI-powered app for creating realistic nude photos

AI Clothes Remover
Online AI tool for removing clothes from photos.

Undress AI Tool
Undress images for free

Clothoff.io
AI clothes remover

AI Hentai Generator
Generate AI Hentai for free.

Hot Article
Hot Tools

Notepad++7.3.1
Easy-to-use and free code editor

SublimeText3 Chinese version
Chinese version, very easy to use

Zend Studio 13.0.1
Powerful PHP integrated development environment

Dreamweaver CS6
Visual web development tools

SublimeText3 Mac version
God-level code editing software (SublimeText3)
Hot Topics


 The role and practical application of arrow symbols in PHP
Mar 22, 2024 am 11:30 AM
The role and practical application of arrow symbols in PHP
Mar 22, 2024 am 11:30 AM
The role and practical application of arrow symbols in PHP In PHP, the arrow symbol (->) is usually used to access the properties and methods of objects. Objects are one of the basic concepts of object-oriented programming (OOP) in PHP. In actual development, arrow symbols play an important role in operating objects. This article will introduce the role and practical application of arrow symbols, and provide specific code examples to help readers better understand. 1. The role of the arrow symbol to access the properties of an object. The arrow symbol can be used to access the properties of an object. When we instantiate a pair
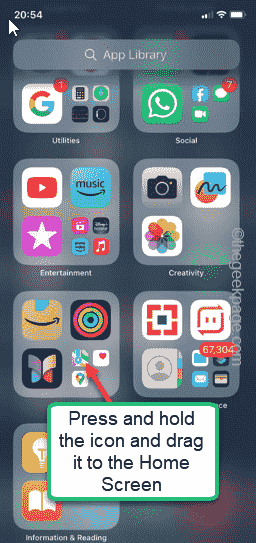 How to Undo Delete from Home Screen in iPhone
Apr 17, 2024 pm 07:37 PM
How to Undo Delete from Home Screen in iPhone
Apr 17, 2024 pm 07:37 PM
Deleted something important from your home screen and trying to get it back? You can put app icons back on the screen in a variety of ways. We have discussed all the methods you can follow and put the app icon back on the home screen. How to Undo Remove from Home Screen in iPhone As we mentioned before, there are several ways to restore this change on iPhone. Method 1 – Replace App Icon in App Library You can place an app icon on your home screen directly from the App Library. Step 1 – Swipe sideways to find all apps in the app library. Step 2 – Find the app icon you deleted earlier. Step 3 – Simply drag the app icon from the main library to the correct location on the home screen. This is the application diagram
 How to install Podman on Ubuntu 24.04
Mar 22, 2024 am 11:26 AM
How to install Podman on Ubuntu 24.04
Mar 22, 2024 am 11:26 AM
If you have used Docker, you must understand daemons, containers, and their functions. A daemon is a service that runs in the background when a container is already in use in any system. Podman is a free management tool for managing and creating containers without relying on any daemon such as Docker. Therefore, it has advantages in managing containers without the need for long-term backend services. Additionally, Podman does not require root-level permissions to be used. This guide discusses in detail how to install Podman on Ubuntu24. To update the system, we first need to update the system and open the Terminal shell of Ubuntu24. During both installation and upgrade processes, we need to use the command line. a simple
 How to Install and Run the Ubuntu Notes App on Ubuntu 24.04
Mar 22, 2024 pm 04:40 PM
How to Install and Run the Ubuntu Notes App on Ubuntu 24.04
Mar 22, 2024 pm 04:40 PM
While studying in high school, some students take very clear and accurate notes, taking more notes than others in the same class. For some, note-taking is a hobby, while for others, it is a necessity when they easily forget small information about anything important. Microsoft's NTFS application is particularly useful for students who wish to save important notes beyond regular lectures. In this article, we will describe the installation of Ubuntu applications on Ubuntu24. Updating the Ubuntu System Before installing the Ubuntu installer, on Ubuntu24 we need to ensure that the newly configured system has been updated. We can use the most famous "a" in Ubuntu system
 Detailed steps to install Go language on Win7 computer
Mar 27, 2024 pm 02:00 PM
Detailed steps to install Go language on Win7 computer
Mar 27, 2024 pm 02:00 PM
Detailed steps to install Go language on Win7 computer Go (also known as Golang) is an open source programming language developed by Google. It is simple, efficient and has excellent concurrency performance. It is suitable for the development of cloud services, network applications and back-end systems. . Installing the Go language on a Win7 computer allows you to quickly get started with the language and start writing Go programs. The following will introduce in detail the steps to install the Go language on a Win7 computer, and attach specific code examples. Step 1: Download the Go language installation package and visit the Go official website
 From beginner to proficient: Explore various application scenarios of Linux tee command
Mar 20, 2024 am 10:00 AM
From beginner to proficient: Explore various application scenarios of Linux tee command
Mar 20, 2024 am 10:00 AM
The Linuxtee command is a very useful command line tool that can write output to a file or send output to another command without affecting existing output. In this article, we will explore in depth the various application scenarios of the Linuxtee command, from entry to proficiency. 1. Basic usage First, let’s take a look at the basic usage of the tee command. The syntax of tee command is as follows: tee[OPTION]...[FILE]...This command will read data from standard input and save the data to
 Complete guide to install FTPS service on Linux system
Mar 19, 2024 am 11:39 AM
Complete guide to install FTPS service on Linux system
Mar 19, 2024 am 11:39 AM
Title: A complete guide to installing FTPS service under Linux system In Linux system, setting up an FTP server is a common requirement. However, in order to enhance the security of data transmission, we can choose to install the FTPS service, which adds SSL/TLS encryption function based on the FTP protocol. Through the FTPS service, we can upload and download files while ensuring the security of data transmission. This article will provide a detailed guide for installing FTPS service under Linux system and provide specific instructions.
 How to install Go language under Win7 system?
Mar 27, 2024 pm 01:42 PM
How to install Go language under Win7 system?
Mar 27, 2024 pm 01:42 PM
Installing Go language under Win7 system is a relatively simple operation. Just follow the following steps to successfully install it. The following will introduce in detail how to install Go language under Win7 system. Step 1: Download the Go language installation package. First, open the Go language official website (https://golang.org/) and enter the download page. On the download page, select the installation package version compatible with Win7 system to download. Click the Download button and wait for the installation package to download. Step 2: Install Go language
