
 Backend Development
PHP Tutorial
LNMP source code compilation and installation php-5.5.32 instance
Backend Development
PHP Tutorial
LNMP source code compilation and installation php-5.5.32 instance
LNMP source code compilation and installation php-5.5.32 instance

This article mainly shares with you the LNMP source code compilation and installation example of php-5.5.32. I hope it can help you.
1 What is CGI
The full name of CGI is "Common Gateway Interface" (Common Gateway Interface), which serves programs on HTTP
servers and other machines A tool for communication, CGI programs must run on a network server.The main disadvantage of the traditional CGI interface method is poor performance, because every time the HTTP server encounters a dynamic program, it needs to restart the parser to perform parsing, and then the result will be Returned to the HTTP server. This is almost unavailable when dealing with high concurrent access, so FastCGI was born. In addition, the traditional CGI interface method has poor security, so it is rarely used now.
2 What is FastCGI
FastCGI is a scalable, high-speed communication interface between HTTP servers and dynamic scripting languages (in Under Linux, the FastCGI interface is a socket, which can be a file socket or an IP socket). The main advantage is to separate the dynamic language and the HTTP server. Most popular HTTP servers support FastCGI. Including Apache, Nginx and Lighttpd, etc.
At the same time, FastCGI is also supported by many scripting languages, one of the more popular scripting languages is PHP. The FastCGI interface adopts the C/S (Client/Server) architecture, which can separate the HTTP server and the script parsing server, and can also start one or more scripts on the script parsing server to parse the daemon process. When the HTTP server encounters a dynamic program, it can be delivered directly to the FastCGI process for execution, and then the result is returned to the browser. This method allows the HTTP server to exclusively handle static requests, or return the results of the dynamic script server to the client, which greatly improves the performance of the entire application system.
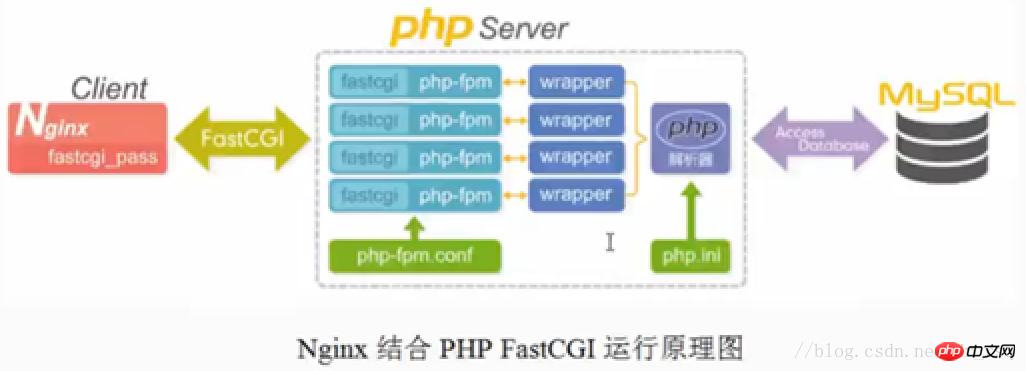
3 The operating principle of Nginx FastCGI
Nginx does not support direct calling or parsing of external dynamic programs. All external programs (including PHP) must pass the FastCGI interface. transfer. The FastCGI interface is a socket under Linux. In order to call a CGI program, a FastCGI wrapper is also needed (which can be understood as a program used to start another program). This wrapper is bound to a fixed socket, such as a port or file socket. . When Nginx sends a CGI request to this socket, through the FastCGI interface, the wrapper receives the request and then spawns a new thread. This thread calls the interpreter or external program processing script to read the returned data; then, the wrapper then The returned data is passed to Nginx through the FastCGI interface and along the fixed socket; finally, Nginx sends the returned data to the client. This is the entire operation process of Nginx+FastCGI. The detailed process is shown below.
4 LNMP PHP (Fastcgi) service installation preparation
4.1 Check the installation of Nginx and MySQL
[root@web01 ~]# netstat -lntup |egrep "nginx|mysql"tcp        0      0 0.0.0.0:3306                0.0.0.0:*                   LISTEN      1568/mysqld
tcp        0      0 0.0.0.0:80                  0.0.0.0:*                   LISTEN      1694/nginx
[root@web01 ~]# cat /etc/redhat-release CentOS release 6.9 (Final)
[root@web01 ~]# uname -r2.6.32-696.el6.x86_64
[root@web01 ~]# uname -mx86_64
4.2 Check the installation of PHP Required lib library
# When the PHP program is developed and run, it will call some function libraries such as zlib, gd, etc., so you need to confirm whether the LIB library has been installed. The execution command is as follows:
rpm -qa zlib-devel libxml2-devel libjpeg-devel libjpeg-turbo-devel libiconv-devel
rpm -qa freetype-devel libpng-devel gd-devel libcurl-devel libxslt-devel
Tip: libjpeg-turbo-devel is the new name of the early libjpeg-devel, and libcurl-devel is the new name of the early curl-devel.
Each lib generally has a corresponding package named "-devel". After installing the corresponding "-devel" package, the corresponding lib package will be automatically installed. For example, if you install gd-devel, it will be installed. gd.
# 这些lib库也不是必须安装的,但是目前的企业环境下一般都需要安装。否则,PHP程序运行有问题,例如验证码无法显示等。[root@web01 ~]# rpm -qa freetype-devel libpng-devel gd-devel libcurl-devel libxslt-devel[root@web01 ~]# [root@web01 ~]# rpm -qa zlib-devel libxml2-devel libjpeg-devel libjpeg-turbo-devel libiconv-develzlib-devel-1.2.3-29.el6.x86_64# 一般都没有安装,需要yum安装下yum -y install zlib-devel libxml2-devel libjpeg-devel libjpeg-turbo-devel libiconv-devel
yum -y install freetype-devel libpng-devel gd-devel libcurl-devel libxslt-devel# 再次检查,发现没有libiconv-devel这个包,需要手动安装下[root@web01 tools]# rpm -qa zlib-devel libxml2-devel libjpeg-devel libjpeg-turbo-devel libiconv-develzlib-devel-1.2.3-29.el6.x86_64
libjpeg-turbo-devel-1.2.1-3.el6_5.x86_64
libxml2-devel-2.7.6-21.el6_8.1.x86_64
[root@web01 tools]# rpm -qa freetype-devel libpng-devel gd-devel libcurl-devel libxslt-develfreetype-devel-2.3.11-17.el6.x86_64
libpng-devel-1.2.49-2.el6_7.x86_64
libcurl-devel-7.19.7-53.el6_9.x86_64
libxslt-devel-1.1.26-2.el6_3.1.x86_64
gd-devel-2.0.35-11.el6.x86_64
[root@web01 ~]# cd /home/oldboy/tools/ [root@web01 tools]# wget http://ftp.gnu.org/pub/gnu/libiconv/libiconv-1.14.tar.gz[root@web01 tools]# tar -zxf libiconv-1.14.tar.gz [root@web01 tools]# cd libiconv-1.14[root@web01 libiconv-1.14]# ./configure --prefix=/usr/local/libiconv[root@web01 libiconv-1.14]# make && make install# 安装php的相关扩展库,需要先安装epel源# 安装libmcrypt库,这是一个使用动态加载的模块化的库,这个不是必须的库,在开发的时候需要用到[root@web01 tools]# wget -O /etc/yum.repos.d/epel.repo http://mirrors.aliyun.com/repo/epel-6.repo[root@web01 tools]# yum install -y libmcrypt-devel# 安装mhash加密扩展库[root@web01 tools]# yum install -y mhash# 安装mcrypt加密扩展库[root@web01 tools]# yum install -y mcrypt# 检查[root@web01 tools]# rpm -qa libmcrypt mcrypt mhashmcrypt-2.6.8-10.el6.x86_64
libmcrypt-2.5.8-9.el6.x86_64
mhash-0.9.9.9-3.el6.x86_64
4.3 Obtain the php software package, compile and install it
# 获取php-5.5.32
[root@web01 tools]# wget http://mirrors.sohu.com/php/php-5.5.32.tar.gz
# 解压配置php
[root@web01 tools]# tar -xf php-5.5.32.tar.gz
[root@web01 tools]# cd php-5.5.32
# 编译;注意每一行后边的反斜线(\)后边不能有任何特殊字符包括空格
# --with-fpm-user=www & --with-fpm-group=www 这两个模块的www是在Nginx安装时候创建的用户
./configure \
--prefix=/application/php5.5.32 \--with-mysql=/application/mysql/ \--with-pdo-mysql=mysqlnd \--with-iconv-dir=/usr/local/libiconv \--with-freetype-dir \--with-jpeg-dir \--with-png-dir \--with-zlib \--with-libxml-dir=/usr \--enable-xml \--disable-rpath \--enable-bcmath \--enable-shmop \--enable-sysvsem \--enable-inline-optimization \--with-curl \--enable-mbregex \--enable-fpm \--enable-mbstring \--with-mcrypt \--with-gd \--with-openssl \--with-mhash \--enable-gd-native-ttf \--enable-pcntl \--enable-sockets \--with-xmlrpc \--enable-soap \--enable-short-tags \--enable-static \--with-xsl \--with-fpm-user=www \--with-fpm-group=www \--enable-ftp \--enable-opcache=no[root@web01 php-5.5.32]# echo $?
0
# 在make install之前需要先做以下操作
[root@web01 php-5.5.32]# ln -s /application/mysql/lib/libmysqlclient.so.18 /usr/lib64/
[root@web01 php-5.5.32]# touch ext/phar/phar.phar
[root@web01 php-5.5.32]# vim /etc/ld.so.conf
[root@web01 php-5.5.32]# tail -1 /etc/ld.so.conf/application/mysql/lib/[root@web01 php-5.5.32]# ldconfig
# make && make install(make -j可以指定多颗CPU,在CPU颗数多的情况下),时间比较长。
[root@web01 php-5.5.32]# make
......

Build complete.
Don't forget to run 'make test'.    # 这样make完毕(等了许久)

[root@web01 php-5.5.32]# make install
......
ln -s -f phar.phar /application/php5.5.32/bin/phar
Installing PDO headers:          /application/php5.5.32/include/php/ext/pdo/        # make install完毕
[root@web01 php-5.5.32]# ln -s /application/php5.5.32/ /application/php
[root@web01 php-5.5.32]# ls /application/php
bin  etc  include  lib  php  sbin  var
[root@web01 php-5.5.32]# ls php.ini* -l
-rw-r--r-- 1 1001 1001 69236 Feb  2  2016 php.ini-development   #开发环境的配置文件-rw-r--r-- 1 1001 1001 69266 Feb  2  2016 php.ini-production    #生产环境的配置文件[root@web01 php-5.5.32]# cp php.ini-production /application/php/lib/php.ini #php配置文件默认路径
[root@web01 php-5.5.32]# cd /application/php/etc/
[root@web01 etc]# cp php-fpm.conf.default php-fpm.conf
[root@web01 etc]# /application/php/sbin/php-fpm
[root@web01 etc]# lsof -i :9000
COMMAND   PID USER   FD   TYPE DEVICE SIZE/OFF NODE NAME
php-fpm 15200 root    7u  IPv4 127921      0t0  TCP localhost:cslistener (LISTEN)
php-fpm 15201  www    0u  IPv4 127921      0t0  TCP localhost:cslistener (LISTEN)
php-fpm 15202  www    0u  IPv4 127921      0t0  TCP localhost:cslistener (LISTEN)
[root@web01 etc]# ps -ef |grep php-fpm
root      15200      1  0 21:35 ?        00:00:00 php-fpm: master process (/application/php5.5.32/etc/php-fpm.conf)
www       15201  15200  0 21:35 ?        00:00:00 php-fpm: pool www
www       15202  15200  0 21:35 ?        00:00:00 php-fpm: pool www
root      15205   1668  0 21:35 pts/0    00:00:00 grep php-fpm
# 到此为止php安装完毕
The above is the detailed content of LNMP source code compilation and installation php-5.5.32 instance. For more information, please follow other related articles on the PHP Chinese website!

Hot AI Tools

Undresser.AI Undress
AI-powered app for creating realistic nude photos

AI Clothes Remover
Online AI tool for removing clothes from photos.

Undress AI Tool
Undress images for free

Clothoff.io
AI clothes remover

AI Hentai Generator
Generate AI Hentai for free.

Hot Article
Hot Tools

Notepad++7.3.1
Easy-to-use and free code editor

SublimeText3 Chinese version
Chinese version, very easy to use

Zend Studio 13.0.1
Powerful PHP integrated development environment

Dreamweaver CS6
Visual web development tools

SublimeText3 Mac version
God-level code editing software (SublimeText3)
Hot Topics
 1386
1386
 52
52

 PHP 8.4 Installation and Upgrade guide for Ubuntu and Debian
Dec 24, 2024 pm 04:42 PM
PHP 8.4 Installation and Upgrade guide for Ubuntu and Debian
Dec 24, 2024 pm 04:42 PM
PHP 8.4 brings several new features, security improvements, and performance improvements with healthy amounts of feature deprecations and removals. This guide explains how to install PHP 8.4 or upgrade to PHP 8.4 on Ubuntu, Debian, or their derivati
 How To Set Up Visual Studio Code (VS Code) for PHP Development
Dec 20, 2024 am 11:31 AM
How To Set Up Visual Studio Code (VS Code) for PHP Development
Dec 20, 2024 am 11:31 AM
Visual Studio Code, also known as VS Code, is a free source code editor — or integrated development environment (IDE) — available for all major operating systems. With a large collection of extensions for many programming languages, VS Code can be c
 7 PHP Functions I Regret I Didn't Know Before
Nov 13, 2024 am 09:42 AM
7 PHP Functions I Regret I Didn't Know Before
Nov 13, 2024 am 09:42 AM
If you are an experienced PHP developer, you might have the feeling that you’ve been there and done that already.You have developed a significant number of applications, debugged millions of lines of code, and tweaked a bunch of scripts to achieve op
 How do you parse and process HTML/XML in PHP?
Feb 07, 2025 am 11:57 AM
How do you parse and process HTML/XML in PHP?
Feb 07, 2025 am 11:57 AM
This tutorial demonstrates how to efficiently process XML documents using PHP. XML (eXtensible Markup Language) is a versatile text-based markup language designed for both human readability and machine parsing. It's commonly used for data storage an
 Explain JSON Web Tokens (JWT) and their use case in PHP APIs.
Apr 05, 2025 am 12:04 AM
Explain JSON Web Tokens (JWT) and their use case in PHP APIs.
Apr 05, 2025 am 12:04 AM
JWT is an open standard based on JSON, used to securely transmit information between parties, mainly for identity authentication and information exchange. 1. JWT consists of three parts: Header, Payload and Signature. 2. The working principle of JWT includes three steps: generating JWT, verifying JWT and parsing Payload. 3. When using JWT for authentication in PHP, JWT can be generated and verified, and user role and permission information can be included in advanced usage. 4. Common errors include signature verification failure, token expiration, and payload oversized. Debugging skills include using debugging tools and logging. 5. Performance optimization and best practices include using appropriate signature algorithms, setting validity periods reasonably,
 PHP Program to Count Vowels in a String
Feb 07, 2025 pm 12:12 PM
PHP Program to Count Vowels in a String
Feb 07, 2025 pm 12:12 PM
A string is a sequence of characters, including letters, numbers, and symbols. This tutorial will learn how to calculate the number of vowels in a given string in PHP using different methods. The vowels in English are a, e, i, o, u, and they can be uppercase or lowercase. What is a vowel? Vowels are alphabetic characters that represent a specific pronunciation. There are five vowels in English, including uppercase and lowercase: a, e, i, o, u Example 1 Input: String = "Tutorialspoint" Output: 6 explain The vowels in the string "Tutorialspoint" are u, o, i, a, o, i. There are 6 yuan in total
 Explain late static binding in PHP (static::).
Apr 03, 2025 am 12:04 AM
Explain late static binding in PHP (static::).
Apr 03, 2025 am 12:04 AM
Static binding (static::) implements late static binding (LSB) in PHP, allowing calling classes to be referenced in static contexts rather than defining classes. 1) The parsing process is performed at runtime, 2) Look up the call class in the inheritance relationship, 3) It may bring performance overhead.
 What are PHP magic methods (__construct, __destruct, __call, __get, __set, etc.) and provide use cases?
Apr 03, 2025 am 12:03 AM
What are PHP magic methods (__construct, __destruct, __call, __get, __set, etc.) and provide use cases?
Apr 03, 2025 am 12:03 AM
What are the magic methods of PHP? PHP's magic methods include: 1.\_\_construct, used to initialize objects; 2.\_\_destruct, used to clean up resources; 3.\_\_call, handle non-existent method calls; 4.\_\_get, implement dynamic attribute access; 5.\_\_set, implement dynamic attribute settings. These methods are automatically called in certain situations, improving code flexibility and efficiency.
