

js dynamic operation form
This time I will bring you a js dynamic operation form. What are the precautions when using js dynamic operation form? The following is a practical case, let’s take a look.
Regarding adding js to the table line by line, I took the time to sort it out today: Create a new html file (if you don’t have an editor, you can create a demo.txt file, and then change the suffix to demo.html), and put the following Just paste all the code in.
Functions include: adding a row to the table, deleting a row from the table, traversing the table to get values, etc.
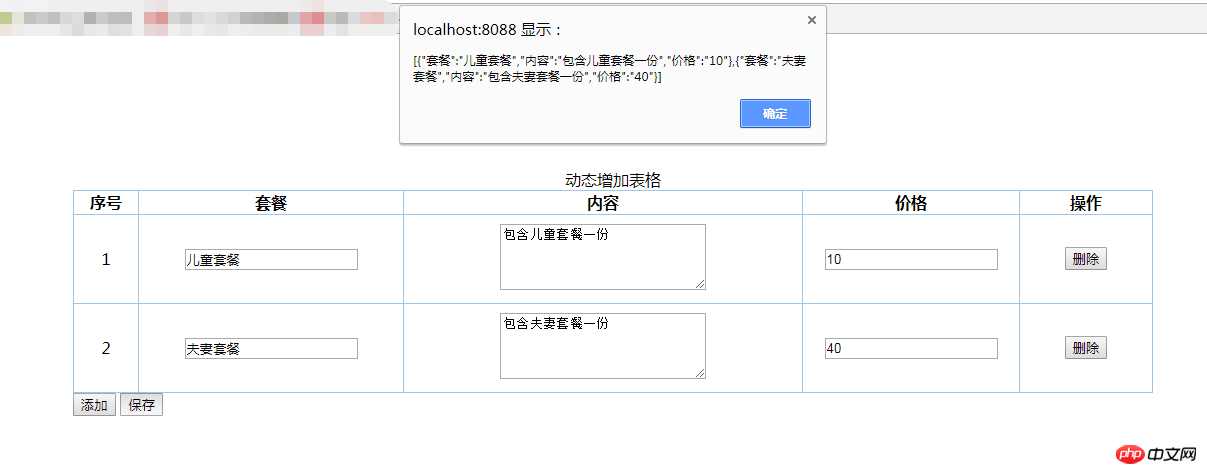
Click instructions: Click the Add button to add a row to the table, which can be entered. The Delete button can delete the current row, and other rows will not be affected. Delete or add, the number of each line will automatically change, the package and price are , the content is
<textarea></textarea>,Click to save When pressing the button, all rows in the table are traversed, and the data of all rows are taken out and displayed in a pop-up box. Later, it can be passed to the background for processing according to needs.
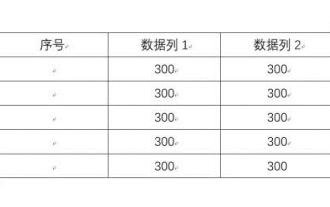
Rendering:
Source code:
<!--
Creator: WangPeng
CreateTime : 2018-01-25
去年今日此门中,人面桃花相映红。
人面不知何处去,桃花依旧笑春风。
-->
<!DOCTYPE html>
<html lang="en">
<head>
<meta charset="UTF-8">
<title>动态增加表格</title>
</head>
<style>
td /*设置表格文字左右和上下居中对齐*/
{
vertical-align: middle;
text-align: center;
padding: 9px;
}
textarea{
min-height: 60px;
min-width: 200px;
}
</style>
<script type="text/javascript">
function del(obj){
if(document.getElementById('tbodyid').children.length>1){
var trid=obj.parentNode.parentNode.id;
var objtr=document.getElementById(trid);
document.getElementById('tbodyid').removeChild(objtr);
var tbody=document.getElementById('tbodyid');
var countchildren=tbody.childElementCount;
for (var i=0;i<countchildren;i++){
tbody.children[i].children[0].innerHTML=i+1;
}
}
else{
alert("请不要全部删除");
}
}
function add(){
var trid = new Date().getTime();
var packageid=trid+'packageid';
var countid=trid+'countid';
var priceid=trid+'priceid';
var objtr=document.createElement('tr');
objtr.id=trid;
objtr.innerHTML="<td></td> " +
" <td><input id='"+trid+"packageid'></td> " +
" <td><textarea id='"+trid+"countid'></textarea></td> " +
" <td><input id='"+trid+"priceid'></td> " +
" <td><button type='button' onclick='del(this)'>删除</button></td>";
document.getElementById("tbodyid").appendChild(objtr);
var tbodyobj=document.getElementById('tbodyid');
var countchildren=tbodyobj.childElementCount;
for (var i=0;i<countchildren;i++){
tbodyobj.children[i].children[0].innerHTML=i+1;
}
}
function save(){
var tbodyobj=document.getElementById('tbodyid');
var countchildren=tbodyobj.childElementCount;
var trid="";
var packageid="";
var countid="";
var priceid="";
var list=new Array();
for (var i=0;i<countchildren;i++){
trid=tbodyobj.children[i].id;
packageid=trid+"packageid";
countid=trid+"countid";
priceid=trid+"priceid";
var map={
"套餐":document.getElementById(packageid).value,
"内容":document.getElementById(countid).value,
"价格":document.getElementById(priceid).value
}
list.push(map);
}
console.log("list:",list);
alert(JSON.stringify(list));
}
</script>
<body>
<p>
<p style="width: 80%;margin: 10%">
<table border="1" bordercolor="#a0c6e5" style="border-collapse:collapse;" align="center" width="100%">
<caption>动态增加表格</caption>
<thead>
<tr>
<th width="5% ">序号</th>
<th width="20%">套餐</th>
<th width="30%">内容</th>
<th width="10%">价格</th>
<th width="10%">操作</th>
</tr>
</thead>
<tbody id="tbodyid">
<tr id="123">
<td>1</td>
<td><input id="123packageid"></td>
<td><textarea id="123countid"></textarea></td>
<td><input id="123priceid"></td>
<td><button type="button" onclick='del(this)'>删除</button></td>
</tr>
</tbody>
</table>
<button type="button" onclick='add()'>添加</button>
<button type="button" onclick='save()'>保存</button>
</p>
</p>
</body>
</html>The same is true for other dynamically generated js, you can specify the location according to your needs Create the elements you need.
I believe you have mastered the method after reading the case in this article. For more exciting information, please pay attention to other related articles on the php Chinese website!
Recommended reading:
Summary of jQuery code optimization methods
Detailed explanation of asymmetric encryption of Node.js
How to deal with incomplete page display in 360 browser compatibility mode
Clear the default spacing of inline-block elements
The above is the detailed content of js dynamic operation form. For more information, please follow other related articles on the PHP Chinese website!

Hot AI Tools

Undresser.AI Undress
AI-powered app for creating realistic nude photos

AI Clothes Remover
Online AI tool for removing clothes from photos.

Undress AI Tool
Undress images for free

Clothoff.io
AI clothes remover

AI Hentai Generator
Generate AI Hentai for free.

Hot Article
Hot Tools

Notepad++7.3.1
Easy-to-use and free code editor

SublimeText3 Chinese version
Chinese version, very easy to use

Zend Studio 13.0.1
Powerful PHP integrated development environment

Dreamweaver CS6
Visual web development tools

SublimeText3 Mac version
God-level code editing software (SublimeText3)
Hot Topics
 1385
1385
 52
52

 Steps to adjust the format of pictures inserted in PPT tables
Mar 26, 2024 pm 04:16 PM
Steps to adjust the format of pictures inserted in PPT tables
Mar 26, 2024 pm 04:16 PM
1. Create a new PPT file and name it [PPT Tips] as an example. 2. Double-click [PPT Tips] to open the PPT file. 3. Insert a table with two rows and two columns as an example. 4. Double-click on the border of the table, and the [Design] option will appear on the upper toolbar. 5. Click the [Shading] option and click [Picture]. 6. Click [Picture] to pop up the fill options dialog box with the picture as the background. 7. Find the tray you want to insert in the directory and click OK to insert the picture. 8. Right-click on the table box to bring up the settings dialog box. 9. Click [Format Cells] and check [Tile images as shading]. 10. Set [Center], [Mirror] and other functions you need, and click OK. Note: The default is for pictures to be filled in the table
 How to make a table for sales forecast
Mar 20, 2024 pm 03:06 PM
How to make a table for sales forecast
Mar 20, 2024 pm 03:06 PM
Being able to skillfully make forms is not only a necessary skill for accounting, human resources, and finance. For many sales staff, learning to make forms is also very important. Because the data related to sales is very large and complex, and it cannot be simply recorded in a document to explain the problem. In order to enable more sales staff to be proficient in using Excel to make tables, the editor will introduce the table making issues about sales forecasting. Friends in need should not miss it! 1. Open [Sales Forecast and Target Setting], xlsm, to analyze the data stored in each table. 2. Create a new [Blank Worksheet], select [Cell], and enter [Label Information]. [Drag] downward and [Fill] the month. Enter [Other] data and click [
 How to set WPS value to automatically change color according to conditions_Steps to set WPS table value to automatically change color according to condition
Mar 27, 2024 pm 07:30 PM
How to set WPS value to automatically change color according to conditions_Steps to set WPS table value to automatically change color according to condition
Mar 27, 2024 pm 07:30 PM
1. Open the worksheet and find the [Start]-[Conditional Formatting] button. 2. Click Column Selection and select the column to which conditional formatting will be added. 3. Click the [Conditional Formatting] button to bring up the option menu. 4. Select [Highlight conditional rules]-[Between]. 5. Fill in the rules: 20, 24, dark green text with dark fill color. 6. After confirmation, the data in the selected column will be colored with corresponding numbers, text, and cell boxes according to the settings. 7. Conditional rules without conflicts can be added repeatedly, but for conflicting rules WPS will replace the previously established conditional rules with the last added rule. 8. Repeatedly add the cell columns after [Between] rules 20-24 and [Less than] 20. 9. If you need to change the rules, you can just clear the rules and then reset the rules.
 PyCharm usage tutorial: guide you in detail to run the operation
Feb 26, 2024 pm 05:51 PM
PyCharm usage tutorial: guide you in detail to run the operation
Feb 26, 2024 pm 05:51 PM
PyCharm is a very popular Python integrated development environment (IDE). It provides a wealth of functions and tools to make Python development more efficient and convenient. This article will introduce you to the basic operation methods of PyCharm and provide specific code examples to help readers quickly get started and become proficient in operating the tool. 1. Download and install PyCharm First, we need to go to the PyCharm official website (https://www.jetbrains.com/pyc
 Do you know how to sum a Word table?
Mar 21, 2024 pm 01:10 PM
Do you know how to sum a Word table?
Mar 21, 2024 pm 01:10 PM
Sometimes, we often encounter counting problems in Word tables. Generally, when encountering such problems, most students will copy the Word table to Excel for calculation; some students will silently pick up the calculator. Calculate. Is there a quick way to calculate it? Of course there is, in fact the sum can also be calculated in Word. So, do you know how to do it? Today, let’s take a look together! Without further ado, friends in need should quickly collect it! Step details: 1. First, we open the Word software on the computer and open the document that needs to be processed. (As shown in the picture) 2. Next, we position the cursor on the cell where the summed value is located (as shown in the picture); then, we click [Menu Bar
 Linux Deploy operation steps and precautions
Mar 14, 2024 pm 03:03 PM
Linux Deploy operation steps and precautions
Mar 14, 2024 pm 03:03 PM
LinuxDeploy operating steps and precautions LinuxDeploy is a powerful tool that can help users quickly deploy various Linux distributions on Android devices, allowing users to experience a complete Linux system on their mobile devices. This article will introduce the operating steps and precautions of LinuxDeploy in detail, and provide specific code examples to help readers better use this tool. Operation steps: Install LinuxDeploy: First, install
 What to do if you forget to press F2 for win10 boot password
Feb 28, 2024 am 08:31 AM
What to do if you forget to press F2 for win10 boot password
Feb 28, 2024 am 08:31 AM
Presumably many users have several unused computers at home, and they have completely forgotten the power-on password because they have not been used for a long time, so they would like to know what to do if they forget the password? Then let’s take a look together. What to do if you forget to press F2 for win10 boot password? 1. Press the power button of the computer, and then press F2 when turning on the computer (different computer brands have different buttons to enter the BIOS). 2. In the bios interface, find the security option (the location may be different for different brands of computers). Usually in the settings menu at the top. 3. Then find the SupervisorPassword option and click it. 4. At this time, the user can see his password, and at the same time find the Enabled next to it and switch it to Dis.
 How to insert automatic numbering or serial numbers into Word tables
Mar 20, 2024 am 09:30 AM
How to insert automatic numbering or serial numbers into Word tables
Mar 20, 2024 am 09:30 AM
When we make tables, the first thing we think of is to use Excel software to make tables. But did you know that Word software is actually very convenient to make tables. Sometimes when we make tables in Word software, we need to enter serial numbers or numbers. , if you enter them one by one manually, it will be very troublesome. In fact, there is an operation in the word software that can automatically insert numbers or serial numbers. So let’s learn with the editor how to insert automatic numbering or serial numbers into Word tables. . 1. First create a Word document and insert a table. 2. Select the column or cell where you want to insert automatic serial numbers or numbers. 3. Click "Start" - "Number". 4. Select one of the style numbers. 5.
