

postMessage implements cross-domain and cross-window messaging
This time I will bring you postMessage to implement cross-domain and cross-window messaging. What are the precautions for postMessage to implement cross-domain and cross-window messaging? The following is a practical case, let's take a look.
When doing web development, regarding message passing, in addition to the value transfer between the client and the server, there are several frequently encountered problems1. The data of the page and the new window it opens. Transfer2. Message transfer between multiple windows3. Page and nested iframe message transfer4. Cross-domain data transfer for the above three issuespostMessage()
There are some solutions to these problems, but the message API introduced in html5 can solve these problems more conveniently, effectively, and safely. The postMessage() method allows scripts from different sources to communicate in an asynchronous manner in a limited manner, and can realize cross-text files, multi-windows, and cross-domain messaging. postMessage(data,origin) method accepts two parameters1.data:The data to be passed, the html5 specification mentions that the parameter can be any JavaScript Basic types or copyable objects. However, not all browsers can do this. Some browsers can only handle string parameters, so we need to use the JSON.stringify() method to modify the object parameter sequence when passing parameters. ization, similar effects can be achieved by referencing json2.js in lower versions of IE.
2.origin: String parameter, indicating the source of the target window, protocol + host + port number [+URL], the URL will be ignored, so it does not need to be written, this parameter is For security reasons, the postMessage() method will only pass the message to the specified window. Of course, if you like, you can set the parameter to "*" so that it can be passed to any window. If you want to specify the same origin as the current window, set it to "/ ".
http://test.com/index.html<p style="width:200px; float:left; margin-right:200px;border:solid 1px #333;"> <p id="color">Frame Color</p> </p> <p> <iframe id="child" src="http://lsLib.com/lsLib.html"></iframe> </p>
window.onload=function(){
window.frames[0].postMessage('getcolor','http://lslib.com');
}window.addEventListener('message',function(e){
if(e.source!=window.parent) return;
var color=container.style.backgroundColor;
window.parent.postMessage(color,'*');
},false);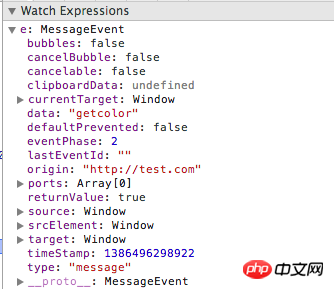
1.data:As the name suggests, it is the message passed in
2.source:Window object for sending messages
3.origin:The source of the window for sending messages (protocol + host + port number)
This way you can receive cross-domain message, we can also send the message back, the method is similar toSimple demo
In this example, the p on the left will be based on The color of the p in the iframe on the right changes as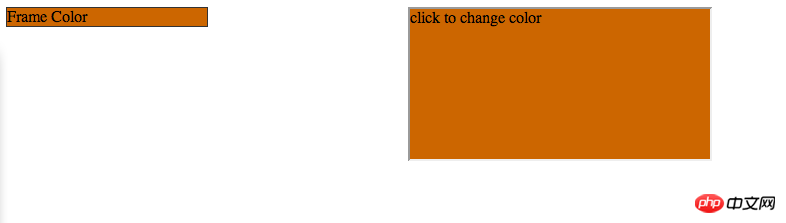
##
<!DOCTYPE html>
<html>
<head>
<title>Post Message</title>
</head>
<body>
<p style="width:200px; float:left; margin-right:200px;border:solid 1px #333;">
        <p id="color">Frame Color</p>
    </p>
    <p>
        <iframe id="child" src="http://lsLib.com/lsLib.html"></iframe>
 </p>
<script type="text/javascript">
window.onload=function(){
            window.frames[0].postMessage('getcolor','http://lslib.com');
        }
window.addEventListener('message',function(e){
var color=e.data;
document.getElementById('color').style.backgroundColor=color;
},false);
</script>
</body>
</html>
http://test.com/index.html<!doctype html>
<html>
<head>
<style type="text/css">
html,body{
height:100%;
margin:0px;
}
</style>
</head>
<body style="height:100%;">
<p id="container" onclick="changeColor();" style="widht:100%; height:100%; background-color:rgb(204, 102, 0);">
click to change color
</p>
<script type="text/javascript">
var container=document.getElementById('container');
window.addEventListener('message',function(e){
                if(e.source!=window.parent) return;
                var color=container.style.backgroundColor;
                window.parent.postMessage(color,'*');
            },false);
function changeColor () {
var color=container.style.backgroundColor;
if(color=='rgb(204, 102, 0)'){
color='rgb(204, 204, 0)';
}else{
color='rgb(204,102,0)';
}
container.style.backgroundColor=color;
window.parent.postMessage(color,'*');
}
</script>
</body>
</html>
http://lslib.com/lslib.html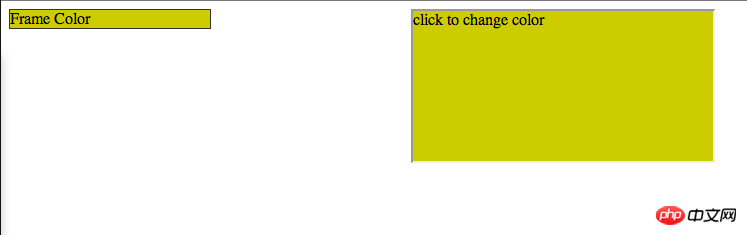 In the example, when the page is loaded, the homepage sends a 'getColor' request (parameter) to the iframe No practical use)
 window.onload=function(){
window.frames[0].postMessage('getcolor','http://lslib.com');
}The iframe receives the message and sends the current color to the main page.
window.addEventListener('message',function(e){
                if(e.source!=window.parent) return;
                var color=container.style.backgroundColor;
                window.parent.postMessage(color,'*');
},false);The main page receives the message and changes its color.
window.addEventListener('message',function(e){
            var color=e.data;
            document.getElementById('color').style.backgroundColor=color;
},false);When the iframe is clicked Event triggers its color change method, and sends the latest color to the main page
function changeColor () {
                var color=container.style.backgroundColor;
                if(color=='rgb(204, 102, 0)'){
                    color='rgb(204, 204, 0)';
                }else{
                    color='rgb(204,102,0)';
                }
                container.style.backgroundColor=color;
                window.parent.postMessage(color,'*');
}The main page still uses the program that just listened to the message event to process its own color change
window.addEventListener('message',function(e){
            var color=e.data;
            document.getElementById('color').style.backgroundColor=color;
},false);I believe you have mastered the method after reading the case in this article , for more exciting content, please pay attention to other related articles on the php Chinese website!
Recommended reading:
spring mvc+localResizeIMG implements H5 image compression and uploadThe above is the detailed content of postMessage implements cross-domain and cross-window messaging. For more information, please follow other related articles on the PHP Chinese website!

Hot AI Tools

Undresser.AI Undress
AI-powered app for creating realistic nude photos

AI Clothes Remover
Online AI tool for removing clothes from photos.

Undress AI Tool
Undress images for free

Clothoff.io
AI clothes remover

AI Hentai Generator
Generate AI Hentai for free.

Hot Article
Hot Tools

Notepad++7.3.1
Easy-to-use and free code editor

SublimeText3 Chinese version
Chinese version, very easy to use

Zend Studio 13.0.1
Powerful PHP integrated development environment

Dreamweaver CS6
Visual web development tools

SublimeText3 Mac version
God-level code editing software (SublimeText3)
Hot Topics
 1371
1371
 52
52

 What does it mean when a message has been sent but rejected by the other party?
Mar 07, 2024 pm 03:59 PM
What does it mean when a message has been sent but rejected by the other party?
Mar 07, 2024 pm 03:59 PM
The message has been sent but rejected by the other party. This means that the sent information has been successfully sent from the device, but for some reason, the other party did not receive the message. More specifically, this is usually because the other party has set certain permissions or taken certain actions, which prevents your information from being received normally.
 What are Delivery Optimization files in Windows 11 and can you delete them?
Sep 29, 2023 pm 04:09 PM
What are Delivery Optimization files in Windows 11 and can you delete them?
Sep 29, 2023 pm 04:09 PM
Delivery Optimization is a feature that helps Windows Update and Windows Store run and deliver updates faster. Cache files in Delivery Optimization are supposed to be deleted after a while, but for some of our readers they keep piling up and taking up unnecessary space. Is it safe to delete delivery optimization files? Yes, it is safe to delete delivery optimization files, and in this article, you will find out how easy it is to do so in Windows 11. Although it is not recommended to manually delete delivery optimization files, it is possible to do so automatically. How to delete delivery optimization files on Windows 11? Click the search bar, type Disk Cleanup, and open the tool from the results. If you have multiple drives, select the drive with your system (usually C:
 How to swipe right and reply quickly in iMessage on iOS 17
Sep 20, 2023 am 10:45 AM
How to swipe right and reply quickly in iMessage on iOS 17
Sep 20, 2023 am 10:45 AM
How to Use Swipe to Reply in iMessages on iPhone Note: The Swipe to Reply feature only works with iMessage conversations in iOS 17, not regular SMS conversations in the Messages app. Open the Messages app on your iPhone. Then, head to the iMessage conversation and simply swipe right on the iMessage you want to reply to. Once this is done, the selected iMessage will be in focus while all other messages will be blurred in the background. You'll see a text box for typing a reply and a "+" icon for accessing iMessage apps like Check-ins, Places, Stickers, Photos, and more. Just enter your message,
 iOS 17: How to use emojis as stickers in Messages
Sep 18, 2023 pm 05:13 PM
iOS 17: How to use emojis as stickers in Messages
Sep 18, 2023 pm 05:13 PM
In iOS17, Apple has added several new features to its Messages app to make communicating with other Apple users more creative and fun. One of the features is the ability to use emojis as stickers. Stickers have been around in the Messages app for years, but so far, they haven't changed much. This is because in iOS17, Apple treats all standard emojis as stickers, allowing them to be used in the same way as actual stickers. This essentially means you're no longer limited to inserting them into conversations. Now you can also drag them anywhere on the message bubble. You can even stack them on top of each other to create little emoji scenes. The following steps show you how it works in iOS17
 How to edit messages on iPhone
Dec 18, 2023 pm 02:13 PM
How to edit messages on iPhone
Dec 18, 2023 pm 02:13 PM
The native Messages app on iPhone lets you easily edit sent texts. This way, you can correct your mistakes, punctuation, and even autocorrect wrong phrases/words that may have been applied to your text. In this article, we will learn how to edit messages on iPhone. How to Edit Messages on iPhone Required: iPhone running iOS16 or later. You can only edit iMessage text on the Messages app, and then only within 15 minutes of sending the original text. Non-iMessage text is not supported, so they cannot be retrieved or edited. Launch the Messages app on your iPhone. In Messages, select the conversation from which you want to edit the message
 The message has been sent but was rejected by the other party. Should I block it or delete it?
Mar 12, 2024 pm 02:41 PM
The message has been sent but was rejected by the other party. Should I block it or delete it?
Mar 12, 2024 pm 02:41 PM
1. Being added to the blacklist: The message has been sent but rejected by the other party. Generally, you have been blacklisted. At this time, you will not be able to send messages to the other party, and the other party will not be able to receive your messages. 2. Network problems: If the recipient's network condition is poor or there is a network failure, the message may not be successfully received. At this point, you can try to wait for the network to return to normal before sending the message again. 3. The other party has set up Do Not Disturb: If the recipient has set up Do Not Disturb in WeChat, the sender’s messages will not be reminded or displayed within a certain period of time.
 How to set up Xiaomi Mi 14 Pro to light up the screen for messages?
Mar 18, 2024 pm 12:07 PM
How to set up Xiaomi Mi 14 Pro to light up the screen for messages?
Mar 18, 2024 pm 12:07 PM
Xiaomi 14Pro is a flagship model with excellent performance and configuration. It has achieved high sales since its official release. Many small functions of Xiaomi 14Pro will be ignored by everyone. For example, it can be set to light up the screen for messages. Although the function is small, , but it is very practical. Everyone will encounter various problems when using the mobile phone. So how to set up the Xiaomi 14Pro to light up the screen for messages? How to set up Xiaomi Mi 14 Pro to light up the screen for messages? Step 1: Open your phone’s Settings app. Step 2: Swipe down until you find the "Lock screen and password" option and click to enter. Step 3: In the "Lock screen & passcode" menu, find and click the "Turn on screen for notifications" option. Step 4: On the "Turn on screen when receiving notifications" page, turn on the switch to enable
 Vivox100s release date confirmed! Be the first to know the latest news
Mar 22, 2024 pm 02:18 PM
Vivox100s release date confirmed! Be the first to know the latest news
Mar 22, 2024 pm 02:18 PM
Vivox100s release date confirmed! The latest news has been previewed. Recently, there has been a craze about Vivox100s in the technology world. This highly anticipated product has finally confirmed its release date, making many consumers and technology enthusiasts excited. It is reported that Vivox100s will be officially released at the end of this month. What surprises will it bring? What are the highlights of the much-anticipated new product? Let us uncover this technological mystery together. Vivox100s, as the latest masterpiece of the Vivox series, has attracted much attention since its exposure.
