
 Web Front-end
JS Tutorial
Adding and deleting data in jqGrid table application with source code download_jquery
Web Front-end
JS Tutorial
Adding and deleting data in jqGrid table application with source code download_jquery
Adding and deleting data in jqGrid table application with source code download_jquery

jqGrid can be combined with fancybox and other plug-ins to achieve cool pop-up layer effects. By interacting with the PHP background, you can easily add data and view details, and this process is completely an Ajax asynchronous communication process, which is a very friendly rich client application.
The renderings are shown below. Friends who like it can download the source code directly.
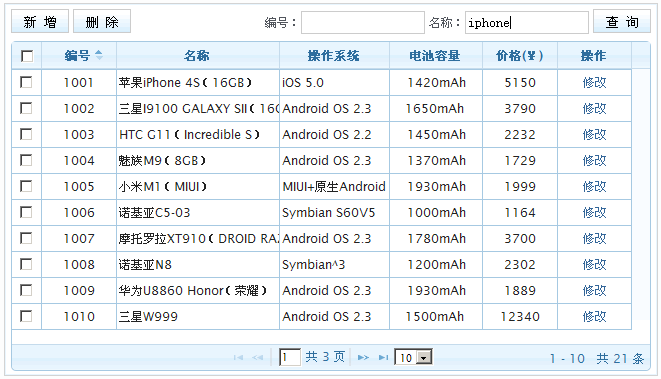
Effect display Source code download
In the previous article, we mentioned that jqGrid itself has powerful cell operation modules , but these modules are not suitable for user habits. In this article, we use fancybox, And form plug-in to complete the adding and deleting operations of jqGrid data.
XHTML
First, you need to introduce relevant js and css files in the head.
<link rel="stylesheet" type="text/css" href="css/ui-lightness/jquery-ui-1.8.2.custom.css" />
<link rel="stylesheet" type="text/css" href="css/ui.jqgrid.css" />
<link rel="stylesheet" type="text/css" href="css/fancybox.css" />
<script src="js/jquery.js" type="text/javascript"></script>
<script src="js/i18n/grid.locale-cn.js" type="text/javascript"></script>
<script src="js/jquery.jqGrid.min.js" type="text/javascript"></script>
<script src="js/jquery.fancybox.js" type="text/javascript"></script>
<script src="js/jquery.form.js" type="text/javascript"></script>
<script src="js/jquery.message.js" type="text/javascript"></script>
Among them, fancybox is a plug-in used to display the pop-up layer effect, form and message are plug-ins used to process forms and prompt information, and then add the following code to the body:
<div id="opt">
 <div id="query">
 <label>编号:</label><input type="text" class="input" id="sn" />
 <label>名称:</label><input type="text" class="input" id="title" />
 <input type="submit" class="btn" id="find_btn" value="查 询" />
 </div>
 <input type="button" class="btn" id="add_btn" value="新 增" />
 <input type="button" class="btn" id="del_btn" value="删 除" />
</div>
<table id="list"></table>
<div id="pager"></div>
We place a "Add" and "Delete" button on the page, as well as a table container #list (jqGrid generates a table) and a paging bar #pager. Regarding the query function, we explained it in the previous article.
New data
1. Read data: call jqGrid to generate a table. This code is explained in detail in the previous article on this site. This article will not be repeated. You can view: jqGrid table application - reading and Query data
2. Call the form: When the "Add" button is clicked, the fancybox plug-in is called and a form layer for adding new products pops up.
$(function(){
 $("#add_btn").click(function(){
 $.fancybox({
 'type':'ajax',
 'href':'addGrid.html'
 });
}); It can be seen that when fancybox is called, a page is loaded in ajax mode: addGrid.html. This page is used to place the form to be submitted. Regarding the application of fancybox plug-in, you can check the article on this site to learn more: Fancybox’s rich pop-up layer effects
3. Submit the form: We need to place a form on the addGrid.html page.
<form id="add_form" action="do.php?action=add" method="post"> ... </form>
When the "Submit" button is clicked, the form is verified. Here we use jquery.form.js to complete the verification and submission of the form. We add the following code to the addGrid.html page:
$(function(){
 $('#add_form').ajaxForm({
 beforeSubmit: validate, //验证表单
 success: function(msg){
 if(msg==1){ //如果成功提交
 $.fancybox.close(); //关闭fancybox弹出层
 $().message("成功添加"); //提示信息
 $("#list").trigger("reloadGrid"); //重新载入jqGrid数据
 }else{
 alert(msg);
 }
 }
 });
});
function validate(formData, jqForm, options) {
 for (var i=0; i < formData.length; i++) {
 if (!formData[i].value) {
 $().message("请输入完整相关信息");
 return false;
 }
 }
 $().message("正在提交...");
} 4. PHP processes data: After the form data is submitted to the backend do.php, the program needs to filter the data submitted by the form, then insert the data into the data table, and return the execution results to the front-end page.
include_once ("connect.php"); //连接数据库
$action = $_GET['action'];
switch ($action) {
 case 'list' : //列表
 ... //读取数据列表,代码省略,请参照上一篇文章中的代码
 break;
 case 'add' : //新增
 //过滤输入的字符串
 $pro_title = htmlspecialchars(stripslashes(trim($_POST['pro_title'])));
 $pro_sn = htmlspecialchars(stripslashes(trim($_POST['pro_sn'])));
 $size = htmlspecialchars(stripslashes(trim($_POST['size'])));
 $os = htmlspecialchars(stripslashes(trim($_POST['os'])));
 $charge = htmlspecialchars(stripslashes(trim($_POST['charge'])));
 $price = htmlspecialchars(stripslashes(trim($_POST['price'])));
 if (mb_strlen($pro_title) < 1)
 die("产品名称不能为空");
 $addtime = date('Y-m-d H:i:s');
 //插入数据
 $query = mysql_query("insert into products(sn,title,size,os,charge,price,addtime)values
 ('$pro_sn','$pro_title','$size','$os','$charge','$price','$addtime')");
 if (mysql_affected_rows($link) != 1) {
 die("操作失败");
 } else {
 echo '1';
 }

 break;
 case '' :
 echo 'Bad request.';
 break;
} Delete data
The deletion of data is also completed through asynchronous interaction between the front end and the backend. The deletion function in this example can perform batch deletion. js obtains the rows to be deleted selected by jqGrid, and then submits the id corresponding to the selected data to php Processing, please see the code:
$(function(){
 $("#del_btn").click(function(){
 var sels = $("#list").jqGrid('getGridParam','selarrrow');
 if(sels==""){
 $().message("请选择要删除的项!");
 }else{
 if(confirm("您是否确认删除?")){
 $.ajax({
 type: "POST",
 url: "do.php?action=del",
 data: "ids="+sels,
 beforeSend: function() {
  $().message("正在请求...");
 },
 error:function(){
  $().message("请求失败...");
 },
 success: function(msg){
  if(msg!=0){
  var arr = msg.split(',');
  $.each(arr,function(i,n){
  if(arr[i]!=""){
   $("#list").jqGrid('delRowData',n);
  }
  });
  $().message("已成功删除!");
  }else{
  $().message("操作失败!");
  }
 }
 });
 }
 }
 });
}); Looking at the code, first get the selected data row selarrrow through jqGrid's getGridParam method. If multiple items are selected, the obtained sels value is a string separated by commas, and then you will be prompted to confirm the deletion. After confirmation, submit ajax Request, if the background php deletes the data successfully, the deleted data id will be returned. The front end calls the delRowData method of jqGrid to delete the corresponding data row, and prompts "successful deletion".
Backend do.php gets the id to be deleted submitted by ajax, executes the delete statement, and completes the deletion operation.
switch ($action) {
 case 'del' : //删除
 $ids = $_POST['ids'];
 delAllSelect($ids, $link);
 break;
 case '' :
 echo 'Bad request.';
 break;
}
//批量删除操作
function delAllSelect($ids, $link) {
 if (empty ($ids))
 die("0");
 mysql_query("delete from products where id in($ids)");
 if (mysql_affected_rows($link)) {
 echo $ids;
 } else {
 die("0");
 }
} So far, we have completed the explanation of the basic operations of reading, adding, deleting and querying data in jqGrid. We hope it will be helpful to you. If there are any mistakes in the explanation of the application article of jqGrid table, you are welcome to criticize and correct me.

Hot AI Tools

Undresser.AI Undress
AI-powered app for creating realistic nude photos

AI Clothes Remover
Online AI tool for removing clothes from photos.

Undress AI Tool
Undress images for free

Clothoff.io
AI clothes remover

AI Hentai Generator
Generate AI Hentai for free.

Hot Article
Hot Tools

Notepad++7.3.1
Easy-to-use and free code editor

SublimeText3 Chinese version
Chinese version, very easy to use

Zend Studio 13.0.1
Powerful PHP integrated development environment

Dreamweaver CS6
Visual web development tools

SublimeText3 Mac version
God-level code editing software (SublimeText3)
Hot Topics
 1359
1359
 52
52

 Replace String Characters in JavaScript
Mar 11, 2025 am 12:07 AM
Replace String Characters in JavaScript
Mar 11, 2025 am 12:07 AM
Detailed explanation of JavaScript string replacement method and FAQ This article will explore two ways to replace string characters in JavaScript: internal JavaScript code and internal HTML for web pages. Replace string inside JavaScript code The most direct way is to use the replace() method: str = str.replace("find","replace"); This method replaces only the first match. To replace all matches, use a regular expression and add the global flag g: str = str.replace(/fi
 Build Your Own AJAX Web Applications
Mar 09, 2025 am 12:11 AM
Build Your Own AJAX Web Applications
Mar 09, 2025 am 12:11 AM
So here you are, ready to learn all about this thing called AJAX. But, what exactly is it? The term AJAX refers to a loose grouping of technologies that are used to create dynamic, interactive web content. The term AJAX, originally coined by Jesse J
 How do I create and publish my own JavaScript libraries?
Mar 18, 2025 pm 03:12 PM
How do I create and publish my own JavaScript libraries?
Mar 18, 2025 pm 03:12 PM
Article discusses creating, publishing, and maintaining JavaScript libraries, focusing on planning, development, testing, documentation, and promotion strategies.
 How do I optimize JavaScript code for performance in the browser?
Mar 18, 2025 pm 03:14 PM
How do I optimize JavaScript code for performance in the browser?
Mar 18, 2025 pm 03:14 PM
The article discusses strategies for optimizing JavaScript performance in browsers, focusing on reducing execution time and minimizing impact on page load speed.
 How do I debug JavaScript code effectively using browser developer tools?
Mar 18, 2025 pm 03:16 PM
How do I debug JavaScript code effectively using browser developer tools?
Mar 18, 2025 pm 03:16 PM
The article discusses effective JavaScript debugging using browser developer tools, focusing on setting breakpoints, using the console, and analyzing performance.
 jQuery Matrix Effects
Mar 10, 2025 am 12:52 AM
jQuery Matrix Effects
Mar 10, 2025 am 12:52 AM
Bring matrix movie effects to your page! This is a cool jQuery plugin based on the famous movie "The Matrix". The plugin simulates the classic green character effects in the movie, and just select a picture and the plugin will convert it into a matrix-style picture filled with numeric characters. Come and try it, it's very interesting! How it works The plugin loads the image onto the canvas and reads the pixel and color values: data = ctx.getImageData(x, y, settings.grainSize, settings.grainSize).data The plugin cleverly reads the rectangular area of the picture and uses jQuery to calculate the average color of each area. Then, use
 How to Build a Simple jQuery Slider
Mar 11, 2025 am 12:19 AM
How to Build a Simple jQuery Slider
Mar 11, 2025 am 12:19 AM
This article will guide you to create a simple picture carousel using the jQuery library. We will use the bxSlider library, which is built on jQuery and provides many configuration options to set up the carousel. Nowadays, picture carousel has become a must-have feature on the website - one picture is better than a thousand words! After deciding to use the picture carousel, the next question is how to create it. First, you need to collect high-quality, high-resolution pictures. Next, you need to create a picture carousel using HTML and some JavaScript code. There are many libraries on the web that can help you create carousels in different ways. We will use the open source bxSlider library. The bxSlider library supports responsive design, so the carousel built with this library can be adapted to any
 How to Upload and Download CSV Files With Angular
Mar 10, 2025 am 01:01 AM
How to Upload and Download CSV Files With Angular
Mar 10, 2025 am 01:01 AM
Data sets are extremely essential in building API models and various business processes. This is why importing and exporting CSV is an often-needed functionality.In this tutorial, you will learn how to download and import a CSV file within an Angular
