Detailed explanation of development using Adobe Html5 Extension
This time I will bring you a detailed explanation of the development using Adobe Html5 Extension. What are the precautions for using Adobe Html5 Extension development. The following is a practical case, let's take a look.
1. Background introduction
Adobe company produces a wide range of multimedia processing software product lines, covering audio and video editing, images Dealing with areas such as , graphic design, film and television post-production, etc. In order to extend the functions of the software, Adobe provides developers with two ways to increase the functions of the software: plug-ins and extensions. Last year, two Premiere plug-ins were developed using the officially provided SDK, which were used to import multimedia files in custom formats and preview video streams. Recently I have experienced the development of Adobe Extension.
Adobe Plugin is generally used to provide functions closer to the bottom layer. For efficiency reasons, the official plug-in SDK provided is based on C++ language. Adobe Extension tends to provide extensions for upper-layer applications, which was implemented in the form of Flash in the Adobe CS era.
In the Adobe CC era, HTML5 implementation was provided, which allowed developers to interface with HTML5, CSS3, Javascript and even NodeJS for development. Because Adobe has embedded CEF in Premiere Pro, it can efficiently parse and render HTML5 and run Nodejs programs. Nodejs can realize the call of system functions, which is not too easy! In this article, I roughly summarize the journey of using HTML5 to develop an Adobe extension. The extension we want to make is very simple, as shown in the figure below:
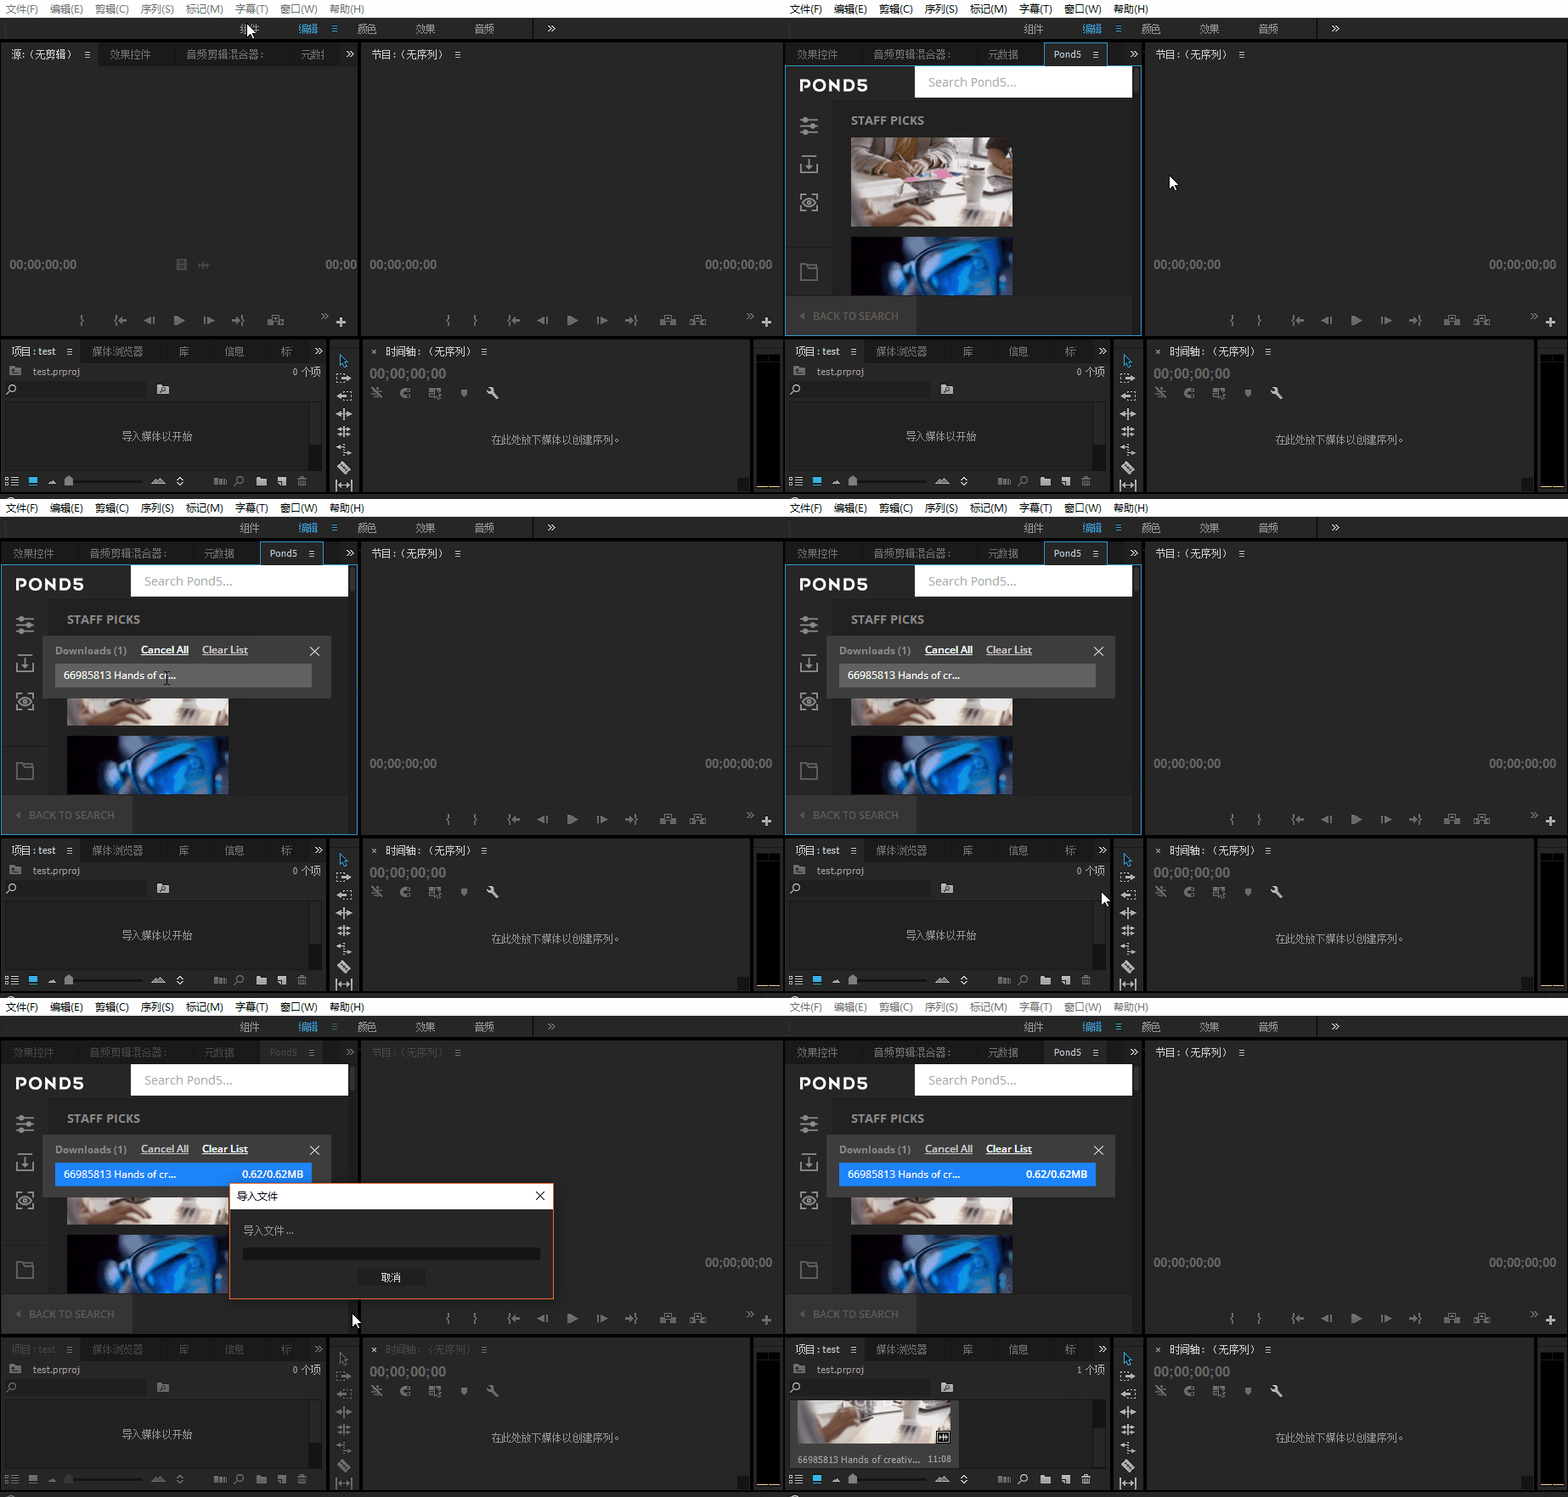
This is a PremierePro extension developed by Pond5, a well-known foreign video material trading website. It can Allow users to log in to the website in Pr, download preview materials, purchase high-definition materials, automatically import videos or automatically replace videos. This eliminates the need for users to open a browser to log in to the website, which greatly improves the user experience. Similar plugins are developed by shutterstock:
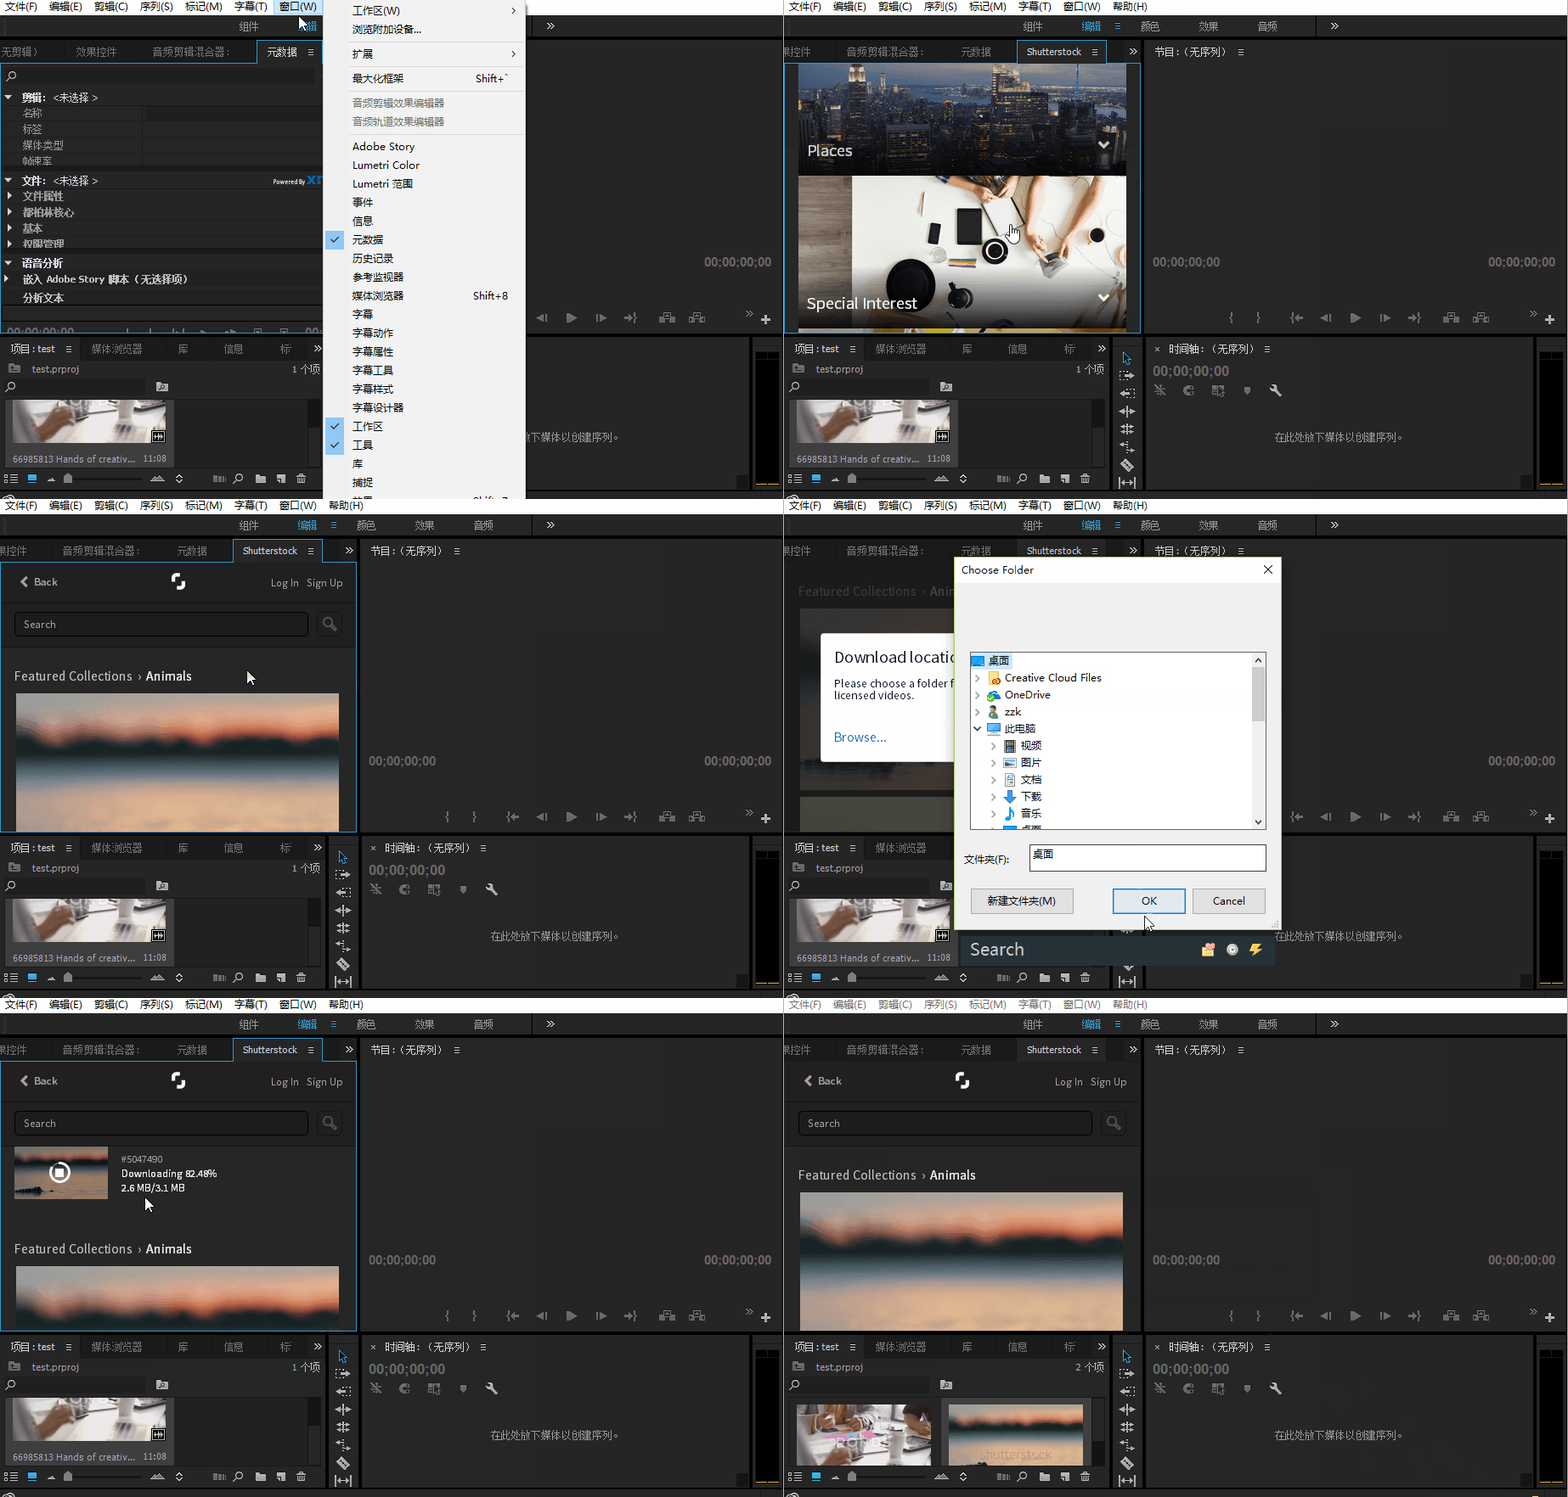
2. Development environment
Adobe official based on eclipse Launched an IDE for developing Adobe Html5 Extension. Therefore, we first configure the development environment according to the following process:
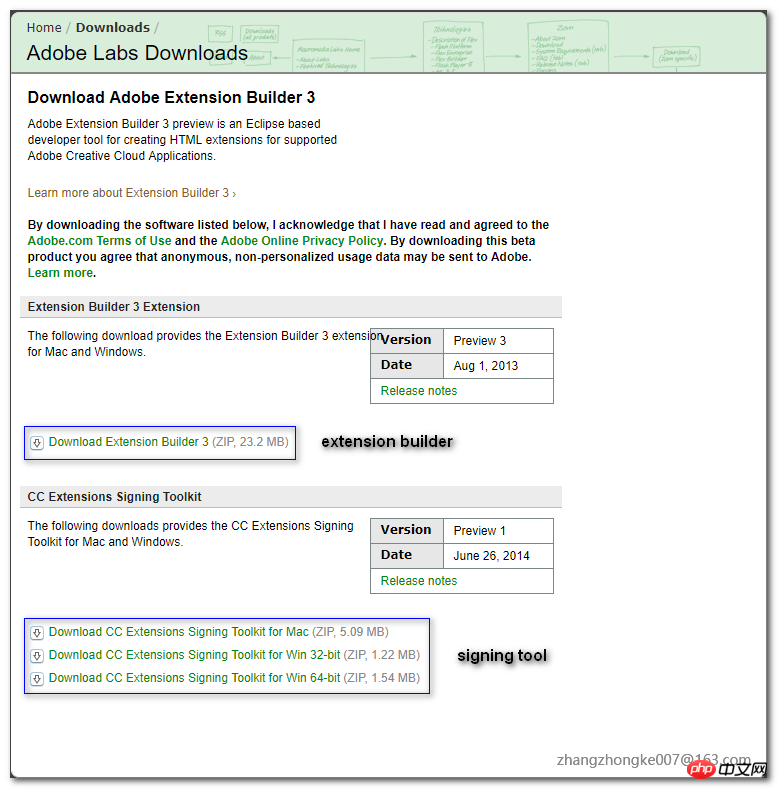
Download Eclipse, preferably version 3.6 or higher, and install Extension Builder
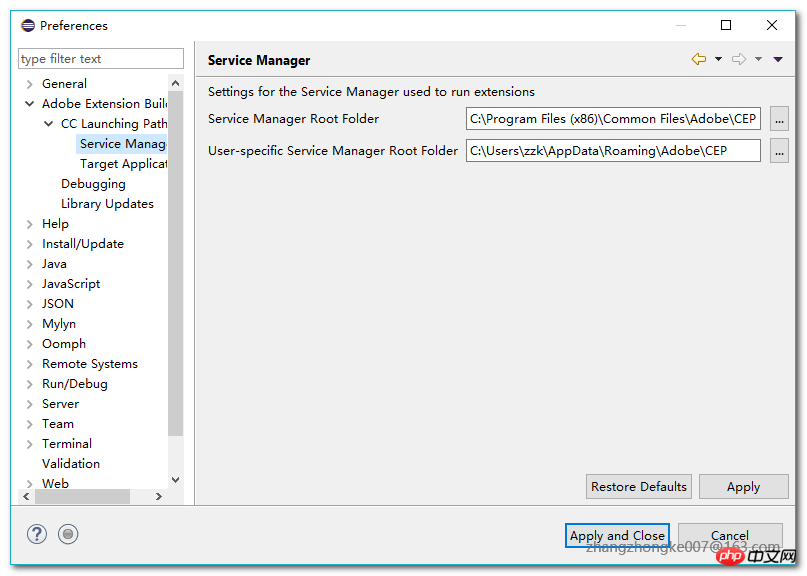
Adobe Premiere Pro CC 2014/2015. Configure elicpse's "target application" and "Service Manager"
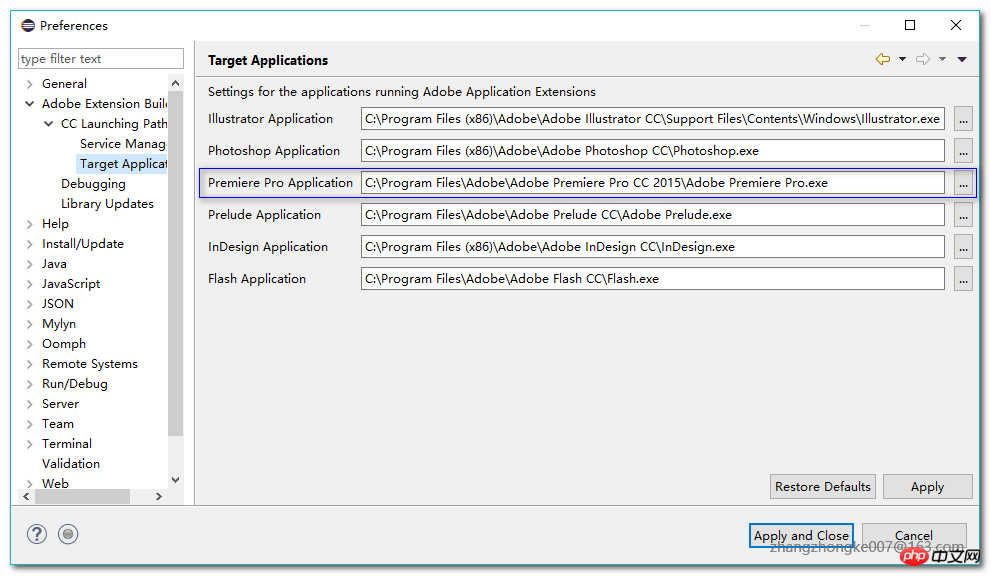
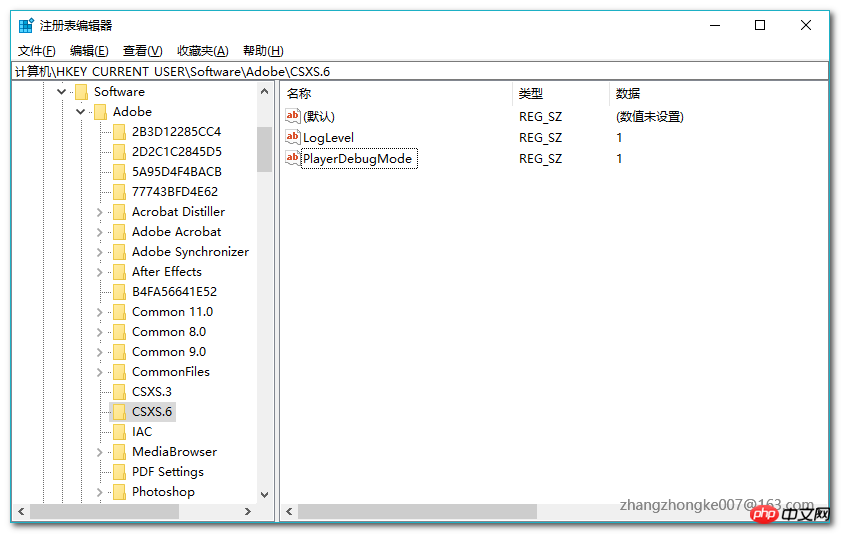
OpenDebug mode: During registration Add the 'PlayerDebugMode' field to the table
#The configuration is complete. At this point, you can use eclipse to generate the extension template project. The generated template project is very simple. There is only one default button in the panel:
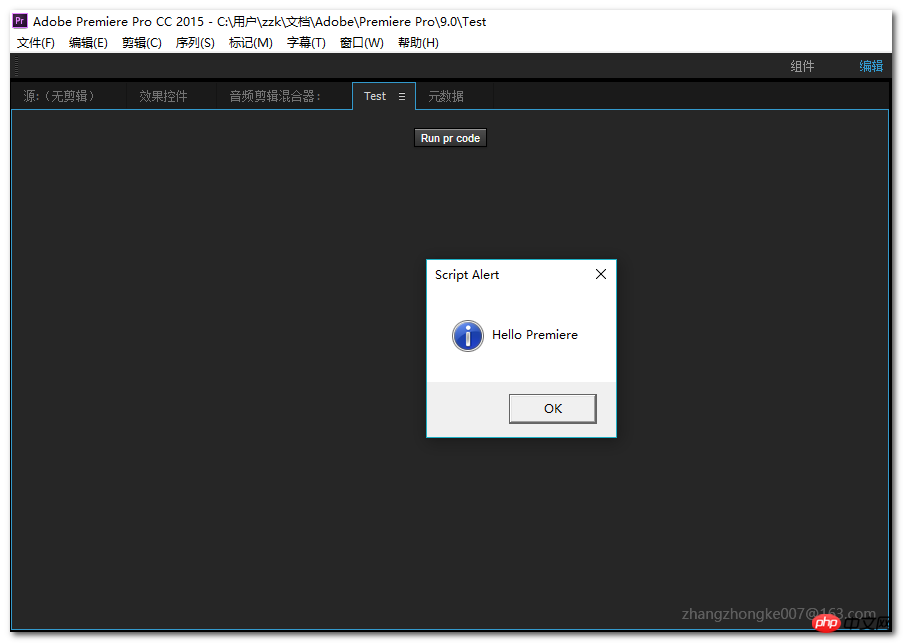
##3. Project configuration manifest.xml file
The most important file in the development of Adobe Html5 Extension is manifest.xml. This file describes the basic information of this extension so that the Adobe host program can recognize and load it normally. The general content is as follows: Among them, BundleName, BundleId, and BundleVersion are determined by the developer, generally based on normal version iterations. The most important thing is the contents of the two tags HostList and RequiredRuntimeList. The HostList determines which host programs this extension supports (such as PremierePro, After Effects, etc.). The following code indicates that multiple host programs can be loaded: Only Photoshop Extended is supported here, and its Host ID corresponds to PHXS. The Host IDs and versions of other host programs are as follows: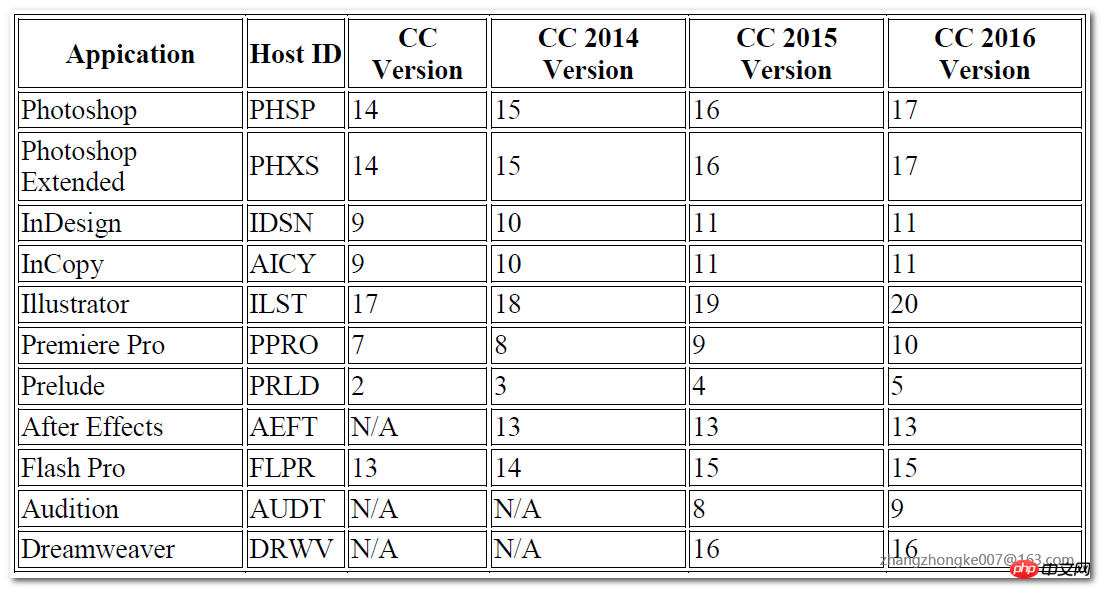
Notice that Version uses a square bracket form [14.0, 14.9], which indicates that this extension supports Photoshop Extended versions 14.0-14.9. Photoshop Extended versions higher than this or lower than this version will not load this extension. of. However, what if you want to specify that all versions above a certain version are supported? For example, if you want to support PremierePro CC 2014 or above, how to specify this Version? Just write the minimum version number:
In addition, there is the RequiredRuntimeList tag. This tag specifies the CEP version of the runtime. The so-called CEP is the abbreviation of Common Extensibility Platform. It provides a core service set to facilitate developers to execute Extendscript code, detect the environment variables of the host program, and process events sent between the extension and the host. Previously, this service set was called Creative Suite Extensible Services, or CSXS for short. Therefore, the abbreviation CSXS can still be seen in some configuration files. The initial version of CEP was 4.x, and it has developed into 5 major versions so far. The latest version is 8.x, which supports the latest Adobe CC 2018 host program.
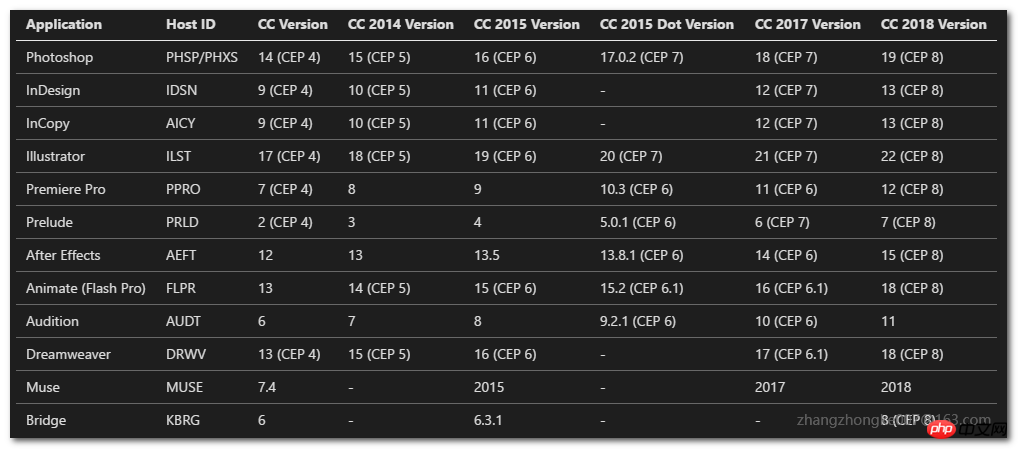
As shown above, if we want to support the first generation CC version of the host program, the Version of RequiredRuntime must be set to 4.0. Otherwise, the extension cannot be loaded normally. In addition, if you want to access the file system in the extension, you must specify some additional parameters:
Disable signature verification
When we develop, we need to adjust the extension code at any time. The Adobe host program ignores extensions that do not have signatures and will not load them. Therefore, we need to turn on debugging mode so that we do not have to sign the extension during development:
On mac, open the file ~/Library/Preferences/com.adobe.CSXS.6.plist and Add a row, the key name is PlayerDebugMode, the type is "String", and the value is set to "1". On Windows, open the registry key: HKEY_CURRENT_USER/Software/Adobe/CSXS.6, add an item named PlayerDebugMode, the type is " String", a key-value pair with a value of "1".
Note: If the version of the host program is different, the corresponding files may also be different. For example, in CC2017, you need to change the corresponding part above to "CSXS.7"
chrome debugging
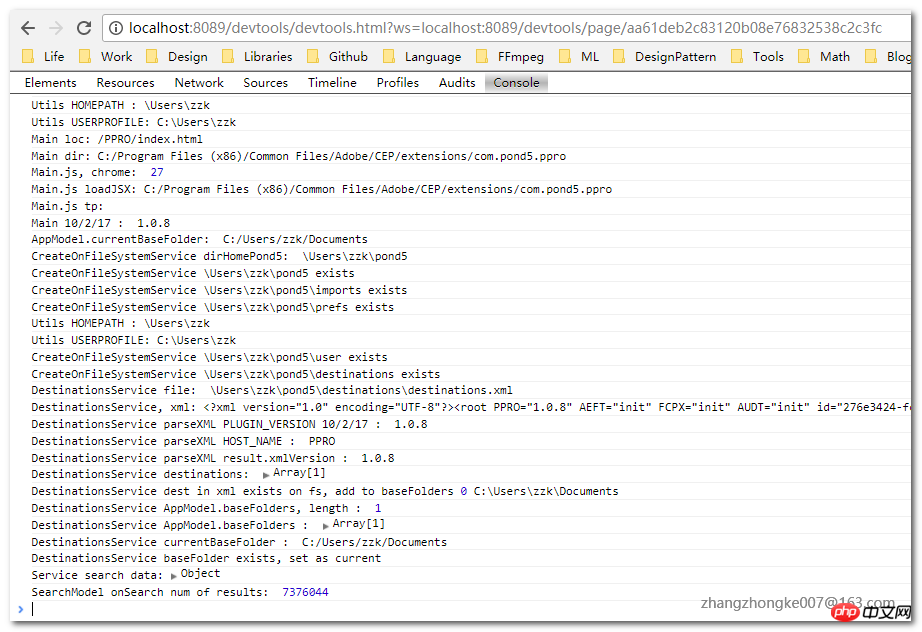
The chrome debugging tool helps to observe the extension The output and probing the DOM structure of the extension are very helpful for debugging. Enabling the chrome debugging tool is also very simple. Create a file named .debug in the root directory of the extension folder and write the following content:
This list illustrates the different ports used when debugging different host programs. Same. Taking Pond5 as an example, the content of its .debug file is as follows:
When specifying to debug Premiere extension, the port is 8089. As shown in the figure below:
CEP cache cleanup
When developing, it may be necessary to disable CEF For web content caching, you can directly manually delete the folder corresponding to the extension in the following location:
Windows: C:\Users\USERNAME\AppData\Local\Temp\cep_cache\Mac: /Users/USERNAME/Library /Logs/CSXS/cep_cache
Of course, some Adobe developers also said to specify the CEF parameter
In this way, all users of the current system can load this Extension. It can also be installed only for the current user, and its location is as follows:
On Mac: ~/Library/Application Support/Adobe/CEP/extensionsOn Windows: C:\\AppData\Roaming\Adobe\CEP\extensions Signature Pack
When publishing an Extension, the entire package needs to be signed. You need to use the ZXPSignCmd tool here, which can be downloaded from the official website. First, to sign we need a digital certificate. We can purchase this certificate from a third-party certificate issuing agency, which requires a certain amount of funding. You can also create a self-signed certificate to sign the extension. We will follow the process in the latter way:
This will generate a self-signed certificate in the current directory, and then we can use this certificate to sign the package:
When signing with the ZXPSignCmd tool A META-INF file will be generated in the extension directory, which stores the signature information. Then, the tool will package and compress the entire directory into a *.zxp file. This is the expansion file we ultimately need to publish. ^_^

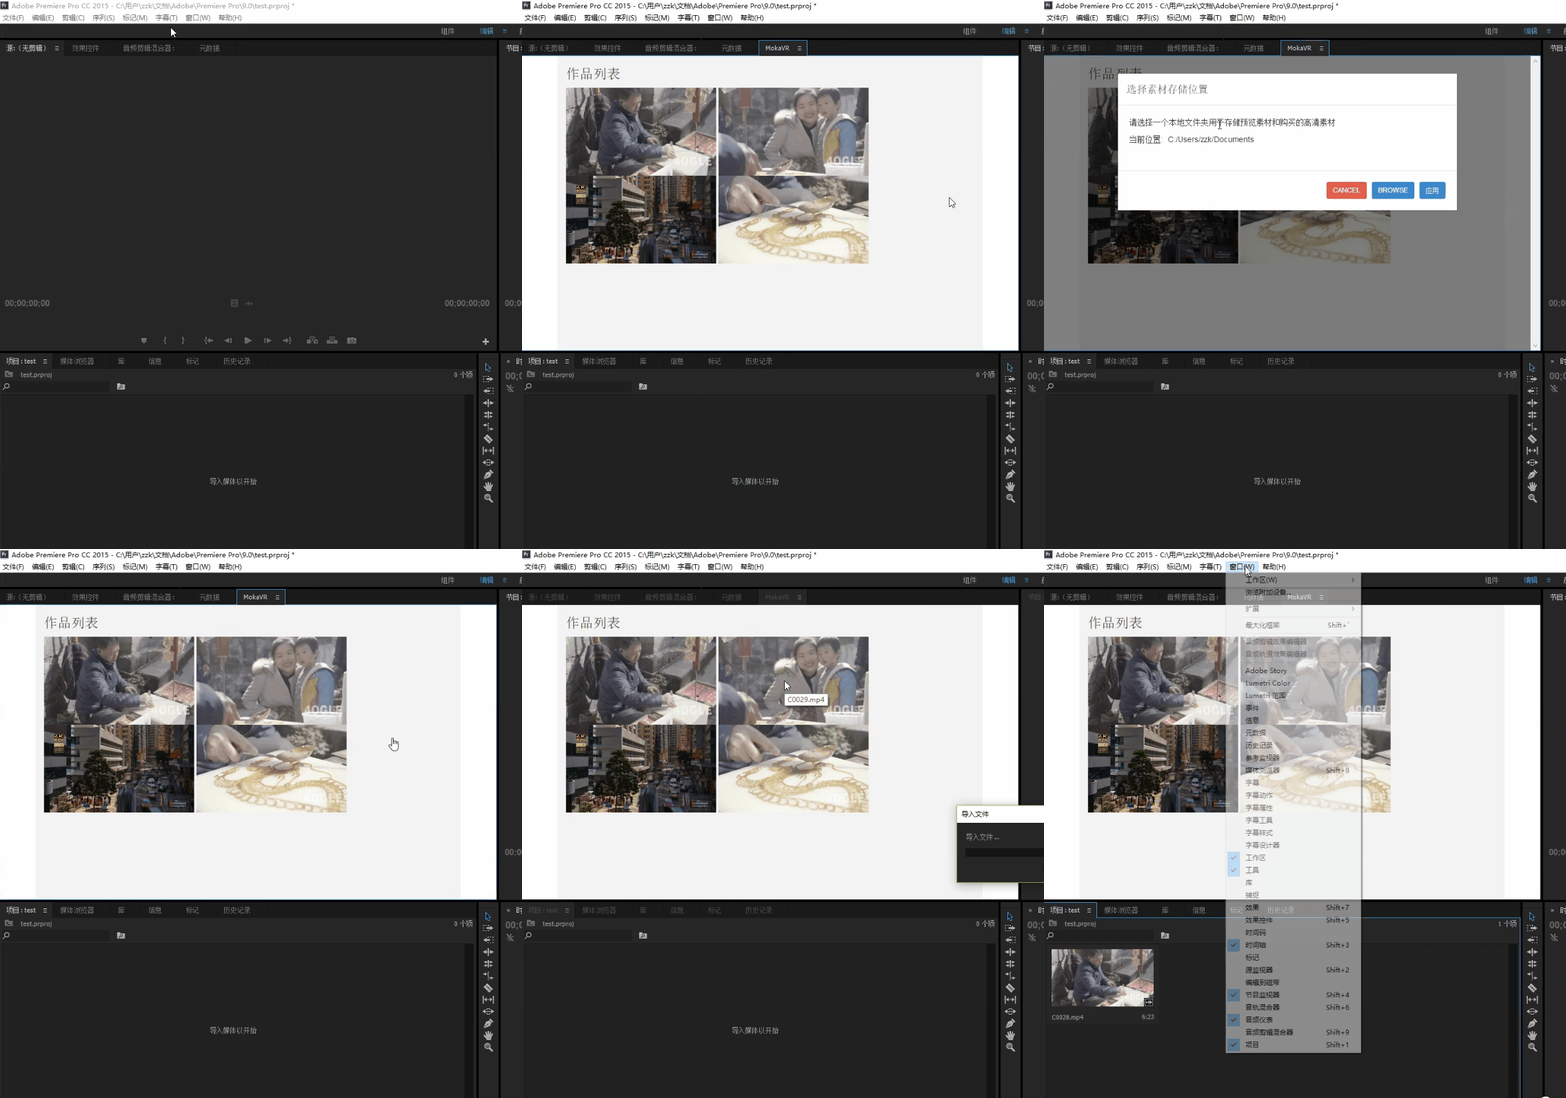
Routine analysis of Pond5 and Shutterstock By carefully analyzing the implementation of Pond5 and shutterstock, we can summarize the general execution logic of this type of extension:
(1) Open the extension panel in the host program, and you can find the loaded extension through "Window - Extension"
(2) The Extension script will analyze whether the user is using it for the first time. If it is the first time, let the user select the location where the video material is to be saved. This is usually achieved through a pop-up dialog box. The location information selected by the user is generally persisted in the user's home directory through an xml file. If the user is not using the extension for the first time, the xml file in the home directory will be directly loaded and parsed.
(3) The user clicks on a certain video material to start the download. This process can generally be achieved through nodejs. However, the downloadcallback function must be set up.
(4) After the download is successful, execute the callback function and import the downloaded video file into the host program. This step is implemented by calling the extendscript script. For specific script writing, please refer here. Refer to this routine to implement Adobe Extension similar to Pond5 and Shutterstock:
I believe you have mastered it after reading the case in this article. Method, for more exciting information, please pay attention to other related articles on the php Chinese website!
Recommended reading:
##How WebGL operates json and echarts charts
The above is the detailed content of Detailed explanation of development using Adobe Html5 Extension. For more information, please follow other related articles on the PHP Chinese website!

Hot AI Tools

Undresser.AI Undress
AI-powered app for creating realistic nude photos

AI Clothes Remover
Online AI tool for removing clothes from photos.

Undress AI Tool
Undress images for free

Clothoff.io
AI clothes remover

Video Face Swap
Swap faces in any video effortlessly with our completely free AI face swap tool!

Hot Article

Hot Tools

Notepad++7.3.1
Easy-to-use and free code editor

SublimeText3 Chinese version
Chinese version, very easy to use

Zend Studio 13.0.1
Powerful PHP integrated development environment

Dreamweaver CS6
Visual web development tools

SublimeText3 Mac version
God-level code editing software (SublimeText3)

Hot Topics
 1386
1386
 52
52
 Table Border in HTML
Sep 04, 2024 pm 04:49 PM
Guide to Table Border in HTML. Here we discuss multiple ways for defining table-border with examples of the Table Border in HTML.
 HTML margin-left
Sep 04, 2024 pm 04:48 PM
Guide to HTML margin-left. Here we discuss a brief overview on HTML margin-left and its Examples along with its Code Implementation.
 Nested Table in HTML
Sep 04, 2024 pm 04:49 PM
This is a guide to Nested Table in HTML. Here we discuss how to create a table within the table along with the respective examples.
 HTML Table Layout
Sep 04, 2024 pm 04:54 PM
Guide to HTML Table Layout. Here we discuss the Values of HTML Table Layout along with the examples and outputs n detail.
 HTML Input Placeholder
Sep 04, 2024 pm 04:54 PM
Guide to HTML Input Placeholder. Here we discuss the Examples of HTML Input Placeholder along with the codes and outputs.
 HTML Ordered List
Sep 04, 2024 pm 04:43 PM
Guide to the HTML Ordered List. Here we also discuss introduction of HTML Ordered list and types along with their example respectively
 Moving Text in HTML
Sep 04, 2024 pm 04:45 PM
Guide to Moving Text in HTML. Here we discuss an introduction, how marquee tag work with syntax and examples to implement.
 HTML onclick Button
Sep 04, 2024 pm 04:49 PM
Guide to HTML onclick Button. Here we discuss their introduction, working, examples and onclick Event in various events respectively.


