

How to reflect noVNC remote desktop in vue project
This time I will show you how to map noVNC remote desktop in the vue project. What are the precautions for mapping noVNC remote desktop in the vue project. The following is a practical case, let's take a look.
1. First, let’s briefly introduce the concept.
VNCServer is a service started on the server in order to satisfy distributed users sharing server resources. The corresponding client software includes the graphical client VNCViewer, while noVNC is HTML5 VNC client, which is implemented using HTML 5 WebSocket, Canvas and JavaScript.
noVNC is widely used in major cloud computing and virtual machine control panels. noVNC is implemented using WebSockets, but most current VNC servers do not support WebSockets, so noVNC cannot directly connect to the VNC server. Instead, a proxy needs to be enabled to convert between WebSockets and TCP sockets. This proxy is called websockify.
2. There is a requirement in the project. There are multiple function pages in the system, but the functions also include the original functions on the physical terminal device( Including the later virtual terminal client on the computer), which uses noVNC. The advantage is that you can embed other functional systems (or pages) into new projects, and you can also click to operate the above functions, etc., which can temporarily solve some problems.
3. Since the project framework is vue, the following are all front-end implementation parts
First, introduce the noVNC library. There are two ways to introduce it. One is to directly download the source code into your own project. Some problems with this method are introduced in detail below;
1 |
|
The second is, if you use webpack, you can use npm to install dependencies. ,more convenient.
1 |
|
The following is the detailed code part
HTML
1 2 3 4 5 6 7 |
|
Script
1 2 3 4 5 6 7 8 9 10 11 12 13 |
|
Since the first introduction method is adopted, the import method is used to introduce resources. It should be noted that when introducing certain files, the project is based on es6 syntax, so the way to introduce external js is slightly different. For example, when introducing the webutil.js file, you need to add export default before it can be used correctly. You can slightly modify the file when importing. There are corresponding notes and descriptions in the file.
After the resources are introduced, the next step is how to use them, which is actually not complicated. Not much to say, let’s get started.
1 2 3 4 5 6 7 8 9 10 11 12 13 14 15 16 17 18 19 20 21 22 23 24 25 26 27 28 29 30 31 32 33 34 35 36 37 |
|
First of all, a method is defined in methodslife cycle, and initialization-related operations are written in it. Then call this.connectVnc() in the mounted life cycle. It must be called within this life cycle, otherwise the DOM structure cannot be obtained if the canvas is not initialized.
A brief description is to instantiate an object, including some used methods or attributes, then call the connect method and pass in the host, port, password, and path parameters to establish a connection.
There are two methods, one is the callback_.onCompleteHandler after the connection is successful, and the other is the callback_disconnected after the connection is successful
1 2 3 4 5 6 7 8 9 10 11 12 13 14 15 16 17 18 19 |
|
You can set some parameter information or screen after the connection is successful. Dimensions etc.
After completing the above operations, you can see a remote desktop screen on the web page.
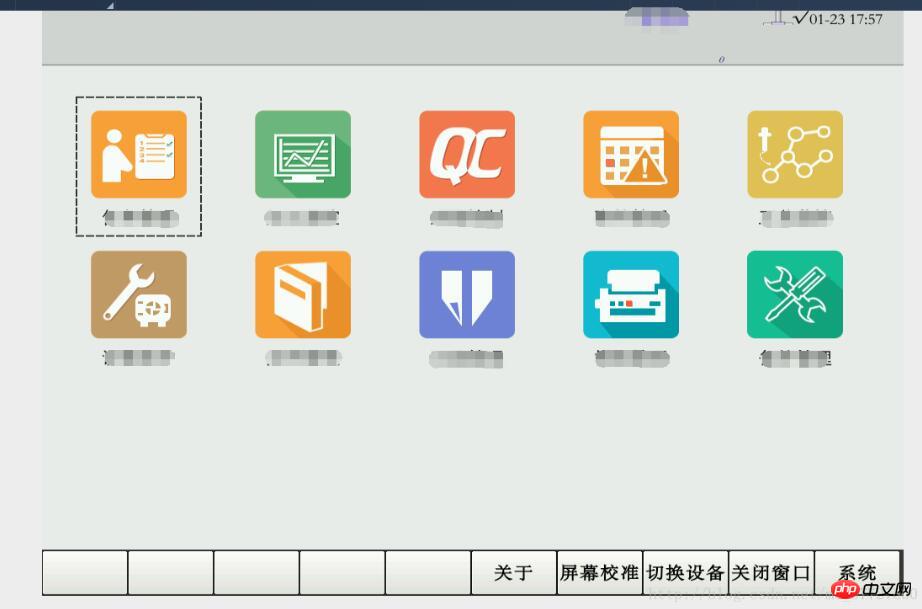
A simple remote desktop can be operated. If you have more other parameters or requirements, please refer to the official websiteClick to open the link. Or contact me for discussion
I believe you have mastered the method after reading the case in this article. For more exciting information, please pay attention to other related articles on the php Chinese website!
Recommended reading:
How Canvas makes a 3D dynamic Chart
The above is the detailed content of How to reflect noVNC remote desktop in vue project. For more information, please follow other related articles on the PHP Chinese website!

Hot AI Tools

Undresser.AI Undress
AI-powered app for creating realistic nude photos

AI Clothes Remover
Online AI tool for removing clothes from photos.

Undress AI Tool
Undress images for free

Clothoff.io
AI clothes remover

Video Face Swap
Swap faces in any video effortlessly with our completely free AI face swap tool!
Hot Article
Hot Tools

Notepad++7.3.1
Easy-to-use and free code editor

SublimeText3 Chinese version
Chinese version, very easy to use

Zend Studio 13.0.1
Powerful PHP integrated development environment

Dreamweaver CS6
Visual web development tools

SublimeText3 Mac version
God-level code editing software (SublimeText3)
Hot Topics
 1657
1657
 14
1415
52
1309
25
1257
29
1231
24
14
1415
52
1309
25
1257
29
1231
24

 Remote Desktop cannot authenticate the remote computer's identity
Feb 29, 2024 pm 12:30 PM
Remote Desktop cannot authenticate the remote computer's identity
Feb 29, 2024 pm 12:30 PM
Windows Remote Desktop Service allows users to access computers remotely, which is very convenient for people who need to work remotely. However, problems can be encountered when users cannot connect to the remote computer or when Remote Desktop cannot authenticate the computer's identity. This may be caused by network connection issues or certificate verification failure. In this case, the user may need to check the network connection, ensure that the remote computer is online, and try to reconnect. Also, ensuring that the remote computer's authentication options are configured correctly is key to resolving the issue. Such problems with Windows Remote Desktop Services can usually be resolved by carefully checking and adjusting settings. Remote Desktop cannot verify the identity of the remote computer due to a time or date difference. Please make sure your calculations
 How to make a remote desktop connection display the other party's taskbar
Jan 03, 2024 pm 12:49 PM
How to make a remote desktop connection display the other party's taskbar
Jan 03, 2024 pm 12:49 PM
There are many users using Remote Desktop Connection. Many users will encounter some minor problems when using it, such as the other party's taskbar not being displayed. In fact, it is probably a problem with the other party's settings. Let's take a look at the solutions below. How to display the other party's taskbar during Remote Desktop Connection: 1. First, click "Settings". 2. Then open "Personalization". 3. Then select "Taskbar" on the left. 4. Turn off the Hide Taskbar option in the picture.
 Six commonly used remote connection tools, which one do you like the most?
Feb 22, 2024 pm 06:28 PM
Six commonly used remote connection tools, which one do you like the most?
Feb 22, 2024 pm 06:28 PM
Xshell "Xshell" is a powerful secure terminal emulation software that supports SSH1, SSH2 protocols and the TELNET protocol of the Windows platform. By using Xshell under the Windows interface, users can easily access remote servers and realize remote control terminal operations. In addition, Xshell also provides various appearance color schemes and style choices, allowing users to customize according to personal preferences and improve the user experience. The features and benefits of Xshell are as follows: Session Management: Use the session manager and inheritable session configurations to easily create, edit and start sessions. Comprehensive support: Supports multiple verification methods, protocols or algorithms to handle various situations. local shell
 How to learn and use remote connection commands
Jan 12, 2024 pm 07:57 PM
How to learn and use remote connection commands
Jan 12, 2024 pm 07:57 PM
For many engineers engaged in operation and maintenance, Windows remote connection is very important. Skilled use of remote commands can greatly improve work efficiency. Today I will talk about how to use remote connection commands. The Microsoft Windows operating system has its own remote connection function. You can connect to a remote computer through the remote connection command. Many friends do not know how to use the remote connection command. Let’s take a look at how the editor operates it! How to use the remote connection command 1. Press the windows+R key combination on the keyboard to open the run dialog box, enter the remote connection command mstsc in the run box and press Enter. Remote connection diagram-12. Then the remote desktop connection dialog box will appear. Enter the computer name or IP address.
 An in-depth look at Linux remote management protocols: a comprehensive guide to technical practice
Feb 24, 2024 pm 02:18 PM
An in-depth look at Linux remote management protocols: a comprehensive guide to technical practice
Feb 24, 2024 pm 02:18 PM
"Comprehensive Interpretation of Linux Remote Management Protocol: A complete guide to technical practice, specific code examples are required" With the rapid development of the Internet, remote management of servers has become an efficient method of managing servers, and the remote management protocol under Linux systems has attracted even more attention. . This article will comprehensively explain the Linux remote management protocol, provide detailed technical practice strategies, and come with specific code examples to help readers deeply understand and practice the method of remote management of servers. 1. SSH protocol SSH (SecureShell) is a
 Demystifying the Linux Remote Management Protocol: Understand all aspects of technology applications
Feb 24, 2024 am 09:21 AM
Demystifying the Linux Remote Management Protocol: Understand all aspects of technology applications
Feb 24, 2024 am 09:21 AM
The Linux remote management protocol has always been an important part of network management. It has a wide range of applications, involving server management, remote maintenance, monitoring and other aspects. In Linux systems, there are many remote management protocols, among which the more common ones include SSH, Telnet, VNC, etc. This article will focus on these protocols, delve into the technical applications of Linux remote management protocols, and provide specific code examples. 1.SSH protocol SSH (SecureShell) is a
 Threat of Java Remote Code Execution Vulnerability
Aug 08, 2023 pm 03:21 PM
Threat of Java Remote Code Execution Vulnerability
Aug 08, 2023 pm 03:21 PM
The Threat of Java Remote Code Execution Vulnerabilities Java is a powerful and widely used programming language that is used by many enterprises and developers to build secure and reliable applications. However, even Java has some security vulnerabilities, one of which is remote code execution vulnerability. This article will introduce the threat of Java remote code execution vulnerabilities and provide a code example to illustrate. A remote code execution vulnerability refers to a vulnerability in which an attacker can input malicious code to cause the target application to execute the code. This vulnerability is usually due to the application
 How to handle PHP remote image download errors and generate corresponding error messages
Aug 06, 2023 pm 07:57 PM
How to handle PHP remote image download errors and generate corresponding error messages
Aug 06, 2023 pm 07:57 PM
How to handle PHP remote image download errors and generate corresponding error messages. When developing web applications, you often encounter the need to download images from a remote server. However, due to various reasons, you may encounter errors while downloading images. This article will introduce how to handle remote image download errors in PHP and generate corresponding error messages. Use the file_get_contents function to download remote images. You can use the file_get_contents function in PHP to download remote images. Below is a brief
