Nginx dynamic and static separation operation explanation
Nginx has strong static processing capabilities, but insufficient dynamic processing capabilities. Therefore, dynamic and static separation technology is commonly used in enterprises. The dynamic and static separation technology actually uses a proxy method. In the server{} section, a location with a regular match is added to specify the matching item. Dynamic and static separation for PHP: static pages are handed over to Nginx for processing, and dynamic pages are handed over to the PHP-FPM module or Apache. . In the Nginx configuration, different processing methods for static and dynamic pages are implemented through the location configuration section and regular matching.

1. Project brief description
Deploy wordpress to realize the dynamic separation of the entire website and achieve the following requirements:
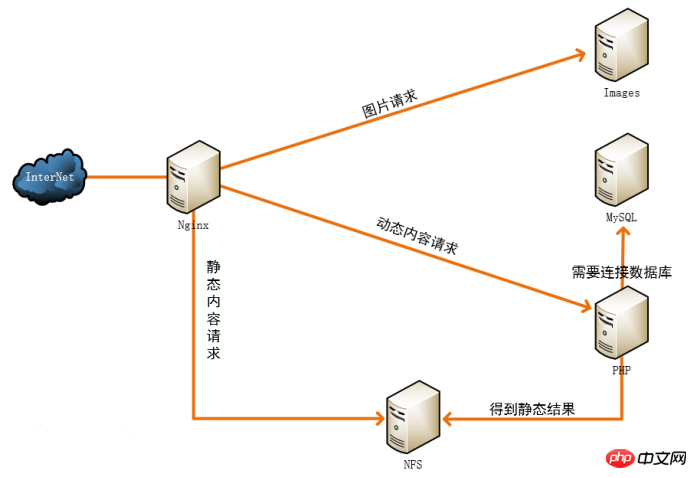
1. The front-end Nginx receives the static request and returns it directly from NFS to the client.
2. The front-end Nginx receives the dynamic request and forwards it to the PHP server for processing through FastCGI.
----If you get a static result, directly retrieve the result from NFS and give it to Nginx and then return it to the client.
----If data processing is required, the PHP server will connect to the database and return the results to Nginx
3. The front-end Nginx receives the image request and submits it as .jpg, .png, .gif, etc. Processed by the backend Images server.

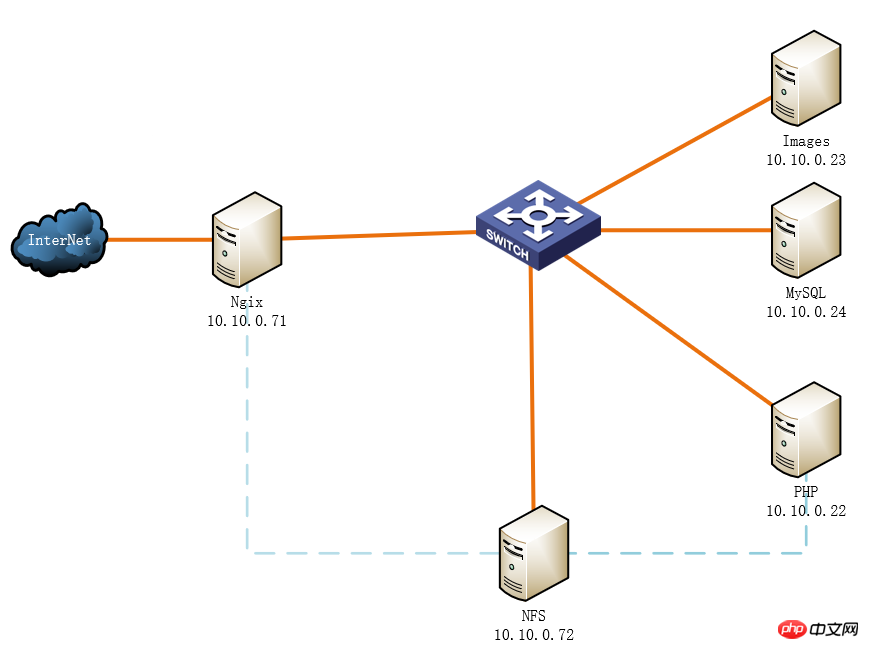
2. Overall architecture diagram

3. Configuration details
1.NFS server configuration
vim /etc/exports
/app/blog   10.10.0.0/24(ro,sync,root_squash,no_all_squash) # 只允许内网网段挂载,提高安全性。

cd /app/blog                                                # 将wordpress文件解压
tar  -xvf  wordpress-4.8.1-zh_CN.tar.gz
2.Nginx server configuration
First of all, both Nginx and PHP servers must be installed Load NFS. Achieve unified deployment and facilitate management
mount 10.10.0.72:/app/blog /app/blog #Mount NFS/app/blog to local/app/blog
and then configure Nginx
Nginx is mainly the configuration of location in the server. Configure the location to hand the file ending in .php to the PHP server. Give the ones ending in .jpg or gif to Image. Other configurations can be left as default.
vim /etc/nginx/nginx.conf
http {
    log_format  main  '$remote_addr - $remote_user [$time_local] "$request" '
                      '$status $body_bytes_sent "$http_referer" '
                      '"$http_user_agent" "$http_x_forwarded_for"';
    access_log  /var/log/nginx/access.log  main;
    sendfile                on;
    tcp_nopush           on;
    tcp_nodelay             on;
    keepalive_timeout   65;
    types_hash_max_size 2048;
    include             /etc/nginx/mime.types;
    default_type        application/octet-stream;
    include /etc/nginx/conf.d/*.conf;
    server {
        listen       80 default_server;
        server_name  www.shuaiguoxia.com;
        index index.php index.html;
        root /app/blog;                                     # 根目录为挂载的NFS的挂载点
        include /etc/nginx/default.d/*.conf;
        location ~* \.php$ {                                # location匹配将php结尾的交给PHP服务器
                fastcgi_pass 10.10.0.22:9000;
                fastcgi_index index.php;
                fastcgi_param SCRIPT_FILENAME /app/blog$fastcgi_script_name;
                include fastcgi_params;
        }
        location ~* \.(jpg|gif)$ {                          # location匹配将图片交给Image处理
                proxy_pass http://10.10.0.23:80;            # Image服务器要开启web服务
        }
        error_page 404 /404.html;
            location = /40x.html {
        }
        error_page 500 502 503 504 /50x.html;
            location = /50x.html {
        }
}3.PHP server configuration
PHP服务器的配置比较简单,主要讲PHP以FPM模式安装后进行简单的配置即可
yum install php-fpm php-mysql
vim /etc/php-fpm.d/www.conf
listen = 9000                                   # 只写监听端口,即监听所有IP
listen.allowed_clients = any                    # 允许所有IP进行访问。或者将这行注释。
4.MySQL服务器
yum install marirdb-server
/usr/local/mysql/bin/myhsql_secure_installation         #MySql初始化脚本,以下为每一项的翻译
  是否设置root密码
  输入密码
  确认密码
  是否设置匿名用户
  是否允许root远程登录
  删除test数据库
  现在是否生效

mysql -uroot -p

create database wpdb;                                   # 创建wp数据库
grant all on wpdb.* to wpadm@'10.10.%' idenfied by 'centos';    # 授权用户。用户不存在系统会自动创建
5.Image服务器配置
yum install nginx # 安装Nginx
cd /app/image                                   # 将所有图片解压至此路径。图片的目录结构要保持原样
tar  -xvf  wordpress-4.8.1-zh_CN.tar.gz
 server {
        root      /app/image;                   # 仅仅修改根目录这一行即可。Httpd同理
} # 如果使用apache要注意在CentOS7下默认拒绝所有nginx start # 启动服务
6.配置wordpress
cp wp-config-sample.php wp-config.php           # 复制一个模板文件后改名作为主配置文件

vim wp-config.php
/** WordPress数据库的名称 */
define('DB_NAME', 'wpdb');                      # wpdb为MySQL中创建的数据库

/** MySQL数据库用户名 */
define('DB_USER', 'wpadm');                     # wpadm为MySQL中授权的用户

/** MySQL数据库密码 */
define('DB_PASSWORD', 'centos');                # 授权用户的密码

/** MySQL主机 */
define('DB_HOST', '10.10.0.24'); # MySQL主机地址至此配置就已经完成。达到了图片从图片服务器返回,静态nginx直接返回,动态交给PHP进行处理。
总结
1.前端Nginx要做好location匹配,将*.php与*.jpg等进行反向代理。
2.后端PHP服务器要修改配置文件,PHP自带配置文件只监听本地,且只允许本地访问
3.后端Image服务器,不论是apache还是Nginx要开启WEB服务。根目录要指向图片根目录,且根目录下的图片要与原本图片文件目录结构一致。
Related recommendations:
Nginx dynamic and static separation classic case configuration
The above is the detailed content of Nginx dynamic and static separation operation explanation. For more information, please follow other related articles on the PHP Chinese website!

Hot AI Tools

Undresser.AI Undress
AI-powered app for creating realistic nude photos

AI Clothes Remover
Online AI tool for removing clothes from photos.

Undress AI Tool
Undress images for free

Clothoff.io
AI clothes remover

Video Face Swap
Swap faces in any video effortlessly with our completely free AI face swap tool!

Hot Article

Hot Tools

Notepad++7.3.1
Easy-to-use and free code editor

SublimeText3 Chinese version
Chinese version, very easy to use

Zend Studio 13.0.1
Powerful PHP integrated development environment

Dreamweaver CS6
Visual web development tools

SublimeText3 Mac version
God-level code editing software (SublimeText3)

Hot Topics
 1387
1387
 52
52
 How to configure cloud server domain name in nginx
Apr 14, 2025 pm 12:18 PM
How to configure an Nginx domain name on a cloud server: Create an A record pointing to the public IP address of the cloud server. Add virtual host blocks in the Nginx configuration file, specifying the listening port, domain name, and website root directory. Restart Nginx to apply the changes. Access the domain name test configuration. Other notes: Install the SSL certificate to enable HTTPS, ensure that the firewall allows port 80 traffic, and wait for DNS resolution to take effect.
 How to start nginx server
Apr 14, 2025 pm 12:27 PM
Starting an Nginx server requires different steps according to different operating systems: Linux/Unix system: Install the Nginx package (for example, using apt-get or yum). Use systemctl to start an Nginx service (for example, sudo systemctl start nginx). Windows system: Download and install Windows binary files. Start Nginx using the nginx.exe executable (for example, nginx.exe -c conf\nginx.conf). No matter which operating system you use, you can access the server IP
 How to check nginx version
Apr 14, 2025 am 11:57 AM
The methods that can query the Nginx version are: use the nginx -v command; view the version directive in the nginx.conf file; open the Nginx error page and view the page title.
 How to check the name of the docker container
Apr 15, 2025 pm 12:21 PM
You can query the Docker container name by following the steps: List all containers (docker ps). Filter the container list (using the grep command). Gets the container name (located in the "NAMES" column).
 How to run nginx apache
Apr 14, 2025 pm 12:33 PM
To get Nginx to run Apache, you need to: 1. Install Nginx and Apache; 2. Configure the Nginx agent; 3. Start Nginx and Apache; 4. Test the configuration to ensure that you can see Apache content after accessing the domain name. In addition, you need to pay attention to other matters such as port number matching, virtual host configuration, and SSL/TLS settings.
 How to check whether nginx is started
Apr 14, 2025 pm 01:03 PM
How to confirm whether Nginx is started: 1. Use the command line: systemctl status nginx (Linux/Unix), netstat -ano | findstr 80 (Windows); 2. Check whether port 80 is open; 3. Check the Nginx startup message in the system log; 4. Use third-party tools, such as Nagios, Zabbix, and Icinga.
 How to create a mirror in docker
Apr 15, 2025 am 11:27 AM
Steps to create a Docker image: Write a Dockerfile that contains the build instructions. Build the image in the terminal, using the docker build command. Tag the image and assign names and tags using the docker tag command.
 How to start containers by docker
Apr 15, 2025 pm 12:27 PM
Docker container startup steps: Pull the container image: Run "docker pull [mirror name]". Create a container: Use "docker create [options] [mirror name] [commands and parameters]". Start the container: Execute "docker start [Container name or ID]". Check container status: Verify that the container is running with "docker ps".


