

How to implement real-time verification function in ajax
This time I will show you how to implement the real-time verification function with ajax. What are the precautions for ajax to implement the real-time verification function? Here are practical cases, let’s take a look.
What is ajax
Ajax means "Asynchronous Javascript And XML" (asynchronous JavaScript and XML), which means A web development technology for creating interactive web applications.
Ajax = Asynchronous JavaScript and XML (a subset of Standard Universal Markup Language).
Ajax is a technology for creating fast, dynamic web pages.
Ajax is a technology that can update parts of a web page without reloading the entire web page.
By exchanging a small amount of data with the server in the background, Ajax can enable asynchronous updates of web pages. This means that parts of a web page can be updated without reloading the entire page.
Traditional web pages (not using Ajax) must reload the entire web page if the content needs to be updated.
This is Baidu’s definition of it, which is detailed enough.
One thing worth adding is the understanding of asynchronous. Asynchronous is relative to synchronization. Here they refer to the interaction mode between the server and the browser.
Synchronization, after each request is issued, the user operation is blocked and must require a response to be returned before continuing the operation. Asynchronous means that after sending a request, the user does not need to wait for a response. Everything is implemented by ajax, and the data can be partially updated without refreshing the web page. Improved communication efficiency between both ends.
Let’s make a small demo
Make a demo of the verification form without refreshing, enter the user name in the dialog box, and perform verification in the background. Use ajax technology.
Project structure, built using maven
login.jsp
<%@ page contentType="text/html;charset=UTF-8" language="java" isELIgnored="false" %>
<html>
<head>
  <title>login</title>
</head>
<body>
Welcome to log in:
    用户名:<input type="text" name="username" id="username" onchange="CallServer()"/>
    <!-- 显示提示信息 -->
    <p id="msg"></p>
    <!-- 在jsp页面中引入js,绝对路径的方式 -->
    <script src="${pageContext.request.contextPath}/js/main.js"></script>
</body>
</html>main.js
alert("use ajax!")
//创建XMLHttpRequest对象,在不同浏览器
function createXMLHTTP() {
  if(window.XMLHttpRequest){
    // IE7+, Firefox, Chrome, Opera, Safari 浏览器执行代码
    xmlhttp = new XMLHttpRequest();
  }else {
    // IE6, IE5 浏览器执行代码
    xmlhttp = new ActiveXObject("Microsoft.XMLHTTP");
  }
  return xmlhttp;
}
function CallServer() {
  var username = document.getElementById("username").value;
  // 判断为空
  if ((username == null) || (username == "")) return;
  var xmlhttp = createXMLHTTP();
  // 构建请求url
  var url = "/loginServlet"+"?"+"username="+username;
  //状态码改变调用事件
  xmlhttp.onreadystatechange = function () {
    //正常返回,替换msg内容
    if(xmlhttp.readyState == 4 && xmlhttp.status == 200){
      document.getElementById("msg").innerHTML = xmlhttp.responseText;
    }
  }
  //异步提交请求
  xmlhttp.open("GET",url,true);
  //发送请求
  xmlhttp.send();
}web. xml
<!DOCTYPE web-app PUBLIC
 "-//Sun Microsystems, Inc.//DTD Web Application 2.3//EN"
 "http://java.sun.com/dtd/web-app_2_3.dtd" >
<web-app>
 <display-name>Archetype Created Web Application</display-name>
 <welcome-file-list>
  <welcome-file>index.jsp</welcome-file>
 </welcome-file-list>
 <servlet>
  <servlet-name>loginServlet</servlet-name>
  <servlet-class>com.lbw.servlet.loginServlet</servlet-class>
 </servlet>
 <servlet-mapping>
  <servlet-name>loginServlet</servlet-name>
  <url-pattern>/loginServlet</url-pattern>
 </servlet-mapping>
</web-app>
loginServlet.java
package com.lbw.servlet;
import javax.servlet.ServletException;
import javax.servlet.annotation.WebServlet;
import javax.servlet.http.HttpServlet;
import javax.servlet.http.HttpServletRequest;
import javax.servlet.http.HttpServletResponse;
import java.io.IOException;
import java.io.PrintWriter;
/**
 * 后端使用Servlet处理请求
 */
public class loginServlet extends HttpServlet {
  protected void doPost(HttpServletRequest request, HttpServletResponse response) throws ServletException, IOException {
    //设置编码和响应头
    request.setCharacterEncoding("UTF-8");
    response.setContentType("text/xml;charset=UTF-8");
    response.setHeader("Cache-Control", "no-cache");
    //获取参数
    String username = request.getParameter("username");
    String msg = "";
    if("lbw".equals(username)){
      msg = "名称正确";
    }else {
      msg = "名称错误";
    }
    PrintWriter out = response.getWriter();
    out.println(msg);
  }
  protected void doGet(HttpServletRequest request, HttpServletResponse response) throws ServletException, IOException {
    doPost(request,response);
  }
}Start testing
Enter localhost:8888/login.jsp, pop-up window
Represents the successful introduction of js into jsp
Enter the test data in the input box
It is determined by the logic in the Servlet and returns error message
Determined by the logic in the Servlet, success information is returned
Thus, ajax asynchronous requests are initially implemented and the requirements for real-time verification are met
Some small details
1. When using maven to build the project, pay attention to Project Structure -> Facets, set the path of web.xml and webapp here, idea will use
2. When introducing js, pay attention to using relative paths for mapping, and when using ELexpression, turn on isELIgnored="false"·` to avoid no parsing.
I believe you have mastered the method after reading the case in this article. For more exciting information, please pay attention to other related articles on the php Chinese website!
Recommended reading:
Detailed graphic explanation of ajax to implement dynamic pie charts and column charts
Judge ID card and How to write the regular format of bank card number
The above is the detailed content of How to implement real-time verification function in ajax. For more information, please follow other related articles on the PHP Chinese website!

Hot AI Tools

Undresser.AI Undress
AI-powered app for creating realistic nude photos

AI Clothes Remover
Online AI tool for removing clothes from photos.

Undress AI Tool
Undress images for free

Clothoff.io
AI clothes remover

Video Face Swap
Swap faces in any video effortlessly with our completely free AI face swap tool!

Hot Article
Hot Tools

Notepad++7.3.1
Easy-to-use and free code editor

SublimeText3 Chinese version
Chinese version, very easy to use

Zend Studio 13.0.1
Powerful PHP integrated development environment

Dreamweaver CS6
Visual web development tools

SublimeText3 Mac version
God-level code editing software (SublimeText3)
Hot Topics
 1386
1386
 52
52

 How to verify signature in PDF
Feb 18, 2024 pm 05:33 PM
How to verify signature in PDF
Feb 18, 2024 pm 05:33 PM
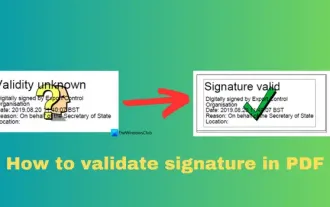
We usually receive PDF files from the government or other agencies, some with digital signatures. After verifying the signature, we see the SignatureValid message and a green check mark. If the signature is not verified, the validity is unknown. Verifying signatures is important, let’s see how to do it in PDF. How to Verify Signatures in PDF Verifying signatures in PDF format makes it more trustworthy and the document more likely to be accepted. You can verify signatures in PDF documents in the following ways. Open the PDF in Adobe Reader Right-click the signature and select Show Signature Properties Click the Show Signer Certificate button Add the signature to the Trusted Certificates list from the Trust tab Click Verify Signature to complete the verification Let
 Detailed method to unblock using WeChat friend-assisted verification
Mar 25, 2024 pm 01:26 PM
Detailed method to unblock using WeChat friend-assisted verification
Mar 25, 2024 pm 01:26 PM
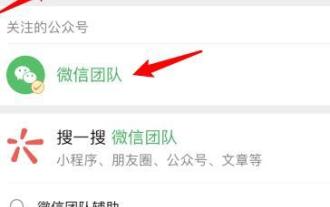
1. After opening WeChat, click the search icon, enter WeChat team, and click the service below to enter. 2. After entering, click the self-service tool option in the lower left corner. 3. After clicking, in the options above, click the option of unblocking/appealing for auxiliary verification.
 How to solve the 403 error encountered by jQuery AJAX request
Feb 20, 2024 am 10:07 AM
How to solve the 403 error encountered by jQuery AJAX request
Feb 20, 2024 am 10:07 AM
Title: Methods and code examples to resolve 403 errors in jQuery AJAX requests. The 403 error refers to a request that the server prohibits access to a resource. This error usually occurs because the request lacks permissions or is rejected by the server. When making jQueryAJAX requests, you sometimes encounter this situation. This article will introduce how to solve this problem and provide code examples. Solution: Check permissions: First ensure that the requested URL address is correct and verify that you have sufficient permissions to access the resource.
 New features in PHP 8: Added verification and signing
Mar 27, 2024 am 08:21 AM
New features in PHP 8: Added verification and signing
Mar 27, 2024 am 08:21 AM
PHP8 is the latest version of PHP, bringing more convenience and functionality to programmers. This version has a special focus on security and performance, and one of the noteworthy new features is the addition of verification and signing capabilities. In this article, we'll take a closer look at these new features and their uses. Verification and signing are very important security concepts in computer science. They are often used to ensure that the data transmitted is complete and authentic. Verification and signatures become even more important when dealing with online transactions and sensitive information because if someone is able to tamper with the data, it could potentially
 How to solve jQuery AJAX request 403 error
Feb 19, 2024 pm 05:55 PM
How to solve jQuery AJAX request 403 error
Feb 19, 2024 pm 05:55 PM
jQuery is a popular JavaScript library used to simplify client-side development. AJAX is a technology that sends asynchronous requests and interacts with the server without reloading the entire web page. However, when using jQuery to make AJAX requests, you sometimes encounter 403 errors. 403 errors are usually server-denied access errors, possibly due to security policy or permission issues. In this article, we will discuss how to resolve jQueryAJAX request encountering 403 error
 PHP and Ajax: Building an autocomplete suggestion engine
Jun 02, 2024 pm 08:39 PM
PHP and Ajax: Building an autocomplete suggestion engine
Jun 02, 2024 pm 08:39 PM
Build an autocomplete suggestion engine using PHP and Ajax: Server-side script: handles Ajax requests and returns suggestions (autocomplete.php). Client script: Send Ajax request and display suggestions (autocomplete.js). Practical case: Include script in HTML page and specify search-input element identifier.
 How to solve the problem of jQuery AJAX error 403?
Feb 23, 2024 pm 04:27 PM
How to solve the problem of jQuery AJAX error 403?
Feb 23, 2024 pm 04:27 PM
How to solve the problem of jQueryAJAX error 403? When developing web applications, jQuery is often used to send asynchronous requests. However, sometimes you may encounter error code 403 when using jQueryAJAX, indicating that access is forbidden by the server. This is usually caused by server-side security settings, but there are ways to work around it. This article will introduce how to solve the problem of jQueryAJAX error 403 and provide specific code examples. 1. to make
 How to get variables from PHP method using Ajax?
Mar 09, 2024 pm 05:36 PM
How to get variables from PHP method using Ajax?
Mar 09, 2024 pm 05:36 PM
Using Ajax to obtain variables from PHP methods is a common scenario in web development. Through Ajax, the page can be dynamically obtained without refreshing the data. In this article, we will introduce how to use Ajax to get variables from PHP methods, and provide specific code examples. First, we need to write a PHP file to handle the Ajax request and return the required variables. Here is sample code for a simple PHP file getData.php:
