Build reusable pagination components with Vue
Paging components are very common components in web projects. Let us use Vue to build reusable paging components. For the basic structure and related event monitoring, please refer to this article.
Resource paging in Web applications is not only Great for performance, but also very useful from a user experience perspective. In this article, learn how to create a dynamic and usable pagination component using Vue.
Basic Structure
The pagination component should allow the user to access the first and last pages, move forward and backward, and switch directly to the close page.
Most applications make an API request every time the user changes a page. We need to make sure that the component allows this, but we don't want to make such a request within the component. This way, we will ensure that components are reusable throughout the application and requests are made in the operation or service layer. We can do this by triggering an event using the number of the page the user clicked on.
There are several possible ways to implement pagination on API endpoints. For this example, we assume that the API tells us the number of results for each page, the total number of pages, and the current page. These will be our dynamic props.
In contrast, if the API only tells the total number of records, then we can calculate the number of pages by dividing the number of results by the number of results per page: totalResults / resultsPerPage .
We want to render a button to the first page, previous page, page number range, next page and last page:
[first] [next] [1] [2 ] [3] [previous] [last]
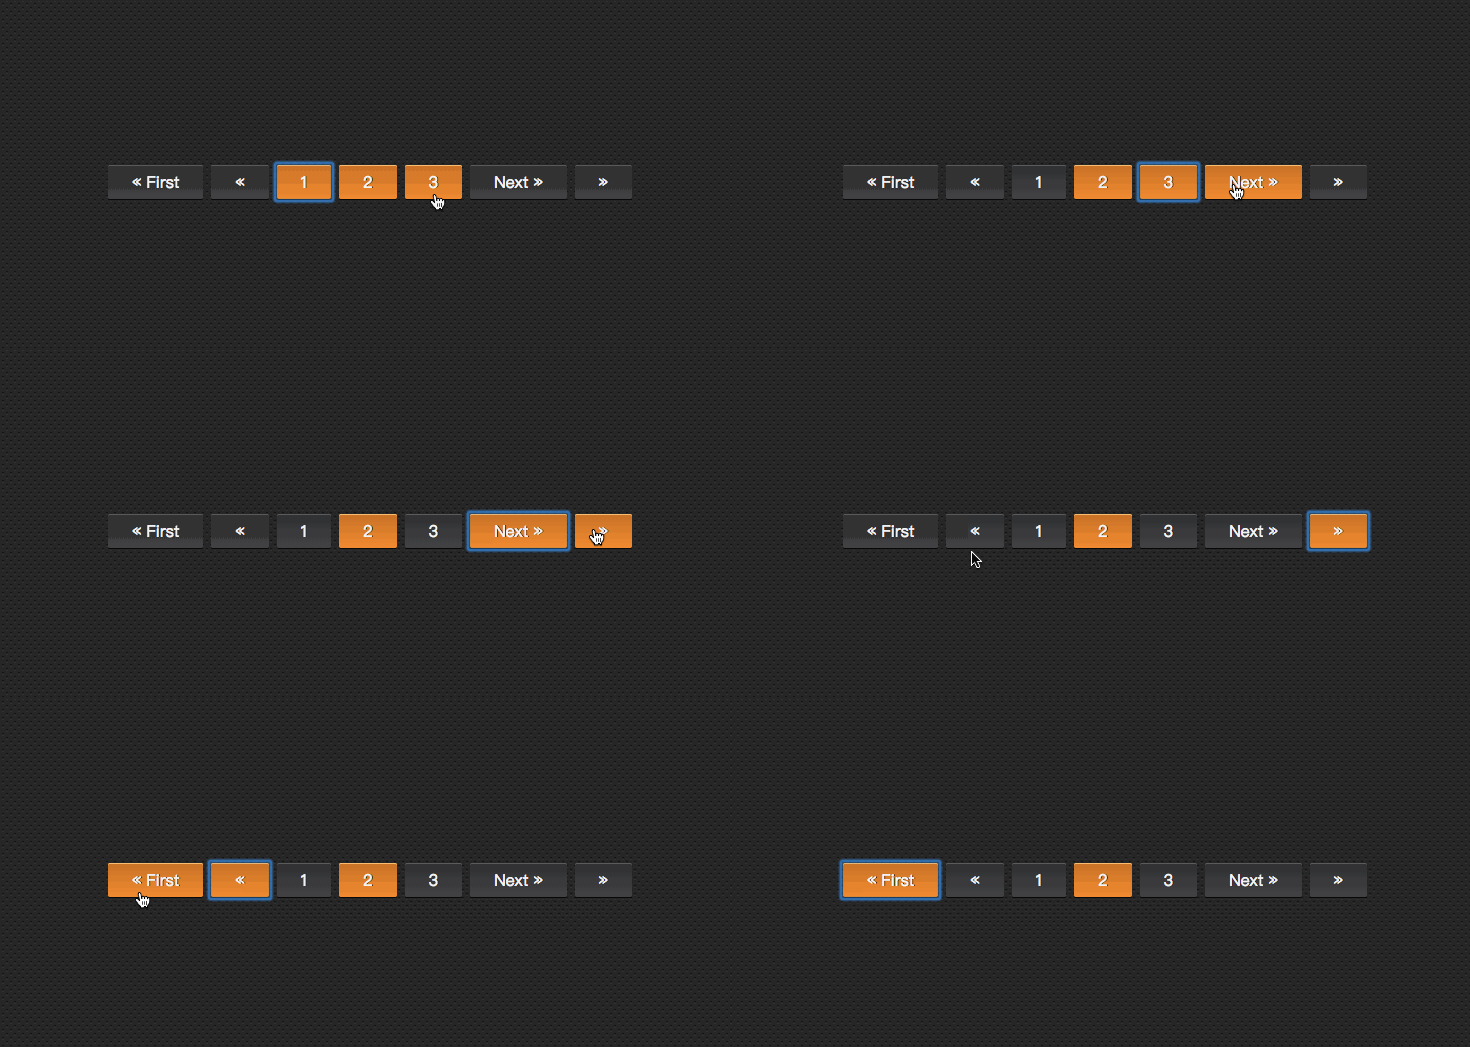
For example, an effect like the picture below:

Although we hope to render a series of pages, but does not want to render all available pages. Let's allow setting a prop for the most visible buttons in our component.
Now that we know what we want the component to do and what data it requires, we can set up the HTML structure and required props.
<template id="pagination">
<ul class="pagination">
<li>
<button type="button">« First</button>
</li>
<li>
<button type="button">«</button>
</li>
<!-- 页数的范围 -->
<li>
<button type="button">Next »</button>
</li>
<li>
<button type="button">»</button>
</li>
</ul>
</template>
Vue.component('pagination', {
template: '#pagination',
props: {
maxVisibleButtons: {
type: Number,
required: false,
default: 3
},
totalPages: {
type: Number,
required: true
},
total: {
type: Number,
required: true
},
currentPage: {
type: Number,
required: true
}
}
})The above code registers a pagination component. If you call this component:
<p id="app">
  <pagination></pagination>
</p>
The effect you see at this time is as follows:

Note, in order to make the component look better , adds a little style to the component.
Event Listening
Now we need to notify the parent component which button the user clicked when the user clicks the button.
We need to add an event listener for each button. The v-on directive allows listening for DOM events. In this example, I'll use the v-on shortcut to listen for click events.
In order to notify the parent node, we will use the $emit method to emit an event with a page click.
We also need to ensure that the paging button only has a current state when the page is available. In order to do this, v-bind will be used to bind the value of the disabled attribute to the current page. We still use the :v-bind shortcut key: .
To keep our template clean, we will use the computed attribute to check if the button is disabled. Using computed is also cached, which means that as long as currentPage does not change, several accesses to the same computed property will return the previously computed result without having to run the function again.
<template id="pagination">
<ul class="pagination">
<li>
<button type="button" @click="onClickFirstPage" :disabled="isInFirstPage">« First</button>
</li>
<li>
<button type="button" @click="onClickPreviousPage" :disabled="isInFirstPage">«</button>
</li>
<li v-for="page in pages">
<button type="button" @click="onClickPage(page.name)" :disabled="page.isDisabled"> {{ page.name }}</button>
</li>
<li>
<button type="button" @click="onClickNextPage" :disabled="isInLastPage">Next »</button>
</li>
<li>
<button type="button" @click="onClickLastPage" :disabled="isInLastPage">»</button>
</li>
</ul>
</template>
Vue.component('pagination', {
template: '#pagination',
props: {
maxVisibleButtons: {
type: Number,
required: false,
default: 3
},
totalPages: {
type: Number,
required: true
},
total: {
type: Number,
required: true
},
currentPage: {
type: Number,
required: true
}
},
computed: {
isInFirstPage: function () {
return this.currentPage === 1
},
isInLastPage: function () {
return this.currentPage === this.totalPages
}
},
methods: {
onClickFirstPage: function () {
this.$emit('pagechanged', 1)
},
onClickPreviousPage: function () {
this.$emit('pagechanged', this.currentPage - 1)
},
onClickPage: function (page) {
this.$emit('pagechanged', page)
},
onClickNextPage: function () {
this.$emit('pagechanged', this.currentPage + 1)
},
onClickLastPage: function () {
this.$emit('pagechanged', this.totalPages)
}
}
})When calling the pagination component, pass totalPages and total and currentPage to the component:
<p id="app">
<pagination :total-pages="11" :total="120" :current-page="currentPage"></pagination>
</p>
let app = new Vue({
el: '#app',
data () {
return {
currentPage: 2
}
}
})When you run the above code, an error will be reported:

It is not difficult to find that in pagination Among the components, we are also missing pages. From what was introduced earlier, we can easily find that we need to calculate the value of pages.
Vue.component('pagination', {
template: '#pagination',
props: {
maxVisibleButtons: {
type: Number,
required: false,
default: 3
},
totalPages: {
type: Number,
required: true
},
total: {
type: Number,
required: true
},
currentPage: {
type: Number,
required: true
}
},
computed: {
isInFirstPage: function () {
return this.currentPage === 1
},
isInLastPage: function () {
return this.currentPage === this.totalPages
},
startPage: function () {
if (this.currentPage === 1) {
return 1
}
if (this.currentPage === this.totalPages) {
return this.totalPages - this.maxVisibleButtons + 1
}
return this.currentPage - 1
},
endPage: function () {
return Math.min(this.startPage + this.maxVisibleButtons - 1, this.totalPages)
},
pages: function () {
const range = []
for (let i = this.startPage; i <= this.endPage; i+=1) {
range.push({
name: i,
isDisabled: i === this.currentPage
})
}
return range
}
},
methods: {
onClickFirstPage: function () {
this.$emit('pagechanged', 1)
},
onClickPreviousPage: function () {
this.$emit('pagechanged', this.currentPage - 1)
},
onClickPage: function (page) {
this.$emit('pagechanged', page)
},
onClickNextPage: function () {
this.$emit('pagechanged', this.currentPage + 1)
},
onClickLastPage: function () {
this.$emit('pagechanged', this.totalPages)
}
}
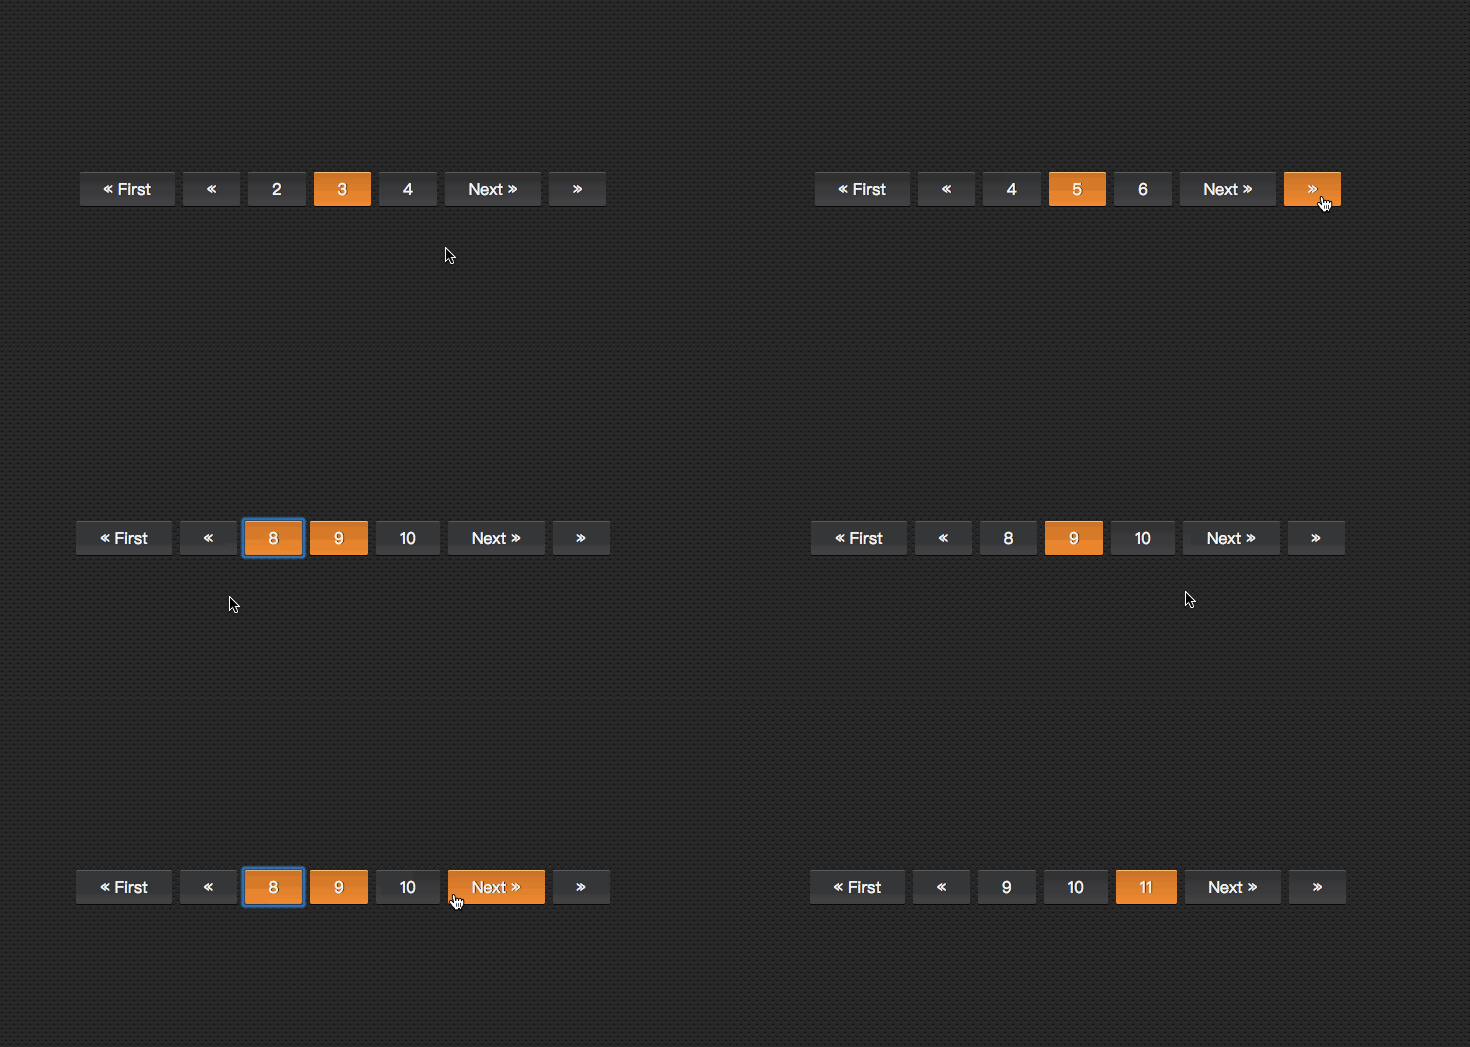
})The result obtained at this time will no longer report an error. You will see the following effect in the browser:

Add styles
Now our component implements all the functionality we originally wanted, and Added some styling to make it look more like a pagination component rather than just a list.
We also want users to be able to clearly identify the page they are on. Let's change the color of the button representing the current page.
To do this, we can use object syntax to bind the HTML class to the current page button. When binding a class name using object syntax, Vue will automatically switch classes when the value changes.
虽然 v-for 中的每个块都可以访问父作用域范围,但是我们将使用 method 来检查页面是否处于 active 状态,以便保持我们的 templage 干净。
Vue.component('pagination', {
template: '#pagination',
props: {
maxVisibleButtons: {
type: Number,
required: false,
default: 3
},
totalPages: {
type: Number,
required: true
},
total: {
type: Number,
required: true
},
currentPage: {
type: Number,
required: true
}
},
computed: {
isInFirstPage: function () {
return this.currentPage === 1
},
isInLastPage: function () {
return this.currentPage === this.totalPages
},
startPage: function () {
if (this.currentPage === 1) {
return 1
}
if (this.currentPage === this.totalPages) {
return this.totalPages - this.maxVisibleButtons + 1
}
return this.currentPage - 1
},
endPage: function () {
return Math.min(this.startPage + this.maxVisibleButtons - 1, this.totalPages)
},
pages: function () {
const range = []
for (let i = this.startPage; i <= this.endPage; i+=1) {
range.push({
name: i,
isDisabled: i === this.currentPage
})
}
return range
}
},
methods: {
onClickFirstPage: function () {
this.$emit('pagechanged', 1)
},
onClickPreviousPage: function () {
this.$emit('pagechanged', this.currentPage - 1)
},
onClickPage: function (page) {
this.$emit('pagechanged', page)
},
onClickNextPage: function () {
this.$emit('pagechanged', this.currentPage + 1)
},
onClickLastPage: function () {
this.$emit('pagechanged', this.totalPages)
},
isPageActive: function (page) {
return this.currentPage === page;
}
}
})接下来,在 pages 中添加当前状态:
<li v-for="page in pages">
  <button type="button" @click="onClickPage(page.name)" :disabled="page.isDisabled" :class="{active: isPageActive(page.name)}"> {{ page.name }}</button>
</li>这个时候你看到效果如下:

但依然还存在一点点小问题,当你在点击别的按钮时, active 状态并不会随着切换:

继续添加代码改变其中的效果:
let app = new Vue({
  el: '#app',
  data () {
    return {
      currentPage: 2
    }
  },
  methods: {
    onPageChange: function (page) {
      console.log(page)
      this.currentPage = page;
    }
  }
})在调用组件时:
<p id="app">
  <pagination :total-pages="11" :total="120" :current-page="currentPage" @pagechanged="onPageChange"></pagination>
</p>
这个时候的效果如下了:

到这里,基本上实现了咱想要的分页组件效果。
无障碍化处理
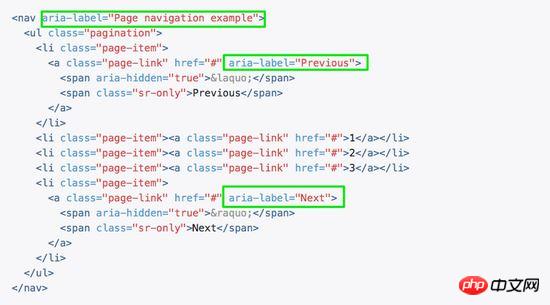
熟悉Bootstrap的同学都应该知道,Bootstrap中的组件都做了无障碍化的处理,就是在组件中添加了WAI-ARIA相关的设计。比如在分页按钮上添加 aria-label 相关属性:

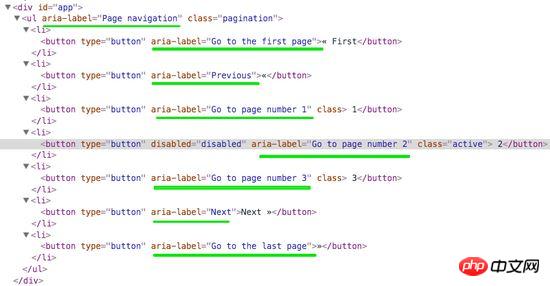
在我们这个组件中,也相应的添加有关于WAI-ARIA相关的处理:
<template id="pagination">
  <ul class="pagination" aria-label="Page navigation">
    <li>
      <button type="button" @click="onClickFirstPage" :disabled="isInFirstPage" aria-label="Go to the first page">« First</button>
    </li>
    <li>
      <button type="button" @click="onClickPreviousPage" :disabled="isInFirstPage" aria-label="Previous">«</button>
    </li>
    <li v-for="page in pages">
      <button type="button" @click="onClickPage(page.name)" :disabled="page.isDisabled" :aria-label="`Go to page number ${page.name}`"> {{ page.name }}</button>
    </li>
    <li>
      <button type="button" @click="onClickNextPage" :disabled="isInLastPage" aria-label="Next">Next »</button>
    </li>
    <li>
      <button type="button" @click="onClickLastPage" :disabled="isInLastPage" aria-label="Go to the last page">»</button>
    </li>
  </ul>
</template>这样有关于 aria 相关的属性就加上了:

最终的效果如下,可以点击下面的连接访问:
相关推荐:
The above is the detailed content of Build reusable pagination components with Vue. For more information, please follow other related articles on the PHP Chinese website!

Hot AI Tools

Undresser.AI Undress
AI-powered app for creating realistic nude photos

AI Clothes Remover
Online AI tool for removing clothes from photos.

Undress AI Tool
Undress images for free

Clothoff.io
AI clothes remover

AI Hentai Generator
Generate AI Hentai for free.

Hot Article

Hot Tools

Notepad++7.3.1
Easy-to-use and free code editor

SublimeText3 Chinese version
Chinese version, very easy to use

Zend Studio 13.0.1
Powerful PHP integrated development environment

Dreamweaver CS6
Visual web development tools

SublimeText3 Mac version
God-level code editing software (SublimeText3)

Hot Topics
 How to install the Windows 10 old version component DirectPlay
Dec 28, 2023 pm 03:43 PM
Many users always encounter some problems when playing some games on win10, such as screen freezes and blurred screens. At this time, we can solve the problem by turning on the directplay function, and the operation method of the function is also Very simple. How to install directplay, the old component of win10 1. Enter "Control Panel" in the search box and open it 2. Select large icons as the viewing method 3. Find "Programs and Features" 4. Click on the left to enable or turn off win functions 5. Select the old version here Just check the box
 How to implement an online speech recognition system using WebSocket and JavaScript
Dec 17, 2023 pm 02:54 PM
How to use WebSocket and JavaScript to implement an online speech recognition system Introduction: With the continuous development of technology, speech recognition technology has become an important part of the field of artificial intelligence. The online speech recognition system based on WebSocket and JavaScript has the characteristics of low latency, real-time and cross-platform, and has become a widely used solution. This article will introduce how to use WebSocket and JavaScript to implement an online speech recognition system.
 WebSocket and JavaScript: key technologies for implementing real-time monitoring systems
Dec 17, 2023 pm 05:30 PM
WebSocket and JavaScript: Key technologies for realizing real-time monitoring systems Introduction: With the rapid development of Internet technology, real-time monitoring systems have been widely used in various fields. One of the key technologies to achieve real-time monitoring is the combination of WebSocket and JavaScript. This article will introduce the application of WebSocket and JavaScript in real-time monitoring systems, give code examples, and explain their implementation principles in detail. 1. WebSocket technology
 How to implement an online reservation system using WebSocket and JavaScript
Dec 17, 2023 am 09:39 AM
How to use WebSocket and JavaScript to implement an online reservation system. In today's digital era, more and more businesses and services need to provide online reservation functions. It is crucial to implement an efficient and real-time online reservation system. This article will introduce how to use WebSocket and JavaScript to implement an online reservation system, and provide specific code examples. 1. What is WebSocket? WebSocket is a full-duplex method on a single TCP connection.
 How to use JavaScript and WebSocket to implement a real-time online ordering system
Dec 17, 2023 pm 12:09 PM
Introduction to how to use JavaScript and WebSocket to implement a real-time online ordering system: With the popularity of the Internet and the advancement of technology, more and more restaurants have begun to provide online ordering services. In order to implement a real-time online ordering system, we can use JavaScript and WebSocket technology. WebSocket is a full-duplex communication protocol based on the TCP protocol, which can realize real-time two-way communication between the client and the server. In the real-time online ordering system, when the user selects dishes and places an order
 Angular components and their display properties: understanding non-block default values
Mar 15, 2024 pm 04:51 PM
The default display behavior for components in the Angular framework is not for block-level elements. This design choice promotes encapsulation of component styles and encourages developers to consciously define how each component is displayed. By explicitly setting the CSS property display, the display of Angular components can be fully controlled to achieve the desired layout and responsiveness.
 How to open the settings of the old version of win10 components
Dec 22, 2023 am 08:45 AM
Win10 old version components need to be turned on by users themselves in the settings, because many components are usually closed by default. First we need to enter the settings. The operation is very simple. Just follow the steps below. Where are the win10 old version components? Open 1. Click Start, then click "Win System" 2. Click to enter the Control Panel 3. Then click the program below 4. Click "Enable or turn off Win functions" 5. Here you can choose what you want to open
 JavaScript and WebSocket: Building an efficient real-time weather forecasting system
Dec 17, 2023 pm 05:13 PM
JavaScript and WebSocket: Building an efficient real-time weather forecast system Introduction: Today, the accuracy of weather forecasts is of great significance to daily life and decision-making. As technology develops, we can provide more accurate and reliable weather forecasts by obtaining weather data in real time. In this article, we will learn how to use JavaScript and WebSocket technology to build an efficient real-time weather forecast system. This article will demonstrate the implementation process through specific code examples. We


