python opencv detects and extracts target color
This time I will bring you python opencv detects and extracts the target color, python opencv detects and extracts the target color. What are the precautions? Here is a practical case, let’s take a look one time.
An example is shown below:
# -*- coding:utf-8 -*-
author = 'kingking'
version = '1.0'
date = '14/07/2017'
import cv2
import numpy as np
import time
if name == 'main':
 Img = cv2.imread('example.png')#读入一幅图像
 kernel_2 = np.ones((2,2),np.uint8)#2x2的卷积核
 kernel_3 = np.ones((3,3),np.uint8)#3x3的卷积核
 kernel_4 = np.ones((4,4),np.uint8)#4x4的卷积核
 if Img is not None:#判断图片是否读入
  HSV = cv2.cvtColor(Img, cv2.COLOR_BGR2HSV)#把BGR图像转换为HSV格式
  '''
  HSV模型中颜色的参数分别是:色调(H),饱和度(S),明度(V)
  下面两个值是要识别的颜色范围
  '''
  Lower = np.array([20, 20, 20])#要识别颜色的下限
  Upper = np.array([30, 255, 255])#要识别的颜色的上限
  #mask是把HSV图片中在颜色范围内的区域变成白色,其他区域变成黑色
  mask = cv2.inRange(HSV, Lower, Upper)
  #下面四行是用卷积进行滤波
  erosion = cv2.erode(mask,kernel_4,iterations = 1)
  erosion = cv2.erode(erosion,kernel_4,iterations = 1)
  dilation = cv2.dilate(erosion,kernel_4,iterations = 1)
  dilation = cv2.dilate(dilation,kernel_4,iterations = 1)
  #target是把原图中的非目标颜色区域去掉剩下的图像
  target = cv2.bitwise_and(Img, Img, mask=dilation)
  #将滤波后的图像变成二值图像放在binary中
  ret, binary = cv2.threshold(dilation,127,255,cv2.THRESH_BINARY)
  #在binary中发现轮廓,轮廓按照面积从小到大排列
  contours, hierarchy = cv2.findContours(binary,cv2.RETR_EXTERNAL,cv2.CHAIN_APPROX_SIMPLE)
  p=0
  for i in contours:#遍历所有的轮廓
   x,y,w,h = cv2.boundingRect(i)#将轮廓分解为识别对象的左上角坐标和宽、高
   #在图像上画上矩形(图片、左上角坐标、右下角坐标、颜色、线条宽度)
   cv2.rectangle(Img,(x,y),(x+w,y+h),(0,255,),3)
   #给识别对象写上标号
   font=cv2.FONT_HERSHEY_SIMPLEX
   cv2.putText(Img,str(p),(x-10,y+10), font, 1,(0,0,255),2)#加减10是调整字符位置
   p +=1
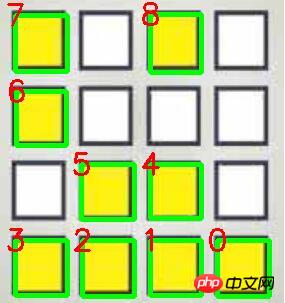
  print '黄色方块的数量是',p,'个'#终端输出目标数量
  cv2.imshow('target', target)
  cv2.imshow('Mask', mask)
  cv2.imshow("prod", dilation)
  cv2.imshow('Img', Img)
  cv2.imwrite('Img.png', Img)#将画上矩形的图形保存到当前目录
 while True:
  Key = chr(cv2.waitKey(15) & 255)
  if Key == 'q':
   cv2.destroyAllWindows()
breakOriginal image

Image saved after processing

I believe you have mastered it after reading the case in this article Method, for more exciting information, please pay attention to other related articles on the php Chinese website!
Recommended reading:
Implementation of python batch reading of images and storing them in the database
In Python3.5 in Window10 How to install opencv
The above is the detailed content of python opencv detects and extracts target color. For more information, please follow other related articles on the PHP Chinese website!

Hot AI Tools

Undresser.AI Undress
AI-powered app for creating realistic nude photos

AI Clothes Remover
Online AI tool for removing clothes from photos.

Undress AI Tool
Undress images for free

Clothoff.io
AI clothes remover

Video Face Swap
Swap faces in any video effortlessly with our completely free AI face swap tool!

Hot Article

Hot Tools

Notepad++7.3.1
Easy-to-use and free code editor

SublimeText3 Chinese version
Chinese version, very easy to use

Zend Studio 13.0.1
Powerful PHP integrated development environment

Dreamweaver CS6
Visual web development tools

SublimeText3 Mac version
God-level code editing software (SublimeText3)

Hot Topics
 1387
1387
 52
52
 Is the vscode extension malicious?
Apr 15, 2025 pm 07:57 PM
VS Code extensions pose malicious risks, such as hiding malicious code, exploiting vulnerabilities, and masturbating as legitimate extensions. Methods to identify malicious extensions include: checking publishers, reading comments, checking code, and installing with caution. Security measures also include: security awareness, good habits, regular updates and antivirus software.
 How to run programs in terminal vscode
Apr 15, 2025 pm 06:42 PM
In VS Code, you can run the program in the terminal through the following steps: Prepare the code and open the integrated terminal to ensure that the code directory is consistent with the terminal working directory. Select the run command according to the programming language (such as Python's python your_file_name.py) to check whether it runs successfully and resolve errors. Use the debugger to improve debugging efficiency.
 Can vs code run in Windows 8
Apr 15, 2025 pm 07:24 PM
VS Code can run on Windows 8, but the experience may not be great. First make sure the system has been updated to the latest patch, then download the VS Code installation package that matches the system architecture and install it as prompted. After installation, be aware that some extensions may be incompatible with Windows 8 and need to look for alternative extensions or use newer Windows systems in a virtual machine. Install the necessary extensions to check whether they work properly. Although VS Code is feasible on Windows 8, it is recommended to upgrade to a newer Windows system for a better development experience and security.
 Can visual studio code be used in python
Apr 15, 2025 pm 08:18 PM
VS Code can be used to write Python and provides many features that make it an ideal tool for developing Python applications. It allows users to: install Python extensions to get functions such as code completion, syntax highlighting, and debugging. Use the debugger to track code step by step, find and fix errors. Integrate Git for version control. Use code formatting tools to maintain code consistency. Use the Linting tool to spot potential problems ahead of time.
 Choosing Between PHP and Python: A Guide
Apr 18, 2025 am 12:24 AM
PHP is suitable for web development and rapid prototyping, and Python is suitable for data science and machine learning. 1.PHP is used for dynamic web development, with simple syntax and suitable for rapid development. 2. Python has concise syntax, is suitable for multiple fields, and has a strong library ecosystem.
 Can vscode be used for mac
Apr 15, 2025 pm 07:36 PM
VS Code is available on Mac. It has powerful extensions, Git integration, terminal and debugger, and also offers a wealth of setup options. However, for particularly large projects or highly professional development, VS Code may have performance or functional limitations.
 PHP and Python: Different Paradigms Explained
Apr 18, 2025 am 12:26 AM
PHP is mainly procedural programming, but also supports object-oriented programming (OOP); Python supports a variety of paradigms, including OOP, functional and procedural programming. PHP is suitable for web development, and Python is suitable for a variety of applications such as data analysis and machine learning.
 Can vscode run ipynb
Apr 15, 2025 pm 07:30 PM
The key to running Jupyter Notebook in VS Code is to ensure that the Python environment is properly configured, understand that the code execution order is consistent with the cell order, and be aware of large files or external libraries that may affect performance. The code completion and debugging functions provided by VS Code can greatly improve coding efficiency and reduce errors.


