How to configure and install Anaconda in win
This time I will show you how to configure and installAnaconda in win. What are the precautions for configuring and installing Anaconda in win? The following is a practical case, let’s take a look together. take a look.
1. Download anaconda
The first step is of course to download anaconda. To download from the official website, you need to use Thunder to quickly
Select the appropriate one Just download the version
In addition to the installation location, there are two other places that need to be confirmed during the download process.
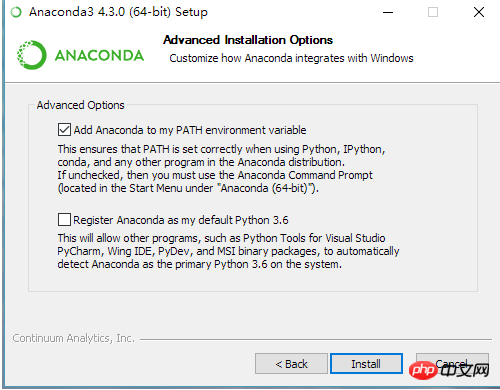
The first check is whether to add Anaconda to the environment Variables, which involves whether you can use conda, jupyter, ipython and other commands directly in cmd , it is recommended to check it. If you don’t check it, it won’t be a big problem. You can use the command line tool provided by Anaconda to operate it later. The second is whether to set Python 3.6 provided by Anaconda as the default Python version of the system. This depends on yourself. Let's do it, it's not a big problem.
After the installation is complete, you can open cmd to test the installation results.
Enter python, ipython, conda, jupyter notebook and other commands respectively, and you will see the corresponding results, indicating that the installation is successful. (python is to enter the python interactive command line; ipython is to enter the ipython interactive command line, which is very powerful; conda is the configuration command of Anaconda; jupyter notebook will start the ipython notebook on the Web side)
What you need to pay attention to is the jupyter notebook command The jupyter service will be started locally on the computer with the default configuration. We will talk about this later.
After Anaconda is successfully installed, we need to modify its package management image to a domestic source.
2. Configure the mirror address, otherwise it will be too slow to download the upgrade file from the official website
After the installation is completed, find the Anaconda prompt, add the mirror address, and complete the configuration:
conda config --add channels https://mirrors.tuna.tsinghua.edu.cn/anaconda/pkgs/free/
conda config --set show_channel_urls yes
On Windows, a number of applications are installed with Anaconda:
Anaconda Navigator, which is a GUI for managing environments and packages
-
Anaconda Prompt terminal, which allows you to use the command line interface to manage environments and packages
Spyder, it is an IDE for scientific development
In order to avoid errors, I recommend updating all packages in the default environment. Open Anaconda Prompt (or the terminal under Mac), type:
conda upgrade --all
and enter y (Yes) when prompted to update. Updates continue. The version of the software package installed for the first time is generally relatively old, so updating in advance can avoid unnecessary problems in the future.
Managing Packages
After installing Anaconda, managing packages is quite simple. To install a package, type conda install package_name in the terminal. For example, to install numpy, type conda install numpy.
You can also install multiple packages at the same time. A command like conda install numpy scipy pandas will install all these packages at the same time. You can also specify the desired package version by adding the version number (e.g. conda install numpy=1.10).
Conda will also automatically install dependencies for you. For example, scipy depends on numpy because it uses and requires numpy. If you only install scipy (conda install scipy), conda will also install numpy if it is not already installed.
Most commands are very intuitive. To uninstall a package, use conda remove package_name. To update a package, use conda update package_name. If you want to update all packages in the environment (which is often useful), use conda update --all. Finally, to list installed packages, use the conda list mentioned earlier.
If you don’t know the exact name of the package you are looking for, you can try searching using conda search search_term . For example, I know I want to install Beautiful Soup, but I don't know the exact package name. So I tried executing conda search beautifulsoup.
Search beautifulsoup
It returns a list of available Beautiful Soup packages and lists the corresponding package name beautifulsoup4.
Manage Environments
As mentioned before, you can use conda to create environments to isolate projects. To create an environment, use conda create -n env_name list of packages in the terminal. Here, -n env_name sets the name of the environment (-n refers to the name), and list of packages is the list of packages to be installed in the environment. For example, to create an environment named my_env and install numpy in it, type conda create -n my_env numpy.

#When you create an environment, you can specify the Python version to be installed in the environment. This is useful when you are working with code from both Python 2.x and Python 3.x. To create an environment with a specific Python version, type a command similar to conda create -n py3 python=3 or conda create -n py2 python=2 . I actually created both environments on my personal computer. I use them as a general-purpose environment that is not tied to any specific project, for common work (easily working with every Python version). These commands will install the latest versions of Python 3 and Python 2 respectively. To install a specific version (such as Python 3.3), use conda create -n py python=3.3.
Enter the environment
After creating the environment, use source activate my_env to enter the environment on OSX/Linux. On Windows, use activate my_env.
After entering the environment, you will see the environment name in the terminal prompt, it will be similar to (my_env) ~ $. There are only a few default packages installed in the environment, as well as the packages you installed when you created it. You can check this using conda list. The command to install the package in the environment is the same as before: conda install package_name. This time, however, the specific packages you install are only available once you're in the environment. To leave the environment, type source deactivate (on OSX/Linux). On Windows, use deactivate.
Saving and Loading Environments
Shared Environments This feature is really useful, it allows others to install all the packages used in your code and ensure that these packages The version is correct. You can use conda env export > environment.yaml to save the package as YAML. The first part of the command, conda env export, prints the names of all packages in the environment (including Python versions).
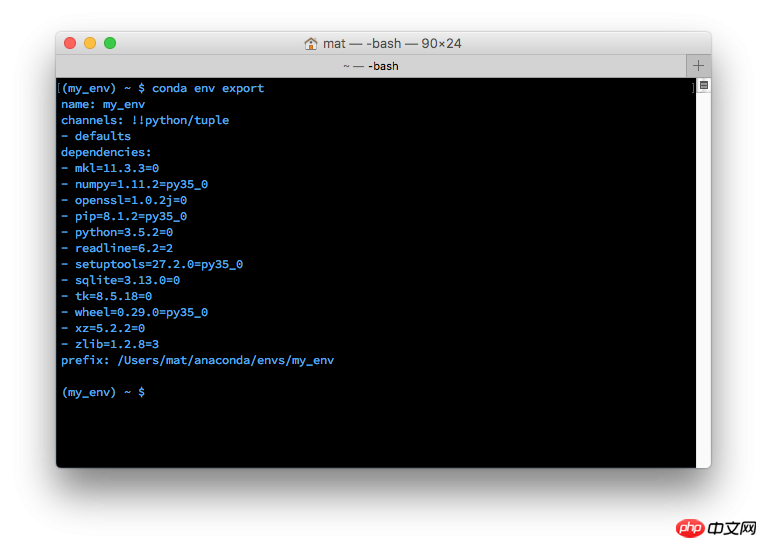
Output the exported environment to the terminal
In the above picture, you can see the name of the environment and all dependencies and their versions. The second part of the export command > environment.yaml writes the exported text to the YAML file environment.yaml. This file can now be shared and used by others to create the same environment as your project.
To create an environment from an environment file, use conda env create -f environment.yaml. This creates a new environment with the same libraries listed in environment.yaml.
List the environment
If you forget the name of the environment (I sometimes do), you can use conda env list List the environment you created All environments. You'll see a list of environments, and there will be an asterisk next to the environment you're currently in. The default environment (that is, the environment used when you are not in the selected environment) is named root.
Delete environment
If you no longer use certain environments, you can use conda env remove -n env_name Delete the specified environment (here named env_name).
Using Environment
One thing that helps me a lot is that I have separate environments for Python 2 and Python 3. I used conda create -n py2 python=2 and conda create -n py3 python=3 to create two independent environments, py2 and py3. Now I have a common environment for each Python version. In all of these environments, I have most of the standard data science packages installed (numpy, scipy, pandas, etc.).
I also find it useful to create an environment for each project I work on. This is also useful for non-data related projects such as web apps developed using Flask. For example, I created an environment for my personal blog (using Pelican).
Shared environment
When sharing code on GitHub, it's a good idea to also create environment files and include them in the code repository. This makes it easier for others to install all of your code's dependencies. For those not using conda, I also typically export and include a pip requirements.txt file using pip freeze (learn more here).
Continue to add one more point:
The configuration is complete and you can play happily.
Input: conda list Check which packages are installed
Test it:
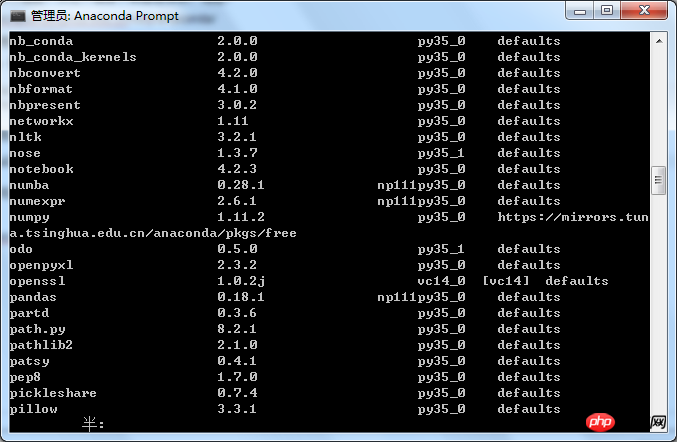
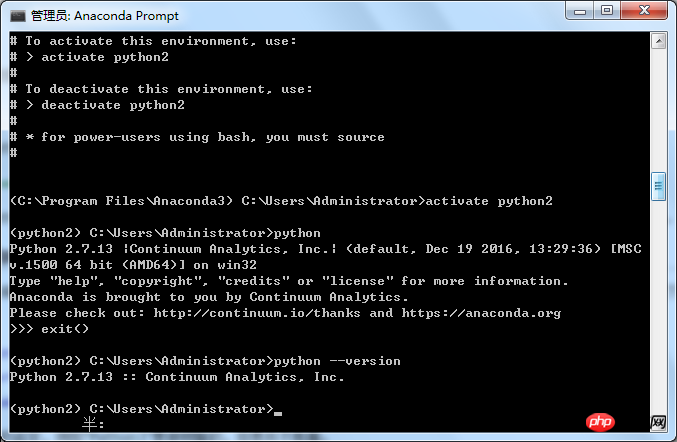
Switch the current environment:
Currently it is python3. If you switch to 2.7, enter
conda create -n python2 python=2.7
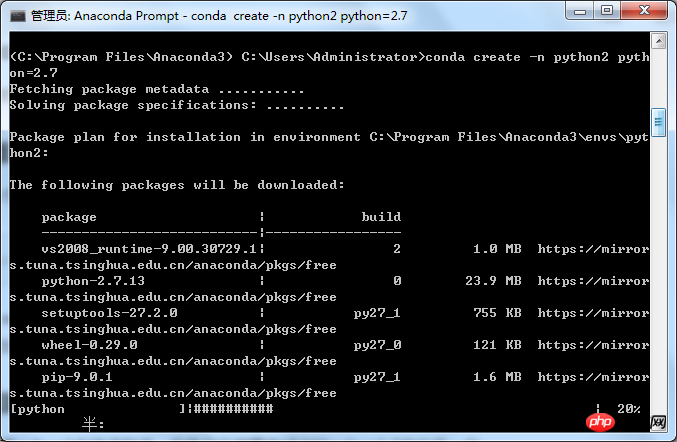
Input:
activate python2
Complete environment switching
Supplement:
Conda common commands
View the environment under the current system
conda info -e
Create a new environment
# Specify the python version as 2.7
conda create -n python2 python=2.7
# Install necessary packages at the same time
conda create -n python2 numpy matplotlib python=2.7
Environment switching
# Under linux/Mac, you need to use source activate python2
activate python2
#Exit the environment
deactivate python2
Remove environment
conda remove -n python2 --all
I believe you have mastered the method after reading the case in this article. For more exciting information, please pay attention to other related matters on the php Chinese website article!
Recommended reading:
Python operation matrix rows and columns
Python operation excel read and write data
unittest coverageHow to perform unit test coverage
The above is the detailed content of How to configure and install Anaconda in win. For more information, please follow other related articles on the PHP Chinese website!

Hot AI Tools

Undresser.AI Undress
AI-powered app for creating realistic nude photos

AI Clothes Remover
Online AI tool for removing clothes from photos.

Undress AI Tool
Undress images for free

Clothoff.io
AI clothes remover

Video Face Swap
Swap faces in any video effortlessly with our completely free AI face swap tool!

Hot Article

Hot Tools

Notepad++7.3.1
Easy-to-use and free code editor

SublimeText3 Chinese version
Chinese version, very easy to use

Zend Studio 13.0.1
Powerful PHP integrated development environment

Dreamweaver CS6
Visual web development tools

SublimeText3 Mac version
God-level code editing software (SublimeText3)

Hot Topics
 1386
1386
 52
52
 Solution to the problem that Win11 system cannot install Chinese language pack
Mar 09, 2024 am 09:48 AM
Solution to the problem that Win11 system cannot install Chinese language pack With the launch of Windows 11 system, many users began to upgrade their operating system to experience new functions and interfaces. However, some users found that they were unable to install the Chinese language pack after upgrading, which troubled their experience. In this article, we will discuss the reasons why Win11 system cannot install the Chinese language pack and provide some solutions to help users solve this problem. Cause Analysis First, let us analyze the inability of Win11 system to
 Unable to install guest additions in VirtualBox
Mar 10, 2024 am 09:34 AM
You may not be able to install guest additions to a virtual machine in OracleVirtualBox. When we click on Devices>InstallGuestAdditionsCDImage, it just throws an error as shown below: VirtualBox - Error: Unable to insert virtual disc C: Programming FilesOracleVirtualBoxVBoxGuestAdditions.iso into ubuntu machine In this post we will understand what happens when you What to do when you can't install guest additions in VirtualBox. Unable to install guest additions in VirtualBox If you can't install it in Virtua
 What should I do if Baidu Netdisk is downloaded successfully but cannot be installed?
Mar 13, 2024 pm 10:22 PM
If you have successfully downloaded the installation file of Baidu Netdisk, but cannot install it normally, it may be that there is an error in the integrity of the software file or there is a problem with the residual files and registry entries. Let this site take care of it for users. Let’s introduce the analysis of the problem that Baidu Netdisk is successfully downloaded but cannot be installed. Analysis of the problem that Baidu Netdisk downloaded successfully but could not be installed 1. Check the integrity of the installation file: Make sure that the downloaded installation file is complete and not damaged. You can download it again, or try to download the installation file from another trusted source. 2. Turn off anti-virus software and firewall: Some anti-virus software or firewall programs may prevent the installation program from running properly. Try disabling or exiting the anti-virus software and firewall, then re-run the installation
 How to install Android apps on Linux?
Mar 19, 2024 am 11:15 AM
Installing Android applications on Linux has always been a concern for many users. Especially for Linux users who like to use Android applications, it is very important to master how to install Android applications on Linux systems. Although running Android applications directly on Linux is not as simple as on the Android platform, by using emulators or third-party tools, we can still happily enjoy Android applications on Linux. The following will introduce how to install Android applications on Linux systems.
 Understand Linux Bashrc: functions, configuration and usage
Mar 20, 2024 pm 03:30 PM
Understanding Linux Bashrc: Function, Configuration and Usage In Linux systems, Bashrc (BourneAgainShellruncommands) is a very important configuration file, which contains various commands and settings that are automatically run when the system starts. The Bashrc file is usually located in the user's home directory and is a hidden file. Its function is to customize the Bashshell environment for the user. 1. Bashrc function setting environment
 How to install Podman on Ubuntu 24.04
Mar 22, 2024 am 11:26 AM
If you have used Docker, you must understand daemons, containers, and their functions. A daemon is a service that runs in the background when a container is already in use in any system. Podman is a free management tool for managing and creating containers without relying on any daemon such as Docker. Therefore, it has advantages in managing containers without the need for long-term backend services. Additionally, Podman does not require root-level permissions to be used. This guide discusses in detail how to install Podman on Ubuntu24. To update the system, we first need to update the system and open the Terminal shell of Ubuntu24. During both installation and upgrade processes, we need to use the command line. a simple
 How to Install and Run the Ubuntu Notes App on Ubuntu 24.04
Mar 22, 2024 pm 04:40 PM
While studying in high school, some students take very clear and accurate notes, taking more notes than others in the same class. For some, note-taking is a hobby, while for others, it is a necessity when they easily forget small information about anything important. Microsoft's NTFS application is particularly useful for students who wish to save important notes beyond regular lectures. In this article, we will describe the installation of Ubuntu applications on Ubuntu24. Updating the Ubuntu System Before installing the Ubuntu installer, on Ubuntu24 we need to ensure that the newly configured system has been updated. We can use the most famous "a" in Ubuntu system
 Detailed steps to install Go language on Win7 computer
Mar 27, 2024 pm 02:00 PM
Detailed steps to install Go language on Win7 computer Go (also known as Golang) is an open source programming language developed by Google. It is simple, efficient and has excellent concurrency performance. It is suitable for the development of cloud services, network applications and back-end systems. . Installing the Go language on a Win7 computer allows you to quickly get started with the language and start writing Go programs. The following will introduce in detail the steps to install the Go language on a Win7 computer, and attach specific code examples. Step 1: Download the Go language installation package and visit the Go official website


