

vue custom select built-in component

This article mainly introduces the relevant knowledge of vue's custom built-in component select. Now I will share it with you. For specific example codes, please refer to this article
1. Integrated third-party jQuery plug-in (select2 )
##
<!DOCTYPE html>
<html>
<head>
<meta charset="UTF-8">
<title></title>
<link rel="stylesheet" href="js/select2/select2.min.css" />
<style>
html, body {
font: 13px/18px sans-serif;
}
select {
min-width: 300px;
}
</style>
</head>
<body>
<p id="el">
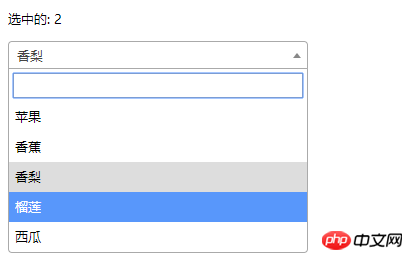
<p>选中的: {{ selected }}</p>
<select2 :options="options" v-model="selected"></select2>
</p>
<script src="js/jQuery-2.1.4.min.js"></script>
<script src="js/select2/select2.min.js"></script>
<script src="http://cdnjs.cloudflare.com/ajax/libs/vue/2.1.3/vue.js"></script>
<script>
Vue.component('select2', {
props: ['options', 'value'],
template: '<select><slot></slot></select>',
mounted: function () {
var vm = this;// init select2
$(this.$el).select2({ data: this.options }).val(this.value).trigger('change').on('change', function () {
// emit event on change.
vm.$emit('input', this.value)
})
},
watch: {
value: function (value) {
// update value
$(this.$el).val(value).trigger('change')
},
options: function (options) {
// update options
$(this.$el).empty().select2({ data: options })
}
},
destroyed: function () {
$(this.$el).off().select2('destroy')
}
})
var vm = new Vue({
el: '#el',
data: {
selected: 2,
options: [
{ id: 0, text: '苹果' },
{ id: 1, text: '香蕉' },
{ id: 2, text: '香梨' },
{ id: 3, text: '榴莲' },
{ id: 4, text: '西瓜' }
]
}
})
</script>
</body>
</html>2.Simple select

<!DOCTYPE html>
<html lang="en">
<head>
<meta charset="utf-8">
<style>
*{
padding: 0;
margin: 0;
}
ul,li {
list-style: none;
}
li {
line-height: 2em;
}
li:hover {
background-color: #f9f9f9;
border-radius:5px;
cursor: pointer;
}
input{
cursor:pointer;
outline:none;
}
#app {
margin-top: 20px;
}
#app h2 {
text-align: center;
}
.wrap {
background-color: rgba(56, 170, 214, 0.45);
border-radius: 20px;
width: 300px;
margin: 40px;
padding: 20px;
}
input[type="button"] {
font-size:14px;
margin-left:2px;
padding:2px 5px;
background-color:rgb(228, 33, 33);
color:white;
border:1px solid rgb(228, 33, 33);
border-radius:5px;
}
.clearFix {
padding-left:
}
input.keyWord {
border: 1px solid #777777;
border-radius: 10px;
height: 30px;
width: 80%;
padding-left: 10px;
font-size: 16px;
}
ul.list {
margin: 20px 0;
}
ul.list li {
padding: 10px 0 0 10px;
}
</style>
</head>
<body>
<p id="app">
<p style="float: left;">
<h2>自定义下拉框</h2>
<custom-select btn-value="查询" v-bind:list="list1"></custom-select>
</p>
<p style="float: left;">
<h2>自定义下拉框2</h2>
<custom-select btn-value="搜索" v-bind:list="list2"></custom-select>
</p>
</p>
<p id="app1">
<custom-select></custom-select>
</p>
<script src="http://cdnjs.cloudflare.com/ajax/libs/vue/2.1.3/vue.js"></script>
<script>
Vue.component("custom-select",{
data(){
return {
selectShow:false,
val:""
}
},
props:["btnValue","list"],
template:`<section class="wrap">
<p class="searchIpt clearFix">
<p class="clearFix">
<input type="text" class="keyWord" :value="val" @click="selectShow = !selectShow" />
<input type="button" :value="btnValue" />
<span></span>
</p>
<custom-list
v-show="selectShow"
:list="list"
v-on:receive="changeValueHandle"
>
</custom-list>
</p>
</section>`,
methods:{
changeValueHandle(value){
this.val = value;
}
}
});
Vue.component("custom-list",{
props:["list"],
template:`<ul class="list">
<li v-for="item in list" @click="selectValueHandle(item)">{{item}}
</li>
</ul>`,
methods:{
selectValueHandle:function(item){
this.$emit("receive",item)
}
}
})
new Vue({
el:"#app",
data:{
list1:['北京','上海','广州','杭州'],
list2:['17-01-11','17-02-11','17-03-11','17-04-11'],
}
})
</script>
</body>
</html>
Vue select component usage and disabling implementation code
Vue single component implements unlimited level multi-select menu function
The above is the detailed content of vue custom select built-in component. For more information, please follow other related articles on the PHP Chinese website!

Hot AI Tools

Undresser.AI Undress
AI-powered app for creating realistic nude photos

AI Clothes Remover
Online AI tool for removing clothes from photos.

Undress AI Tool
Undress images for free

Clothoff.io
AI clothes remover

AI Hentai Generator
Generate AI Hentai for free.

Hot Article
Hot Tools

Notepad++7.3.1
Easy-to-use and free code editor

SublimeText3 Chinese version
Chinese version, very easy to use

Zend Studio 13.0.1
Powerful PHP integrated development environment

Dreamweaver CS6
Visual web development tools

SublimeText3 Mac version
God-level code editing software (SublimeText3)
Hot Topics
 1359
1359
 52
52

 How to quickly set up a custom avatar in Netflix
Feb 19, 2024 pm 06:33 PM
How to quickly set up a custom avatar in Netflix
Feb 19, 2024 pm 06:33 PM
An avatar on Netflix is a visual representation of your streaming identity. Users can go beyond the default avatar to express their personality. Continue reading this article to learn how to set a custom profile picture in the Netflix app. How to quickly set a custom avatar in Netflix In Netflix, there is no built-in feature to set a profile picture. However, you can do this by installing the Netflix extension on your browser. First, install a custom profile picture for the Netflix extension on your browser. You can buy it in the Chrome store. After installing the extension, open Netflix on your browser and log into your account. Navigate to your profile in the upper right corner and click
 How to install the Windows 10 old version component DirectPlay
Dec 28, 2023 pm 03:43 PM
How to install the Windows 10 old version component DirectPlay
Dec 28, 2023 pm 03:43 PM
Many users always encounter some problems when playing some games on win10, such as screen freezes and blurred screens. At this time, we can solve the problem by turning on the directplay function, and the operation method of the function is also Very simple. How to install directplay, the old component of win10 1. Enter "Control Panel" in the search box and open it 2. Select large icons as the viewing method 3. Find "Programs and Features" 4. Click on the left to enable or turn off win functions 5. Select the old version here Just check the box
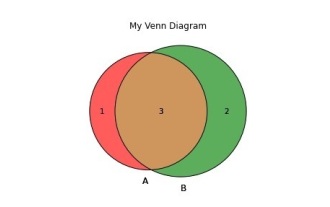 How to create and customize Venn diagrams in Python?
Sep 14, 2023 pm 02:37 PM
How to create and customize Venn diagrams in Python?
Sep 14, 2023 pm 02:37 PM
A Venn diagram is a diagram used to represent relationships between sets. To create a Venn diagram we will use matplotlib. Matplotlib is a commonly used data visualization library in Python for creating interactive charts and graphs. It is also used to create interactive images and charts. Matplotlib provides many functions to customize charts and graphs. In this tutorial, we will illustrate three examples to customize Venn diagrams. The Chinese translation of Example is: Example This is a simple example of creating the intersection of two Venn diagrams; first, we imported the necessary libraries and imported venns. Then we create the dataset as a Python set, after that we use the "venn2()" function to create
 How to customize shortcut key settings in Eclipse
Jan 28, 2024 am 10:01 AM
How to customize shortcut key settings in Eclipse
Jan 28, 2024 am 10:01 AM
How to customize shortcut key settings in Eclipse? As a developer, mastering shortcut keys is one of the keys to improving efficiency when coding in Eclipse. As a powerful integrated development environment, Eclipse not only provides many default shortcut keys, but also allows users to customize them according to their own preferences. This article will introduce how to customize shortcut key settings in Eclipse and give specific code examples. Open Eclipse First, open Eclipse and enter
 The operation process of edius custom screen layout
Mar 27, 2024 pm 06:50 PM
The operation process of edius custom screen layout
Mar 27, 2024 pm 06:50 PM
1. The picture below is the default screen layout of edius. The default EDIUS window layout is a horizontal layout. Therefore, in a single-monitor environment, many windows overlap and the preview window is in single-window mode. 2. You can enable [Dual Window Mode] through the [View] menu bar to make the preview window display the playback window and recording window at the same time. 3. You can restore the default screen layout through [View menu bar>Window Layout>General]. In addition, you can also customize the layout that suits you and save it as a commonly used screen layout: drag the window to a layout that suits you, then click [View > Window Layout > Save Current Layout > New], and in the pop-up [Save Current Layout] Layout] enter the layout name in the small window and click OK
 Angular components and their display properties: understanding non-block default values
Mar 15, 2024 pm 04:51 PM
Angular components and their display properties: understanding non-block default values
Mar 15, 2024 pm 04:51 PM
The default display behavior for components in the Angular framework is not for block-level elements. This design choice promotes encapsulation of component styles and encourages developers to consciously define how each component is displayed. By explicitly setting the CSS property display, the display of Angular components can be fully controlled to achieve the desired layout and responsiveness.
 How to open the settings of the old version of win10 components
Dec 22, 2023 am 08:45 AM
How to open the settings of the old version of win10 components
Dec 22, 2023 am 08:45 AM
Win10 old version components need to be turned on by users themselves in the settings, because many components are usually closed by default. First we need to enter the settings. The operation is very simple. Just follow the steps below. Where are the win10 old version components? Open 1. Click Start, then click "Win System" 2. Click to enter the Control Panel 3. Then click the program below 4. Click "Enable or turn off Win functions" 5. Here you can choose what you want to open
 How to customize x-axis and y-axis in excel? (How to customize excel axis scale)
Mar 14, 2024 pm 02:10 PM
How to customize x-axis and y-axis in excel? (How to customize excel axis scale)
Mar 14, 2024 pm 02:10 PM
In an excel table, sometimes you may need to insert coordinate axes to see the changing trend of the data more intuitively. Some friends still don’t know how to insert coordinate axes in the table. Next, I will share with you how to customize the coordinate axis scale in Excel. Coordinate axis insertion method: 1. In the excel interface, select the data. 2. In the insertion interface, click to insert a column chart or bar chart. 3. In the expanded interface, select the graphic type. 4. In the right-click interface of the table, click Select Data. 5. In the expanded interface, you can customize it.
