

The content shared with you in this article is about interviews: writing a two-way data binding for Vue has certain reference value. Friends in need can refer to it
In the current front-end interview, Vue's two-way data binding has become a very easy point to learn. Even if you can't write it out on the spot, you must at least be able to explain the principle. In this article, I will write an example of two-way data binding based on vue. Let's call it myVue. Combined with the comments, I hope everyone can gain something. (Recommended: vue interview questions2020)
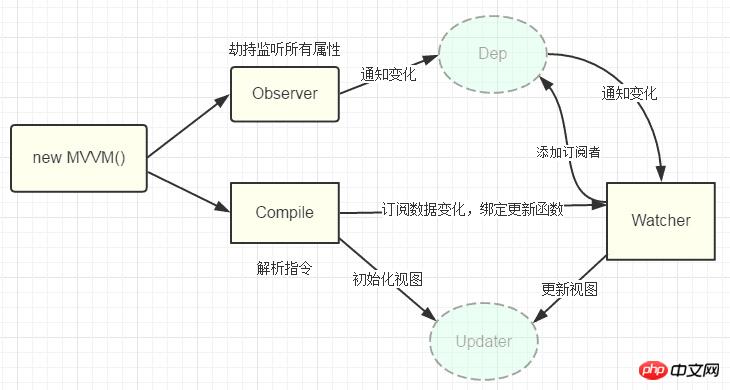
I believe everyone is familiar with the principle of Vue’s two-way data binding, mainly through The defineProperty attribute of the Object object is implemented by rewriting the set and get functions of data. I won’t describe the principle too much here, just implement an instance. In order to make the code clearer, only the most basic content will be implemented here, mainly implementing the three commands v-model, v-bind and v-click. Other commands can also be supplemented by yourself.
Add a picture from the Internet
page structure is very simple, as follows
<p id="app">
    <form>
      <input type="text"  v-model="number">
      <button type="button" v-click="increment">增加</button>
    </form>
    <h3 v-bind="number"></h3>
</p>Contains:
 1. 一个input,使用v-model指令
 2. 一个button,使用v-click指令
 3. 一个h3,使用v-bind指令。
We will finally use our two-way data binding in a way similar to vue, adding comments combined with our data structure
var app = new myVue({
      el:'#app',
      data: {
        number: 0
      },
      methods: {
        increment: function() {
          this.number ++;
        },
      }
})First we need to define A myVue constructor:
function myVue(options) {

}In order to initialize this constructor, add an _init attribute to it
function myVue(options) {
  this._init(options);
}
myVue.prototype._init = function (options) {
    this.$options = options;  // options 为上面使用时传入的结构体,包括el,data,methods
    this.$el = document.querySelector(options.el); // el是 #app, this.$el是id为app的Element元素
    this.$data = options.data; // this.$data = {number: 0}
    this.$methods = options.methods;  // this.$methods = {increment: function(){}}
}Next implement the _obverse function, process the data, and rewrite the set and data of the data get function
And transform the _init function
 myVue.prototype._obverse = function (obj) { // obj = {number: 0}
    var value;
    for (key in obj) {  //遍历obj对象
      if (obj.hasOwnProperty(key)) {
        value = obj[key];
        if (typeof value === 'object') {  //如果值还是对象,则遍历处理
          this._obverse(value);
        }
        Object.defineProperty(this.$data, key, {  //关键
          enumerable: true,
          configurable: true,
          get: function () {
            console.log(`获取${value}`);
            return value;
          },
          set: function (newVal) {
            console.log(`更新${newVal}`);
            if (value !== newVal) {
              value = newVal;
            }
          }
        })
      }
    }
  }

 myVue.prototype._init = function (options) {
    this.$options = options;
    this.$el = document.querySelector(options.el);
    this.$data = options.data;
    this.$methods = options.methods;

    this._obverse(this.$data);
}Next we write an instruction class Watcher to bind the update function to update the DOM elements
function Watcher(name, el, vm, exp, attr) {
    this.name = name;         //指令名称,例如文本节点,该值设为"text"
    this.el = el;             //指令对应的DOM元素
    this.vm = vm;             //指令所属myVue实例
    this.exp = exp;           //指令对应的值,本例如"number"
    this.attr = attr;         //绑定的属性值,本例为"innerHTML"

    this.update();
  }

  Watcher.prototype.update = function () {
    this.el[this.attr] = this.vm.$data[this.exp]; //比如 H3.innerHTML = this.data.number; 当number改变时,
    会触发这个update函数,保证对应的DOM内容进行了更新。
}Update _init function and _obverse function
myVue.prototype._init = function (options) {
    //...
    this._binding = {};   //_binding保存着model与view的映射关系,也就是我们前面定义的Watcher的实例。
    当model改变时,我们会触发其中的指令类更新,保证view也能实时更新
    //...
  }

  myVue.prototype._obverse = function (obj) {
    //...
      if (obj.hasOwnProperty(key)) {
        this._binding[key] = {    // 按照前面的数据,_binding = {number: _directives: []}
          _directives: []
        };
        //...
        var binding = this._binding[key];
        Object.defineProperty(this.$data, key, {
          //...
          set: function (newVal) {
            console.log(`更新${newVal}`);
            if (value !== newVal) {
              value = newVal;
              binding._directives.forEach(function (item) {  // 当number改变时,
              触发_binding[number]._directives 中的绑定的Watcher类的更新
                item.update();
              })
            }
          }
        })
      }
    }
}So how to bind the view to the model? Next, we define a _compile function to parse our instructions (v-bind, v-model, v-clickde), etc., and bind the view and model in the process.
myVue.prototype._init = function (options) {
//...
this._complie(this.$el);
}
myVue.prototype._complie = function (root) { root 为 id为app的Element元素,也就是我们的根元素
var _this = this;
var nodes = root.children;
for (var i = 0; i < nodes.length; i++) {
var node = nodes[i];
if (node.children.length) { // 对所有元素进行遍历,并进行处理
this._complie(node);
}
if (node.hasAttribute('v-click')) { // 如果有v-click属性,我们监听它的onclick事件,触发increment事件,
即number++
node.onclick = (function () {
var attrVal = nodes[i].getAttribute('v-click');
return _this.$methods[attrVal].bind(_this.$data);
//bind是使data的作用域与method函数的作用域保持一致
})();
}
if (node.hasAttribute('v-model') && (node.tagName = 'INPUT' || node.tagName == 'TEXTAREA')) {
// 如果有v-model属性,并且元素是INPUT或者TEXTAREA,我们监听它的input事件
node.addEventListener('input', (function(key) {
var attrVal = node.getAttribute('v-model');
//_this._binding['number']._directives = [一个Watcher实例]
// 其中Watcher.prototype.update = function () {
// node['vaule'] = _this.$data['number']; 这就将node的值保持与number一致
// }
_this._binding[attrVal]._directives.push(new Watcher(
'input',
node,
_this,
attrVal,
'value'
))
return function() {
_this.$data[attrVal] = nodes[key].value; // 使number 的值与 node的value保持一致,
已经实现了双向绑定
}
})(i));
}
if (node.hasAttribute('v-bind')) { // 如果有v-bind属性,我们只要使node的值及时更新为data中number的值即可
var attrVal = node.getAttribute('v-bind');
_this._binding[attrVal]._directives.push(new Watcher(
'text',
node,
_this,
attrVal,
'innerHTML'
))
}
}
}So far, we have implemented a simple two-way binding function of vue, including three instructions: v-bind, v-model, and v-click. The effect is as shown below

myVue <p id="app"> <form> <input type="text" v-model="number"> <button type="button" v-click="increment">增加</button> </form> <h3 v-bind="number"></h3> </p> <script> function myVue(options) { this._init(options); } myVue.prototype._init = function (options) { this.$options = options; this.$el = document.querySelector(options.el); this.$data = options.data; this.$methods = options.methods; this._binding = {}; this._obverse(this.$data); this._complie(this.$el); } myVue.prototype._obverse = function (obj) { var value; for (key in obj) { if (obj.hasOwnProperty(key)) { this._binding[key] = { _directives: [] }; value = obj[key]; if (typeof value === 'object') { this._obverse(value); } var binding = this._binding[key]; Object.defineProperty(this.$data, key, { enumerable: true, configurable: true, get: function () { console.log(`获取${value}`); return value; }, set: function (newVal) { console.log(`更新${newVal}`); if (value !== newVal) { value = newVal; binding._directives.forEach(function (item) { item.update(); }) } } }) } } } myVue.prototype._complie = function (root) { var _this = this; var nodes = root.children; for (var i = 0; i < nodes.length; i++) { var node = nodes[i]; if (node.children.length) { this._complie(node); } if (node.hasAttribute('v-click')) { node.onclick = (function () { var attrVal = nodes[i].getAttribute('v-click'); return _this.$methods[attrVal].bind(_this.$data); })(); } if (node.hasAttribute('v-model') && (node.tagName = 'INPUT' || node.tagName == 'TEXTAREA')) { node.addEventListener('input', (function(key) { var attrVal = node.getAttribute('v-model'); _this._binding[attrVal]._directives.push(new Watcher( 'input', node, _this, attrVal, 'value' )) return function() { _this.$data[attrVal] = nodes[key].value; } })(i)); } if (node.hasAttribute('v-bind')) { var attrVal = node.getAttribute('v-bind'); _this._binding[attrVal]._directives.push(new Watcher( 'text', node, _this, attrVal, 'innerHTML' )) } } } function Watcher(name, el, vm, exp, attr) { this.name = name; //指令名称,例如文本节点,该值设为"text" this.el = el; //指令对应的DOM元素 this.vm = vm; //指令所属myVue实例 this.exp = exp; //指令对应的值,本例如"number" this.attr = attr; //绑定的属性值,本例为"innerHTML" this.update(); } Watcher.prototype.update = function () { this.el[this.attr] = this.vm.$data[this.exp]; } window.onload = function() { var app = new myVue({ el:&#39;#app&#39;, data: { number: 0 }, methods: { increment: function() { this.number ++; }, } }) } </script>
js code to implement vue two-way data binding example
Vue two-way data binding source code analysis
Exploration on the principle of vue two-way data binding
The above is the detailed content of About the interview: Write a two-way data binding for Vue. For more information, please follow other related articles on the PHP Chinese website!


![[Web front-end] Node.js quick start](https://img.php.cn/upload/course/000/000/067/662b5d34ba7c0227.png)


