

node combined with swig rendering template

The content shared with you in this article is about node combined with swig rendering template. It has certain reference value. Friends in need can refer to it.
Here is a summary of how nodejs applies swig template. Let’s look at some basic usage.
First of all, of course, we use the express framework to build services on the node background.
var express = require('express');
var server = express();

server.listen(8080,'localhost',(req,res)=>{
     console.log('服务器启动...');
})After the startup is successful, start setting up the relevant configuration of the swig template. The specific code is as follows:
npm install swig -s
After successful installation, add swig configuration, the code is as follows:
//配置摸板引擎
var swig = require('swig');
//参数1,摸板引擎的名称,固定字段
//参数2,摸板引擎的方法
server.engine('html',swig.renderFile);
//摸板引擎存放目录的关键字,固定字段
//实际存在的目录,html文件就在html文件夹下面
server.set('views',__dirname+'/html');
//注册摸板引擎,固定字段
server.set('view engine','html');
//关闭swig缓存,缓存的目的也是提高node服务器的响应速度
swig.setDefaults({cache:false});Configure the data that needs to be rendered:
server.get('/',(req,res)=>{
    //render方法只有在使用摸板引擎之后才会生效,其中 参数1是需要渲染的摸板名称,参数2就是需要渲染到页面的一些参数
    res.render('temp',{
        name:'张三',
        user:{
            name:'栗子',
            age:18
        },
        lists:['item1','item2','item3','item4','item5',
        'item6','item7','item8','item9','item10','item11','item12',
        'item13','item14','item15','item16','item17','item18','item19',
        'item20','item21','item22','item23','item24','item25','item26']
    });
})The specific code of the html file is as follows:
<!DOCTYPE html>
<html lang="en">
<head>
<meta charset="UTF-8">
<meta name="viewport" content="width=device-width, initial-scale=1.0">
<meta http-equiv="X-UA-Compatible" content="ie=edge">
<title>Document</title>
</head>
<body>
<p>摸板引擎</p>
<!-- {{}} 插值表达式-->
姓名:<p>{{name}}</p>
{% if user.name == '栗子' && user.age == '18'%}
姓名:<p>栗子</p>
{% elseif user.name == '张三'%}
<p>张三</p>
{% endif %}
<p>遍历数组</p>
{% for items in lists%}
<li>items</li>
{% endfor %}
<!-- 页面上面设置数据 -->
{% set arr = [1,2,3,4,5]%}
<p>{{arr.length}}</p>
<!-- 如何引入页面-->
{% include './common.html' %}
</body>
</html>Specific page The display is as follows: 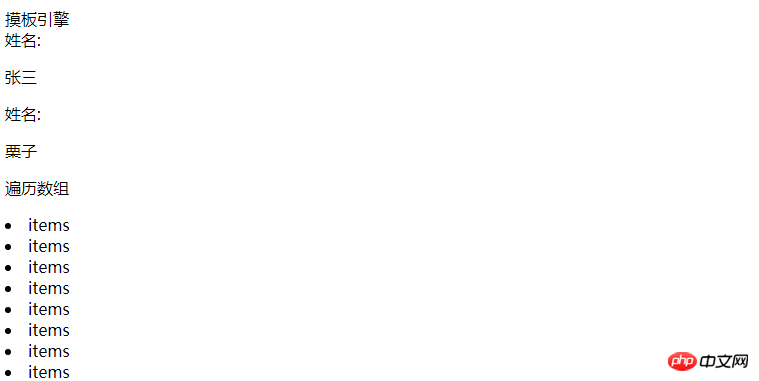
#The above describes how to use the swig template engine to pass parameters to page rendering. Let’s take a look at how to use swig to extract the public parts of html:
Public parts of the html page, such as header, public js css files, navigation bar, etc.
Set a public page:
<header>
<title>node</title>
<!-- css占位符主要用来显示其他页面的个性化的css文件,例如home.css about.css -->
{% block css%}
{% endblock %}
<link rel="stylesheet" href="/static/css/layout.css">
</header>
<!-- 所以页面公共的导航栏 -->
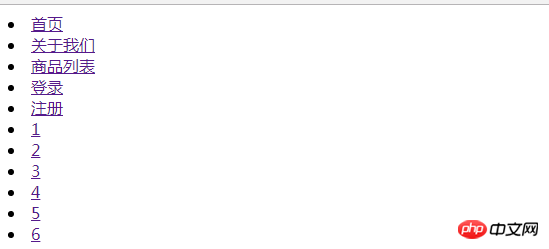
<nav>
<li><a href="">首页</a></li>
<li><a href="">关于我们</a></li>
<li><a href="">商品列表</a></li>
<li><a href="">登录</a></li>
<li><a href="">注册</a></li>
</nav>
<!-- content占位符主要用来显示其他页面的个性化的内容显示,不同的页面有不同的显示方式 -->
{% block content%}
{% endblock %}
<!-- js占位符主要用来显示其他页面的个性化的js文件,例如home.js about.js -->
{% block js%}
{% endblock %}
<script src="/static/js/layout.js"></script>home.html
<!-- 继承所有页面公共的页面模块layout.html -->
{% extends './layout.html'%}
{% block css %}
<link rel="stylesheet" href="/static/css/home.css">
{% endblock %}
{% block content %}
<li><a href="">1</a></li>
<li><a href="">2</a></li>
<li><a href="">3</a></li>
<li><a href="">4</a></li>
<li><a href="">5</a></li>
<li><a href="">6</a></li>
{% endblock %}
{% block js %}
<script src="/static/js/home.js"></script>
{% endblock %}When started node server, when rendering the home page, you will see
server.get('/',(req,res)=>{
    res.render('www/home',{});
})
node implementation is based on Token authentication
Example details how node.js obtains SQL Server database
The above is the detailed content of node combined with swig rendering template. For more information, please follow other related articles on the PHP Chinese website!

Hot AI Tools

Undresser.AI Undress
AI-powered app for creating realistic nude photos

AI Clothes Remover
Online AI tool for removing clothes from photos.

Undress AI Tool
Undress images for free

Clothoff.io
AI clothes remover

AI Hentai Generator
Generate AI Hentai for free.

Hot Article
Hot Tools

Notepad++7.3.1
Easy-to-use and free code editor

SublimeText3 Chinese version
Chinese version, very easy to use

Zend Studio 13.0.1
Powerful PHP integrated development environment

Dreamweaver CS6
Visual web development tools

SublimeText3 Mac version
God-level code editing software (SublimeText3)
Hot Topics
 1386
1386
 52
52

 How to delete node in nvm
Dec 29, 2022 am 10:07 AM
How to delete node in nvm
Dec 29, 2022 am 10:07 AM
How to delete node with nvm: 1. Download "nvm-setup.zip" and install it on the C drive; 2. Configure environment variables and check the version number through the "nvm -v" command; 3. Use the "nvm install" command Install node; 4. Delete the installed node through the "nvm uninstall" command.
 How to use express to handle file upload in node project
Mar 28, 2023 pm 07:28 PM
How to use express to handle file upload in node project
Mar 28, 2023 pm 07:28 PM
How to handle file upload? The following article will introduce to you how to use express to handle file uploads in the node project. I hope it will be helpful to you!
 How to render orthogonal top view in Kujiale_Tutorial on rendering orthogonal top view in Kujiale
Apr 02, 2024 pm 01:10 PM
How to render orthogonal top view in Kujiale_Tutorial on rendering orthogonal top view in Kujiale
Apr 02, 2024 pm 01:10 PM
1. First open the design plan to be rendered in Kujiale. 2. Then open top view rendering under the rendering menu. 3. Then click Orthogonal in the parameter settings in the top view rendering interface. 4. Finally, after adjusting the model angle, click Render Now to render the orthogonal top view.
 An in-depth analysis of Node's process management tool 'pm2”
Apr 03, 2023 pm 06:02 PM
An in-depth analysis of Node's process management tool 'pm2”
Apr 03, 2023 pm 06:02 PM
This article will share with you Node's process management tool "pm2", and talk about why pm2 is needed, how to install and use pm2, I hope it will be helpful to everyone!
 Pi Node Teaching: What is a Pi Node? How to install and set up Pi Node?
Mar 05, 2025 pm 05:57 PM
Pi Node Teaching: What is a Pi Node? How to install and set up Pi Node?
Mar 05, 2025 pm 05:57 PM
Detailed explanation and installation guide for PiNetwork nodes This article will introduce the PiNetwork ecosystem in detail - Pi nodes, a key role in the PiNetwork ecosystem, and provide complete steps for installation and configuration. After the launch of the PiNetwork blockchain test network, Pi nodes have become an important part of many pioneers actively participating in the testing, preparing for the upcoming main network release. If you don’t know PiNetwork yet, please refer to what is Picoin? What is the price for listing? Pi usage, mining and security analysis. What is PiNetwork? The PiNetwork project started in 2019 and owns its exclusive cryptocurrency Pi Coin. The project aims to create a one that everyone can participate
 Is vue page rendering synchronous or asynchronous?
Dec 13, 2022 pm 07:26 PM
Is vue page rendering synchronous or asynchronous?
Dec 13, 2022 pm 07:26 PM
Vue page rendering is asynchronous. Vue uses asynchronous rendering, which can improve performance; if asynchronous updates are not used, the current component will be re-rendered every time the data is updated. For performance reasons, Vue will asynchronously update the view after this round of data updates.
 What to do if npm node gyp fails
Dec 29, 2022 pm 02:42 PM
What to do if npm node gyp fails
Dec 29, 2022 pm 02:42 PM
npm node gyp fails because "node-gyp.js" does not match the version of "Node.js". The solution is: 1. Clear the node cache through "npm cache clean -f"; 2. Through "npm install -g n" Install the n module; 3. Install the "node v12.21.0" version through the "n v12.21.0" command.
 Token-based authentication with Angular and Node
Sep 01, 2023 pm 02:01 PM
Token-based authentication with Angular and Node
Sep 01, 2023 pm 02:01 PM
Authentication is one of the most important parts of any web application. This tutorial discusses token-based authentication systems and how they differ from traditional login systems. By the end of this tutorial, you will see a fully working demo written in Angular and Node.js. Traditional Authentication Systems Before moving on to token-based authentication systems, let’s take a look at traditional authentication systems. The user provides their username and password in the login form and clicks Login. After making the request, authenticate the user on the backend by querying the database. If the request is valid, a session is created using the user information obtained from the database, and the session information is returned in the response header so that the session ID is stored in the browser. Provides access to applications subject to
