 Web Front-end
 JS Tutorial
 Illustration of the working principles and processes of WebGL and Three.js
Illustration of the working principles and processes of WebGL and Three.js
The content of this article is to illustrate the working principles and processes of WebGL and Three.js. It has certain reference value. Friends in need can refer to it
1. What do we talk about?
Let’s talk about two things:
1. What is the working principle behind WebGL?
2. Taking Three.js as an example, what role does the framework play behind the scenes?
2. Why do we need to understand the principle?
We assume that you already have a certain understanding of WebGL, or have done something with Three.js. At this time, you may encounter some of the following problems:
1. Many things still cannot be done. I don’t even have any ideas;
2. I can’t solve the bugs and even have no direction;
3. There are performance problems and I don’t know how to optimize them at all.
At this time, we need to know more.
3. First understand a basic concept
1. What is a matrix?
Simply put, the matrix is used for coordinate transformation, as shown below: 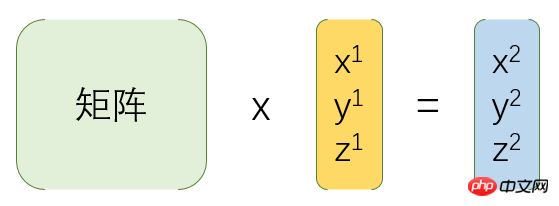
#2. How is it transformed, as shown below: 
3. For example, translate the coordinates by 2, as shown below: 
If you still don’t understand at this time , it doesn’t matter, you just need to know that the matrix is used for coordinate transformation.
4. Working Principle of WebGL
4.1. WebGL API
Before understanding a new technology, we will first look at its development Documentation or API.
Looking at the Canvas drawing API, we will find that it can draw straight lines, rectangles, circles, arcs, and Bezier curves.
So, we looked at the WebGL drawing API and found: 
It can only understand points, lines, and triangles? I must have read it wrong.
No, you read that right. 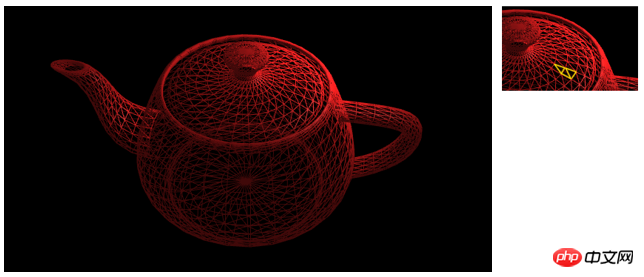
Even such a complex model is drawn one by one.
4.2. WebGL drawing process
Simply put, the WebGL drawing process includes the following three steps:
1. Obtaining vertex coordinates
2. Graph elements Assembly (that is, drawing triangles one by one)
3. Rasterization (generating fragments, that is, pixels one by one)
Next, we will explain each step step by step.
4.2.1. Obtaining vertex coordinates
Where do the vertex coordinates come from? A cube is fine, but what if it’s a robot?
Yes, we will not write these coordinates one by one.
Often it comes from 3D software export, or frame generation, as shown below: 
What is the write buffer area?
Yes, in order to simplify the process, I did not introduce it before.
Since vertex data is often in the thousands, after obtaining the vertex coordinates, we usually store it in the video memory, that is, the cache area, so that the GPU can read it faster.
4.2.2. Primitive assembly
We already know that primitive assembly is to generate primitives (i.e. triangles) from vertices. Is this process completed automatically? The answer is not entirely.
In order to give us higher controllability, that is, free control of vertex positions, WebGL gives us this power. This is the programmable rendering pipeline (no need to understand).
WebGL requires us to process the vertices first, so how to deal with it? Let’s take a look at the picture below: 
We have introduced a new term called "vertex shader", which is written by opengl es and defined by javascript in the form of a string and passed to GPU generation.
For example, the following is a vertex shader code:
|
1 2 3 4 |
attribute vec4 position;
void main() {
  gl_Position = position;
}
Copy after login |
attribute修饰符用于声明由浏览器(javascript)传输给顶点着色器的变量值;
position即我们定义的顶点坐标;
gl_Position是一个内建的传出变量。
这段代码什么也没做,如果是绘制2d图形,没问题,但如果是绘制3d图形,即传入的顶点坐标是一个三维坐标,我们则需要转换成屏幕坐标。
比如:v(-0.5, 0.0, 1.0)转换为p(0.2, -0.4),这个过程类似我们用相机拍照。
4.2.2.1、顶点着色器处理流程
回到刚才的话题,顶点着色器是如何处理顶点坐标的呢?
如上图,顶点着色器会先将坐标转换完毕,然后由GPU进行图元装配,有多少顶点,这段顶点着色器程序就运行了多少次。
你可能留意到,这时候顶点着色器变为:
1 2 3 4 5 | attribute vec4 position;
uniform mat4 matrix;
void main() {
gl_Position = position * matrix;
}Copy after login |
这就是应用了矩阵matrix,将三维世界坐标转换成屏幕坐标,这个矩阵叫投影矩阵,由javascript传入,至于这个matrix怎么生成,我们暂且不讨论。
4.2.3、光栅化
和图元装配类似,光栅化也是可控的。
在图元生成完毕之后,我们需要给模型“上色”,而完成这部分工作的,则是运行在GPU的“片元着色器”来完成。
它同样是一段opengl es程序,模型看起来是什么质地(颜色、漫反射贴图等)、灯光等由片元着色器来计算。
如下是一段简单的片元着色器代码:
1 2 3 4 | precision mediump float;
void main(void) {
gl_FragColor = vec4(1.0, 1.0, 1.0, 1.0);
}Copy after login |
gl_FragColor is the output color value.
4.2.3.1. Fragment shader processing flow
How does the fragment shader control color generation? 
As shown above, the vertex shader is how many vertices it has and how many times it has been run, while the fragment shader is how many fragments (pixels) it has generated and how many times it has been run.
4.3. The complete workflow of WebGL
So far, in essence, WebGL has gone through the following processing flow:
1. Preparing data stage
At this stage, we need to provide vertex coordinates, indexes (triangle drawing order), uv (determines texture coordinates), normals (determines lighting effects), and various matrices (such as projection matrices).
The vertex data is stored in the buffer area (because the number is huge) and is passed to the vertex shader with the modifier attribute;
The matrix is passed to the vertex shader with the modifier uniform.
2. Generate a vertex shader
According to our needs, define a string of vertex shader (opengl es) program in Javascript, generate and compile it into a shader program and pass it to the GPU.
3. Primitive assembly
The GPU executes the vertex shader program one by one according to the number of vertices, generates the final coordinates of the vertices, and completes the coordinate conversion.
4. Generate fragment shader
What color is the model, what texture does it look like, lighting effects, and shadows (the process is more complicated and needs to be rendered to the texture first, so you don’t need to pay attention to it yet) , are all processed at this stage.
5. Rasterization
can pass the fragment shader. We have determined the color of each fragment and determined which fragments are blocked based on the depth buffer area. No rendering is required. , and finally store the fragment information in the color buffer area, and finally complete the entire rendering.
5. What exactly does Three.js do?
We know that three.js has helped us accomplish many things, but what exactly does it do, and what role does it play in the entire process?
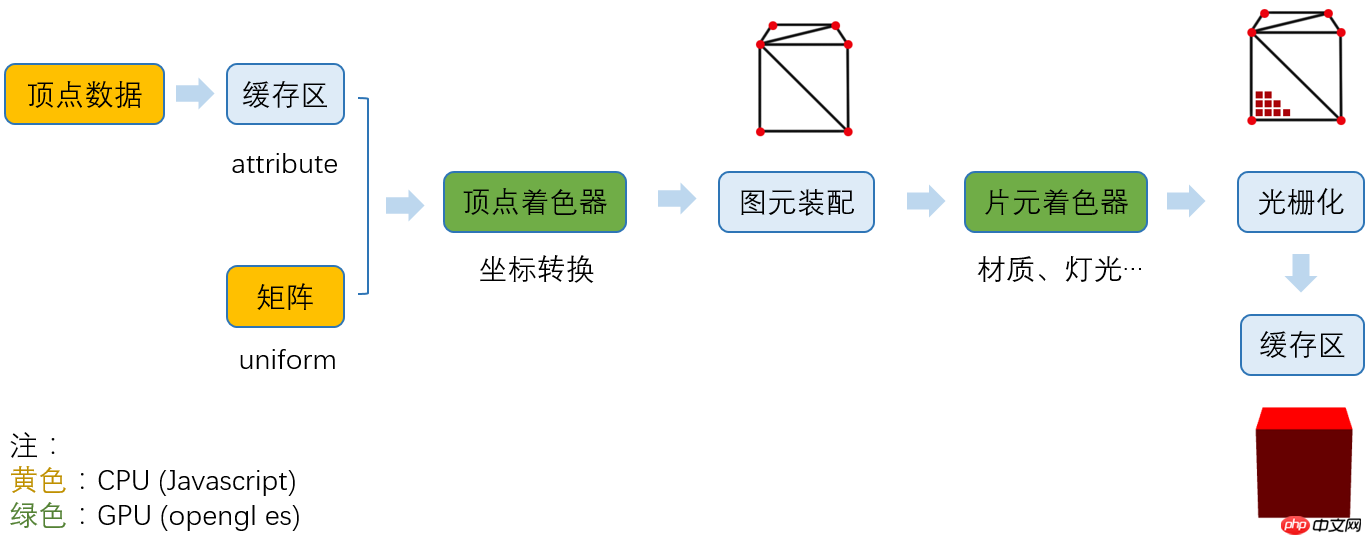
Let’s take a brief look at the process three.js participates in: 
The yellow and green parts are the parts three.js participates in , where yellow is the javascript part and green is the opengl es part.
We found that three.js basically did everything for us.
辅助我们导出了模型数据;
自动生成了各种矩阵;
生成了顶点着色器;
辅助我们生成材质,配置灯光;
根据我们设置的材质生成了片元着色器。
而且将webGL基于光栅化的2D API,封装成了我们人类能看懂的 3D API。
5.1、Three.js顶点处理流程
从WebGL工作原理的章节中,我们已经知道了顶点着色器会将三维世界坐标转换成屏幕坐标,但实际上,坐标转换不限于投影矩阵。
如下图:
之前WebGL在图元装配之后的结果,由于我们认为模型是固定在坐标原点,并且相机在x轴和y轴坐标都是0,其实正常的结果是这样的:
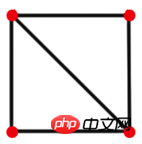
5.1.1、模型矩阵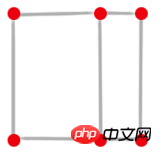
现在,我们将模型顺时针旋转Math.PI/6,所有顶点位置肯定都变化了。
1 | box.rotation.y = Math.PI/6; Copy after login |
但是,如果我们直接将顶点位置用javascript计算出来,那性能会很低(顶点通常成千上万),而且,这些数据也非常不利于维护。
所以,我们用矩阵modelMatrix将这个旋转信息记录下来。
5.1.2、视图矩阵
然后,我们将相机往上偏移30。
1 | camera.position.y = 30; Copy after login |
同理,我们用矩阵viewMatrix将移动信息记录下来。
5.1.3、投影矩阵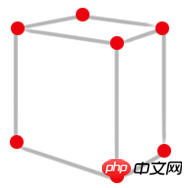
这是我们之前介绍过的了,我们用projectMatrix记录。
5.1.4、应用矩阵
然后,我们编写顶点着色器:
1 | gl_Position = position * modelMatrix * viewMatrix * projectionMatrix; Copy after login |
In this way, we calculate the final vertex position in the GPU.
Actually, three.js has completed all the above steps for us. 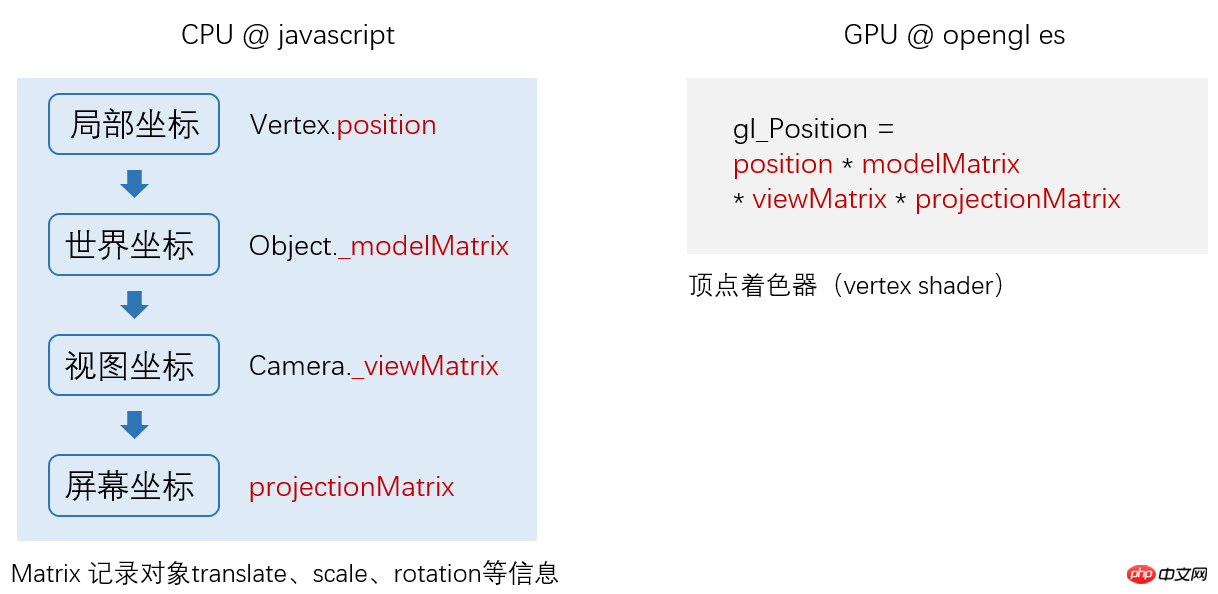
5.2. Fragment shader processing flow
We already know that the fragment shader is responsible for processing materials, lighting and other information, but specifically How to deal with it?
As shown below: 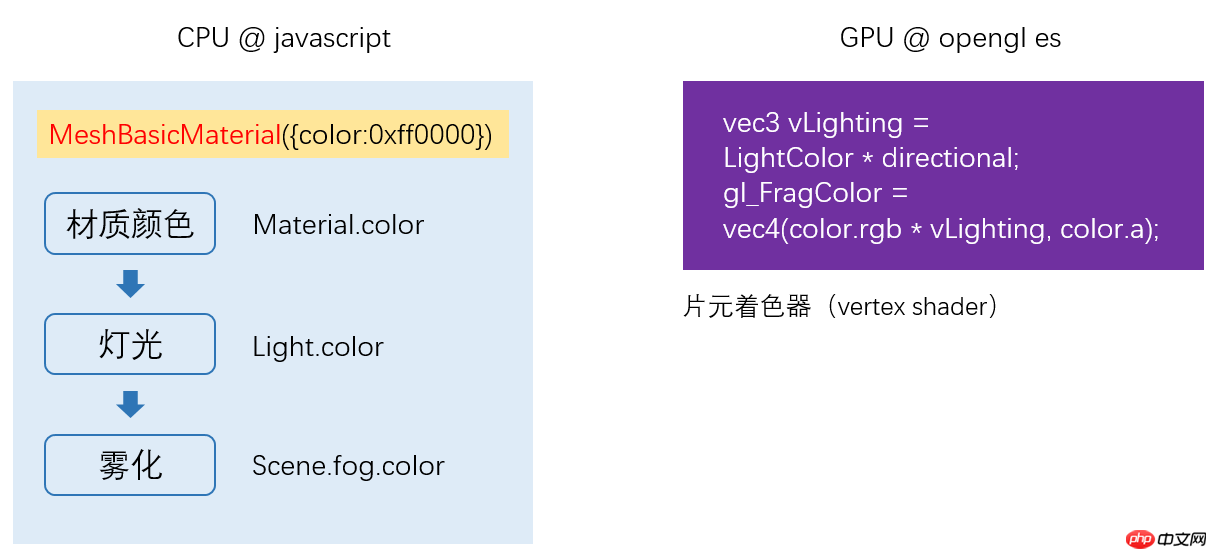
5.3, three.js complete running process:
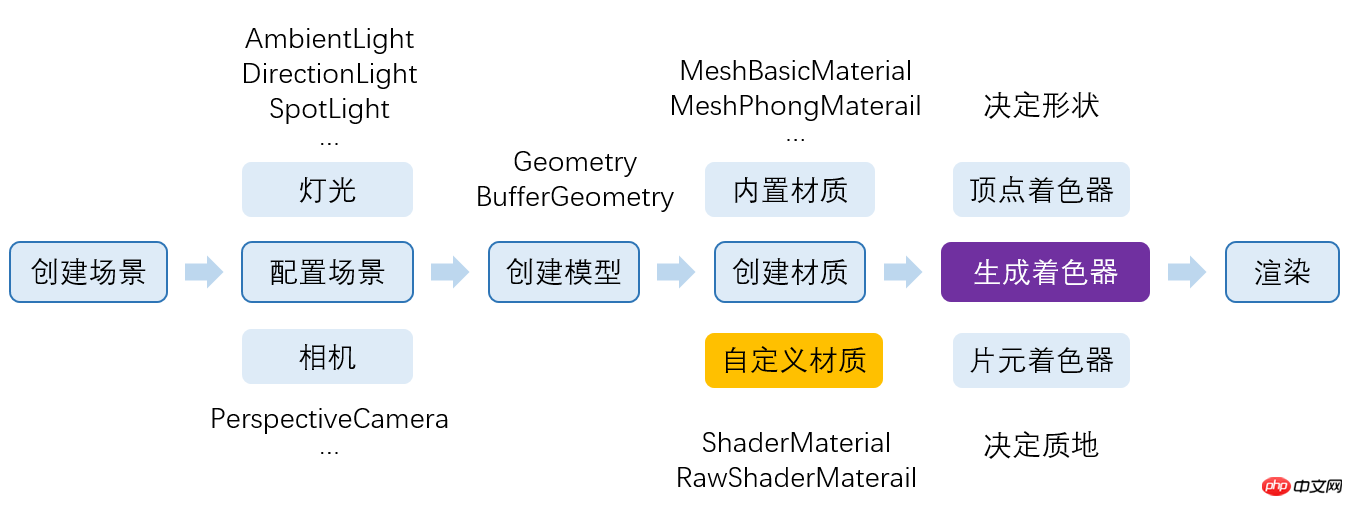
When we select a material, three.js will select the corresponding vertex shader and fragment shader based on the material we selected.
Our commonly used shaders have been built into three.js.
End of full text.
The above is the detailed content of Illustration of the working principles and processes of WebGL and Three.js. For more information, please follow other related articles on the PHP Chinese website!

Hot AI Tools

Undresser.AI Undress
AI-powered app for creating realistic nude photos

AI Clothes Remover
Online AI tool for removing clothes from photos.

Undress AI Tool
Undress images for free

Clothoff.io
AI clothes remover

Video Face Swap
Swap faces in any video effortlessly with our completely free AI face swap tool!

Hot Article

Hot Tools

Notepad++7.3.1
Easy-to-use and free code editor

SublimeText3 Chinese version
Chinese version, very easy to use

Zend Studio 13.0.1
Powerful PHP integrated development environment

Dreamweaver CS6
Visual web development tools

SublimeText3 Mac version
God-level code editing software (SublimeText3)

Hot Topics
 1389
1389
 52
52
 How to implement an online speech recognition system using WebSocket and JavaScript
Dec 17, 2023 pm 02:54 PM
How to use WebSocket and JavaScript to implement an online speech recognition system Introduction: With the continuous development of technology, speech recognition technology has become an important part of the field of artificial intelligence. The online speech recognition system based on WebSocket and JavaScript has the characteristics of low latency, real-time and cross-platform, and has become a widely used solution. This article will introduce how to use WebSocket and JavaScript to implement an online speech recognition system.
 WebSocket and JavaScript: key technologies for implementing real-time monitoring systems
Dec 17, 2023 pm 05:30 PM
WebSocket and JavaScript: Key technologies for realizing real-time monitoring systems Introduction: With the rapid development of Internet technology, real-time monitoring systems have been widely used in various fields. One of the key technologies to achieve real-time monitoring is the combination of WebSocket and JavaScript. This article will introduce the application of WebSocket and JavaScript in real-time monitoring systems, give code examples, and explain their implementation principles in detail. 1. WebSocket technology
 How to use JavaScript and WebSocket to implement a real-time online ordering system
Dec 17, 2023 pm 12:09 PM
Introduction to how to use JavaScript and WebSocket to implement a real-time online ordering system: With the popularity of the Internet and the advancement of technology, more and more restaurants have begun to provide online ordering services. In order to implement a real-time online ordering system, we can use JavaScript and WebSocket technology. WebSocket is a full-duplex communication protocol based on the TCP protocol, which can realize real-time two-way communication between the client and the server. In the real-time online ordering system, when the user selects dishes and places an order
 How to implement an online reservation system using WebSocket and JavaScript
Dec 17, 2023 am 09:39 AM
How to use WebSocket and JavaScript to implement an online reservation system. In today's digital era, more and more businesses and services need to provide online reservation functions. It is crucial to implement an efficient and real-time online reservation system. This article will introduce how to use WebSocket and JavaScript to implement an online reservation system, and provide specific code examples. 1. What is WebSocket? WebSocket is a full-duplex method on a single TCP connection.
 JavaScript and WebSocket: Building an efficient real-time weather forecasting system
Dec 17, 2023 pm 05:13 PM
JavaScript and WebSocket: Building an efficient real-time weather forecast system Introduction: Today, the accuracy of weather forecasts is of great significance to daily life and decision-making. As technology develops, we can provide more accurate and reliable weather forecasts by obtaining weather data in real time. In this article, we will learn how to use JavaScript and WebSocket technology to build an efficient real-time weather forecast system. This article will demonstrate the implementation process through specific code examples. We
 Simple JavaScript Tutorial: How to Get HTTP Status Code
Jan 05, 2024 pm 06:08 PM
JavaScript tutorial: How to get HTTP status code, specific code examples are required. Preface: In web development, data interaction with the server is often involved. When communicating with the server, we often need to obtain the returned HTTP status code to determine whether the operation is successful, and perform corresponding processing based on different status codes. This article will teach you how to use JavaScript to obtain HTTP status codes and provide some practical code examples. Using XMLHttpRequest
 How to use insertBefore in javascript
Nov 24, 2023 am 11:56 AM
Usage: In JavaScript, the insertBefore() method is used to insert a new node in the DOM tree. This method requires two parameters: the new node to be inserted and the reference node (that is, the node where the new node will be inserted).
 JavaScript and WebSocket: Building an efficient real-time image processing system
Dec 17, 2023 am 08:41 AM
JavaScript is a programming language widely used in web development, while WebSocket is a network protocol used for real-time communication. Combining the powerful functions of the two, we can create an efficient real-time image processing system. This article will introduce how to implement this system using JavaScript and WebSocket, and provide specific code examples. First, we need to clarify the requirements and goals of the real-time image processing system. Suppose we have a camera device that can collect real-time image data


