

How to achieve carousel effect in js

The content of this article is to share with you how to achieve the carousel effect in js. It has a certain reference value. Friends in need can refer to it.
There are many examples on the Internet , the seamless scrolling I do here is to make the picture appear left and right scrolling by changing the left value of the element.
Let’s first take a look at the structural style of p css: 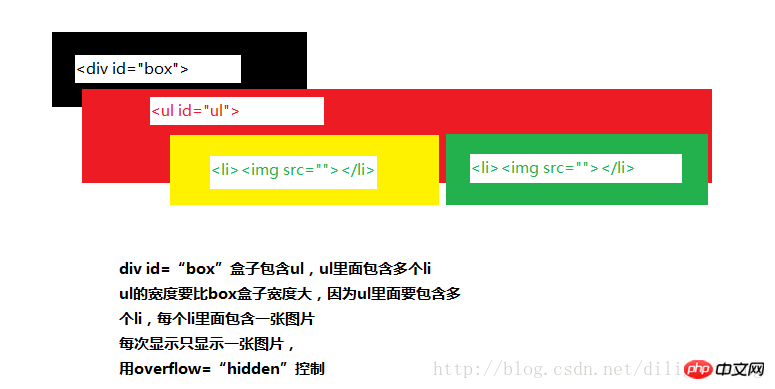
p css code
<!DOCTYPE html>
<html>
    <head>
        <meta charset="UTF-8">
        <title></title>
        <style type="text/css">
            *{
                   margin: 0;
                   padding: 0;
              }
            ul,ol{
                   list-style: none;
              }
            /*消除图片底部3像素距离*/
            img{
                   vertical-align: top;
                }
            .scroll{
                   width: 500px;
                   height: 200px;
                   margin: 100px auto;
                   border: 1px solid #ccc;
                   padding: 7px;
                   overflow: hidden;
                   position: relative;
             }
            .box{
                   width: 500px;
                   height: 200px;
                   overflow: hidden;
                   position: relative;
             }
            .box ul{
                  width: 600%;
                  position: absolute;
                  left: 0;
                  top: 0;
             }
            .box ul li{
                   float: left;
            }
            .scroll ol{
                     position: absolute;
                     right: 10px;
                     bottom: 10px;
            }
            .scroll ol li{
                   float: left;
                   width: 20px;
                   height: 20px;
                   background: pink;
                   text-align: center;
                   line-height: 20px;
                   border-radius: 50%;
                   background-color: pink;
                margin-left:10px ;
                cursor: pointer;            }
            .scroll ol li.current{
                    background-color: purple;            }
        </style>
    </head>
    <body>
        <p id="scroll" class="scroll">
            <p id="box" class="box">
                <ul id="ul">
                    <li><img  src="/static/imghw/default1.png"  data-src="images/1.jpg"  class="lazy"      style="max-width:90%"  style="max-width:90%" alt="How to achieve carousel effect in js" ></li>
                    <li><img  src="/static/imghw/default1.png"  data-src="images/2.jpg"  class="lazy"      style="max-width:90%"  style="max-width:90%" alt="How to achieve carousel effect in js" ></li>
                    <li><img  src="/static/imghw/default1.png"  data-src="images/3.jpg"  class="lazy"      style="max-width:90%"  style="max-width:90%" alt="How to achieve carousel effect in js" ></li>
                    <li><img  src="/static/imghw/default1.png"  data-src="images/4.jpg"  class="lazy"      style="max-width:90%"  style="max-width:90%" alt="How to achieve carousel effect in js" ></li>
                    <li><img  src="/static/imghw/default1.png"  data-src="images/5.jpg"  class="lazy"      style="max-width:90%"  style="max-width:90%" alt="How to achieve carousel effect in js" ></li>
                </ul>
                <ol id="ol">
                    <li class="current">1</li>
                    <li>2</li>
                    <li>3</li>
                    <li>4</li>
                    <li>5</li>
                </ol>
            </p>
        </p>
</body></html>The display effect is as shown in the figure: 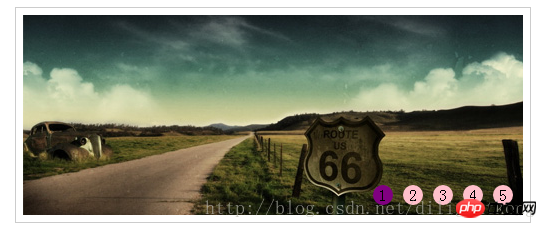
Next we want to js code,
Before we do this, we must understand that the small dots 1 2 3 are not hard-coded. It is determined based on the number of pictures in ul li, so we must first put p in ol li Remove the code
To achieve seamless scrolling, you need one more picture, that is, clone the first picture and put it at the end. At this time, the css layout is retained, and only p is left:
<body>
        <p id="scroll" class="scroll">
            <p id="box" class="box">
                <ul id="ul">
                    <li><img  src="/static/imghw/default1.png"  data-src="images/1.jpg"  class="lazy"      style="max-width:90%"  style="max-width:90%" alt="How to achieve carousel effect in js" ></li>
                    <li><img  src="/static/imghw/default1.png"  data-src="images/2.jpg"  class="lazy"      style="max-width:90%"  style="max-width:90%" alt="How to achieve carousel effect in js" ></li>
                    <li><img  src="/static/imghw/default1.png"  data-src="images/3.jpg"  class="lazy"      style="max-width:90%"  style="max-width:90%" alt="How to achieve carousel effect in js" ></li>
                    <li><img  src="/static/imghw/default1.png"  data-src="images/4.jpg"  class="lazy"      style="max-width:90%"  style="max-width:90%" alt="How to achieve carousel effect in js" ></li>
                    <li><img  src="/static/imghw/default1.png"  data-src="images/5.jpg"  class="lazy"      style="max-width:90%"  style="max-width:90%" alt="How to achieve carousel effect in js" ></li>
                </ul>
            </p>
        </p>
</body>At this time, we use js code to generate small dots
var scroll = document.getElementById("scroll"); // 获得大盒子
        var ul = document.getElementById("ul"); // 获得ul
        var ulLis = ul.children;// 获得ul的盒子 以此来生成ol中li的个数
        var liWidth = ul.children[0].offsetWidth;// 获得每个li的宽度
        // 操作元素
        // 因为要做无缝滚动,所以要克隆第一张,放到最后一张后面
        // 1. 克隆元素
        ul.appendChild(ul.children[0].cloneNode(true));        // 2.创建ol 和li
        vaar ol = document.createElement("ol");//创建ol元素
        scroll.appendChild(ol);// 把ol放到scroll盒子里面去
        for (var i=0;i<ulLis.length-1;i++) {            var li = document.createElement("li");// 创建li元素
            li.innerHTML = i + 1;// 给li里面添加文字  1 2 3 4 5
            ol.appendChild(li);// 将li元素添加到ol里面
        }
ol.children[0].className = "current";// ol中的第一个li背景色为purpleAt this time, after the ol li element, which is the small dot, is created, we continue to use js for animation
The animation part includes:
1. When the mouse passes through several small dots, which picture will be displayed, and the color of the small dots also changes
2. Automatic carousel of pictures , (this requires a timer)
3. When the mouse passes over the picture, the picture stops playing automatically (this requires clearing the timer)
4. When the mouse leaves the picture, the picture continues to rotate automatically (restart the timer)
Here we encapsulate an animate() animation function
// 动画函数 第一个参数,代表谁动  第二个参数 动多少
        // 让图片做匀速运动,匀速动画的原理是 当前的位置 + 速度  即 offsetLeft + speed

        function animate(obj,target){
            // 首先清除掉定时器
            clearInterval(obj.timer);            // 用来判断 是+ 还是 -  即说明向左走还是向右走
            var speed = obj.offsetLeft < target ? 15 : -15;
            obj.timer = setInterval(function(){
                var result = target - obj.offsetLeft;//它们的差值不会超过speed
                obj.style.left = obj.offsetLeft + speed + "px";                // 有可能有小数的存在,所以在这里要做个判断
                if (Math.abs(result) <= Math.abs(speed)) {
                    clearInterval(obj.timer);
                    obj.style.left = target + "px";
                }
            },10);
}Timer function
var timer = null; // 轮播图的定时器
        var key = 0;// 控制播放的张数
        var circle = 0;// 控制小圆点

        timer = setInterval(autoplay,1000);// 自动轮播
        function autoplay(){
            /*自动轮播时,要对播放的张数key进行一个判断,如果播放的张数超过ulLis.length-1,
            就要重头开始播放.  因为我们克隆了第一张并将其放在最后面,所以我们要从第二张图片开始播放*/
            key++; // 先++
            if(key > ulLis.length-1){// 后判断

                ul.style.left = 0; // 迅速调回
                key = 1; // 因为第6张是第一张,所以播放的时候是从第2张开始播放
            }            // 动画部分
            animate(ul,-key*liWidth);            // 小圆点circle   当显示第几张图片是,对应的小圆点的颜色也发生变化

            /*同理,对小圆点也要有一个判断*/
            circle++;            if (circle > olLis.length-1) {
                circle = 0;
            }            // 小圆点颜色发生变化
            for (var i = 0 ; i < olLis.length;i++) {                // 先清除掉所用的小圆点类名
                olLis[i].className = "";
            }            // 给当前的小圆点 添加一个类名
            olLis[circle].className = "current";

}Okay, here we show the main code, the specific code, check here to download js to achieve the carousel effect
The above is the detailed content of How to achieve carousel effect in js. For more information, please follow other related articles on the PHP Chinese website!

Hot AI Tools

Undresser.AI Undress
AI-powered app for creating realistic nude photos

AI Clothes Remover
Online AI tool for removing clothes from photos.

Undress AI Tool
Undress images for free

Clothoff.io
AI clothes remover

Video Face Swap
Swap faces in any video effortlessly with our completely free AI face swap tool!

Hot Article
Hot Tools

Notepad++7.3.1
Easy-to-use and free code editor

SublimeText3 Chinese version
Chinese version, very easy to use

Zend Studio 13.0.1
Powerful PHP integrated development environment

Dreamweaver CS6
Visual web development tools

SublimeText3 Mac version
God-level code editing software (SublimeText3)
Hot Topics


 How to implement an online speech recognition system using WebSocket and JavaScript
Dec 17, 2023 pm 02:54 PM
How to implement an online speech recognition system using WebSocket and JavaScript
Dec 17, 2023 pm 02:54 PM
How to use WebSocket and JavaScript to implement an online speech recognition system Introduction: With the continuous development of technology, speech recognition technology has become an important part of the field of artificial intelligence. The online speech recognition system based on WebSocket and JavaScript has the characteristics of low latency, real-time and cross-platform, and has become a widely used solution. This article will introduce how to use WebSocket and JavaScript to implement an online speech recognition system.
 WebSocket and JavaScript: key technologies for implementing real-time monitoring systems
Dec 17, 2023 pm 05:30 PM
WebSocket and JavaScript: key technologies for implementing real-time monitoring systems
Dec 17, 2023 pm 05:30 PM
WebSocket and JavaScript: Key technologies for realizing real-time monitoring systems Introduction: With the rapid development of Internet technology, real-time monitoring systems have been widely used in various fields. One of the key technologies to achieve real-time monitoring is the combination of WebSocket and JavaScript. This article will introduce the application of WebSocket and JavaScript in real-time monitoring systems, give code examples, and explain their implementation principles in detail. 1. WebSocket technology
 How to use JavaScript and WebSocket to implement a real-time online ordering system
Dec 17, 2023 pm 12:09 PM
How to use JavaScript and WebSocket to implement a real-time online ordering system
Dec 17, 2023 pm 12:09 PM
Introduction to how to use JavaScript and WebSocket to implement a real-time online ordering system: With the popularity of the Internet and the advancement of technology, more and more restaurants have begun to provide online ordering services. In order to implement a real-time online ordering system, we can use JavaScript and WebSocket technology. WebSocket is a full-duplex communication protocol based on the TCP protocol, which can realize real-time two-way communication between the client and the server. In the real-time online ordering system, when the user selects dishes and places an order
 How to implement an online reservation system using WebSocket and JavaScript
Dec 17, 2023 am 09:39 AM
How to implement an online reservation system using WebSocket and JavaScript
Dec 17, 2023 am 09:39 AM
How to use WebSocket and JavaScript to implement an online reservation system. In today's digital era, more and more businesses and services need to provide online reservation functions. It is crucial to implement an efficient and real-time online reservation system. This article will introduce how to use WebSocket and JavaScript to implement an online reservation system, and provide specific code examples. 1. What is WebSocket? WebSocket is a full-duplex method on a single TCP connection.
 JavaScript and WebSocket: Building an efficient real-time weather forecasting system
Dec 17, 2023 pm 05:13 PM
JavaScript and WebSocket: Building an efficient real-time weather forecasting system
Dec 17, 2023 pm 05:13 PM
JavaScript and WebSocket: Building an efficient real-time weather forecast system Introduction: Today, the accuracy of weather forecasts is of great significance to daily life and decision-making. As technology develops, we can provide more accurate and reliable weather forecasts by obtaining weather data in real time. In this article, we will learn how to use JavaScript and WebSocket technology to build an efficient real-time weather forecast system. This article will demonstrate the implementation process through specific code examples. We
 Simple JavaScript Tutorial: How to Get HTTP Status Code
Jan 05, 2024 pm 06:08 PM
Simple JavaScript Tutorial: How to Get HTTP Status Code
Jan 05, 2024 pm 06:08 PM
JavaScript tutorial: How to get HTTP status code, specific code examples are required. Preface: In web development, data interaction with the server is often involved. When communicating with the server, we often need to obtain the returned HTTP status code to determine whether the operation is successful, and perform corresponding processing based on different status codes. This article will teach you how to use JavaScript to obtain HTTP status codes and provide some practical code examples. Using XMLHttpRequest
 How to use insertBefore in javascript
Nov 24, 2023 am 11:56 AM
How to use insertBefore in javascript
Nov 24, 2023 am 11:56 AM
Usage: In JavaScript, the insertBefore() method is used to insert a new node in the DOM tree. This method requires two parameters: the new node to be inserted and the reference node (that is, the node where the new node will be inserted).
 JavaScript and WebSocket: Building an efficient real-time image processing system
Dec 17, 2023 am 08:41 AM
JavaScript and WebSocket: Building an efficient real-time image processing system
Dec 17, 2023 am 08:41 AM
JavaScript is a programming language widely used in web development, while WebSocket is a network protocol used for real-time communication. Combining the powerful functions of the two, we can create an efficient real-time image processing system. This article will introduce how to implement this system using JavaScript and WebSocket, and provide specific code examples. First, we need to clarify the requirements and goals of the real-time image processing system. Suppose we have a camera device that can collect real-time image data
