

How to develop multiple pages in vue2.0
This time I will show you how to develop multiple pages in vue2.0. What are the precautions for developing multi-pages in vue2.0. Here are practical cases, let’s take a look.
When we usually use vue to develop, we always feel that vue seems to be born specifically for single-page applications, but it is not. Because Vue relies heavily on webpack during engineering development, and webpack integrates all resources into a single page. But vue can not only make a single page, it can also make multiple pages. If you want to make multiple pages, you need to rely on it, that is, webpack needs to be reconfigured. This article will talk about the configuration of webpack in detail.
There are two ways to develop vue. One is to directly introduce the vue.js file in the script tag. If you introduce it this way, I personally feel that it will be more comfortable to make small multi-pages. Once you do a larger project, you still can't do it without it. webpack. So another method is engineering development based on webpack and vue-cli. The steps are detailed below.
Let me first state that if you use vue for engineering development, you must first have node.js, and then next npm. However, generally new versions of node will have npm, so you don’t need to do it. Instructions are entered on the command line. The first step is to generate a vue project using the command:
vue init webpack test
The file name declared by the blogger himself is test. After downloading, enter all the way, and then a vue project is generated. However, this vue project does not have some related dependencies. At this time, you need to enter the folder and enter the command:
npm install
If the network speed is not good, use cnpm install, the effect will be the same. After a few minutes, the entire dependency has been downloaded, and then enter the command:
npm run dev
An interface will be opened automatically. If an error is reported and the webpage cannot be opened, there is only one reason, that is, the port is occupied. At this time, you need to change the port in the /config/index.js directory.
When a vue project has completed all configurations, the next step is our focus. First, we create a few new html files. As a blogger, I created a new one.html and two.html, and their corresponding vue files. and js files, the file directory is as follows:
After that, we enter the buildwebpack.base.conf.js directory, find the entry in the module.exports domain, and configure and add multiple entries there:
entry: {
 app: './src/main.js',
 one: './src/js/one.js',
 two: './src/js/two.js'
},Note that the variable name in the purple part must be chosen carefully, because it will be used later to prevent forgetting.
The next step is to modify the development environment run dev, open the buildwebpack.dev.conf.js file, and find the plugins in module.exports. The following is written as follows:
plugins: [
 new webpack.DefinePlugin({
  'process.env': config.dev.env
 }),
 // https://github.com/glenjamin/webpack-hot-middleware#installation--usage
 new webpack.HotModuleReplacementPlugin(),
 new webpack.NoEmitOnErrorsPlugin(),
 // https://github.com/ampedandwired/html-webpack-plugin
 new HtmlWebpackPlugin({
  filename: 'index.html',
  template: 'index.html',
  inject: true,
  chunks: ['app']
 }),
 new HtmlWebpackPlugin({
  filename: 'one.html',
  template: 'one.html',
  inject: true,
  chunks: ['one']
 }),
 new HtmlWebpackPlugin({
  filename: 'two.html',
  template: 'two.html',
  inject: true,
  chunks: ['two']
 }),
 new FriendlyErrorsPlugin()
]The app in chunks refers to the corresponding variable name in the entry of webpack.base.conf.js. The function of chunks is that each entry will correspond to an entry every time it is compiled and run. If not written, the resources of all pages will be introduced.
Then configure the run build, which is the compilation environment. First open the configindex.js file and add this to the build:
index: path.resolve(dirname, '../dist/index.html'),
one: path.resolve(dirname, '../dist/one.html'),
two: path.resolve(dirname, '../dist/two.html'),
Then open the /build/webpack.prod/conf.js file, find HTMLWebpackPlugin in plugins, and add the following code:
new HtmlWebpackPlugin({
 filename: process.env.NODE_ENV === 'testing'
  ? 'index.html'
  : config.build.index,
 template: 'index.html',
 inject: true,
 minify: {
  removeComments: true,
  collapseWhitespace: true,
  removeAttributeQuotes: true
  // more options:
  // https://github.com/kangax/html-minifier#options-quick-reference
 },
 // necessary to consistently work with multiple chunks via CommonsChunkPlugin
 chunksSortMode: 'dependency',
 chunks: ['manifest', 'vendor', 'app']
}),
new HtmlWebpackPlugin({
 filename: config.build.one,
 template: 'one.html',
 inject: true,
 minify: {
  removeComments: true,
  collapseWhitespace: true,
  removeAttributeQuotes: true
 },
 chunksSortMode: 'dependency',
 chunks: ['manifest', 'vendor', 'one']
}),
 new HtmlWebpackPlugin({
   filename: config.build.two,
   template: 'two.html',
   inject: true,
   minify: {
     removeComments: true,
     collapseWhitespace: true,
     removeAttributeQuotes: true
   },
   chunksSortMode: 'dependency',
   chunks: ['manifest', 'vendor', 'two']
}),The filename refers to the build in configindex.js. Each page must be configured with one chunks, otherwise the resources of all pages will be loaded.
Then the one.js file can be written like this:
import Vue from 'vue'
import one from './one.vue'
Vue.config.productionTip = false
/* eslint-disable no-new */
new Vue({
 el: '#one',
 render: h => h(one)
})
one.vue写法如下:
<template>
 <p id="one">
  {{msg}}
 </p>
</template>
<script>
export default {
 name: 'one',
 data () {
  return {
   msg: 'I am one'
  }
 }
}
</script>The writing method of two is similar to it, so I won’t write it down,
Then write this in App.vue:
<template>
 <p id="app">
  <a href="one.html" rel="external nofollow" >one</a><br>
  <a href="two.html" rel="external nofollow" >two</a><br>
  {{msg}}
 </p>
</template>In this way, when you open the page, clicking the one link above will jump to one.html, and clicking two will jump to two.html. This way you're done.
I believe you have mastered the method after reading the case in this article. For more exciting information, please pay attention to other related articles on the php Chinese website!
Recommended reading:
JS prompt text box email address completion
$.ajax() method how to get json from the server data
The above is the detailed content of How to develop multiple pages in vue2.0. For more information, please follow other related articles on the PHP Chinese website!

Hot AI Tools

Undresser.AI Undress
AI-powered app for creating realistic nude photos

AI Clothes Remover
Online AI tool for removing clothes from photos.

Undress AI Tool
Undress images for free

Clothoff.io
AI clothes remover

Video Face Swap
Swap faces in any video effortlessly with our completely free AI face swap tool!

Hot Article
Hot Tools

Notepad++7.3.1
Easy-to-use and free code editor

SublimeText3 Chinese version
Chinese version, very easy to use

Zend Studio 13.0.1
Powerful PHP integrated development environment

Dreamweaver CS6
Visual web development tools

SublimeText3 Mac version
God-level code editing software (SublimeText3)
Hot Topics
 1387
1387
 52
52

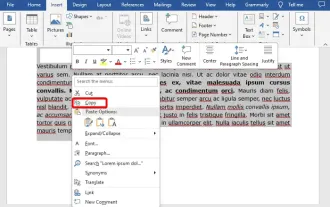 How to copy a page in Word
Feb 20, 2024 am 10:09 AM
How to copy a page in Word
Feb 20, 2024 am 10:09 AM
Want to copy a page in Microsoft Word and keep the formatting intact? This is a smart idea because duplicating pages in Word can be a useful time-saving technique when you want to create multiple copies of a specific document layout or format. This guide will walk you through the step-by-step process of copying pages in Word, whether you are creating a template or copying a specific page in a document. These simple instructions are designed to help you easily recreate your page without having to start from scratch. Why copy pages in Microsoft Word? There are several reasons why copying pages in Word is very beneficial: When you have a document with a specific layout or format that you want to copy. Unlike recreating the entire page from scratch
 How to customize and edit standby mode on iPhone: What's new in iOS 17
Sep 21, 2023 pm 04:01 PM
How to customize and edit standby mode on iPhone: What's new in iOS 17
Sep 21, 2023 pm 04:01 PM
Standby is a new feature in the iOS 17 update that provides a new and enhanced way to access information when your phone is idle quickly. With StandBy, you can conveniently check the time, view upcoming events, browse your calendar, get weather updates for your location, and more. Once activated, the iPhone will intuitively enter standby mode when set to landscape while charging. This feature is perfect for wireless charging points like your bedside table, or when you're away from your iPhone charging during daily tasks. It allows you to swipe through various widgets displayed in standby to access different sets of information from various applications. However, you may want to modify these widgets or even delete some based on your preferences and the information you need frequently. So let's dive into
 How to quickly refresh a web page?
Feb 18, 2024 pm 01:14 PM
How to quickly refresh a web page?
Feb 18, 2024 pm 01:14 PM
Page refresh is very common in our daily network use. When we visit a web page, we sometimes encounter some problems, such as the web page not loading or displaying abnormally, etc. At this time, we usually choose to refresh the page to solve the problem, so how to refresh the page quickly? Let’s discuss the shortcut keys for page refresh. The page refresh shortcut key is a method to quickly refresh the current web page through keyboard operations. In different operating systems and browsers, the shortcut keys for page refresh may be different. Below we use the common W
 How to Rearrange, Disable, and Delete iPhone Home Screen Pages
Nov 29, 2023 am 08:22 AM
How to Rearrange, Disable, and Delete iPhone Home Screen Pages
Nov 29, 2023 am 08:22 AM
In iOS, Apple allows you to disable individual home screen pages on your iPhone. It's also possible to rearrange the order of home screen pages and delete pages directly instead of just disabling them. Here's how it works. How to Rearrange Home Screen Pages Touch and hold Space on the Home screen to enter jitter mode. Tap the row of dots that represent Home screen pages. In the Home screen grid that appears, touch and drag a page to rearrange it relative to other pages. Others move in response to your dragging. When you're happy with your new arrangement, tap "Done" in the upper right corner of the screen, then tap "Done" again to exit dither mode. How to Disable or Remove Home Screen Pages Touch and hold Space on the Home screen to enter dither mode. Tap to represent home screen
 How to implement page jump in 3 seconds: PHP Programming Guide
Mar 25, 2024 am 10:42 AM
How to implement page jump in 3 seconds: PHP Programming Guide
Mar 25, 2024 am 10:42 AM
Title: Implementation method of page jump in 3 seconds: PHP Programming Guide In web development, page jump is a common operation. Generally, we use meta tags in HTML or JavaScript methods to jump to pages. However, in some specific cases, we need to perform page jumps on the server side. This article will introduce how to use PHP programming to implement a function that automatically jumps to a specified page within 3 seconds, and will also give specific code examples. The basic principle of page jump using PHP. PHP is a kind of
 How to deal with the problem that Laravel page cannot display CSS correctly
Mar 10, 2024 am 11:33 AM
How to deal with the problem that Laravel page cannot display CSS correctly
Mar 10, 2024 am 11:33 AM
"Methods to handle Laravel pages that cannot display CSS correctly, need specific code examples" When using the Laravel framework to develop web applications, sometimes you will encounter the problem that the page cannot display CSS styles correctly, which may cause the page to render abnormal styles. Affect user experience. This article will introduce some methods to deal with the failure of Laravel pages to display CSS correctly, and provide specific code examples to help developers solve this common problem. 1. Check the file path. First check the path of the CSS file.
 Use ThinkPHP6 to implement a beautiful 404 page
Jun 20, 2023 am 11:06 AM
Use ThinkPHP6 to implement a beautiful 404 page
Jun 20, 2023 am 11:06 AM
As the Internet develops, many websites or applications have gradually become more complex. When users use it, they often encounter error pages, the most common of which is the 404 page. The 404 page means that the page being accessed does not exist and is a common error page. For websites or applications, a beautiful 404 page can greatly improve the user experience. In this article, we will introduce how to use ThinkPHP6 to quickly implement a beautiful 404 page. Create a route First, we need to create an err in the route folder
 Introduction to how to delete a page of content in Word
Mar 26, 2024 am 10:06 AM
Introduction to how to delete a page of content in Word
Mar 26, 2024 am 10:06 AM
Title: Introduction to how to delete a page of content in Word When editing a document using Microsoft Word, you may sometimes encounter a situation where you need to delete the content of a certain page. You may want to delete a blank page or unnecessary content on a certain page in the document. In response to this situation, we can take some methods to quickly and effectively delete a page of content. Next, some methods to delete a page of content in Microsoft Word will be introduced. Method 1: Delete a page of content First, open the Word document that needs to be edited. Certainly
