
 Backend Development
PHP Tutorial
Detailed explanation of three methods for importing custom modules in Python3
Backend Development
PHP Tutorial
Detailed explanation of three methods for importing custom modules in Python3
Detailed explanation of three methods for importing custom modules in Python3

This article mainly introduces you to the three methods of importing custom modules in Python3. The article introduces it in detail through sample code, which has certain reference learning value for everyone's study or work
Preface
I recently learned the module section from Liao Xuefeng’s tutorial. Regarding how to customize a module, if you don’t understand, let’s take a look at the basic introduction first:
Module
In the development of computer programs In the process, as more program code is written, the code in a file will become longer and longer, making it increasingly difficult to maintain.
In order to write maintainable code, we group many functions and put them in different files. In this way, each file contains relatively less code. Many programming languages adopt this organization of code. Way. In Python, a .py file is called a module.
What are the benefits of using modules?
The biggest benefit is that it greatly improves the maintainability of the code. Second, you don't have to start from scratch when writing code. When a module is written, it can be referenced elsewhere. When we write programs, we often refer to other modules, including Python's built-in modules and modules from third parties.
Using modules can also avoid conflicts between function names and variable names. Functions and variables with the same name can exist in different modules. Therefore, when we write the module ourselves, we do not have to consider that the name will conflict with other modules. But also be careful not to conflict with built-in function names. Click here to view all built-in functions of Python.
You may also think, what if different people write modules with the same name? In order to avoid module name conflicts, Python has introduced a method of organizing modules by directory, called a package.
For example, a file abc.py is a module named abc, and a file xyz.py is a module named xyz.
Now, suppose that our two module names abc and xyz conflict with other modules, so we can organize the modules through packages to avoid conflicts. The method is to choose a top-level package name, such as mycompany, and store it in the following directory:
mycompany
├─ __init__.py
├─ abc.py
└─ xyz.py
After the package is introduced, as long as the top-level package name does not conflict with others, all modules will not conflict with others. Now, the module name of abc.py becomes mycompany.abc, and similarly, the module name of xyz.py becomes mycompany.xyz.
Please note that there will be an __init__.py file under each package directory. This file must exist. Otherwise, Python will treat this directory as a normal directory instead of a package. __init__.py can be an empty file, or it can have Python code, because __init__.py itself is a module, and its module name is mycompany.
Similarly, there can be multi-level directories to form a multi-level package structure. For example, the following directory structure:
mycompany
├─ web
│ ├─ __init__.py
│ ├─ utils.py
│ └─ www.py
├ ─ __init__.py
├─ abc.py
└─ xyz.py
The module name of the file www.py is mycompany.web.www, and the module names of the two files utils.py are respectively are mycompany.utils and mycompany.web.utils.
When you create your own module, you should pay attention to the naming, and it cannot conflict with the module name that comes with Python. For example, if the system comes with the sys module, your module cannot be named sys.py, otherwise you will not be able to import the sys module that comes with the system.
mycompany.web is also a module. Please indicate the .py file corresponding to this module.
Summary
A module is a collection of Python codes that can use other modules and can also be used by other modules.
When creating your own module, please note:
The module name must follow the Python variable naming convention and do not use Chinese or special characters;
The module name should not conflict with the system module name. It is best to check whether the module already exists in the system. The check method is to execute import abc in the Python interactive environment. If it succeeds, it means that this module exists in the system.
Modules are a good thing. The experts share many modules in open source, which also speeds up everyone’s development.
Because I just started, I don’t understand many details, so on the Internet When searching for information, I found that the tutorials given by the experts were too concise, which made it very difficult for me, a novice, to succeed.
So record it here.
Start
The first way is to directly import
There is a major premise here, that is Your py execution file and module belong to the same directory (parent directory), as shown below:
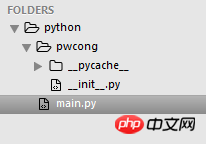
main.py and pwcong module are in the same directory python directory
The execution file is main.py
The pwcong folder is a module
I wrote the functions provided by the pwcong module in __init__.py, which only provides one hi function:
# pwcong 模块的 __init__.py
# -*- coding: utf-8 -*-
def hi():
print("hi")Execute the file main.py to directly import the module:
# main.py
# -*- coding: utf-8 -*-
import pwcong
pwcong.hi()
Then we run main.py and we can see that the command line window outputs the sentence hi. The first method is completed.
The way to use the module is: first import -》then enter the module.variable|function, such as pwcong.hi() in the above example
Second, import the path of the custom module through the sys module
If the executable file and the module are not in the same directory, the custom module cannot be found by direct import at this time. As shown below:

The execution file main.py is in the main directory
The pwcong module is in the python directory Next
The sys module is built-in in python, so the steps for us to import a custom module are as follows:
Import the sys module first
Then use the
sys.path.append(path)function to import the directory where the custom module is locatedImport the custom module.
At this time, write main.py like this:
# main.py
# -*- coding: utf-8 -*-
import sys
sys.path.append(r"C:\Users\Pwcong\Desktop\python")
import pwcong
pwcong.hi()
Finally execute the main.py file and finally output hi. The second method is completed.
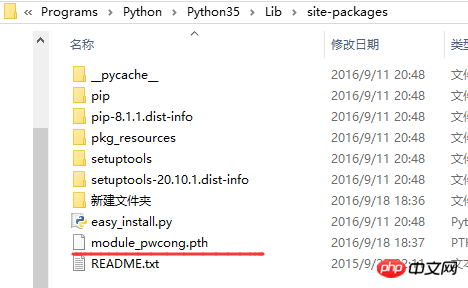
The third method is to find the custom module through the pth file.
The principle of this method is to use system variables. Python will scan the path of the path variable to import the module. You can Add it to the system path. But I still recommend using pth file addition.
The module and executable file directory structure is the same as the picture:

- ##The executable file main.py is in the main directory
- The pwcong module is in the python directory
# -*- coding: utf-8 -*-
import pwcong
pwcong.hi()
The above is the detailed content of Detailed explanation of three methods for importing custom modules in Python3. For more information, please follow other related articles on the PHP Chinese website!

Hot AI Tools

Undresser.AI Undress
AI-powered app for creating realistic nude photos

AI Clothes Remover
Online AI tool for removing clothes from photos.

Undress AI Tool
Undress images for free

Clothoff.io
AI clothes remover

Video Face Swap
Swap faces in any video effortlessly with our completely free AI face swap tool!

Hot Article
Hot Tools

Notepad++7.3.1
Easy-to-use and free code editor

SublimeText3 Chinese version
Chinese version, very easy to use

Zend Studio 13.0.1
Powerful PHP integrated development environment

Dreamweaver CS6
Visual web development tools

SublimeText3 Mac version
God-level code editing software (SublimeText3)
Hot Topics
 1386
1386
 52
52

 How to quickly set up a custom avatar in Netflix
Feb 19, 2024 pm 06:33 PM
How to quickly set up a custom avatar in Netflix
Feb 19, 2024 pm 06:33 PM
An avatar on Netflix is a visual representation of your streaming identity. Users can go beyond the default avatar to express their personality. Continue reading this article to learn how to set a custom profile picture in the Netflix app. How to quickly set a custom avatar in Netflix In Netflix, there is no built-in feature to set a profile picture. However, you can do this by installing the Netflix extension on your browser. First, install a custom profile picture for the Netflix extension on your browser. You can buy it in the Chrome store. After installing the extension, open Netflix on your browser and log into your account. Navigate to your profile in the upper right corner and click
 How to customize background image in Win11
Jun 30, 2023 pm 08:45 PM
How to customize background image in Win11
Jun 30, 2023 pm 08:45 PM
How to customize background image in Win11? In the newly released win11 system, there are many custom functions, but many friends do not know how to use these functions. Some friends think that the background image is relatively monotonous and want to customize the background image, but don’t know how to customize the background image. If you don’t know how to define the background image, the editor has compiled the steps to customize the background image in Win11 below. If you are interested If so, take a look below! Steps for customizing background images in Win11: 1. Click the win button on the desktop and click Settings in the pop-up menu, as shown in the figure. 2. Enter the settings menu and click Personalization, as shown in the figure. 3. Enter Personalization and click on Background, as shown in the picture. 4. Enter background settings and click to browse pictures
 How to create and customize Venn diagrams in Python?
Sep 14, 2023 pm 02:37 PM
How to create and customize Venn diagrams in Python?
Sep 14, 2023 pm 02:37 PM
A Venn diagram is a diagram used to represent relationships between sets. To create a Venn diagram we will use matplotlib. Matplotlib is a commonly used data visualization library in Python for creating interactive charts and graphs. It is also used to create interactive images and charts. Matplotlib provides many functions to customize charts and graphs. In this tutorial, we will illustrate three examples to customize Venn diagrams. The Chinese translation of Example is: Example This is a simple example of creating the intersection of two Venn diagrams; first, we imported the necessary libraries and imported venns. Then we create the dataset as a Python set, after that we use the "venn2()" function to create
 How to customize shortcut key settings in Eclipse
Jan 28, 2024 am 10:01 AM
How to customize shortcut key settings in Eclipse
Jan 28, 2024 am 10:01 AM
How to customize shortcut key settings in Eclipse? As a developer, mastering shortcut keys is one of the keys to improving efficiency when coding in Eclipse. As a powerful integrated development environment, Eclipse not only provides many default shortcut keys, but also allows users to customize them according to their own preferences. This article will introduce how to customize shortcut key settings in Eclipse and give specific code examples. Open Eclipse First, open Eclipse and enter
 How to create custom pagination in CakePHP?
Jun 04, 2023 am 08:32 AM
How to create custom pagination in CakePHP?
Jun 04, 2023 am 08:32 AM
CakePHP is a powerful PHP framework that provides developers with many useful tools and features. One of them is pagination, which helps us divide large amounts of data into several pages, making browsing and manipulation easier. By default, CakePHP provides some basic pagination methods, but sometimes you may need to create some custom pagination methods. This article will show you how to create custom pagination in CakePHP. Step 1: Create a custom pagination class First, we need to create a custom pagination class. this
 How to enable and customize crossfades in Apple Music on iPhone with iOS 17
Jun 28, 2023 pm 12:14 PM
How to enable and customize crossfades in Apple Music on iPhone with iOS 17
Jun 28, 2023 pm 12:14 PM
The iOS 17 update for iPhone brings some big changes to Apple Music. This includes collaborating with other users on playlists, initiating music playback from different devices when using CarPlay, and more. One of these new features is the ability to use crossfades in Apple Music. This will allow you to transition seamlessly between tracks, which is a great feature when listening to multiple tracks. Crossfading helps improve the overall listening experience, ensuring you don't get startled or dropped out of the experience when the track changes. So if you want to make the most of this new feature, here's how to use it on your iPhone. How to Enable and Customize Crossfade for Apple Music You Need the Latest
 How to implement custom middleware in CodeIgniter
Jul 29, 2023 am 10:53 AM
How to implement custom middleware in CodeIgniter
Jul 29, 2023 am 10:53 AM
How to implement custom middleware in CodeIgniter Introduction: In modern web development, middleware plays a vital role in applications. They can be used to perform some shared processing logic before or after the request reaches the controller. CodeIgniter, as a popular PHP framework, also supports the use of middleware. This article will introduce how to implement custom middleware in CodeIgniter and provide a simple code example. Middleware overview: Middleware is a kind of request
 render function in Vue3: custom rendering function
Jun 18, 2023 pm 06:43 PM
render function in Vue3: custom rendering function
Jun 18, 2023 pm 06:43 PM
Vue is a popular JavaScript framework that provides many convenient functions and APIs to help developers build interactive front-end applications. With the release of Vue3, the render function has become an important update. This article will introduce the concept and purpose of the render function in Vue3 and how to use it to customize the rendering function. What is the render function? In Vue, template is the most commonly used rendering method, but in Vue3, you can use another method: r
