In-depth understanding of PHP extension development
PHP is a language that is currently widely used. It can be seen from Facebook and Twitter abroad to Taobao, Tencent, Baidu in China, and various large, medium and small websites on the Internet. . It should be said that the success of PHP relies largely on its open extension API mechanism and rich extension components (PHP Extension). It is these extension components that allow PHP to operate from various database operations to XML, JSON, encryption, file processing, It is omnipotent in fields such as graphics processing and Socket. Sometimes developers may need to develop their own PHP extensions. The current extension mechanism of PHP5 is based on Zend API. Zend API provides rich interfaces and macro definitions, plus some practical tools, making it not particularly difficult to develop PHP extensions. . This article will introduce the basic knowledge about the development of PHP extension components, and demonstrate the basic process of developing PHP extensions through an example.
The development process of PHP extension components is different in Unix and Windows environments, but they are basically interoperable. This article will be based on the Unix environment (specifically using Linux). Reading this article requires a simple understanding of the Unix environment, some basic knowledge of PHP and C language. As long as you have a simple understanding, I will try not to cover too specific operating system and language features, and explain them where necessary to facilitate readers' reading.
The specific development environment of this article is Ubuntu 10.04 PHP 5.3.3.
Download PHP source code
To develop PHP extensions, the first step is to download the PHP source code, because it contains the tools needed to develop extensions. What I downloaded is the latest version of PHP 5.3.3, in the format of tar.bz2 compressed package.
The download address is: http://cn.php.net/get/php-5.3.3.tar.bz2/from/a/mirror
Download Finally, move the source code to the appropriate directory and unzip it. The decompression command is:
tar -jxvf Source package name
If you downloaded a tar.gz compressed package, the decompression command is
##tar - zxvf Source package name

ext_skel --extname=module [--proto=file] [-- stubs=file] [--xml [=file]] [--skel=dir] [--full-xml] [--no-help]
As beginners, we don’t have to know all the command parameters. In fact, in most cases, we only need to provide the first parameter, which is the extension module name. Therefore, we type the following command in the ext directory:
./ext_skel --extname =say_hello
(If you want to know more about the various command parameters of ext_skel, please refer to here)
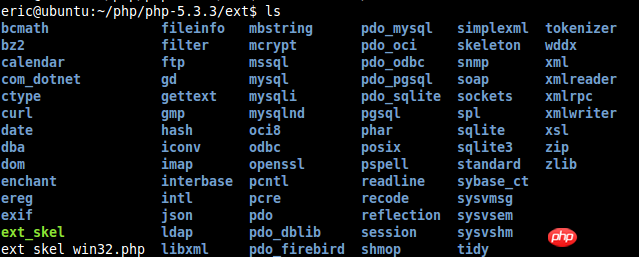
At this time, use ls to view it, and you will find that there is an additional "say_hello" directory. Enter this directory, and you will find that ext_skel has established the basic framework of say_hello for us, as shown below:

If you are too lazy to figure out the entire contents of the PHP extension package directory structure, then there are three files in it that you must pay attention to:
config.m4: This is the Build System configuration file in the Unix environment, followed by Configuration and installation will be generated through it.
php_say_hello.h: This file is the header file of the extension module. Following the consistent style of C language, some custom structures, global variables, etc. can be placed in this.
say_hello.c: This is the main program file of the extension module. The final function entries of the extension module are here. Of course, you can stuff all the program code into it, or you can follow the modular idea and put each functional module into different files.
The following content mainly revolves around these three files.
Unix Build System Configuration
The first step in developing PHP extension components is not to write the implementation code, but to configure the Build System options first. Since we are developing under Linux, the configuration here is mainly related to config.m4.
Regarding the Build System configuration, if I can write a lot, and it is related to many things in the Unix system, even if I am interested in writing it, I guess everyone will not be interested in reading it, so we will omit it here and only select Let’s talk about the key points. For more details about config.m4, please refer here.
Open the generated config.m4 file, the content is roughly as follows:
dnl $Id$
dnl config.m4 for extension say_hello
dnl Comments in this file start with the string 'dnl'.
dnl Remove where necessary. This file will not work
dnl without editing.

dnl If your extension references something external, use with:
dnl PHP_ARG_WITH(say_hello, for say_hello support,
dnl Make sure that the comment is aligned:
dnl [ --with-say_hello Include say_hello support])

dnl Otherwise use enable:
dnl PHP_ARG_ENABLE(say_hello, whether to enable say_hello support,
dnl Make sure that the comment is aligned:
dnl [ --enable-say_hello Enable say_hello support])

if test "$PHP_SAY_HELLO" != "no"; then
dnl Write more examples of tests here...
dnl # --with-say_hello -> check with-path
dnl SEARCH_PATH="/usr/local /usr" # you might want to change this
dnl SEARCH_FOR="/include/say_hello.h" # you most likely want to change this
dnl if test -r $PHP_SAY_HELLO/$SEARCH_FOR; then # path given as parameter
dnl SAY_HELLO_DIR=$PHP_SAY_HELLO
dnl else # search default path list
dnl AC_MSG_CHECKING([for say_hello files in default path])
dnl for i in $SEARCH_PATH ; do
dnl if test -r $i/$SEARCH_FOR; then
dnl SAY_HELLO_DIR=$i
dnl AC_MSG_RESULT(found in $i)
dnl fi
dnl done
dnl fi
dnl
dnl if test -z "$SAY_HELLO_DIR"; then
dnl AC_MSG_RESULT([not found])
dnl AC_MSG_ERROR([Please reinstall the say_hello distribution])
dnl fi
dnl # --with-say_hello -> add include path
dnl PHP_ADD_INCLUDE($SAY_HELLO_DIR/include)
dnl # --with-say_hello -> check for lib and symbol presence
dnl LIBNAME=say_hello # you may want to change this
dnl LIBSYMBOL=say_hello # you most likely want to change this
dnl PHP_CHECK_LIBRARY($LIBNAME,$LIBSYMBOL,
dnl [
dnl PHP_ADD_LIBRARY_WITH_PATH($LIBNAME, $SAY_HELLO_DIR/lib, SAY_HELLO_SHARED_LIBADD)
dnl AC_DEFINE(HAVE_SAY_HELLOLIB,1,[ ])
dnl ],[
dnl AC_MSG_ERROR([wrong say_hello lib version or lib not found])
dnl ],[
dnl -L$SAY_HELLO_DIR/lib -lm
dnl ])
dnl
dnl PHP_SUBST(SAY_HELLO_SHARED_LIBADD)
PHP_NEW_EXTENSION(say_hello, say_hello.c, $ext_shared)
fi
Copy after login
Don’t read so much, because all the files starting with "dnl" It's all comments, so there are only a few lines that actually work. All that needs to be configured here are the following lines:
dnl If your extension references something external, use with:
dnl PHP_ARG_WITH(say_hello, for say_hello support,
dnl Make sure that the comment is aligned:
dnl [ --with-say_hello Include say_hello support])

dnl Otherwise use enable:
dnl PHP_ARG_ENABLE(say_hello, whether to enable say_hello support,
dnl Make sure that the comment is aligned:
dnl [ --enable-say_hello Enable say_hello support])
Copy after login
I think everyone can understand it, which means "if your extension references external components, use …, otherwise use…”. Our say_hello extension does not reference external components, so remove the "dnl" in the three lines below "Otherwise use enable" and change it to:
dnl Otherwise use enable:
PHP_ARG_ENABLE(say_hello, whether to enable say_hello support,
Make sure that the comment is aligned:
[ --enable-say_hello Enable say_hello support])
Copy after login
Save, In this way, the Build System configuration is complete.
PHP Extension and Zend_Module Structural Analysis
The above can be seen as preparation work for developing PHP extensions, and the core code will be written next. As mentioned above, writing PHP extensions is based on Zend API and some macros, so if we want to write core code, we must first figure out the structure of PHP Extension. Because a PHP Extension is actually a zend_module_entry structure at the C language level, which can be confirmed from "php_say_hello.h". Open "php_say_hello.h" and you will see a line in it:
extern zend_module_entry say_hello_module_entry;
say_hello_module_entry is the C language corresponding element of the say_hello extension, and the definition of its type zend_module_entry can be found in the "Zend/zend_modules.h" file of the PHP source code. The following code is zend_module_entry Definition:
typedef struct _zend_module_entry zend_module_entry;

struct _zend_module_entry {
    unsigned short size;
    unsigned int zend_api;
    unsigned char zend_debug;
    unsigned char zts;
    const struct _zend_ini_entry *ini_entry;
    const struct _zend_module_dep *deps;
    const char *name;
    const struct _zend_function_entry *functions;
    int (*module_startup_func)(INIT_FUNC_ARGS);
    int (*module_shutdown_func)(SHUTDOWN_FUNC_ARGS);
    int (*request_startup_func)(INIT_FUNC_ARGS);
    int (*request_shutdown_func)(SHUTDOWN_FUNC_ARGS);
    void (*info_func)(ZEND_MODULE_INFO_FUNC_ARGS);
    const char *version;
    size_t globals_size;

    #ifdef ZTS
    ts_rsrc_id* globals_id_ptr;
    #else
    void* globals_ptr;
    #endif

    void (*globals_ctor)(void *global TSRMLS_DC);
    void (*globals_dtor)(void *global TSRMLS_DC);
    int (*post_deactivate_func)(void);
    int module_started;
    unsigned char type;
    void *handle;
    int module_number;
    char *build_id;
};
Copy after login
This structure may seem a bit confusing, but I still want to explain what’s inside. Because this is the prototype of PHP Extension, if you don't understand it, you won't be able to develop PHP Extension. Of course, I will not explain each field one by one. I will only select the key fields that will be used in this article, because many fields do not need to be filled in manually, but can use certain predefined macros. filling.
The seventh field "name", this field is the name of this PHP Extension, in this example it is "say_hello".
The 8th field "functions" will store references to the functions we define in this extension. The specific structure will not be analyzed. Interested friends can read the source code of _zend_function_entry. There will be corresponding macros here when writing specific code.
The 9th to 12th fields are four function pointers respectively. These four functions will be called at the corresponding timing, namely "when the extension module is loaded", "when the extension module is unloaded", and "each request "At the beginning" and "At the end of each request". These four functions can be regarded as an interception mechanism, mainly used for resource allocation, release and other related operations at corresponding times.
The 13th field "info_func" is also a function pointer. The function pointed to by this pointer will be called when executing phpinfo() to display custom module information.
The 14th field "version" is the version of the module.
(For a more detailed introduction to zend_module_entry, please refer here)
After introducing the above fields, we can take a look at the "say_hello_module_entry" framework code automatically generated in "say_hello.c".
/* {{{ say_hello_module_entry
*/
zend_module_entry say_hello_module_entry = {
    #if ZEND_MODULE_API_NO >= 20010901
    STANDARD_MODULE_HEADER,
    #endif
    "say_hello",
    say_hello_functions,
    PHP_MINIT(say_hello),
    PHP_MSHUTDOWN(say_hello),
    PHP_RINIT(say_hello), /* Replace with NULL if there's nothing to do at request start */
    PHP_RSHUTDOWN(say_hello), /* Replace with NULL if there's nothing to do at request end */
    PHP_MINFO(say_hello),
    #if ZEND_MODULE_API_NO >= 20010901
    "0.1", /* Replace with version number for your extension */
    #endif
    STANDARD_MODULE_PROPERTIES
};
/* }}} */
Copy after login
首先,宏“STANDARD_MODULE_HEADER”会生成前6个字段,“STANDARD_MODULE_PROPERTIES ”会生成“version”后的字段,所以现在我们还不用操心。而我们关心的几个字段,也都填写好或由宏生成好了,并且在“say_hello.c”的相应位置也生成了几个函数的框架。这里要注意,几个宏的参数均为“say_hello”,但这并不表示几个函数的名字全为“say_hello”,C语言中也不可能存在函数名重载机制。实际上,在开发PHP Extension的过程中,几乎处处都要用到Zend里预定义的各种宏,从全局变量到函数的定义甚至返回值,都不能按照“裸写”的方式来编写C语言,这是因为PHP的运行机制可能会导致命名冲突等问题,而这些宏会将函数等元素变换成一个内部名称,但这些对程序员都是透明的(除非你去阅读那些宏的代码),我们通过各种宏进行编程,而宏则为我们处理很多内部的东西。
写到这里,我们的任务就明了了:第一,如果需要在相应时机处理一些东西,那么需要填充各个拦截函数内容;第二,编写say_hello的功能函数,并将引用添加到say_hello_functions中。
编写phpinfo()回调函数
因为say_hello扩展在各个生命周期阶段并不需要做操作,所以我们只编写info_func的内容,上文说过,这个函数将在phpinfo()执行时被自动调用,用于显示扩展的信息。编写这个函数会用到四个函数:
php_info_print_table_start()——开始phpinfo表格。无参数。
php_info_print_table_header()——输出表格头。第一个参数是整形,指明头的列数,然后后面的参数是与列数等量的(char*)类型参数用于指定显示的文字。
php_info_print_table_row()——输出表格内容。第一个参数是整形,指明这一行的列数,然后后面的参数是与列数等量的(char*)类型参数用于指定显示的文字。
php_info_print_table_end()——结束phpinfo表格。无参数。
下面是“say_hello.c”中需要编写的info_func的具体代码:
/* {{{ PHP_MINFO_FUNCTION
*/
PHP_MINFO_FUNCTION(say_hello)
{
    php_info_print_table_start();
    php_info_print_table_header(2, "say_hello support", "enabled");
    php_info_print_table_row(2, "author", "Zhang Yang"); /* Replace with your name */
    php_info_print_table_end();
    /* Remove comments if you have entries in php.ini
    DISPLAY_INI_ENTRIES();
    */
}
/* }}} */
Copy after login
可以看到我们编写了两行内容、组件是否可用以及作者信息。
编写核心函数
编写核心函数,总共分为三步:1、使用宏PHP_FUNCTION定义函数体;2、使用宏ZEND_BEGIN_ARG_INFO和ZEND_END_ARG_INFO定义参数信息;3、使用宏PHP_FE将函数加入到say_hello_functions中。下面分步说明。
使用宏PHP_FUNCTION定义函数体
PHP_FUNCTION(say_hello_func)
{
    char *name;
    int name_len;
    if (zend_parse_parameters(ZEND_NUM_ARGS() TSRMLS_CC, "s", &name, &name_len) == FAILURE)
    {
        return;
    }
    php_printf("Hello %s!", name);

    RETURN_TRUE;
}
Copy after login
上文说过,编写PHP扩展时几乎所有东西都不能裸写,而是必须使用相应的宏。从上面代码可以清楚看到这一点。总体来说,核心函数代码一般由如下几部分构成:
定义函数,这一步通过宏PHP_FUNCTION实现,函数的外部名称就是宏后面括号里面的名称。
声明并定义局部变量。
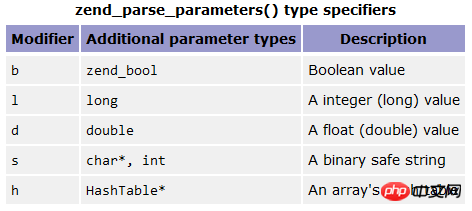
解析参数,这一步通过zend_parse_parameters函数实现,这个函数的作用是从函数用户的输入栈中读取数据,然后转换成相应的函数参数填入变量以供后面核心功能代码使用。zend_parse_parameters的第一个参数是用户传入参数的个数,可以由宏“ZEND_NUM_ARGS() TSRMLS_CC”生成;第二个参数是一个字符串,其中每个字母代表一个变量类型,我们只有一个字符串型变量,所以第二个参数是“s”;最后各个参数需要一些必要的局部变量指针用于存储数据,下表给出了不同变量类型的字母代表及其所需要的局部变量指针。

参数解析完成后就是核心功能代码,我们这里只是输出一行字符,php_printf是Zend版本的printf。
最后的返回值也是通过宏实现的。RETURN_TRUE宏是返回布尔值“true”。
使用宏ZEND_BEGIN_ARG_INFO和ZEND_END_ARG_INFO定义参数信息
参数信息是函数所必要部分,这里不做深究,直接给出相应代码:
ZEND_BEGIN_ARG_INFO(arginfo_say_hello_func, 0) ZEND_END_ARG_INFO()
Copy after login
如需了解具体信息请阅读相关宏定义。
使用宏PHP_FE将函数加入到say_hello_functions中
最后,我们需要将刚才定义的函数和参数信息加入到say_hello_functions数组里,代码如下:
const zend_function_entry say_hello_functions[] = {
PHP_FE(say_hello_func, arginfo_say_hello_func)
    {NULL, NULL, NULL}
};
Copy after login
这一步就是通过PHP_EF宏实现,注意这个数组最后一行必须是{NULL, NULL, NULL} ,请不要删除。
下面是编写完成后的say_hello.c全部代码:
/*
+----------------------------------------------------------------------+
| PHP Version 5                                                        |
+----------------------------------------------------------------------+
| Copyright (c) 1997-2010 The PHP Group                                |
+----------------------------------------------------------------------+
| This source file is subject to version 3.01 of the PHP license,      |
| that is bundled with this package in the file LICENSE, and is        |
| available through the world-wide-web at the following url:           |
| http://www.php.net/license/3_01.txt                                  |
| If you did not receive a copy of the PHP license and are unable to   |
| obtain it through the world-wide-web, please send a note to          |
| license@php.net so we can mail you a copy immediately.               |
+----------------------------------------------------------------------+
| Author: ZhangYang                          |
+----------------------------------------------------------------------+
*/
/* $Id: header 297205 2010-03-30 21:09:07Z johannes $ */
#ifdef HAVE_CONFIG_H
#include "config.h"
#endif
#include "php.h"
#include "php_ini.h"
#include "ext/standard/info.h"
#include "php_say_hello.h"
/* If you declare any globals in php_say_hello.h uncomment this:
ZEND_DECLARE_MODULE_GLOBALS(say_hello)
*/
/* True global resources - no need for thread safety here */
static int le_say_hello;
/* {{{ PHP_FUNCTION
*/
PHP_FUNCTION(say_hello_func)
{
    char *name;
    int name_len;
    if (zend_parse_parameters(ZEND_NUM_ARGS() TSRMLS_CC, "s", &name, &name_len) == FAILURE)
    {
        return;
    }
    php_printf("Hello %s!", name);
    RETURN_TRUE;
}
ZEND_BEGIN_ARG_INFO(arginfo_say_hello_func, 0)
ZEND_END_ARG_INFO()
/* }}} */
/* {{{ say_hello_functions[]
*
* Every user visible function must have an entry in say_hello_functions[].
*/
const zend_function_entry say_hello_functions[] = {
    PHP_FE(say_hello_func, arginfo_say_hello_func)
    {NULL, NULL, NULL} /* Must be the last line in say_hello_functions[] */
};
/* }}} */
/* {{{ say_hello_module_entry
*/
zend_module_entry say_hello_module_entry = {
    #if ZEND_MODULE_API_NO >= 20010901
    STANDARD_MODULE_HEADER,
    #endif
    "say_hello",
    say_hello_functions,
    NULL,
    NULL,
    NULL,
    NULL,
    PHP_MINFO(say_hello),
    #if ZEND_MODULE_API_NO >= 20010901
    "0.1", /* Replace with version number for your extension */
    #endif
    STANDARD_MODULE_PROPERTIES
};
/* }}} */
#ifdef COMPILE_DL_SAY_HELLO
ZEND_GET_MODULE(say_hello)
#endif
/* {{{ PHP_MINFO_FUNCTION
*/
PHP_MINFO_FUNCTION(say_hello)
{
    php_info_print_table_start();
    php_info_print_table_header(2, "say_hello support", "enabled");
    php_info_print_table_row(2, "author", "Zhang Yang"); /* Replace with your name */
    php_info_print_table_end();
    /* Remove comments if you have entries in php.ini
    DISPLAY_INI_ENTRIES();
    */
}
/* }}} */
Copy after login
编译并安装扩展
在say_hello目录下输入下面命令:
/usr/bin/phpize
./configure
make
make install
这样就完成了say_hello扩展的安装(如果没有报错的话)。
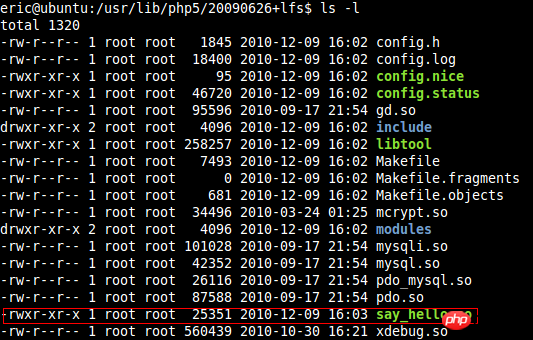
这时如果你去放置php扩展的目录下,会发现多了一个say_hello.so的文件。如下图所示:

下面就是将其加入到php.ini配置中,然后重启Apache(如果需要的话)。这些都是PHP基本配置的内容,我就不详述了。
扩展测试
如果上面顺利完成,这时运行phpinfo(),应该能看到如下信息:

这说明扩展已经安装成功了。然后我们编写一个测试用PHP脚本:
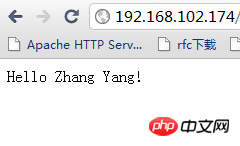
<?php say_hello_func('Zhang Yang'); ?>;
Copy after login
执行这个脚本,结果如下:

说明扩展已经正常工作了。
总结
这篇文章主要用示例方法介绍PHP Extension的开发基础。在PHP的使用中,也许是因为需要支持新的组件(如新的数据库),又或是业务需要或性能需要,几乎都会遇到需要开发PHP扩展的地方。后续如果有机会,我会写文章介绍一些关于扩展开发较为深入的东西,如扩展模块生命周期、INI使用以及编写面向对象的扩展模块等等。
The above is the detailed content of In-depth understanding of PHP extension development. For more information, please follow other related articles on the PHP Chinese website!

Hot AI Tools

Undresser.AI Undress
AI-powered app for creating realistic nude photos

AI Clothes Remover
Online AI tool for removing clothes from photos.

Undress AI Tool
Undress images for free

Clothoff.io
AI clothes remover

Video Face Swap
Swap faces in any video effortlessly with our completely free AI face swap tool!

Hot Article

Hot Tools

Notepad++7.3.1
Easy-to-use and free code editor

SublimeText3 Chinese version
Chinese version, very easy to use

Zend Studio 13.0.1
Powerful PHP integrated development environment

Dreamweaver CS6
Visual web development tools

SublimeText3 Mac version
God-level code editing software (SublimeText3)

Hot Topics
 1389
1389
 52
52
 PHP 8.4 Installation and Upgrade guide for Ubuntu and Debian
Dec 24, 2024 pm 04:42 PM
PHP 8.4 brings several new features, security improvements, and performance improvements with healthy amounts of feature deprecations and removals. This guide explains how to install PHP 8.4 or upgrade to PHP 8.4 on Ubuntu, Debian, or their derivati
 7 PHP Functions I Regret I Didn't Know Before
Nov 13, 2024 am 09:42 AM
If you are an experienced PHP developer, you might have the feeling that you’ve been there and done that already.You have developed a significant number of applications, debugged millions of lines of code, and tweaked a bunch of scripts to achieve op
 How To Set Up Visual Studio Code (VS Code) for PHP Development
Dec 20, 2024 am 11:31 AM
Visual Studio Code, also known as VS Code, is a free source code editor — or integrated development environment (IDE) — available for all major operating systems. With a large collection of extensions for many programming languages, VS Code can be c
 Explain JSON Web Tokens (JWT) and their use case in PHP APIs.
Apr 05, 2025 am 12:04 AM
JWT is an open standard based on JSON, used to securely transmit information between parties, mainly for identity authentication and information exchange. 1. JWT consists of three parts: Header, Payload and Signature. 2. The working principle of JWT includes three steps: generating JWT, verifying JWT and parsing Payload. 3. When using JWT for authentication in PHP, JWT can be generated and verified, and user role and permission information can be included in advanced usage. 4. Common errors include signature verification failure, token expiration, and payload oversized. Debugging skills include using debugging tools and logging. 5. Performance optimization and best practices include using appropriate signature algorithms, setting validity periods reasonably,
 How do you parse and process HTML/XML in PHP?
Feb 07, 2025 am 11:57 AM
This tutorial demonstrates how to efficiently process XML documents using PHP. XML (eXtensible Markup Language) is a versatile text-based markup language designed for both human readability and machine parsing. It's commonly used for data storage an
 PHP Program to Count Vowels in a String
Feb 07, 2025 pm 12:12 PM
A string is a sequence of characters, including letters, numbers, and symbols. This tutorial will learn how to calculate the number of vowels in a given string in PHP using different methods. The vowels in English are a, e, i, o, u, and they can be uppercase or lowercase. What is a vowel? Vowels are alphabetic characters that represent a specific pronunciation. There are five vowels in English, including uppercase and lowercase: a, e, i, o, u Example 1 Input: String = "Tutorialspoint" Output: 6 explain The vowels in the string "Tutorialspoint" are u, o, i, a, o, i. There are 6 yuan in total
 Explain late static binding in PHP (static::).
Apr 03, 2025 am 12:04 AM
Static binding (static::) implements late static binding (LSB) in PHP, allowing calling classes to be referenced in static contexts rather than defining classes. 1) The parsing process is performed at runtime, 2) Look up the call class in the inheritance relationship, 3) It may bring performance overhead.
 What are PHP magic methods (__construct, __destruct, __call, __get, __set, etc.) and provide use cases?
Apr 03, 2025 am 12:03 AM
What are the magic methods of PHP? PHP's magic methods include: 1.\_\_construct, used to initialize objects; 2.\_\_destruct, used to clean up resources; 3.\_\_call, handle non-existent method calls; 4.\_\_get, implement dynamic attribute access; 5.\_\_set, implement dynamic attribute settings. These methods are automatically called in certain situations, improving code flexibility and efficiency.


