
 Backend Development
Python Tutorial
Detailed explanation of Django's auth module (user authentication)
Backend Development
Python Tutorial
Detailed explanation of Django's auth module (user authentication)
Detailed explanation of Django's auth module (user authentication)

This article mainly introduces the detailed explanation of Django's auth module (user authentication). Now I share it with you and give it as a reference. Let’s take a look together
#The auth module is an encapsulation of the login authentication method. Previously, after we obtained the user name and password entered by the user, we needed to query whether there is a user from the user table. An object whose name and password match,
With the auth module, you can easily verify whether the user's login information exists in the database.
In addition, auth also encapsulates the session to facilitate us to verify whether the user has logged in
Methods in auth
If you want to use the methods of the auth module, you must first import the auth module.
from django.contrib import auth
django.contrib.auth provides many methods. Here we mainly introduce four of them:
1, authenticate()
provides user authentication, that is, to verify whether the username and password are correct. Generally, two username and password are required. Keyword parameters
If the authentication information is valid, a User object will be returned. authenticate() will set an attribute on the User object to identify which authentication backend authenticated the user, and this information will be needed in the subsequent login process. When we try to log in to a User object that is taken directly from the database without authenticate(), an error will be reported! !
user = authenticate(username='someone',password='somepassword')
2, login(HttpRequest, user)
This function accepts an HttpRequest object and an authenticated User object
This function uses Django's session framework to attach session id and other information to an authenticated user.
from django.contrib.auth import authenticate, login

def my_view(request):
  username = request.POST['username']
  password = request.POST['password']
  user = authenticate(username=username, password=password)
  if user is not None:
    login(request, user)
    # Redirect to a success page.
    ...
  else:
    # Return an 'invalid login' error message.
...3 、logout(request) Log out the user
This function accepts an HttpRequest object and has no return value. When this function is called, all session information for the current request will be cleared. Even if the user is not logged in, no error will be reported when using this function.
from django.contrib.auth import logout

def logout_view(request):
  logout(request)
 # Redirect to a success page.
4. is_authenticated() of the user object
Requirements:
1 User login Some pages can only be accessed after logging in.
2 If the user accesses the page without logging in, it will jump directly to the login page.
3 After the user completes the login in the jumped login interface, the user will automatically access the jump page. Go to the previously visited address
Method 1:
Directly verify using the is_authenticated() method of auth
def my_view(request):
   if not request.user.is_authenticated():
return redirect('%s?next=%s' % (settings.LOGIN_URL, request.path))Method 2:
Verify based on request.user.username. If it is empty, it means you are not logged in
def my_view(request):
   if not request.user.username:
return redirect('%s?next=%s' % (settings.LOGIN_URL, request.path))Method 3:
Django has designed a decorator for us for this situation: login_requierd()
from django.contrib.auth.decorators import login_required

@login_required
def my_view(request):
 ...
If the user is not logged in, it will jump Go to django's default login URL '/accounts/login/ ' (this value can be modified in the settings file through LOGIN_URL). And pass the absolute path of the current access URL (after successful login, you will be redirected to this path).
user object
User object attributes: username, password (required) password is saved to the database using a hash algorithm
is_staff: Whether the user has administrative rights to the website.
is_active: Whether the user is allowed to log in, set to ``False``, you can prohibit the user from logging in without deleting the user
2.1. is_authenticated()
If it is a real User object, the return value is always True. Used to check whether the user has passed the authentication.
Passing authentication does not mean that the user has any permissions, nor does it even check whether the user is active. It just means that the user has successfully passed the authentication. This method is very important. Use request.user.is_authenticated() in the background to determine whether the user has logged in. If true, you can display request.user.name
2.2 and create a user
Use the create_user auxiliary function to create a user:
from django.contrib.auth.models import User
user = User.objects.create_user(username='',password='',email='')
2.3, check_password(passwd)
user = User.objects.get(username=' ')
if user.check_password(passwd):
  ......
When the user needs to change the password, he must first enter the original password. If the given string passes the password check, return True
Use set_password() To change the password
user = User.objects.get(username='')
user.set_password(password='')
user.save
2.5, simple example
Registration:
def sign_up(request):

  state = None
  if request.method == 'POST':

    password = request.POST.get('password', '')
    repeat_password = request.POST.get('repeat_password', '')
    email=request.POST.get('email', '')
    username = request.POST.get('username', '')
    if User.objects.filter(username=username):
        state = 'user_exist'
    else:
        new_user = User.objects.create_user(username=username, password=password,email=email)
        new_user.save()

        return redirect('/book/')
  content = {
    'state': state,
    'user': None,
  }
return render(request, 'sign_up.html', content) Change password:
@login_required
def set_password(request):
  user = request.user
  state = None
  if request.method == 'POST':
    old_password = request.POST.get('old_password', '')
    new_password = request.POST.get('new_password', '')
    repeat_password = request.POST.get('repeat_password', '')
    if user.check_password(old_password):
      if not new_password:
        state = 'empty'
      elif new_password != repeat_password:
        state = 'repeat_error'
      else:
        user.set_password(new_password)
        user.save()
        return redirect("/log_in/")
    else:
      state = 'password_error'
  content = {
    'user': user,
    'state': state,
  }
return render(request, 'set_password.html', content)##Create the User table yourself
It should be noted that all the above operations are for the auth_user table automatically created by django. We can take a look at the structure of this table
继承表的好处是我们可以增加一些自己需要的字段,并且同时可以使用auth模块提供的接口、方法
下面就讲一下继承auth的方法:
1、导入AbstractUser类,并且写一个自定义的类,继承AbstractUser类,如下:
from django.contrib.auth.models import AbstractUser

class UserInfo(AbstractUser):
  """
  用户信息
  """
  nid = models.AutoField(primary_key=True)
  telephone = models.CharField(max_length=11, null=True, unique=True)
  ......
需要注意的是,UserInfo表里就不需要有auth_user里重复的字段了,比如说username以及password等,但是还是可以直接使用这些字段的,并且django会自动将password进行加密
2、这样写完之后,还需要在setting.py文件里配置:
AUTH_USER_MODEL = 'blog.UserInfo'
这样,django就知道从blog项目下的models去查找UserInfo这张表了
相关推荐:
The above is the detailed content of Detailed explanation of Django's auth module (user authentication). For more information, please follow other related articles on the PHP Chinese website!

Hot AI Tools

Undresser.AI Undress
AI-powered app for creating realistic nude photos

AI Clothes Remover
Online AI tool for removing clothes from photos.

Undress AI Tool
Undress images for free

Clothoff.io
AI clothes remover

AI Hentai Generator
Generate AI Hentai for free.

Hot Article
Hot Tools

Notepad++7.3.1
Easy-to-use and free code editor

SublimeText3 Chinese version
Chinese version, very easy to use

Zend Studio 13.0.1
Powerful PHP integrated development environment

Dreamweaver CS6
Visual web development tools

SublimeText3 Mac version
God-level code editing software (SublimeText3)
Hot Topics
 1377
1377
 52
52

 How to use Xiaohongshu account to find users? Can I find my mobile phone number?
Mar 22, 2024 am 08:40 AM
How to use Xiaohongshu account to find users? Can I find my mobile phone number?
Mar 22, 2024 am 08:40 AM
With the rapid development of social media, Xiaohongshu has become one of the most popular social platforms. Users can create a Xiaohongshu account to show their personal identity and communicate and interact with other users. If you need to find a user’s Xiaohongshu number, you can follow these simple steps. 1. How to use Xiaohongshu account to find users? 1. Open the Xiaohongshu APP, click the "Discover" button in the lower right corner, and then select the "Notes" option. 2. In the note list, find the note posted by the user you want to find. Click to enter the note details page. 3. On the note details page, click the "Follow" button below the user's avatar to enter the user's personal homepage. 4. In the upper right corner of the user's personal homepage, click the three-dot button and select "Personal Information"
 Log in to Ubuntu as superuser
Mar 20, 2024 am 10:55 AM
Log in to Ubuntu as superuser
Mar 20, 2024 am 10:55 AM
In Ubuntu systems, the root user is usually disabled. To activate the root user, you can use the passwd command to set a password and then use the su- command to log in as root. The root user is a user with unrestricted system administrative rights. He has permissions to access and modify files, user management, software installation and removal, and system configuration changes. There are obvious differences between the root user and ordinary users. The root user has the highest authority and broader control rights in the system. The root user can execute important system commands and edit system files, which ordinary users cannot do. In this guide, I'll explore the Ubuntu root user, how to log in as root, and how it differs from a normal user. Notice
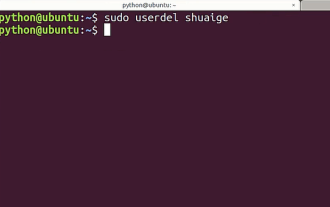 Tutorial: How to delete a normal user account in Ubuntu system?
Jan 02, 2024 pm 12:34 PM
Tutorial: How to delete a normal user account in Ubuntu system?
Jan 02, 2024 pm 12:34 PM
Many users have been added to the Ubuntu system. I want to delete the users that are no longer in use. How to delete them? Let’s take a look at the detailed tutorial below. 1. Open the terminal command line and use the userdel command to delete the specified user. Be sure to add the sudo permission command, as shown in the figure below. 2. When deleting, be sure to be in the administrator directory. Ordinary users do not have this permission. , as shown in the figure below 3. After the delete command is executed, how to judge whether it has been truly deleted? Next we use the cat command to open the passwd file, as shown in the figure below 4. We see that the deleted user information is no longer in the passwd file, which proves that the user has been deleted, as shown in the figure below 5. Then we enter the home file
 What is sudo and why is it important?
Feb 21, 2024 pm 07:01 PM
What is sudo and why is it important?
Feb 21, 2024 pm 07:01 PM
sudo (superuser execution) is a key command in Linux and Unix systems that allows ordinary users to run specific commands with root privileges. The function of sudo is mainly reflected in the following aspects: Providing permission control: sudo achieves strict control over system resources and sensitive operations by authorizing users to temporarily obtain superuser permissions. Ordinary users can only obtain temporary privileges through sudo when needed, and do not need to log in as superuser all the time. Improved security: By using sudo, you can avoid using the root account during routine operations. Using the root account for all operations may lead to unexpected system damage, as any mistaken or careless operation will have full permissions. and
 Django vs. Flask: A comparative analysis of Python web frameworks
Jan 19, 2024 am 08:36 AM
Django vs. Flask: A comparative analysis of Python web frameworks
Jan 19, 2024 am 08:36 AM
Django and Flask are both leaders in Python Web frameworks, and they both have their own advantages and applicable scenarios. This article will conduct a comparative analysis of these two frameworks and provide specific code examples. Development Introduction Django is a full-featured Web framework, its main purpose is to quickly develop complex Web applications. Django provides many built-in functions, such as ORM (Object Relational Mapping), forms, authentication, management backend, etc. These features allow Django to handle large
 Django Framework Pros and Cons: Everything You Need to Know
Jan 19, 2024 am 09:09 AM
Django Framework Pros and Cons: Everything You Need to Know
Jan 19, 2024 am 09:09 AM
Django is a complete development framework that covers all aspects of the web development life cycle. Currently, this framework is one of the most popular web frameworks worldwide. If you plan to use Django to build your own web applications, then you need to understand the advantages and disadvantages of the Django framework. Here's everything you need to know, including specific code examples. Django advantages: 1. Rapid development-Djang can quickly develop web applications. It provides a rich library and internal
 Analysis of user password storage mechanism in Linux system
Mar 20, 2024 pm 04:27 PM
Analysis of user password storage mechanism in Linux system
Mar 20, 2024 pm 04:27 PM
Analysis of user password storage mechanism in Linux system In Linux system, the storage of user password is one of the very important security mechanisms. This article will analyze the storage mechanism of user passwords in Linux systems, including the encrypted storage of passwords, the password verification process, and how to securely manage user passwords. At the same time, specific code examples will be used to demonstrate the actual operation process of password storage. 1. Encrypted storage of passwords In Linux systems, user passwords are not stored in the system in plain text, but are encrypted and stored. L
 How to upgrade Django version: steps and considerations
Jan 19, 2024 am 10:16 AM
How to upgrade Django version: steps and considerations
Jan 19, 2024 am 10:16 AM
How to upgrade Django version: steps and considerations, specific code examples required Introduction: Django is a powerful Python Web framework that is continuously updated and upgraded to provide better performance and more features. However, for developers using older versions of Django, upgrading Django may face some challenges. This article will introduce the steps and precautions on how to upgrade the Django version, and provide specific code examples. 1. Back up project files before upgrading Djan
