

How to upgrade vue cli to webapck4
This time I will show you how to upgrade webapck4 with vue cli. What are the precautions for upgrading webapck4 with vue cli? Here are actual cases, let’s take a look.
webpack4 has been released for a while, and the plug-in system has stabilized. I am very dissatisfied with the packaging speed of webpack3, so I decided to upgrade the project I am currently working on and try out webpack4. New Features0 Configuration
It should be after parcel came out that the webpack team realized that its configuration was indeed a bit complicated and not easy to get started. so, webapck4 starts to support zero configuration startup. However, the same thing remains true. The 0 configuration of webpack4 only supports the default entry and output, that is, the default entry is ./src and the default output is /dist.Mode selectionmode
mode has two options, production & development. As a required option, mode cannot be defaulted. In production mode, some necessary optimizations will be made by default, such as code compression and scope promotion, and process.env.NODE_ENV will be specified as production by default. In development mode, incremental builds are optimized, comments and prompts are supported, and source maps under eval are supported, while process.env.NODE_ENV is specified as development by default.sideEffects
This configuration can greatly reduce the packaging volume. When the module's package.json is configured with sideEffects:false, it indicates that the module has no side effects, which means that webpack can safely clean up the code used for re-exports.Module Type
webpack4 provides 5 module types.- json: JSON format data that can be imported through
- webassembly: WebAssembly module, (currently the default type for .wasm files)
javascript/auto: (default type in webpack 3) supports all JS Module system: CommonJS, AMD.
- javascript/esm: EcmaScript module (default .mjs file).
- javascript/dynamic: Only supports CommonJS & AMD.
JSON
#webpack 4 not only supports native processing of JSON, but also supports Tree Shaking of JSON. When using ESM syntax to import json, webpack will eliminate unused exports in the JSON Module. In addition, if you want to use loader to convert json to js, you need to set type to javascript/auto.#optimization
Webpack 4 removed the CommonsChunkPlugin and enabled many of its features by default. Therefore webpack4 can achieve good default optimization. However, for those requiring custom caching strategies, optimization.splitChunks and optimization.runtimeChunk were added. For specific explanation, please refer to this article, which is explained in detail. RIP CommonsChunkPlugin click preview.
Step by step upgrade
I upgraded the original vue cli project. Generally speaking, the upgrade was relatively smooth. Here we divide it into two steps. , first upgrade the relevant dependent plug-ins, and then optimize the webapckconfig file.
Upgrade plug-ins
First, upgrade the plug-ins listed below to the corresponding version or the latest versionwebpack@4.4.1If you encounter errors from other packages, it should be solved by upgrading to the latest one. . Update configuration filecss-loader@0.28.10,
extract-text-webpack-plugin@4.0.0-beta.0,file-loader@1.1.11,
html- webpack-plugin@3.1.0,
optimize-css-assets-webpack-plugin@4.0.0,
url-loader@1.0.1,
vue-loader@14.2.2,
vue-style-loader@4.1.0,
vue-template-compiler@2.5.16,
webpack-bundle-analyzer@2.11.1,
webpack-dev-middleware@3.1.0,
webpack-dev-server@3.1.1,
webpack-hot-middleware@2.21.2
webpack.dev.conf.js
dev环境变化不大,毕竟webpack4很大一部分的优化都是针对生产环境的,该文件我们只需要删除一些不再需要的插件既可以。例如:webpack.NamedModulesPlugin、webpack.NoEmitOnErrorsPlugin,其功能webpack4已经默认配置。同时,要设置
mode: 'development'
webpack.production.conf.js
webvpack4中改动最大,影响也最大的就是webpack4使用optimization.splitChunks替代了CommonsChunkPlugin。以前的CommonsChunkPlugin主要用来抽取代码中的共用部分,webpack runtime之类的代码,结合chunkhash,实现最好的缓存策略。而optimization.splitChunks则实现了相同的功能,并且配置更加灵活,具体解释可参考这篇文章,解释得很详细。
mode: 'production',
optimization: {
splitChunks: {
cacheGroups: {
vendors: {
test: /[\\/]node_modules[\\/]/,
chunks: 'initial',
name: 'vendors',
},
'async-vendors': {
test: /[\\/]node_modules[\\/]/,
minChunks: 2,
chunks: 'async',
name: 'async-vendors'
}
}
},
runtimeChunk: { name: 'runtime' }
}总结
总体来说本次升级还算顺利,不到一天搞定,目前感觉,打包速度大约优化了70%左右,同时打包后的代码体积也有了很大的优化,带来的效果很显著的。
相信看了本文案例你已经掌握了方法,更多精彩请关注php中文网其它相关文章!
推荐阅读:
The above is the detailed content of How to upgrade vue cli to webapck4. For more information, please follow other related articles on the PHP Chinese website!

Hot AI Tools

Undresser.AI Undress
AI-powered app for creating realistic nude photos

AI Clothes Remover
Online AI tool for removing clothes from photos.

Undress AI Tool
Undress images for free

Clothoff.io
AI clothes remover

AI Hentai Generator
Generate AI Hentai for free.

Hot Article
Hot Tools

Notepad++7.3.1
Easy-to-use and free code editor

SublimeText3 Chinese version
Chinese version, very easy to use

Zend Studio 13.0.1
Powerful PHP integrated development environment

Dreamweaver CS6
Visual web development tools

SublimeText3 Mac version
God-level code editing software (SublimeText3)
Hot Topics
 1359
1359
 52
52

 Several methods for upgrading Python version in Conda
Feb 18, 2024 pm 08:56 PM
Several methods for upgrading Python version in Conda
Feb 18, 2024 pm 08:56 PM
Several methods for Conda to upgrade the Python version require specific code examples. Overview: Conda is an open source package manager and environment management system for managing Python packages and environments. During development using Python, in order to use a new version of Python, we may need to upgrade from an older Python version. This article will introduce several methods of using Conda to upgrade the Python version and provide specific code examples. Method 1: Use the condainstall command
 Upgrading numpy versions: a detailed and easy-to-follow guide
Feb 25, 2024 pm 11:39 PM
Upgrading numpy versions: a detailed and easy-to-follow guide
Feb 25, 2024 pm 11:39 PM
How to upgrade numpy version: Easy-to-follow tutorial, requires concrete code examples Introduction: NumPy is an important Python library used for scientific computing. It provides a powerful multidimensional array object and a series of related functions that can be used to perform efficient numerical operations. As new versions are released, newer features and bug fixes are constantly available to us. This article will describe how to upgrade your installed NumPy library to get the latest features and resolve known issues. Step 1: Check the current NumPy version at the beginning
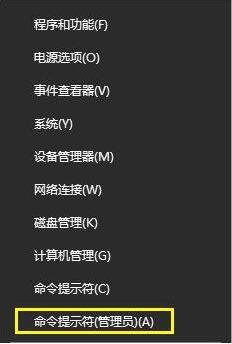 Tutorial on how to solve the problem of being unable to access the Internet after upgrading win10 system
Mar 27, 2024 pm 02:26 PM
Tutorial on how to solve the problem of being unable to access the Internet after upgrading win10 system
Mar 27, 2024 pm 02:26 PM
1. Use the win+x shortcut key to open the menu and select [Command Prompt (Administrator) (A)], as shown below: 2. After entering the command prompt interface, enter the [ipconfig/flushdns] command and press Enter , as shown in the figure below: 3. Then enter the [netshwinsockresetcatalog] command and press Enter, as shown in the figure below: 4. Finally enter the [netshintipreset] command and press Enter, restart the computer and you can access the Internet, as shown in the figure below:
 Xiaoyi upgraded to an intelligent agent! HarmonyOS NEXT Hongmeng native intelligence opens a new AI era
Jun 22, 2024 am 01:56 AM
Xiaoyi upgraded to an intelligent agent! HarmonyOS NEXT Hongmeng native intelligence opens a new AI era
Jun 22, 2024 am 01:56 AM
On June 21, Huawei Developer Conference 2024 (HDC2024) gathered again in Songshan Lake, Dongguan. At this conference, the most eye-catching thing is that HarmonyOSNEXT officially launched Beta for developers and pioneer users, and comprehensively demonstrated the three "king-breaking" innovative features of HarmonyOSNEXT in all scenarios, native intelligence and native security. HarmonyOSNEXT native intelligence: Opening a new AI era After abandoning the Android framework, HarmonyOSNEXT has become a truly independent operating system independent of Android and iOS, which can be called an unprecedented rebirth. Among its many new features, native intelligence is undoubtedly the new feature that can best bring users intuitive feelings and experience upgrades.
 Detailed explanation of how to upgrade Honor mobile phones to Hongmeng system
Mar 25, 2024 am 11:51 AM
Detailed explanation of how to upgrade Honor mobile phones to Hongmeng system
Mar 25, 2024 am 11:51 AM
In a new technological field, new operating systems always attract much attention. Recently, Honor mobile phones announced that they will be upgraded to Hongmeng OS, a new operating system developed by Huawei. This is undoubtedly good news for many Honor mobile phone users. However, many users may still have doubts about how to upgrade to Hongmeng system. This article will explain in detail how to upgrade Honor mobile phones to Hongmeng system to help users better understand and operate it. First of all, to upgrade an Honor phone to the Hongmeng system, users need to ensure that the phone is connected to the network and has sufficient power. this
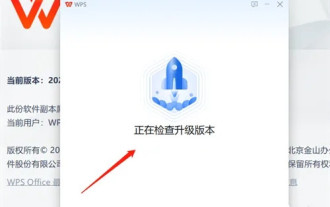 How to upgrade wps version? How to update the version of wps office?
Mar 14, 2024 am 08:43 AM
How to upgrade wps version? How to update the version of wps office?
Mar 14, 2024 am 08:43 AM
WPS is a must-have computer software for many users. Regular updates to new versions can allow users to get a better user experience and more features. So how to upgrade the wps version? There are three main methods for upgrading wpsoffice. Let’s take a look below. Method 1: Download the new version from the official website You can download the latest version of the installation package from the WPSOffice official website. After entering the WPSOffice official website (https://www.wps.cn/), click the "Download" button, select the version you need to download, and then follow the prompts to install it. Note: When installing a new version, you need to uninstall the old version, otherwise it will cause software conflicts and prevent normal use. Method 2: In WPSOf
 How to upgrade Xiaomi 14Pro to ThePaper OS?
Mar 18, 2024 pm 07:34 PM
How to upgrade Xiaomi 14Pro to ThePaper OS?
Mar 18, 2024 pm 07:34 PM
Mi 14 Pro is Xiaomi's latest flagship phone, and ThePaper OS is a new operating system independently developed by Xiaomi, dedicated to providing a smoother and smarter user experience. With the continuous development of technology, ThePaper OS is also constantly being updated and upgraded. So many users who are using Xiaomi mobile phones for the first time are asking Xiaomi 14Pro users how to upgrade ThePaper OS? How to upgrade Xiaomi Mi 14 Pro to Thermal OS? There is no need to update. The original factory comes with Thermal OS. How to update other models that support ThePaper OS: 1. Open the settings application of your phone and find the system update option. 2. The system will automatically detect the current system version and prompt when a new version is available for update. 3. Just click "Update Now" and the system will start downloading automatically.
 How to upgrade Xiaohongshu to a professional account
Mar 01, 2024 pm 04:00 PM
How to upgrade Xiaohongshu to a professional account
Mar 01, 2024 pm 04:00 PM
Many friends expressed that they want to know how to upgrade to a professional account in Xiaohongshu. Here I will introduce the operation method. If you are interested, come and take a look with me. Open the "Little Red Book" APP on your mobile phone, click the "My" option in the lower right corner after entering it, then find the "three horizontal lines" icon in the upper left corner of the My page and click to open it. 2. A menu page will pop up, in which click to select the "Creation Center" item to enter. 3. Next, find "More Services" in the options under "Creation Services" on the page you enter, and click on it to enter. 4. After the page jumps, click "Open a Professional Account" in the options under "Author Capabilities". 5. Finally, the Xiaohongshu Professional Account will be introduced on the entered page. Click "
