

Detailed explanation of the use of webpack v4
This time I will bring you a detailed explanation of the use of webpack v4, what are the precautions when using webpack v4, the following is a practical case, let's take a look.
Overview
This month ushered in the release of the official version of v4. This article is used to learn new features and summarize the must-use plugins & loaders for development, from dev to prd. You~
Big changes
Environment
Node.js 4 is no longer supported. Source Code was upgraded to a higher ecmascript version.
Usage
You have to choose (mode or --mode) between two modes now: production or development
mode is introduced in this new version Configuration items, developers can choose between none, development (development) and production (product) three modes. This configuration item uses production mode by default.
The development mode gives you the ultimate development experience, including browser debugging related tools, extremely fast incremental compilation, and rich and comprehensive error information...
The production mode includes a lot of release optimization, code compression, smooth runtime optimization, elimination of development-related code, ease of use, etc.
none No Using the default is equivalent to the original state of all self-configurations in the old version.
#eg:
webpack --mode development
Usage
Some Plugin options are now validated
CLI has been move to webpack-cli, you need to install webpack-cli to use the CLI
The ProgressPlugin (--progress) now displays plugin names
At least for plugins migrated to the new plugin system
In the new version, the webpack command line tool is split into a separate warehouse, so additional installation of webpack is required- cli.
npm init -y //初始化项目
npm install webpack webpack-cli -D //安装webpack webpack-cli 依赖
npx webpack --mode development // npx可以直接运行node_modules/.bin目录下面的命令
Or configure the script build of package.json
"scripts": {
 "build": "webpack --mode development",
},Load loader method summary
use
module: {
 rules:[
  {
   test: /\.css$/,
   use: ['style-loader','css-loader']
  }
 ]
}css-loader is used to parse and process the url path in the CSS file, and turn the CSS file into a module
Multiple loaders are required in order, written from right to left, because when converting It is converted from right to left
This plug-in first uses css-loader to process the css file, and then uses style-loader to turn the CSS file into a style tag and insert it into the head
loader
module: {
 rules:[
  {
   test: /\.css$/,
   loader: ["style-loader", "css-loader"]
  },
 ]
}use loader
module: {
 rules:[
  {
   test: /\.css$/,
   use:[
    { loader:"style-loader"},
    {
     loader: 'css-loader',
     options: {sourceMap: true}
    }
   ]
  }
 ]
}These three ways of writing loaders have the same final packaging results
The options configuration item in the loader can be followed by "?" after the loader
eg:
{
 test: /\.jpeg$/,
 use: 'url-loader?limit=1024&name=[path][name].[ext]&outputPath=img/&publicPath=output/',
}is the abbreviation of the following configuration
{
 test: /\.jpeg$/,
 use: {
  loader:'url-loader',
  options:{
   limit:1024,
   name:[path][name].[ext],
   outputPath:img/
   publicPath:output/'
  }
 }
}Develop necessary loader&plugins
css-loader
babel-loader
Talk about converting ES6 code to ES5
{
 test: /\.js/,
 use: {
  loader: 'babel-loader',
  query: {
   presets: ["env", "stage-0", "react"]
  }
 }
},babel-loader's preset can be added to the query , you can also add a .babelrc file in the project root directory
.babelrc
{
 "presets": [
  "env",
  "stage-0",
  "react"
 ]
}html-webpack-plugin
The basic function of the plug-in is to generate html files. The principle is very simple:
Insert the relevant entry thunk of the entry configuration in webpack and the css style extracted by extract-text-webpack-plugin into the template provided by the plug-in or the content specified by the templateContent configuration item to generate an html file, the specific insertion method is to insert the style link into the head element and the script into the head or body.
const HtmlWebpackPlugin = require('html-webpack-plugin');
new HtmlWebpackPlugin({
 template: './src/index.html',//指定产的HTML模板
 filename: `index.html`,//产出的HTML文件名
 title: 'index',
 hash: true,// 会在引入的js里加入查询字符串避免缓存,
 minify: {
  removeAttributeQuotes: true
 }
}),You can use cnpm search html-webpack-plugin to find the usage of loader
less-loader sass-loader
Optimize towards prd
Extract public css code
它会将所有的入口 chunk(entry chunks)中引用的 *.css,移动到独立分离的 CSS 文件。因此,你的样式将不再内嵌到 JS bundle 中,而是会放到一个单独的 CSS 文件(即 styles.css)当中。 如果你的样式文件大小较大,这会做更快提前加载,因为 CSS bundle 会跟 JS bundle 并行加载。
npm i extract-text-webpack-plugin@next -D
const ExtractTextWebpackPlugin = require('extract-text-webpack-plugin');
let cssExtract = new ExtractTextWebpackPlugin({
 filename: 'css/css.css',
 allChunks: true
});module:{
rules:[
{
test: /\.css$/,//转换文件的匹配正则
loader: cssExtract.extract({
use: ["css-loader?minimize"]
})
},
]
}
plugins:[
...... ,
+ cssExtract
]尽量减少文件解析,用resolve配置文件解析路径,include
rules: {
 test: /\.js$/,
 loader:'babel-loader',
 include: path.resolve(dirname, 'src'),//只转换或者编译src 目录 下的文件
 exclude: /node_modules/ //不要解析node_modules
}resolve.mainFields
WebpackTest
|
|
| - src
| | - index.js
|
| - lib
| | - fetch
|  |
|  browser.js
|  node.js
|  package.json
|
| - webpack.config.js
当从 npm 包中导入模块时(例如,引入lib下的库),此选项将决定在 package.json 中使用哪个字段导入模块。根据 webpack 配置中指定的 target 不同,默认值也会有所不同。
package.json
lib文件夹下的package.json中配置相对应模块的key
{
 "name": "fetch",
 "version": "1.0.0",
 "description": "",
 "node": "./node.js",
 "browser": "./browser.js",
 "scripts": {
 "test": "echo \"Error: no test specified\" && exit 1"
 },
 "keywords": [],
 "author": "",
 "license": "ISC"
}webpack.config.js
在resolve解析对象中,加入lib的路径
resolve: {
 extensions: ['.js', '.json'],
 mainFields: ['main', 'browser', 'node'],
 modules: [path.resolve('node_modules'), path.resolve('lib')]
}index.js
这样在index.js中引用第三方库时,会去查找modules下的路径中是否配置了所需的文件,知道在package.json中找到mainFields中的key对应文件,停止。
let fetch = require('fetch');
console.log(fetch);打包后 console.log出的对象

如果交换mainFields中的key顺序
mainFields: ['main', 'node','browser']
打包后 console.log出的对象,因为找到了key=node对应的文件就停止了查找

DllReferencePlugin
这个插件是在 webpack 主配置文件中设置的, 这个插件把只有 dll 的 bundle(们)(dll-only-bundle(s)) 引用到需要的预编译的依赖。
新建webpack.react.config.js
const path = require('path');
const webpack = require('webpack')
module.exports = {
 entry: {
  react: ['react', 'react-dom']
 },
 output: {
  path: path.join(dirname, 'dist'),// 输出动态连接库的文件名称
  filename: '[name]_dll.js',
  library: '_dll_[name]'//全局变量的名字,其它会从此变量上获取到里面的模块
 },
 // manifest 表示一个描述文件
 plugins: [
  new webpack.DllPlugin({
   name: '_dll_[name]',
   path: path.join(dirname, 'dist', 'manifest.json')//最后打包出来的文件目录和名字
  })
 ]
}在entry入口写入要打包成dll的文件,这里把体积较大的react和react-dom打包
output中的关键是library的全局变量名,下文详细说明dll&manifest工作原理
打包dll文件
webpack --config webpack.react.config.js --mode development
打包出来的manifest.json节选
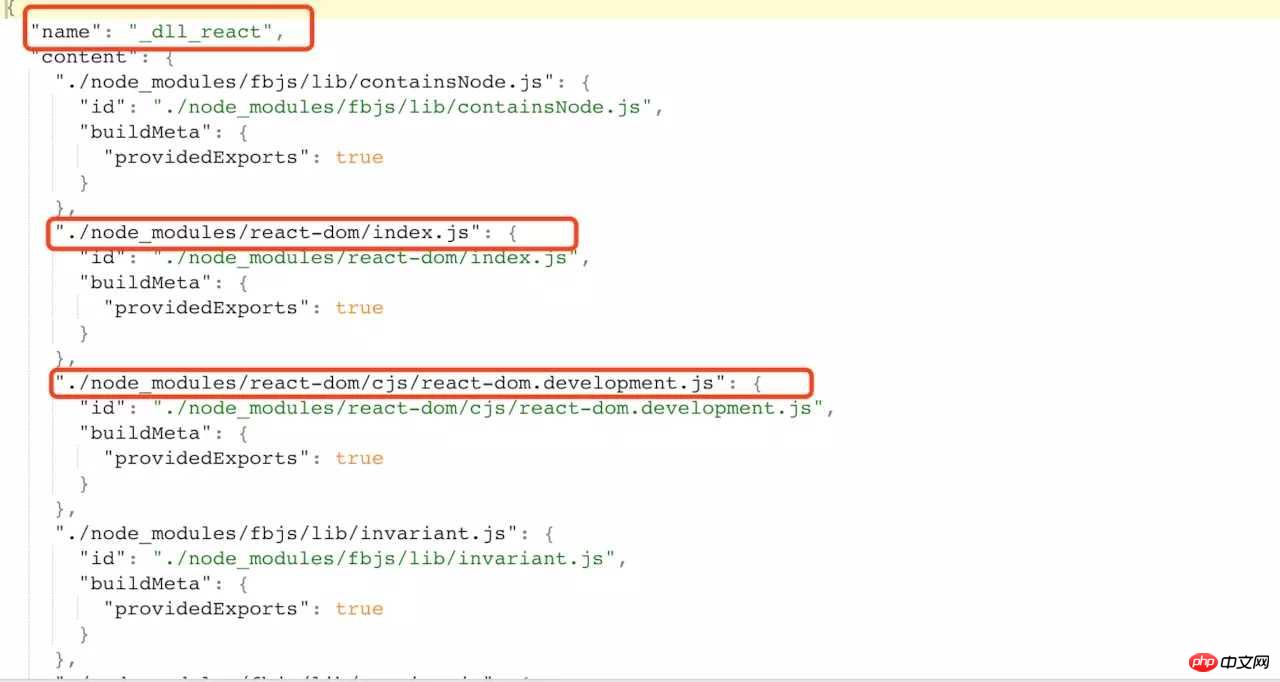
打包出来的react_dll.js节选
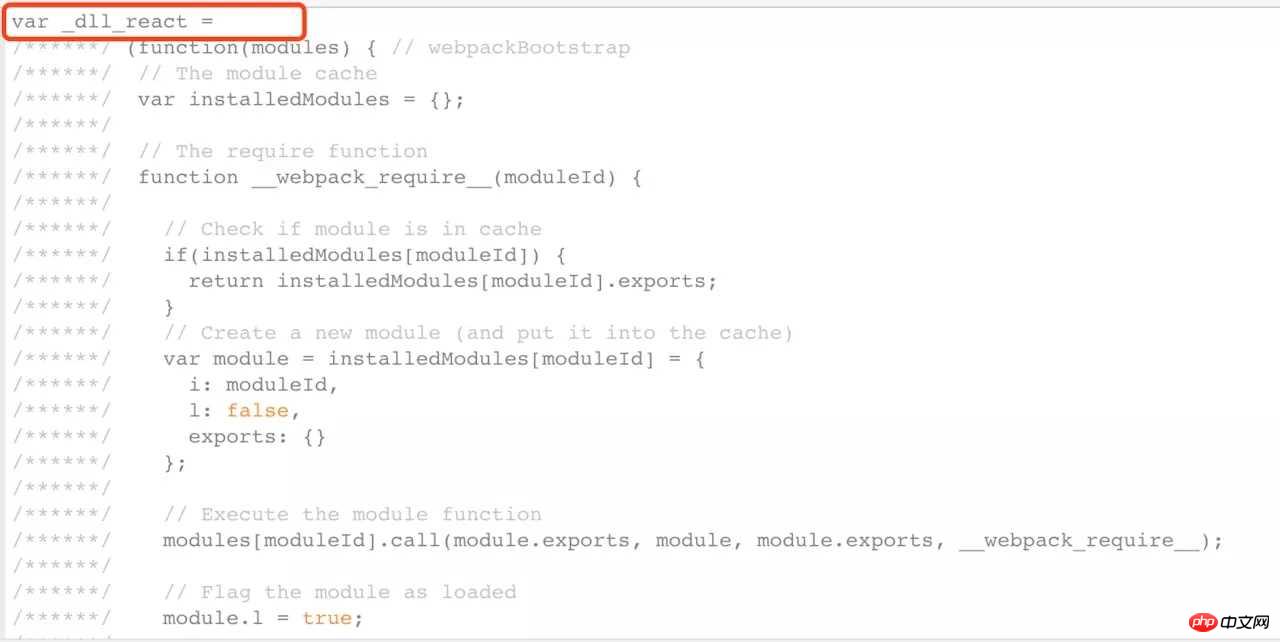
可见manifest.json中的 name值就是
output:{
  library:_dll_react
}manifest.json就是借书证,_dll_react就像图书馆书籍的条形码,为我们最终找到filename为react_dll.js的参考书
使用“参考书”
在webpack.config.js中加入“借书证”
new webpack.DllReferencePlugin({
  manifest: path.join(dirname, 'dist', 'manifest.json')
})再运行
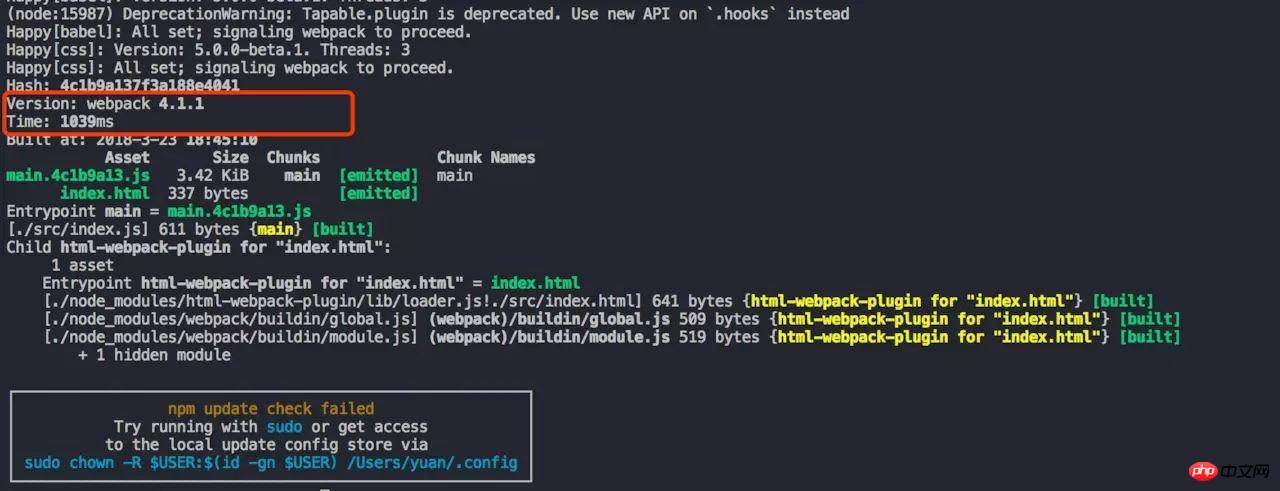
webpack --mode development
打包速度显著变快
打包后的main.js中,react,react-dom.js也打包进来了,成功~
import React from 'react';\n//import ReactDOM from 'react-dom';
 (function(module, exports, webpack_require) {
"use strict";
eval("\n\n//import name from './base';\n//import React from 'react';\n//import ReactDOM from 'react-dom';\n//import ajax from 'ajax';\n//let result = ajax('/ajax');\n\n//ReactDOM.render(<h1>{result}</h1>, document.getElementById('root'));\n// fetch fetch.js fetch.json fetch文件夹\n//let fetch = require('fetch');\n//console.log(fetch);\n//let get = require('../dist/bundle.js');\n//get.getName();\nconsole.log('hello');\n\nvar name = 'zfpx';\nconsole.log(name);\nif (true) {\n  var s = 'ssssssssssssssssssssssss';\n  console.log(s);\n  console.log(s);\n  console.log(s);\n  console.log(s);\n}\n\n//# sourceURL=webpack:///./src/index.js?");
/***/ })
/******/ });相信看了本文案例你已经掌握了方法,更多精彩请关注php中文网其它相关文章!
推荐阅读:
The above is the detailed content of Detailed explanation of the use of webpack v4. For more information, please follow other related articles on the PHP Chinese website!

Hot AI Tools

Undresser.AI Undress
AI-powered app for creating realistic nude photos

AI Clothes Remover
Online AI tool for removing clothes from photos.

Undress AI Tool
Undress images for free

Clothoff.io
AI clothes remover

Video Face Swap
Swap faces in any video effortlessly with our completely free AI face swap tool!

Hot Article
Hot Tools

Notepad++7.3.1
Easy-to-use and free code editor

SublimeText3 Chinese version
Chinese version, very easy to use

Zend Studio 13.0.1
Powerful PHP integrated development environment

Dreamweaver CS6
Visual web development tools

SublimeText3 Mac version
God-level code editing software (SublimeText3)
Hot Topics
 1386
1386
 52
52

 How to use magnet links
Feb 18, 2024 am 10:02 AM
How to use magnet links
Feb 18, 2024 am 10:02 AM
Magnet link is a link method for downloading resources, which is more convenient and efficient than traditional download methods. Magnet links allow you to download resources in a peer-to-peer manner without relying on an intermediary server. This article will introduce how to use magnet links and what to pay attention to. 1. What is a magnet link? A magnet link is a download method based on the P2P (Peer-to-Peer) protocol. Through magnet links, users can directly connect to the publisher of the resource to complete resource sharing and downloading. Compared with traditional downloading methods, magnetic
 How to use mdf and mds files
Feb 19, 2024 pm 05:36 PM
How to use mdf and mds files
Feb 19, 2024 pm 05:36 PM
How to use mdf files and mds files With the continuous advancement of computer technology, we can store and share data in a variety of ways. In the field of digital media, we often encounter some special file formats. In this article, we will discuss a common file format - mdf and mds files, and introduce how to use them. First, we need to understand the meaning of mdf files and mds files. mdf is the extension of the CD/DVD image file, and the mds file is the metadata file of the mdf file.
 What software is crystaldiskmark? -How to use crystaldiskmark?
Mar 18, 2024 pm 02:58 PM
What software is crystaldiskmark? -How to use crystaldiskmark?
Mar 18, 2024 pm 02:58 PM
CrystalDiskMark is a small HDD benchmark tool for hard drives that quickly measures sequential and random read/write speeds. Next, let the editor introduce CrystalDiskMark to you and how to use crystaldiskmark~ 1. Introduction to CrystalDiskMark CrystalDiskMark is a widely used disk performance testing tool used to evaluate the read and write speed and performance of mechanical hard drives and solid-state drives (SSD). Random I/O performance. It is a free Windows application and provides a user-friendly interface and various test modes to evaluate different aspects of hard drive performance and is widely used in hardware reviews
 How to download foobar2000? -How to use foobar2000
Mar 18, 2024 am 10:58 AM
How to download foobar2000? -How to use foobar2000
Mar 18, 2024 am 10:58 AM
foobar2000 is a software that can listen to music resources at any time. It brings you all kinds of music with lossless sound quality. The enhanced version of the music player allows you to get a more comprehensive and comfortable music experience. Its design concept is to play the advanced audio on the computer The device is transplanted to mobile phones to provide a more convenient and efficient music playback experience. The interface design is simple, clear and easy to use. It adopts a minimalist design style without too many decorations and cumbersome operations to get started quickly. It also supports a variety of skins and Theme, personalize settings according to your own preferences, and create an exclusive music player that supports the playback of multiple audio formats. It also supports the audio gain function to adjust the volume according to your own hearing conditions to avoid hearing damage caused by excessive volume. Next, let me help you
 How to use NetEase Mailbox Master
Mar 27, 2024 pm 05:32 PM
How to use NetEase Mailbox Master
Mar 27, 2024 pm 05:32 PM
NetEase Mailbox, as an email address widely used by Chinese netizens, has always won the trust of users with its stable and efficient services. NetEase Mailbox Master is an email software specially created for mobile phone users. It greatly simplifies the process of sending and receiving emails and makes our email processing more convenient. So how to use NetEase Mailbox Master, and what specific functions it has. Below, the editor of this site will give you a detailed introduction, hoping to help you! First, you can search and download the NetEase Mailbox Master app in the mobile app store. Search for "NetEase Mailbox Master" in App Store or Baidu Mobile Assistant, and then follow the prompts to install it. After the download and installation is completed, we open the NetEase email account and log in. The login interface is as shown below
 How to use Baidu Netdisk app
Mar 27, 2024 pm 06:46 PM
How to use Baidu Netdisk app
Mar 27, 2024 pm 06:46 PM
Cloud storage has become an indispensable part of our daily life and work nowadays. As one of the leading cloud storage services in China, Baidu Netdisk has won the favor of a large number of users with its powerful storage functions, efficient transmission speed and convenient operation experience. And whether you want to back up important files, share information, watch videos online, or listen to music, Baidu Cloud Disk can meet your needs. However, many users may not understand the specific use method of Baidu Netdisk app, so this tutorial will introduce in detail how to use Baidu Netdisk app. Users who are still confused can follow this article to learn more. ! How to use Baidu Cloud Network Disk: 1. Installation First, when downloading and installing Baidu Cloud software, please select the custom installation option.
 BTCC tutorial: How to bind and use MetaMask wallet on BTCC exchange?
Apr 26, 2024 am 09:40 AM
BTCC tutorial: How to bind and use MetaMask wallet on BTCC exchange?
Apr 26, 2024 am 09:40 AM
MetaMask (also called Little Fox Wallet in Chinese) is a free and well-received encryption wallet software. Currently, BTCC supports binding to the MetaMask wallet. After binding, you can use the MetaMask wallet to quickly log in, store value, buy coins, etc., and you can also get 20 USDT trial bonus for the first time binding. In the BTCCMetaMask wallet tutorial, we will introduce in detail how to register and use MetaMask, and how to bind and use the Little Fox wallet in BTCC. What is MetaMask wallet? With over 30 million users, MetaMask Little Fox Wallet is one of the most popular cryptocurrency wallets today. It is free to use and can be installed on the network as an extension
 How to use Xiaoai Speaker How to connect Xiaoai Speaker to mobile phone
Feb 22, 2024 pm 05:19 PM
How to use Xiaoai Speaker How to connect Xiaoai Speaker to mobile phone
Feb 22, 2024 pm 05:19 PM
After long pressing the play button of the speaker, connect to wifi in the software and you can use it. Tutorial Applicable Model: Xiaomi 12 System: EMUI11.0 Version: Xiaoai Classmate 2.4.21 Analysis 1 First find the play button of the speaker, and press and hold to enter the network distribution mode. 2 Log in to your Xiaomi account in the Xiaoai Speaker software on your phone and click to add a new Xiaoai Speaker. 3. After entering the name and password of the wifi, you can call Xiao Ai to use it. Supplement: What functions does Xiaoai Speaker have? 1 Xiaoai Speaker has system functions, social functions, entertainment functions, knowledge functions, life functions, smart home, and training plans. Summary/Notes: The Xiao Ai App must be installed on your mobile phone in advance for easy connection and use.
