 Web Front-end
 JS Tutorial
 How to get local images to display in the browser and upload them to the server in js
How to get local images to display in the browser and upload them to the server in js
The content of this article is about the browser displaying the preview of the local image and calling the back-end interface to upload the image to the server. It has certain reference value. Now I share it with everyone. Friends in need can refer to it. Let’s take a look
1. jsp page
<%@ page language="java" contentType="text/html; charset=UTF-8"
pageEncoding="UTF-8"%><%@ taglib prefix="c" uri="http://java.sun.com/jsp/jstl/core"%><!DOCTYPE html PUBLIC "-//W3C//DTD HTML 4.01 Transitional//EN" "http://www.w3.org/TR/html4/loose.dtd"><html>
<head>
<title></title>
<meta http-equiv="Content-Type" content="text/html; charset=utf-8" />
<META HTTP-EQUIV="pragma" CONTENT="no-cache">
<META HTTP-EQUIV="Cache-Control" CONTENT="no-cache, must-revalidate">
<META HTTP-EQUIV="expires" CONTENT="0">
<!-- 引入js -->
<script type="text/javascript" src="<%=request.getContextPath()%>/js/jquery.js"></script>
<script type="text/javascript" src="<%=request.getContextPath()%>/js/jquery.min.js"></script>
<body>
<p id="enteringInfor">
<form id="uploadForm" >
<p class="formItem" style="float:left">
<p class="itemBlock">
<p style="display:inline-block;float:left" class="selectContainer">
<span class="txtBox">姓名</span>
<input type="text" class="select" name="realName" id="realName" placeholder="请输入姓名" style="width:200px;">
</p>
</p>
<p class="itemBlock">
<p style="display:inline-block;float:left" class="selectContainer">
<span class="txtBox">性别</span>
<select class="select" name="gender" id="gender" >
<option value="1">男</option>
<option value="2">女</option>
</select>
</p>
</p>
</p>
<p class="formItem" style="float:right;margin-top:50px;">
<p class="picture">
<p class="layui-upload">
<p class="layui-upload-list" id="localImag">
<img class="layui-upload-img lazy" src="/static/imghw/default1.png" data-src="https://img.php.cn/upload/article/000/099/200/2713c4c20388c1d561df6c4e69371e9b-0.png" id="userPic" style="max-width:90%" alt="How to get local images to display in the browser and upload them to the server in js" >
<p id="demoText"></p>
</p>
<p style="width:332px;position:absolute;bottom:0px">
<span >上传图片</span>
<input id="entrustPicUpload" type="file" name="entImg" onchange="getPhoto(this)" />
</p>
</p>
</p>
</p>
</form>
<p style="padding-left:24px;text-align:center;height:70px;line-height:70px;border:none;width:100%;overflow:hidden;zoom:1">
<button onclick="saveUser()">保存</button>
</p>
<input type="hidden" name="userId" id="userId"/>
</p><script>
var imgurl = "";
function getPhoto(node) {
var imgURL = "";
try{
var file = null;
if(node.files && node.files[0] ){
file = node.files[0];
}else if(node.files && node.files.item(0)) {
file = node.files.item(0);
}
//Firefox 因安全性问题已无法直接通过input[file].value 获取完整的文件路径
try{
imgURL = file.getAsDataURL();
}catch(e){
imgRUL = window.URL.createObjectURL(file);
}
}catch(e){
if (node.files && node.files[0]) {
var reader = new FileReader();
reader.onload = function (e) {
imgURL = e.target.result;
};
reader.readAsDataURL(node.files[0]);
}
}
creatImg(imgRUL);//显示图片
return imgURL;
}
function creatImg(imgRUL){
document.getElementById("userPic").src = imgRUL;
$('#userPic').viewer({
url: 'src',
});
}
//保存
function saveUser(){
//数据判断
var realName=$("#realName").val(); if(realName==null||realName==''){
layer.msg('用户名不能为空!',{icon : 7,time:1000}); return ;
} var imgSrc = $("#userPic").attr("src"); if(imgSrc == "" || imgSrc==null){
layer.msg('请上传图片!',{icon : 7,time:1000}); return ;
} var formData = new FormData($("#uploadForm")[0]);
$.ajax({
url : "../addUser",
type: 'POST',
data: formData,
async: false,
cache: false,
contentType: false,
processData: false,
success : function(data) {
var obj = JSON.parse(data);
layer.msg('保存成功!', {icon : 6,time : 2000});
},
error : function(data) {
layer.msg('保存失败!', {icon : 5,time : 2000});
}
});
} </script>
</body></html>2. Controller interface
/**
     * 添加用户
     * @param session
     * @param request
     * @param response
     * @throws IOException
     */
    @RequestMapping(value = "/addUser", method = RequestMethod.POST)
    public void addUser(MultipartFile entImg,HttpSession session, HttpServletRequest request, HttpServletResponse response)
                throws IOException {
        String realName = request.getParameter("realName");//姓名
        String gender = request.getParameter("gender");// 性别

        //调用工具类上传图片
        String userPic = FileUtils.uploadUser(entImg, request);

        TestUser testUser = new TestUser();
        testUser.setRealName(realName);
        testUser.setGender(Integer.parseInt(gender));
        testUser.setUserPic(userPic);        // 添加人员信息及图片url到数据库
        int res= userService.insertUser(testUser);        if (res > 0) {
            writeJSON(response, res);
        } else {
            writeJSON(response,null);
        }

}3. Tools Category
public class FileUtils {

    FILES_PATH("files_path"); // 此路径存放于jdbc.properties配置文件中,例如:files_path=D:/uploadImgs
    private static final String path = PropertiesUtil.get(FILES_PATH)+"/user";    /**
     * 上传图片URL
     * @param fileName
     * @param request
     * @return
     */
    public static String getPath(String fileName,HttpServletRequest request) {
        String ip=IpUtil.getIP();        int port=request.getLocalPort();
        StringBuilder sb=new StringBuilder();
        sb.append("http://");
        sb.append(ip);
        sb.append(":");
        sb.append(port);
        sb.append("/uploadImgs/user/");
        sb.append(fileName);        return sb.toString();
    }    /**
     * 以时间戳对上传文件进行重新命名
     * @param file
     * @return
     */
    public static String renameFile(MultipartFile file) {        if(file!=null) {
            Long date=new Date().getTime();
            String fileRealName=file.getOriginalFilename();
            String prefix=fileRealName.substring(fileRealName.lastIndexOf(".")+1);
            String fileName = date.toString()+"."+prefix;
            return fileName;
        }        return null;
    }    /**
     * 图片上传
     * @param file
     * @param fileName
     */
    public static String uploadUser(MultipartFile file, HttpServletRequest request) {        // 重命名
        String renameFile = FileUtils.renameFile(file);        // 图片名
        String picPath = FileUtils.getPath(renameFile, request);        // 上传
        File targetFile = new File(borpath, renameFile);        if (!targetFile.exists() && !targetFile.isDirectory()) {
            targetFile.mkdirs();
        }        try {
            file.transferTo(targetFile);
        } catch (Exception e) {
            e.printStackTrace();
        }        return picPath;

    }


}4. Effect 

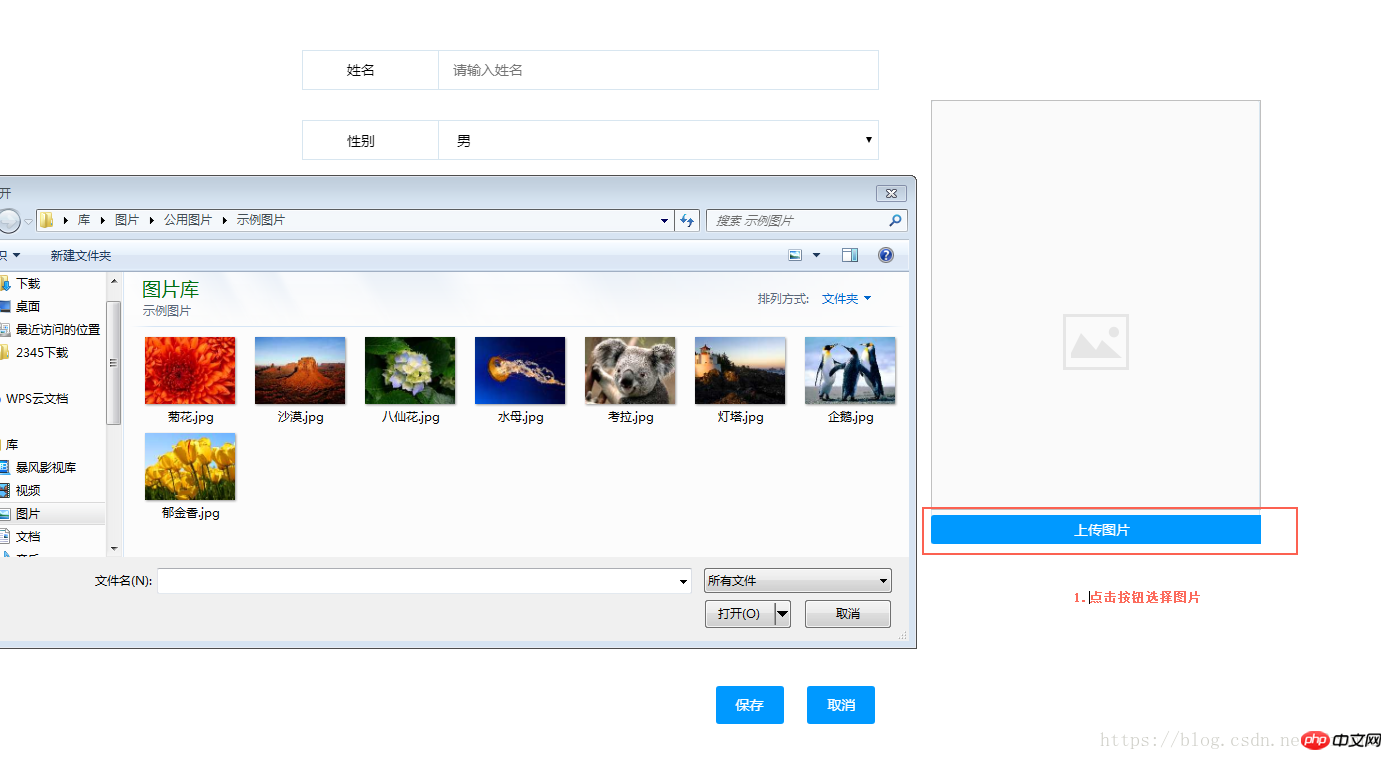
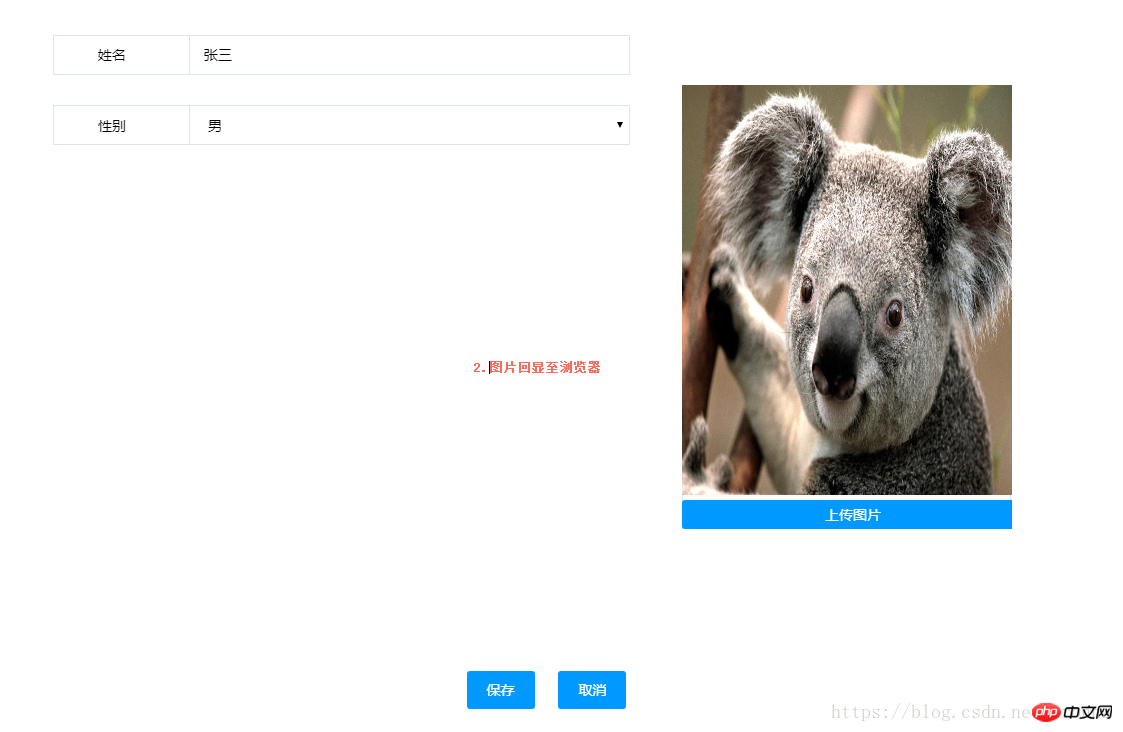
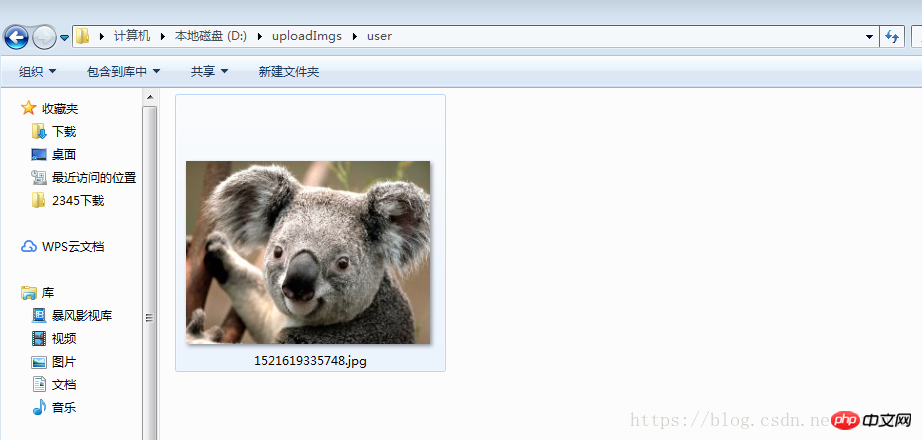
3. After the picture is uploaded successfully, save it to the specified location Under the folder 
4. Database data
## related Recommended:
HTML5 Crop the image locally and upload it to the server
Compress the local image and upload it to the server
JAVA uploads files and images to the server and saves them
Insert the WeChat editor article style Upload pictures to WeChat server
The above is the detailed content of How to get local images to display in the browser and upload them to the server in js. For more information, please follow other related articles on the PHP Chinese website!

Hot AI Tools

Undresser.AI Undress
AI-powered app for creating realistic nude photos

AI Clothes Remover
Online AI tool for removing clothes from photos.

Undress AI Tool
Undress images for free

Clothoff.io
AI clothes remover

AI Hentai Generator
Generate AI Hentai for free.

Hot Article

Hot Tools

Notepad++7.3.1
Easy-to-use and free code editor

SublimeText3 Chinese version
Chinese version, very easy to use

Zend Studio 13.0.1
Powerful PHP integrated development environment

Dreamweaver CS6
Visual web development tools

SublimeText3 Mac version
God-level code editing software (SublimeText3)

Hot Topics
 1385
1385
 52
52
 How to solve the problem of automatically saving pictures when publishing on Xiaohongshu? Where is the automatically saved image when posting?
Mar 22, 2024 am 08:06 AM
With the continuous development of social media, Xiaohongshu has become a platform for more and more young people to share their lives and discover beautiful things. Many users are troubled by auto-save issues when posting images. So, how to solve this problem? 1. How to solve the problem of automatically saving pictures when publishing on Xiaohongshu? 1. Clear the cache First, we can try to clear the cache data of Xiaohongshu. The steps are as follows: (1) Open Xiaohongshu and click the "My" button in the lower right corner; (2) On the personal center page, find "Settings" and click it; (3) Scroll down and find the "Clear Cache" option. Click OK. After clearing the cache, re-enter Xiaohongshu and try to post pictures to see if the automatic saving problem is solved. 2. Update the Xiaohongshu version to ensure that your Xiaohongshu
 How to post pictures in TikTok comments? Where is the entrance to the pictures in the comment area?
Mar 21, 2024 pm 09:12 PM
With the popularity of Douyin short videos, user interactions in the comment area have become more colorful. Some users wish to share images in comments to better express their opinions or emotions. So, how to post pictures in TikTok comments? This article will answer this question in detail and provide you with some related tips and precautions. 1. How to post pictures in Douyin comments? 1. Open Douyin: First, you need to open Douyin APP and log in to your account. 2. Find the comment area: When browsing or posting a short video, find the place where you want to comment and click the "Comment" button. 3. Enter your comment content: Enter your comment content in the comment area. 4. Choose to send a picture: In the interface for entering comment content, you will see a "picture" button or a "+" button, click
 6 Ways to Make Pictures Sharper on iPhone
Mar 04, 2024 pm 06:25 PM
Apple's recent iPhones capture memories with crisp detail, saturation and brightness. But sometimes, you may encounter some issues that may cause the image to look less clear. While autofocus on iPhone cameras has come a long way, allowing you to take photos quickly, the camera can mistakenly focus on the wrong subject in certain situations, making the photo blurry in unwanted areas. If your photos on your iPhone look out of focus or lack sharpness overall, the following post should help you make them sharper. How to Make Pictures Clearer on iPhone [6 Methods] You can try using the native Photos app to clean up your photos. If you want more features and options
 How to make ppt pictures appear one by one
Mar 25, 2024 pm 04:00 PM
In PowerPoint, it is a common technique to display pictures one by one, which can be achieved by setting animation effects. This guide details the steps to implement this technique, including basic setup, image insertion, adding animation, and adjusting animation order and timing. Additionally, advanced settings and adjustments are provided, such as using triggers, adjusting animation speed and order, and previewing animation effects. By following these steps and tips, users can easily set up pictures to appear one after another in PowerPoint, thereby enhancing the visual impact of the presentation and grabbing the attention of the audience.
 What should I do if the images on the webpage cannot be loaded? 6 solutions
Mar 15, 2024 am 10:30 AM
Some netizens found that when they opened the browser web page, the pictures on the web page could not be loaded for a long time. What happened? I checked that the network is normal, so where is the problem? The editor below will introduce to you six solutions to the problem that web page images cannot be loaded. Web page images cannot be loaded: 1. Internet speed problem The web page cannot display images. It may be because the computer's Internet speed is relatively slow and there are more softwares opened on the computer. And the images we access are relatively large, which may be due to loading timeout. As a result, the picture cannot be displayed. You can turn off the software that consumes more network speed. You can go to the task manager to check. 2. Too many visitors. If the webpage cannot display pictures, it may be because the webpages we visited were visited at the same time.
 How to convert pdf documents into jpg images with Foxit PDF Reader - How to convert pdf documents into jpg images with Foxit PDF Reader
Mar 04, 2024 pm 05:49 PM
Are you also using Foxit PDF Reader software? So do you know how Foxit PDF Reader converts pdf documents into jpg images? The following article brings you how Foxit PDF Reader converts pdf documents into jpg images. For those who are interested in the method of converting jpg images, please come and take a look below. First start Foxit PDF Reader, then find "Features" on the top toolbar, and then select the "PDF to Others" function. Next, open a web page called "Foxit PDF Online Conversion". Click the "Login" button on the upper right side of the page to log in, and then turn on the "PDF to Image" function. Then click the upload button and add the pdf file you want to convert into an image. After adding it, click "Start Conversion"
 How to configure Dnsmasq as a DHCP relay server
Mar 21, 2024 am 08:50 AM
The role of a DHCP relay is to forward received DHCP packets to another DHCP server on the network, even if the two servers are on different subnets. By using a DHCP relay, you can deploy a centralized DHCP server in the network center and use it to dynamically assign IP addresses to all network subnets/VLANs. Dnsmasq is a commonly used DNS and DHCP protocol server that can be configured as a DHCP relay server to help manage dynamic host configurations in the network. In this article, we will show you how to configure dnsmasq as a DHCP relay server. Content Topics: Network Topology Configuring Static IP Addresses on a DHCP Relay D on a Centralized DHCP Server
 How to arrange two pictures side by side in wps document
Mar 20, 2024 pm 04:00 PM
When using WPS office software, we found that not only one form is used, tables and pictures can be added to the text, pictures can also be added to the table, etc. These are all used together to make the content of the entire document look richer. , if you need to insert two pictures into the document and they need to be arranged side by side. Our next course can solve this problem: how to place two pictures side by side in a wps document. 1. First, you need to open the WPS software and find the picture you want to adjust. Left-click the picture and a menu bar will pop up, select "Page Layout". 2. Select "Tight wrapping" in text wrapping. 3. After all the pictures you need are confirmed to be set to "Tight text wrapping", you can drag the pictures to the appropriate position and click on the first picture.


