

This article introduces the content of lnmp construction (Nginx1.12.1; mysql5.7.20; php7.2.0), which has certain reference value. Now I share it with everyone. Friends in need can refer to it
Install dependency packages:
#yum install gcc bison bison-devel zlib-devel libmcrypt-devel mcrypt mhash-devel openssl-devel libxml2-devel libcurl-devel bzip2-devel readline-devel libedit-devel sqlite-devel libpng-devel libjpeg-devel freetype freetype-devel
1
Create www user:
#groupadd www#useradd -g www -s /sbin/nologin -M www
1
2
1. Install Nginx1.12.1:
The Nginx version of the centos6.8 image is 1.12.1
#yum install -y nginx #/etc/init.d/nginx start
1
2
2. Install mysql5.7.20:
#wget
#rpm -Uvh mysql57-community-release-el6-9.noarch.rpm
#yum install mysql-community-server
#service mysqld start
#grep 'temporary password' /var/log/mysqld.log  | awk '{print $NF}'
#mysql -uroot -p
mysql>set global validate_password_policy=0;
mysql>set global validate_password_length=6;
mysql>SET PASSWORD FOR 'root'@'localhost' =PASSWORD('******');3. Install PHP7.2.0
3.1 Source code compilation and installation
#wget rm -php-7.2.0.tar.xz
#tar xvJf php-7.2.0.tar -C /usr/local/
#cd /usr/local/php-7.2.0
#./configure --prefix=/usr/local/php --with-config-file-path=/usr/local/php/etc --enable-fpm --with-fpm-user=www --with-fpm-group=www --with-mysqli --with-pdo-mysql --with-iconv-dir --with-freetype-dir --with-jpeg-dir --with-png-dir --with-zlib --with-libxml-dir=/usr --enable-xml --disable-rpath --enable-bcmath --enable-shmop --enable-sysvsem --enable-inline-optimization --with-curl --enable-mbregex --enable-mbstring --enable-ftp  --with-openssl --with-mhash --enable-pcntl --enable-sockets --with-xmlrpc --enable-zip --enable-soap --without-pear --with-gettext --disable-fileinfo --enable-maintainer-zts --with-libdir=lib64
# make
# make install
In the above configure steps, an error may be reported due to the lack of dependent packages. I have installed some other packages on this machine, different The machine conditions may be different. According to the error message during compilation
Use yum search to find the dependent packages and install them. After the compilation is completed, there will be no error! ! !
After make install is completed and there are no errors, you can proceed to the next steps.
3.2 Configure PHP
#cp /usr/local/php-7.2.0/php.ini-development /usr/local/php/etc/php.ini
1
<p style="margin-bottom: 7px;">#cp /usr/local/php/etc/php-fpm.conf.default /usr/local/php/etc/php-fpm.conf<br/></p>
1
#cp /usr/local/php-7.2.0/sapi/fpm/init.d.php-fpm /etc/init.d/php-fpm
1
#chmod +x /etc/init.d/php-fpm
1
#cp /usr/local/php/etc/php-fpm.d/www.conf.default/usr/local/php/etc/php-fpm.d/www.conf
1
# /etc/init.d/php-fpm startStarting php-fpm done
vim ~/.bash_profile
cat ~/.bash_profile# .bash_profile# Get the aliases and functionsif [ -f ~/.bashrc ]; then
. ~/.bashrcfi# User specific environment and startup programsPATH=$PATH:$HOME/bin:/usr/local/php/binexport PATHto make it effective:
#. ~/.bash_profile
# php -vPHP 7.2.0 (cli) (built: Dec 17 2017 19:58:31) ( ZTS )
Copyright (c) 1997-2017 The PHP Group
Zend Engine v3.2.0, Copyright (c) 1998-2017 Zend Technologies
3.6 Test results:
vim /usr/share/nginx/html/a.php<?php
phpinfo(); ?>vim /etc/nginx/conf.d/default.confcat /etc/nginx/conf.d/default.confserver {
listen 80;
server_name localhost;
#charset koi8-r;
#access_log /var/log/nginx/host.access.log main;
location / {
root /usr/share/nginx/html;
index index.php index.html index.htm;
}
location ~ \.php$ {
root html;
fastcgi_pass 127.0.0.1:9000;
fastcgi_index index.php;
fastcgi_param SCRIPT_FILENAME /usr/share/nginx/html$fastcgi_script_name;
include fastcgi_params;
} #error_page 404 /404.html;
# redirect server error pages to the static page /50x.html
#
error_page 500 502 503 504 /50x.html;
location = /50x.html {
root /usr/share/nginx/html;
} # proxy the PHP scripts to Apache listening on 127.0.0.1:80
#
#location ~ \.php$ {
# proxy_pass http://127.0.0.1;
#}
# pass the PHP scripts to FastCGI server listening on 127.0.0.1:9000
#
#location ~ \.php$ {
# root html;
# fastcgi_pass 127.0.0.1:9000;
# fastcgi_index index.php;
# fastcgi_param SCRIPT_FILENAME /scripts$fastcgi_script_name;
# include fastcgi_params;
#}
# deny access to .htaccess files, if Apache's document root
# concurs with nginx's one
#
#location ~ /\.ht {
# deny all;
#}}Nginx配置文件修改的地方(在server里面添加 index.php格式的文件。增加一个location模块)
重新加载Nginx,重启php-fpm
# /etc/init.d/nginx restartStopping nginx:                                            [  OK  ]
Starting nginx:                                            [  OK  ]
# /etc/init.d/php-fpm restartGracefully shutting down php-fpm . doneStarting php-fpm  done
测试:
# curl 192.168.1.185/a.php
1
或者直接到网页上访问。 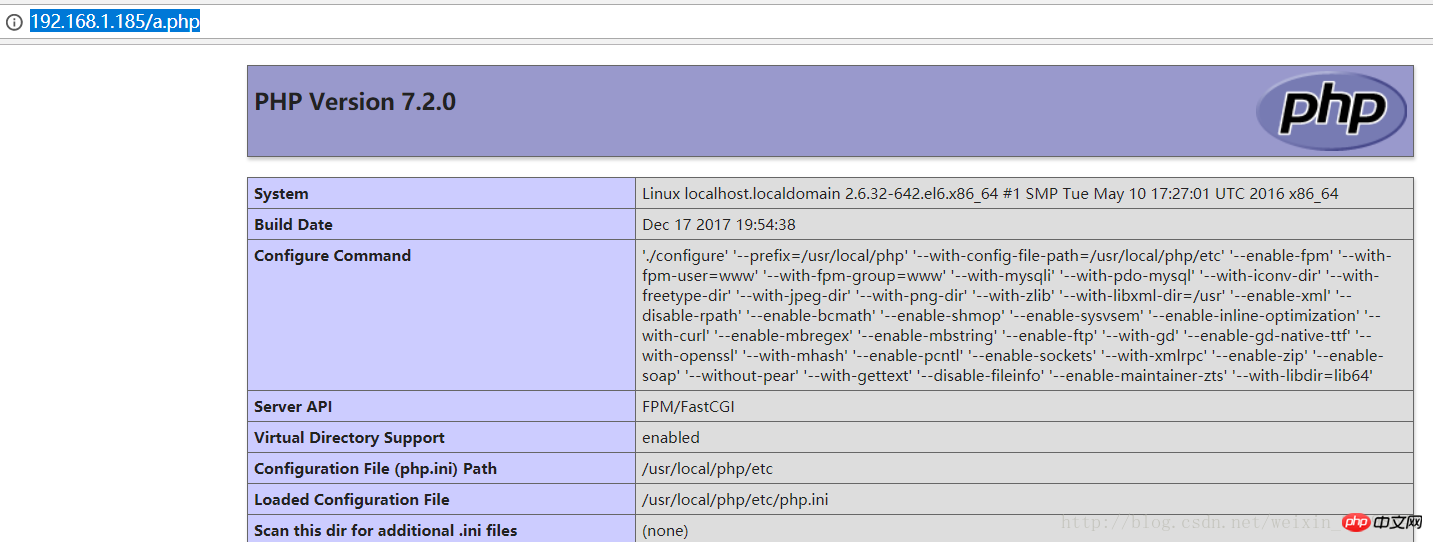
至此,lnmp环境搭建成功
相关推荐:
The above is the detailed content of lnmp build (Nginx1.12.1; mysql5.7.20; php7.2.0). For more information, please follow other related articles on the PHP Chinese website!


![[Web front-end] Node.js quick start](https://img.php.cn/upload/course/000/000/067/662b5d34ba7c0227.png)


